

- SAP Community
- Products and Technology
- Human Capital Management
- HCM Blogs by Members
- Configuring Custom Fields to the Country Specific ...
Human Capital Management Blogs by Members
Gain valuable knowledge and tips on SAP SuccessFactors and human capital management from member blog posts. Share your HCM insights with a post of your own.
Turn on suggestions
Auto-suggest helps you quickly narrow down your search results by suggesting possible matches as you type.
Showing results for
Haridha_P
Participant
Options
- Subscribe to RSS Feed
- Mark as New
- Mark as Read
- Bookmark
- Subscribe
- Printer Friendly Page
- Report Inappropriate Content
02-11-2023
5:03 PM
Introduction
Configuring Custom Fields to the Country Specific corporate Data Models. Currently there are 7 fields listed below with hard-coded sync-mappings delivered with the corporate Address element.
- addressLine1
- addressLine2
- addressLine3
- city
- state
- zip-code
- country
For example: If there if a requirement to customize the corporate address format of India to have an additional field like Floor, Street name, Number etc... based on organizational needs, follow the below configuration steps.
Country/Region Specific Corporate Data Model
The foundation objects from Corporate Data Model that need to be localized based on the country/region are configured in Country Specific corporate data model. In case the configuration for a particular country/region is missing, the definition in the Corporate Data Model is used.
Steps to add a custom Fields.
The following steps are used in adding a custom field to the Country Specific corporate data model.
Export Country Specific Corporate Data Models
- Navigate to Provisioning >> Succession Management >> Import/Export Country/Region Specific XML for Corporate Data Model >> Select Export.
Save the file in the folder containing the DTD files from the course files.
Country specific corporate data model-Provisioning
- To download from Instance, Go to: Admin Center > Import/Export Country/Region-Specific XML for Corporate Data Model.
Verify the below permission is enabled in RBP:
Administrator Permissions > Manage Foundation Objects > Import/Export Corporate Data Model and Import/Export Country/Region-Specific XML for Corporate Data Model.
 Country specific corporate data model-Instance
Updating custom fields using XML
- Open the CSF for the Corporate data model in your XML editor.
- Go to the country "IND".

Country specific corporate data model
Add the below XML example wherever required in the Corporate Address HRIS Element, to configure your corporate address for India.
<hris-field max-length="256" id="custom-string1" visibility="both">
<label>Floor</label>
</hris-field>
<hris-field max-length="256" id="custom-string2" visibility="both">
<label>Street Name</label>
</hris-field>

Corporate data model-Updated
Save a new version of the CSF Corporate Data Model.
Use the Action Search in instance or provisioning to navigate to the Import/Export Country/Region-Specific XML.
Upload the CSF Corporate Data Model.
Navigate to Manage Organization, Pay and Job Structures.
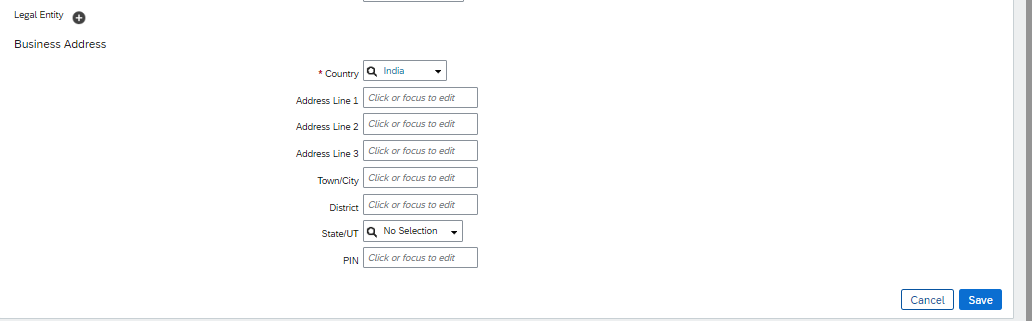
Go to Create New → Location, the Country to India to verify that the Foundation Object meets the requirements and updated with custom fields.
 Updated CS Corporate Data Model
Conclusion
Hope this article clarifies how you add custom Fields to the Country Specific corporate Data Models. Hope the above approach helps with your business requirements.
Please visit the below resources to learn more about SAP Core HR solutions.
- SAP SuccessFactors Employee Central Main Website
- SAP SuccessFactors Employee Central SAP Help
- SAP SuccessFactors Community – Employee Central
Note: The images in the blog are taken from internal Demo Instances and owned by me.
Please feel free to share thoughts & suggestions in the comments. If you have any questions, please let me know.
- SAP Managed Tags:
- SAP SuccessFactors Employee Central,
- SAP SuccessFactors HXM Core
You must be a registered user to add a comment. If you've already registered, sign in. Otherwise, register and sign in.
Labels in this area
-
1H 2024 Product Release
1 -
2H 2023 Product Release
1 -
ACCRUAL TRANSFER
1 -
Advanced Workflow
1 -
Anonymization
1 -
BTP
1 -
Business Rules
1 -
Canvas Report
1 -
Career Development
1 -
Certificate-Based Authentication
1 -
Cloud Platform Integration
1 -
Compensation
1 -
Compensation Information Management
1 -
Compensation Management
1 -
Compliance
2 -
Content
1 -
Conversational AI
2 -
Custom Data Collection
1 -
custom portlet
1 -
Data & Analytics
1 -
Data Integration
1 -
Dayforce
1 -
deep link
1 -
deeplink
1 -
Delimiting Pay Components
1 -
Deprecation
1 -
Employee Central
1 -
Employee Central Global Benefits
1 -
Employee Central Payroll
1 -
employee profile
1 -
Employee Rehires
1 -
external terminal
1 -
external time events
1 -
Generative AI
2 -
Getting Started
1 -
Global Benefits
1 -
Guidelines
1 -
H2 2023
1 -
HR
2 -
HR Data Management
1 -
HR Transformation
1 -
ilx
1 -
Incentive Management Setup (Configuration)
1 -
Integration Center
2 -
Integration Suite
1 -
internal mobility
1 -
Introduction
1 -
learning
3 -
LMS
2 -
LXP
1 -
Massively MDF attachments download
1 -
Mentoring
1 -
Metadata Framework
1 -
Middleware Solutions
1 -
OCN
1 -
OData APIs
1 -
ONB USA Compliance
1 -
Onboarding
2 -
Opportunity Marketplace
1 -
Pay Component Management
1 -
Platform
1 -
portlet
1 -
POSTMAN
1 -
Predictive AI
2 -
Recruiting
1 -
recurring payments
1 -
Role Based Permissions (RBP)
2 -
SAP CPI (Cloud Platform Integration)
1 -
SAP HCM (Human Capital Management)
2 -
SAP HR Solutions
2 -
SAP Integrations
1 -
SAP release
1 -
SAP SuccessFactors
5 -
SAP SuccessFactors Customer Community
1 -
SAP SuccessFactors OData API
1 -
SAP Workzone
1 -
SAP-PAYROLL
1 -
skills
1 -
Skills Management
1 -
sso deeplink
1 -
Stories in People Analytics
3 -
Story Report
1 -
SuccessFactors
2 -
SuccessFactors Employee central home page customization.
1 -
successfactors onboarding i9
1 -
Table Report
1 -
talent
1 -
Talent Intelligence Hub
2 -
talents
1 -
Tax
1 -
Tax Integration
1 -
Time Accounts
1 -
Workflows
1 -
XML Rules
1
Related Content
- Country Compliance - Configure overrides for US WTPA Form fields in Human Capital Management Blogs by SAP
- Demystifying Common Questions: A Quick Dive into SAP Companion, SAP Enable Now and More in Human Capital Management Blogs by SAP
- Delivery of Legal Forms for the UK using My Fiori Forms App. in Human Capital Management Blogs by SAP
- Managing Pay Scale Progression based on Age (or) Service Period in Human Capital Management Blogs by Members
- SAP SuccessFactors and Contingent Workers in Human Capital Management Blogs by Members
Top kudoed authors
| User | Count |
|---|---|
| 4 | |
| 4 | |
| 2 | |
| 2 | |
| 1 | |
| 1 | |
| 1 | |
| 1 | |
| 1 | |
| 1 |