
- SAP Community
- Products and Technology
- Enterprise Resource Planning
- ERP Blogs by SAP
- SAP S/4HANA migration cockpit - Transferring Data ...
Enterprise Resource Planning Blogs by SAP
Get insights and updates about cloud ERP and RISE with SAP, SAP S/4HANA and SAP S/4HANA Cloud, and more enterprise management capabilities with SAP blog posts.
Turn on suggestions
Auto-suggest helps you quickly narrow down your search results by suggesting possible matches as you type.
Showing results for
Advisor
Options
- Subscribe to RSS Feed
- Mark as New
- Mark as Read
- Bookmark
- Subscribe
- Printer Friendly Page
- Report Inappropriate Content
02-06-2023
8:25 PM
This blog post will give details on how to populate the SAP S/4HANA Migration Cockpit staging tables using CSV files. It will give an overview of the CSV feature of the SAP S/4HANA Migration Cockpit and will provide step-by-step examples on how to load data into the staging tables using CSV files for SAP S/4HANA Cloud 2302.
Note that the process for transferring data to the staging tables for SAP S/4HANA 2022 is slightly different. You can find more details about this in the Knowledge Base Article (KBA) 3296020.
First, let’s have a short introduction and overview of the S/4HANA migration cockpit:
The SAP S/4HANA migration cockpit is designed for customers who have just installed SAP S/4HANA and want to move their legacy data from SAP or non-SAP software systems. It allows you to migrate your master data and transactional data to SAP S/4HANA, and it facilitates this process by providing predefined migration content and mapping. It can be launched using the “Migrate Your Data” app in the Fiori Launchpad (Data Migration Launchpad). The migration cockpit is part of both SAP S/4HANA and SAP S/4HANA Cloud and is included in these licenses.
For SAP S/4HANA (On-Premise) for the Migrate your Data – Migration Cockpit two different migration approaches are available. Namely, Migrate Data Using Staging Tables and Migrate Data Directly from SAP System.
The migration approach Migrate Data Using Staging Tables is recommended if you want to transfer a lot of data to SAP S/4HANA in an automated way. It is the most efficient way of transferring large volumes of data. Staging tables are database tables and therefore provide greater flexibility than files regarding managing data (for example sorting data, searching for data, checking for duplicate records and so on).
If you use the migration approach Migrate Data Using Staging Tables, the SAP S/4HANA migration cockpit automatically creates staging tables for each migration object that is relevant for your project. You can fill the staging tables with data either using XML templates, CSV files, or manually using the SAP HANA Studio or by using third party or SAP’s ETL tools (for example SAP Agile Data Preparation).
If you want to have short introduction and overview of the SAP S/4HANA migration cockpit and, more details about the migration approach Migrate Data Using Staging Tables see the blog in the link below. There you can also find more details about loading data to the staging tables using XML files:
The CSV feature is available with SAP S/4HANA Cloud 2208 and SAP S/4HANA 2022. With this feature, you can use CSV files to populate the staging tables with data in the Migration Cockpit - Migrate Your Data app.
For SAP S/4HANA Cloud 2302 and higher, there are some new functions for uploading CSV files, for example, you have now the option to remove columns and change the orders of the columns with the CSV header option “First Row is Header Row”.
For more details see:
Note: For more details about prerequisites and other relevant information about Migrate Data Using Staging Tables see KBA 2733253 – FAQ for SAP S/4HANA migration cockpit – Transfer option: Transfer data from staging tables.
GENERAL REMARK: Using CSV template files is an expert option for filling the staging tables with data. We do not recommend using CSV files unless you have a specific use case for doing so.
The general process for uploading CSV files to the SAP S/4HANA migration cockpit is as follows:

You can either use these CSV templates and enter data directly in the CSV files or you can use the CSV templates as a basis to populate new CSV files with data.
Note: For every data structure of a migration object, you must create a single CSV file containing the relevant data.
.
Before uploading any CSV files, you must verify and adjust first the CSV file options available on the Project Settings screen. This helps to avoid any format errors when you upload your CSV files. Note that if you change any of the CSV file options, then the CSV template you download will contain these changes. For example, if you change the field delimiter to "comma" and previously it was set to "semicolon", then the new CSV templates you download will contain the field delimiter "comma".
Important Note: If you change the settings for CSV files, the new settings will apply to all migration objects in the project. If you have previously uploaded CSV files using other settings, you will not be able to upload them again.
Under CSV File Options, you can view information about how the system processes CSV files. You can also adjust certain settings:
Under General Options, you can adjust the values of the following fields:
In addition, you can view the following information:
Under File Header Options, there are the following options:
a. First Row is Header Row
b. No Header Row (Import All Rows)
c. Number of Rows to Skip
This is the default option. The first row of a CSV template file is the header row. This row contains the technical names of the fields. An asterix (*) next to a field name indicates a mandatory field, while the letter k (k) and an asterix (*) next to the field name indicates a mandatory key field.
If you use the option First Row is Header Row, the first row in your CSV file must be a header row. The field names in the header row must have the same name as the fields in the header row of the CSV template file. The system will expect values for each mandatory field specified in the header row. In addition, the order of the values in each row must correspond to the order of the fields in the header row. In the first row of your CSV file, you can remove the indicators next to the field names if required.
This option also provides a more flexible approach for uploading data. For example, you can remove columns, and change the order of the columns. Note that the mandatory fields must always be present in the header row of your CSV file.
Note: If you want to specify empty values for fields at the start of a row, they must be separated by a delimiter. If you want to specify empty values for fields at the end of a row, they do not need to be separated by a delimiter.
Example: The header row of a CSV file has two mandatory key fields and 2 additional fields. In the second row of the CSV file, you want to specify values for all four fields. For the remaining rows, you want to specify values for the two mandatory key fields only. The following example CSV file is acceptable:
Field1(k/*),Field 2(k/*),Field3,Field4
Value1,Value2,Value3,Value4
You can use the option "No Header Row" if you want to create CSV files with no header rows. For example, if you use your own tools to generate CSV files it may be easier to create CSV files without a header row.
First, you need to download the relevant CSV template file to determine the relevant fields, and then create your CSV file accordingly. If you use this option, the system will expect values for each mandatory field specified in the header row of the CSV template file. The values in your CSV file must also be in the same order as the header row of the CSV template file. In addition, empty values for fields must be separated by a delimiter.
Example: The header row of a CSV template file has two mandatory key fields and 2 additional fields. You want to create a CSV file that has no header row. In the first row of your CSV file, you want to specify values for all four fields. For the remaining rows, you want to specify values for the two mandatory key fields only. The following example CSV file is acceptable:
Value1,Value2,Value3,Value4
Value5,Value6,,
Value7,Value8,,
You can use the option "Number of Rows to Skip" if you want the system to skip one or more rows in the CSV file. For example, you could include the field descriptions in the second row as extra information. The default value of this field is 1. This means that the system will not process first row of the CSV file. You can increase this number if required. For example, if you change this value to 3, the system will skip the first three lines in the file.
First, you need to download the relevant CSV template file to determine the relevant fields, and then create your CSV file accordingly. If you use this option, the system will expect values for each mandatory field specified in the header row of the CSV template file. The values in your CSV file must also be in the same order as the header row of the CSV template file. In addition, empty values for fields must be separated by a delimiter.
For example, for BANK CSV template file:
Note: For SAP S/4HANA Cloud, you can also see some CSV template samples with prefilled sample data under:
Special Characters:
Under Special Characters, you can adjust the values of the following fields:
In addition, you can view the following information:
If you are using CSV template files to populate the staging tables with data, you need to download the CSV template files for the relevant migration object and enter the data to be migrated in the files. You can use these CSV templates to either create your own CSV files or to populate the CSV template with data. For more information, see Downloading Template Files.
1.- On the Migration Project screen, select the relevant migration object and choose the Download Template button and then choose the option Download CSV Files.
2.- The system creates a zip file that contains the CSV template files. In the zip file, there is a CSV file for each data structure of the migration object.
Note: If the technical name of a data structure contains the backslash character ("\"), the backslash character will be replaced with the characters "%2f" when you download the file.
3.- Save the zip file locally and open the CSV files using a text editor or your preferred application.
Note: You can use this CSV template and enter your data, or you can use the file as a basis to populate the csv files with the respective data. Note that using a spreadsheet application to open CSV files may result in formatting issues, for example leading zeros may be deleted.
In this section, you can some important tips and recommendations for creating the CSV files (single or as a zip file) to be uploaded to the SAP S/4HANA migration cockpit.
For CSV header option “First Row is Header Row”:
For CSV header options “No header row” and “Number of rows to skip”:
For example, for BANK CSV template file:
For more information about transferring data from staging tables, leading zeros, default values and correctness of the values of some data types (for example, DATE, DECIMAL, TIME and so on), see SAP KBA 2733253 and the SAP Help Portal: SAP HANA SQL and System Views Reference for SAP HANA Platform → SQL Reference → Data Types.
When you download CSV files for a migration object, the system creates a zip file that contains the CSV template files. In the zip file, there is a CSV file for each data structure of the migration object.
The CSV file names are structured as follows:
For example, for the data structure S_BNKA, the corresponding CSV template file in the zip file is S_BNKA#FreeText.csv
If required, you can replace the text "FreeText" with your own text, but it is not necessary to do so. If you add your own text, it must be preceded by the hash symbol (#). For example, S_BNKA#myfile1.csv or S_BNKA#1.csv.
You can also remove the string "#FreeText". For example, S_BNKA.csv
When you download the CSV template files, the system generates a zip file that contains CSV template files for each data structure of the migration object you selected. In the first row of a CSV template file, you can view the technical names of the fields.
An asterix (*) next to a field name indicates a mandatory field. For example, the field BANKA is a mandatory field. The first row of a CSV file containing this field would have the entry BANKA (*).
Key fields are always mandatory fields. The letter k (k) and an asterix (*) next to the field name indicates a mandatory key field. For example, the field BANKS is a mandatory key field. The first row of a CSV file containing this field would have the entry BANKS(k/*).
On the Tables tab of the Migration Object Tables screen, you can view more detailed information about the fields. For example, you can view the name of the field as well as the data type and length.
Note: CSV files must comply with RFC 4180 and use UTF-8 encoding. UTF-8 with BOM is not supported. RFC 4180 defines a standard dialect for CSV files that specifies delimiters, quoting, and line breaks. However, unlike RFC 4180, the SAP S/4HANA migration cockpit supports different field delimiters. For more information, see CSV File Options.
For additional information about using CSV files, as well as sample CSV files, see SAP Knowledge Base Article 3210687.
When creating your CSV files, you can find field-specific information for creating such files in the following locations:
Once you have filled the CSV template files for a migration object with data, you can upload the files to the SAP S/4HANA migration cockpit.
There are two options for uploading CSV files:
Once you have filled the CSV template files for a migration object with data, you can upload a zip file that contains the CSV to the SAP S/4HANA migration cockpit. The system then validates the data in the CSV files and transfers the data to the staging tables that were generated for that migration object. The system automatically creates a folder for the CSV files.
Note: This is the recommended option, as it is the most efficient method for uploading the CSV files for an object. Note that with the “Upload” button you can upload .XML as well as .ZIP files. Single CSV files cannot be uploaded with this option. If you try to upload single CSV files you will get the following error message: Error To upload a CSV file, you need to first create a folder and upload the file there. Note that if you upload a zip file that contains CSV files, the system will automatically create a folder for the CSV files.
It is recommended that you use the downloaded CSV template files and fill these templates with data or use the CSV templates as a basis to create new CSV files. Remember that your zip file must contain at least one CSV file for each mandatory data structure of a migration object. For this option, you must have first filled the CSV template files with data and saved the CSV files in a zip file. For more information about CSV template files, see Additional Information About CSV Template Files.
The system displays the Migration Object Tables screen.
Or you can use the drag and drop function.
Here you can also view the status of the validation and transfer process.
Once you have filled one or more CSV template files for a migration object with data, you can upload the files to the SAP S/4HANA migration cockpit. For more information about CSV template files, see Chapter 3.3 Additional Information About CSV Template Files or the SAP Help Portal -> Additional Information About CSV Template Files.
Note that if you upload a zip file that contains CSV files, the system will automatically create a folder for the CSV files. Otherwise, you can create a folder for the CSV files on the Upload Files tab by choosing the button Create CSV Folder.
On the Upload Files tab, you can create a folder for the CSV files by choosing the button Create CSV Folder. You can then open your folder and either upload a zip file that contains your CSV files or single CSV files. You will then need to validate the data in the CSV files, and then transfer the data in the files to the staging tables.
Note 1: If the CSV files do not follow the naming convention <data structure name>#<optional user input>.csv (for example: BNKA-File1.csv), your will need to map the CSV files to the relevant data structures. Then you need to validate the data in the CSV files, and then transfer the data in the files to the staging tables. For more information, see Naming Convention for CSV Files | SAP Help Portal and Uploading CSV Files | SAP Help Portal.
Note 2: If the CSV files follow the naming convention <data structure name>#<optional user input>.csv (for example: S_BNKA#Test1.csv), the system will automatically map the CSV file to the relevant data structures. Then you need to validate the data in the CSV files, and after that transfer the data in the files to the staging tables. For more information, see Naming Convention for CSV Files | SAP Help Portal and Uploading CSV Files | SAP Help Portal.
1.- On the Migration Object Tables screen, select the tab Upload File.
2.- Choose button Create CSV Folder.
The system displays the Create Folder for CSV Files screen.
3.- Enter a new CSV Folder Name or you can keep the generated CSV folder name.

4.- Choose the Create and Open button to create your CSV folder and open it to upload your single CSV files.
Your CSV folder is created and opened.
5.- To upload one or more CSV files or a zip file containing your Zip files, on the Upload Files tab, you can use the drag and drop function.
Upload of single CSV files:
Upload of zip files:
6.- Or you can use the Upload button.

7.- If your CSV files have the same name as the data structures of a migration object or follow the naming convention <data structure name>#<optional user input>.csv (for example, S_MARA.csv or S_MARA#Test1.csv), the system automatically maps the uploaded CSV files to the relevant data structures of the migration object. Otherwise, you need to map the files to the relevant data structures. For more information, see chapter Map your CSV file(s) to a data structure and the SAP Help Portal -> Mapping a CSV File to a Data Structure.
If the CSV file you upload has the same name as a data structure of a migration object or follows the naming convention <data structure name>#<optional user input>.csv, the system automatically maps the file to the relevant data structure.
Note: The downloaded file name is S_BNKA#FreeText.csv
For example, for BANK-Bank Master: data structure is called S_BNKA, the .CSV file name could be: S_BNKA.csv or S_BNKA#FreeText.csv, S_BNKA#Test1.csv.
For more details see: Mapping a CSV File to a Data Structure | SAP Help Portal.
A CSV folder is created.
The system automatically maps the CSV files to the data structures that have the same name or if the csv file follows the naming convention <data structure name>#<optional user input>.csv. For example, data structure name = S_BNKA, the file name could be: S_BNKA.csv or S_BNKA#FreeText.csv, S_BNKA#Test1.csv.
On the Data Structures tab, if the CSV file was mapped correctly to the data structure, the status will change to “Mapped”.
If an automatic mapping of the CSV file(s) was not possible either due to upload errors or if the CSV file names are different than the data structure names (for example, for migration object “Product”: S_MARA_n.csv (filename) ≠ S_MARA (data structure name)), you map the CSV files to the data structures manually. This means, you need to map the file to the relevant data structure.
You can perform the following steps to map your CSV files to the relevant data structures.
1.- Choose the Map Files button.
2.- Select the data structure for which you want to map the selected CSV file.
3.- Confirm your selection by choosing Map Files.
4.- If your CSV file was mapped correctly to the data structure, under Data Structures, the status will change to Mapped.
Example
The migration object Product has a data structure called S_MARA. The downloaded CSV template file has the name S_BNKA.csv. You fill this template file with data and save the file as S_MARA_n.csv. On the Folder for CSV Files screen, you upload this file. On the Files tab, the status of the file is Not Mapped to Any Data Structure. You then map the file to the relevant data structure by selecting the file and choosing the Map Files button.
Once you have uploaded your single CSV files or zip file and the mapping has been completed successfully, you can then validate and transfer the data to the staging tables.
Note: The system automatically validates and transfers the data if the names of the CSV files are the same as the corresponding data structure names.
On the Data Structures tab, you can view the uploaded CSV files as well as the corresponding data structure (technical ID) of the migration object.

Notes:
To resolve any validation issues, you need to delete the file and then upload a new version of the file that contains the corrected data. When you upload the file, the system will start the validation process again.
Choose Transfer Data to Staging Tables.

Once all the data in the file has been transferred to the staging tables, the system changes the status of the folder to Data Successfully Transferred to Staging Tables.
On the Migration Object Instances screen you can delete instances and view messages for instances. You can also simulate and migrate single instances or download all instance records.
For more details about viewing migration object instances see: Viewing Migration Object Instances | SAP Help Portal and The Migration Object Instances Screen | SAP Help Portal.
– On-Premise:
– Cloud:
– On-Premise:
– Cloud:
Training Materials & Videos:
Newsletters:
Other relevant Blogs:
Note that the process for transferring data to the staging tables for SAP S/4HANA 2022 is slightly different. You can find more details about this in the Knowledge Base Article (KBA) 3296020.
First, let’s have a short introduction and overview of the S/4HANA migration cockpit:
The SAP S/4HANA migration cockpit is designed for customers who have just installed SAP S/4HANA and want to move their legacy data from SAP or non-SAP software systems. It allows you to migrate your master data and transactional data to SAP S/4HANA, and it facilitates this process by providing predefined migration content and mapping. It can be launched using the “Migrate Your Data” app in the Fiori Launchpad (Data Migration Launchpad). The migration cockpit is part of both SAP S/4HANA and SAP S/4HANA Cloud and is included in these licenses.
For SAP S/4HANA (On-Premise) for the Migrate your Data – Migration Cockpit two different migration approaches are available. Namely, Migrate Data Using Staging Tables and Migrate Data Directly from SAP System.
The migration approach Migrate Data Using Staging Tables is recommended if you want to transfer a lot of data to SAP S/4HANA in an automated way. It is the most efficient way of transferring large volumes of data. Staging tables are database tables and therefore provide greater flexibility than files regarding managing data (for example sorting data, searching for data, checking for duplicate records and so on).
If you use the migration approach Migrate Data Using Staging Tables, the SAP S/4HANA migration cockpit automatically creates staging tables for each migration object that is relevant for your project. You can fill the staging tables with data either using XML templates, CSV files, or manually using the SAP HANA Studio or by using third party or SAP’s ETL tools (for example SAP Agile Data Preparation).
If you want to have short introduction and overview of the SAP S/4HANA migration cockpit and, more details about the migration approach Migrate Data Using Staging Tables see the blog in the link below. There you can also find more details about loading data to the staging tables using XML files:
The CSV feature is available with SAP S/4HANA Cloud 2208 and SAP S/4HANA 2022. With this feature, you can use CSV files to populate the staging tables with data in the Migration Cockpit - Migrate Your Data app.
For SAP S/4HANA Cloud 2302 and higher, there are some new functions for uploading CSV files, for example, you have now the option to remove columns and change the orders of the columns with the CSV header option “First Row is Header Row”.
For more details see:
- SAP Help Portal: Transferring Data from CSV Template Files to Staging Tables
- Knowledge Base Article (KBA) 3210687 and 3296020.
Prerequisites
- In the SAP S/4HANA migration cockpit You have created a migration project that uses the migration approach Migrate Data Using Staging Tables.
- You have selected the relevant migration objects for your migration project.
- If you use the SAP HANA Remote Database connection, you must create first an SAP HANA database connection between the SAP S/4HANA system and the staging system (a remote system that uses the SAP HANA database).
- You have one or more CSV file (.csv) with data to upload or you have created a Zip file that contains your CSV files.
- You have reviewed and adjusted the CSV file options for the migration project you are currently working on.
Note: For more details about prerequisites and other relevant information about Migrate Data Using Staging Tables see KBA 2733253 – FAQ for SAP S/4HANA migration cockpit – Transfer option: Transfer data from staging tables.
GENERAL REMARK: Using CSV template files is an expert option for filling the staging tables with data. We do not recommend using CSV files unless you have a specific use case for doing so.
General CSV upload process
The general process for uploading CSV files to the SAP S/4HANA migration cockpit is as follows:
- Verify and adjust the CSV file options available within the SAP S/4HANA migration cockpit.
- Download the CSV template files for the relevant migration object.
You can either use these CSV templates and enter data directly in the CSV files or you can use the CSV templates as a basis to populate new CSV files with data.
- Create your CSV files. You prepare the data according to the CSV file options within the Migrate your data – Migration Cockpit and create your CSV files. You can also include all your single CSV files in one zip file.
Note: For every data structure of a migration object, you must create a single CSV file containing the relevant data.
- Upload your Zip or CSV files. After preparing your CSV files or your Zip file containing your single CSV files, you have two options for uploading your CSV files.
- Option A. Upload a Zip File: You upload a zip file which contains all your CSV files.
- Option B. Create a CSV Folder: You create a CSV folder for a migration object and then upload single CSV files or a zip file containing your single CSV files.
- Map your CSV file to a data structure. An automatic mapping of the CSV files to the corresponding data structure will occur if the name of the CSV file follows the naming convention for CSV files: <data structure name>#<optional user input>.csv. Otherwise, you must map each of the CSV files to the relevant data structure manually.
- Validate and transfer the data to the staging tables. Once you have uploaded your single CSV files or zip file and the mapping has been successfully completed, you can then validate and transfer the data to the staging tables. Note that if you upload a zip file that contains the CSV files the system will automatically validate the data in the CSV files and transfer the data to the staging tables.
.
Detailed Procedure
1. Verify and Adjust the CSV File Options
Before uploading any CSV files, you must verify and adjust first the CSV file options available on the Project Settings screen. This helps to avoid any format errors when you upload your CSV files. Note that if you change any of the CSV file options, then the CSV template you download will contain these changes. For example, if you change the field delimiter to "comma" and previously it was set to "semicolon", then the new CSV templates you download will contain the field delimiter "comma".
Important Note: If you change the settings for CSV files, the new settings will apply to all migration objects in the project. If you have previously uploaded CSV files using other settings, you will not be able to upload them again.
Under CSV File Options, you can view information about how the system processes CSV files. You can also adjust certain settings:

Project settings screen - CSV File Options
General Options:
Under General Options, you can adjust the values of the following fields:
| Field | Value | Additional Information |
| Date Format | · YYYYMMDD | Dates must use this format, for example 20220707 |
| Time Format | · HHMMSS | Use the 24-hour format. For example, 090955. |
| Decimal Notation | · 1234567.89 | Format decimal numbers using a period for decimal places. Thousand separators are not required or supported. Example: 1234567.89 |
In addition, you can view the following information:
| Character Encoding | · UTF-8 | Ensure that your CSV files use UTF-8-character encoding. |
CSV Header Options:
Under File Header Options, there are the following options:
a. First Row is Header Row
b. No Header Row (Import All Rows)
c. Number of Rows to Skip
a. First Row is Header Row
This is the default option. The first row of a CSV template file is the header row. This row contains the technical names of the fields. An asterix (*) next to a field name indicates a mandatory field, while the letter k (k) and an asterix (*) next to the field name indicates a mandatory key field.
If you use the option First Row is Header Row, the first row in your CSV file must be a header row. The field names in the header row must have the same name as the fields in the header row of the CSV template file. The system will expect values for each mandatory field specified in the header row. In addition, the order of the values in each row must correspond to the order of the fields in the header row. In the first row of your CSV file, you can remove the indicators next to the field names if required.
This option also provides a more flexible approach for uploading data. For example, you can remove columns, and change the order of the columns. Note that the mandatory fields must always be present in the header row of your CSV file.
Note: If you want to specify empty values for fields at the start of a row, they must be separated by a delimiter. If you want to specify empty values for fields at the end of a row, they do not need to be separated by a delimiter.
Example: The header row of a CSV file has two mandatory key fields and 2 additional fields. In the second row of the CSV file, you want to specify values for all four fields. For the remaining rows, you want to specify values for the two mandatory key fields only. The following example CSV file is acceptable:
Field1(k/*),Field 2(k/*),Field3,Field4
Value1,Value2,Value3,Value4
- For example, for BANK CSV template file. CSV Template fields: BANKS(k/*),BANKL(k/*),BANKA(*),PROVZ,STRAS,ORT01, BRNCH,SWIFT,BNKLZ,BGRUP,ISNOTOVERWRITE
- Example for Mandatory and NULL data (CSV file):
STRAS,BANKS(k/*),BANKL(k/*),BANKA(*),ORT01 Gold Street 1,DE,20202027,Commerzbank,Frankfurt ,DE,20202028,Deutsche Bank |
b. No Header Row (Import All Rows)
You can use the option "No Header Row" if you want to create CSV files with no header rows. For example, if you use your own tools to generate CSV files it may be easier to create CSV files without a header row.
First, you need to download the relevant CSV template file to determine the relevant fields, and then create your CSV file accordingly. If you use this option, the system will expect values for each mandatory field specified in the header row of the CSV template file. The values in your CSV file must also be in the same order as the header row of the CSV template file. In addition, empty values for fields must be separated by a delimiter.
Example: The header row of a CSV template file has two mandatory key fields and 2 additional fields. You want to create a CSV file that has no header row. In the first row of your CSV file, you want to specify values for all four fields. For the remaining rows, you want to specify values for the two mandatory key fields only. The following example CSV file is acceptable:
Value1,Value2,Value3,Value4
Value5,Value6,,
Value7,Value8,,
- For example, for BANK CSV template file with CSV Template fields: BANKS(k/*),BANKL(k/*),BANKA(*),PROVZ,STRAS,ORT01, BRNCH,SWIFT,BNKLZ,BGRUP,ISNOTOVERWRITE
- Example for Mandatory (3 Fields, marked with * in the CSV template file) and NULL data (CSV file):
DE,20000036,Commerzbank,,,,,,,,, DE,20000037,Deutsche Bank,Hessen,,,,,,,, |
c. Number of Rows to Skip
You can use the option "Number of Rows to Skip" if you want the system to skip one or more rows in the CSV file. For example, you could include the field descriptions in the second row as extra information. The default value of this field is 1. This means that the system will not process first row of the CSV file. You can increase this number if required. For example, if you change this value to 3, the system will skip the first three lines in the file.
First, you need to download the relevant CSV template file to determine the relevant fields, and then create your CSV file accordingly. If you use this option, the system will expect values for each mandatory field specified in the header row of the CSV template file. The values in your CSV file must also be in the same order as the header row of the CSV template file. In addition, empty values for fields must be separated by a delimiter.
For example, for BANK CSV template file:
- CSV Template fields: BANKS(k/*),BANKL(k/*),BANKA(*),PROVZ,STRAS,ORT01, BRNCH,SWIFT,BNKLZ,BGRUP,ISNOTOVERWRITE
- Example for Mandatory and NULL data (CSV file):
BANKS(k/*),BANKL(k/*),BANKA(*),PROVZ,STRAS,ORT01,BRNCH,SWIFT,XPGRO,BNKLZ,BGRUP,ISNOTOVERWRITE DE,20000019,Commerzbank,,,,,,,,, |
Note: For SAP S/4HANA Cloud, you can also see some CSV template samples with prefilled sample data under:
- 2470789 - SAP S/4HANA Migration Cockpit (Cloud) - Sample data migration templates
- SAP Help Portal: Data Migration Template Samples
Special Characters:
Under Special Characters, you can adjust the values of the following fields:
- Record Delimiter. A line break separates each row in the CSV file. The following values are possible:
- Windows (CR LF)
- Macintosh (CR)
- Unix (LF)
- Field Delimiter. The following values are possible:
- Comma (,)
- Semicolon (;)
- Tab
In addition, you can view the following information:
| Field | Value | Additional Information |
| Character Used to Enclose Fields | · Double Quotes (") | Each field may or may not be enclosed in double quotes. If fields are not enclosed with double quotes, then double quotes may not appear inside the fields. |
| Escape Character | · Double Quotes (") | If double-quotes are used to enclose fields, then a double-quote that appears inside a field must be preceded by another double quote. Example: "aaa","b""bb","ccc" |
2. Download the CSV Template Files
If you are using CSV template files to populate the staging tables with data, you need to download the CSV template files for the relevant migration object and enter the data to be migrated in the files. You can use these CSV templates to either create your own CSV files or to populate the CSV template with data. For more information, see Downloading Template Files.
Steps
1.- On the Migration Project screen, select the relevant migration object and choose the Download Template button and then choose the option Download CSV Files.

2.- The system creates a zip file that contains the CSV template files. In the zip file, there is a CSV file for each data structure of the migration object.

Note: If the technical name of a data structure contains the backslash character ("\"), the backslash character will be replaced with the characters "%2f" when you download the file.
3.- Save the zip file locally and open the CSV files using a text editor or your preferred application.

Note: You can use this CSV template and enter your data, or you can use the file as a basis to populate the csv files with the respective data. Note that using a spreadsheet application to open CSV files may result in formatting issues, for example leading zeros may be deleted.
3. Creating your CSV File
In this section, you can some important tips and recommendations for creating the CSV files (single or as a zip file) to be uploaded to the SAP S/4HANA migration cockpit.
3.1 Tips and Recommendations
- Before creating your CSV files, you must verify (and adjust if required) the CSV file options available in the Migrate your Data app.
- CSV files must have the extension .csv
For CSV header option “First Row is Header Row”:
- The first row in your CSV file must be a header row.
- The field names in the header row must have the same name as the fields in the header row of the CSV template file.
- The mandatory fields must always be present in the header row of your CSV file.
- The system will expect values for each mandatory field specified in the header row.
- You can change the order or the fields, however, the order of the values in each row must correspond to the order of the fields in the header row.
- In the first row of your CSV file, you can remove the indicators next to the field names if required.
- Empty values for fields at the start of a row must be separated by a delimiter.
- Empty values for fields at the end of a row do not need to be separated by a delimiter.
For CSV header options “No header row” and “Number of rows to skip”:
- The fields must appear in the same order as the staging table definition (see the screenshot below). This ensures that the fields can be mapped more easily, or even automatically by using options for mapping (for more information, see section 1 Automatic Mapping of CSV Files).
- Depending on the definition of the field in the source structure, some fields of the staging tables are defined as NOT NULL and expect a value. The database management system will not add a row to the staging table unless the row has a value for that field.
- Fields that are marked as NOT NULL in the data definition need to contain values for the corresponding columns in the file. Otherwise, the system displays an error message stating that the system cannot insert NULL or update to NULL.
- You must include all fields of the staging table in the csv file and populate them with at least NULL values or empty data. Otherwise, you will get an error message saying that the columns do not match.
For example, for BANK CSV template file:
- CSV Template fields: BANKS(k/*),BANKL(k/*),BANKA(*),PROVZ,STRAS,ORT01, BRNCH,SWIFT,BNKLZ,BGRUP,ISNOTOVERWRITE
- Example for Mandatory and NULL data (CSV file): DE,20000016,Commerzbank,,,,,,,,

For more information about transferring data from staging tables, leading zeros, default values and correctness of the values of some data types (for example, DATE, DECIMAL, TIME and so on), see SAP KBA 2733253 and the SAP Help Portal: SAP HANA SQL and System Views Reference for SAP HANA Platform → SQL Reference → Data Types.
3.2 Naming Convention for CSV Files
When you download CSV files for a migration object, the system creates a zip file that contains the CSV template files. In the zip file, there is a CSV file for each data structure of the migration object.
The CSV file names are structured as follows:
- <data structure name>#<optional user input>.csv
For example, for the data structure S_BNKA, the corresponding CSV template file in the zip file is S_BNKA#FreeText.csv
If required, you can replace the text "FreeText" with your own text, but it is not necessary to do so. If you add your own text, it must be preceded by the hash symbol (#). For example, S_BNKA#myfile1.csv or S_BNKA#1.csv.
You can also remove the string "#FreeText". For example, S_BNKA.csv
3.3 Additional Information About CSV Template Files
When you download the CSV template files, the system generates a zip file that contains CSV template files for each data structure of the migration object you selected. In the first row of a CSV template file, you can view the technical names of the fields.
An asterix (*) next to a field name indicates a mandatory field. For example, the field BANKA is a mandatory field. The first row of a CSV file containing this field would have the entry BANKA (*).
Key fields are always mandatory fields. The letter k (k) and an asterix (*) next to the field name indicates a mandatory key field. For example, the field BANKS is a mandatory key field. The first row of a CSV file containing this field would have the entry BANKS(k/*).

On the Tables tab of the Migration Object Tables screen, you can view more detailed information about the fields. For example, you can view the name of the field as well as the data type and length.
Note: CSV files must comply with RFC 4180 and use UTF-8 encoding. UTF-8 with BOM is not supported. RFC 4180 defines a standard dialect for CSV files that specifies delimiters, quoting, and line breaks. However, unlike RFC 4180, the SAP S/4HANA migration cockpit supports different field delimiters. For more information, see CSV File Options.
For additional information about using CSV files, as well as sample CSV files, see SAP Knowledge Base Article 3210687.
3.4 Where to Find Field-Related Information for your CSV Files
When creating your CSV files, you can find field-specific information for creating such files in the following locations:
- In the CSV template file, key fields and mandatory fields are marked with a k (k) and an asterix (*) respectively.

- On the Migration Object Tables Screen, you can download the metadata file for a migration object. This file contains the structure of the staging tables of a migration object. For each field, you can view information such as mandatory and key fields, description, data type, and length.

- On the Migration Object Tables, Structure screen you can find detailed information about each field of a data structure such as key fields, mandatory fields, length, data type, and so on.

- Note: Alternatively, you can find more detailed field-related information in the XML template file for a migration object. This might be easier for users already familiar with XML template files.
4. Upload Single CSV Files or a Zip File for a Migration Object
Once you have filled the CSV template files for a migration object with data, you can upload the files to the SAP S/4HANA migration cockpit.
There are two options for uploading CSV files:
- Option A. You can upload a zip file that contains a CSV file for each data structure of the migration object. We recommend using this option, as it is the most efficient method for uploading the CSV files for a migration object.
- Option B. You can create a CSV folder and upload a single CSV file for any data structure of the migration object or a zip file containing one or more CSV files.

4.1 Option A: Upload a Zip File
Once you have filled the CSV template files for a migration object with data, you can upload a zip file that contains the CSV to the SAP S/4HANA migration cockpit. The system then validates the data in the CSV files and transfers the data to the staging tables that were generated for that migration object. The system automatically creates a folder for the CSV files.
Note: This is the recommended option, as it is the most efficient method for uploading the CSV files for an object. Note that with the “Upload” button you can upload .XML as well as .ZIP files. Single CSV files cannot be uploaded with this option. If you try to upload single CSV files you will get the following error message: Error To upload a CSV file, you need to first create a folder and upload the file there. Note that if you upload a zip file that contains CSV files, the system will automatically create a folder for the CSV files.
It is recommended that you use the downloaded CSV template files and fill these templates with data or use the CSV templates as a basis to create new CSV files. Remember that your zip file must contain at least one CSV file for each mandatory data structure of a migration object. For this option, you must have first filled the CSV template files with data and saved the CSV files in a zip file. For more information about CSV template files, see Additional Information About CSV Template Files.
Steps
- On the Migration Project screen, select the relevant migration object and choose the action Upload File.

The system displays the Migration Object Tables screen.
- To upload a zip file, on the Upload Files tab, you can either use the Upload button.


Or you can use the drag and drop function.

Here you can also view the status of the validation and transfer process.
![]()
- If a CSV file follows the naming convention <data structure name>#<optional user input>.csv (for example, S_BNKA#Test1.csv or S_BNKA.csv), the system automatically maps the file to the relevant data structure. Otherwise, you need to map the file(s) to the relevant data structures. For more information, see Chapter Map your CSV file(s) to a data structure and the SAP Help Portal -> Mapping a CSV File to a Data Structure.
4.2 Option B: Create a CSV Folder for your CSV Files
Once you have filled one or more CSV template files for a migration object with data, you can upload the files to the SAP S/4HANA migration cockpit. For more information about CSV template files, see Chapter 3.3 Additional Information About CSV Template Files or the SAP Help Portal -> Additional Information About CSV Template Files.
Note that if you upload a zip file that contains CSV files, the system will automatically create a folder for the CSV files. Otherwise, you can create a folder for the CSV files on the Upload Files tab by choosing the button Create CSV Folder.
On the Upload Files tab, you can create a folder for the CSV files by choosing the button Create CSV Folder. You can then open your folder and either upload a zip file that contains your CSV files or single CSV files. You will then need to validate the data in the CSV files, and then transfer the data in the files to the staging tables.
Note 1: If the CSV files do not follow the naming convention <data structure name>#<optional user input>.csv (for example: BNKA-File1.csv), your will need to map the CSV files to the relevant data structures. Then you need to validate the data in the CSV files, and then transfer the data in the files to the staging tables. For more information, see Naming Convention for CSV Files | SAP Help Portal and Uploading CSV Files | SAP Help Portal.
Note 2: If the CSV files follow the naming convention <data structure name>#<optional user input>.csv (for example: S_BNKA#Test1.csv), the system will automatically map the CSV file to the relevant data structures. Then you need to validate the data in the CSV files, and after that transfer the data in the files to the staging tables. For more information, see Naming Convention for CSV Files | SAP Help Portal and Uploading CSV Files | SAP Help Portal.
Steps
1.- On the Migration Object Tables screen, select the tab Upload File.

2.- Choose button Create CSV Folder.
The system displays the Create Folder for CSV Files screen.
3.- Enter a new CSV Folder Name or you can keep the generated CSV folder name.
4.- Choose the Create and Open button to create your CSV folder and open it to upload your single CSV files.
Your CSV folder is created and opened.
5.- To upload one or more CSV files or a zip file containing your Zip files, on the Upload Files tab, you can use the drag and drop function.
Upload of single CSV files:

Upload of zip files:

6.- Or you can use the Upload button.

7.- If your CSV files have the same name as the data structures of a migration object or follow the naming convention <data structure name>#<optional user input>.csv (for example, S_MARA.csv or S_MARA#Test1.csv), the system automatically maps the uploaded CSV files to the relevant data structures of the migration object. Otherwise, you need to map the files to the relevant data structures. For more information, see chapter Map your CSV file(s) to a data structure and the SAP Help Portal -> Mapping a CSV File to a Data Structure.
5. Map Your CSV File to a Data Structure
5.1 Automatic Mapping of CSV Files
If the CSV file you upload has the same name as a data structure of a migration object or follows the naming convention <data structure name>#<optional user input>.csv, the system automatically maps the file to the relevant data structure.
Note: The downloaded file name is S_BNKA#FreeText.csv
For example, for BANK-Bank Master: data structure is called S_BNKA, the .CSV file name could be: S_BNKA.csv or S_BNKA#FreeText.csv, S_BNKA#Test1.csv.
For more details see: Mapping a CSV File to a Data Structure | SAP Help Portal.
Steps
- Upload a zip file with all single .csv files with same name as the data structures (as shown in section 1 Option A: Upload a Zip File)or create a CSV folder and upload single CSV files (as shown in Option B: Upload single CSV Files).
A CSV folder is created.

The system automatically maps the CSV files to the data structures that have the same name or if the csv file follows the naming convention <data structure name>#<optional user input>.csv. For example, data structure name = S_BNKA, the file name could be: S_BNKA.csv or S_BNKA#FreeText.csv, S_BNKA#Test1.csv.
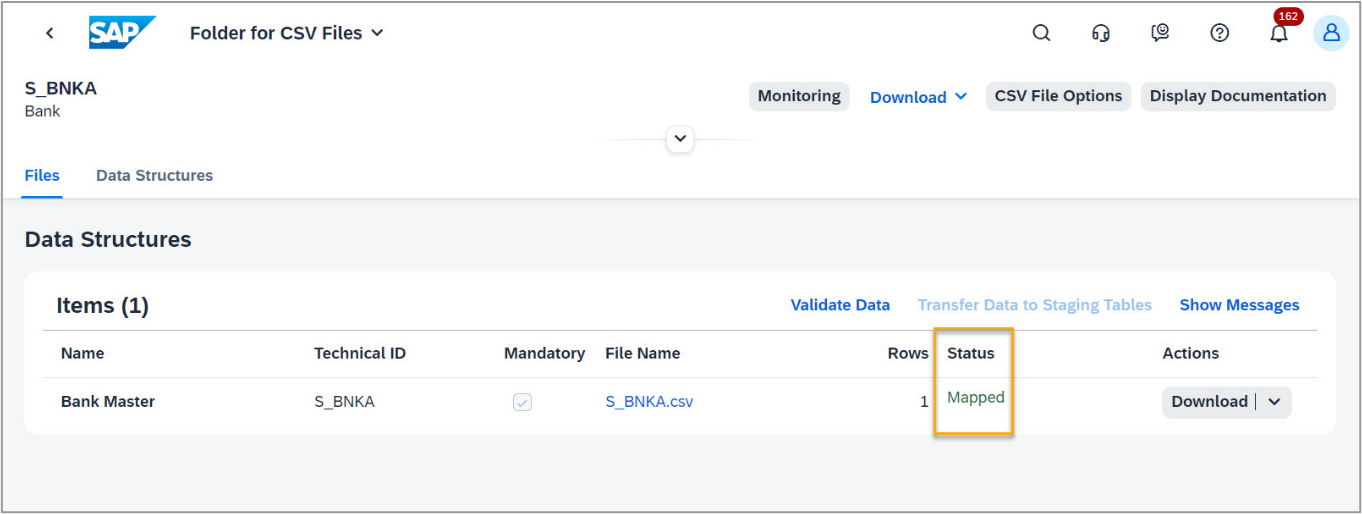
On the Data Structures tab, if the CSV file was mapped correctly to the data structure, the status will change to “Mapped”.
5.2 Manual Mapping of CSV files
If an automatic mapping of the CSV file(s) was not possible either due to upload errors or if the CSV file names are different than the data structure names (for example, for migration object “Product”: S_MARA_n.csv (filename) ≠ S_MARA (data structure name)), you map the CSV files to the data structures manually. This means, you need to map the file to the relevant data structure.
Steps
- After uploading your CSV files, if one or more of the files (for example, for migration object product, files: S_MAKT.csv, S_MARA_n.csv) was not automatically mapped you will see the status of the file “Not Mapped to Any Data Structure” on the Files tab.

You can perform the following steps to map your CSV files to the relevant data structures.
1.- Choose the Map Files button.

2.- Select the data structure for which you want to map the selected CSV file.

3.- Confirm your selection by choosing Map Files.

4.- If your CSV file was mapped correctly to the data structure, under Data Structures, the status will change to Mapped.

Example
The migration object Product has a data structure called S_MARA. The downloaded CSV template file has the name S_BNKA.csv. You fill this template file with data and save the file as S_MARA_n.csv. On the Folder for CSV Files screen, you upload this file. On the Files tab, the status of the file is Not Mapped to Any Data Structure. You then map the file to the relevant data structure by selecting the file and choosing the Map Files button.
6. Validate and Transfer the Data to the Staging Tables.
Once you have uploaded your single CSV files or zip file and the mapping has been completed successfully, you can then validate and transfer the data to the staging tables.
Note: The system automatically validates and transfers the data if the names of the CSV files are the same as the corresponding data structure names.
- Choose Validate Data to validate the data in the CSV file.

On the Data Structures tab, you can view the uploaded CSV files as well as the corresponding data structure (technical ID) of the migration object.
- You can view the relevant messages by choosing the Show Messages
Notes:
- If the status of the folder for the CSV files is Validation Failed, then there is an issue with the data in at least one of the CSV files in the folder.
To resolve any validation issues, you need to delete the file and then upload a new version of the file that contains the corrected data. When you upload the file, the system will start the validation process again.
- If the status of the folder for the CSV files is Validation Completed with Warnings, you need to analyze the relevant messages before proceeding. If you determine that the messages can be ignored, you need to transfer the data to the staging tables manually.
- Once the CSV file has been validated successfully (no error or warning messages), you can transfer the data in the file to the staging tables that were generated for that migration object.
Choose Transfer Data to Staging Tables.
Once all the data in the file has been transferred to the staging tables, the system changes the status of the folder to Data Successfully Transferred to Staging Tables.
- After the data was transferred successfully to the staging tables, you can view the migration object instances by clicking the number of instances.

On the Migration Object Instances screen you can delete instances and view messages for instances. You can also simulate and migrate single instances or download all instance records.
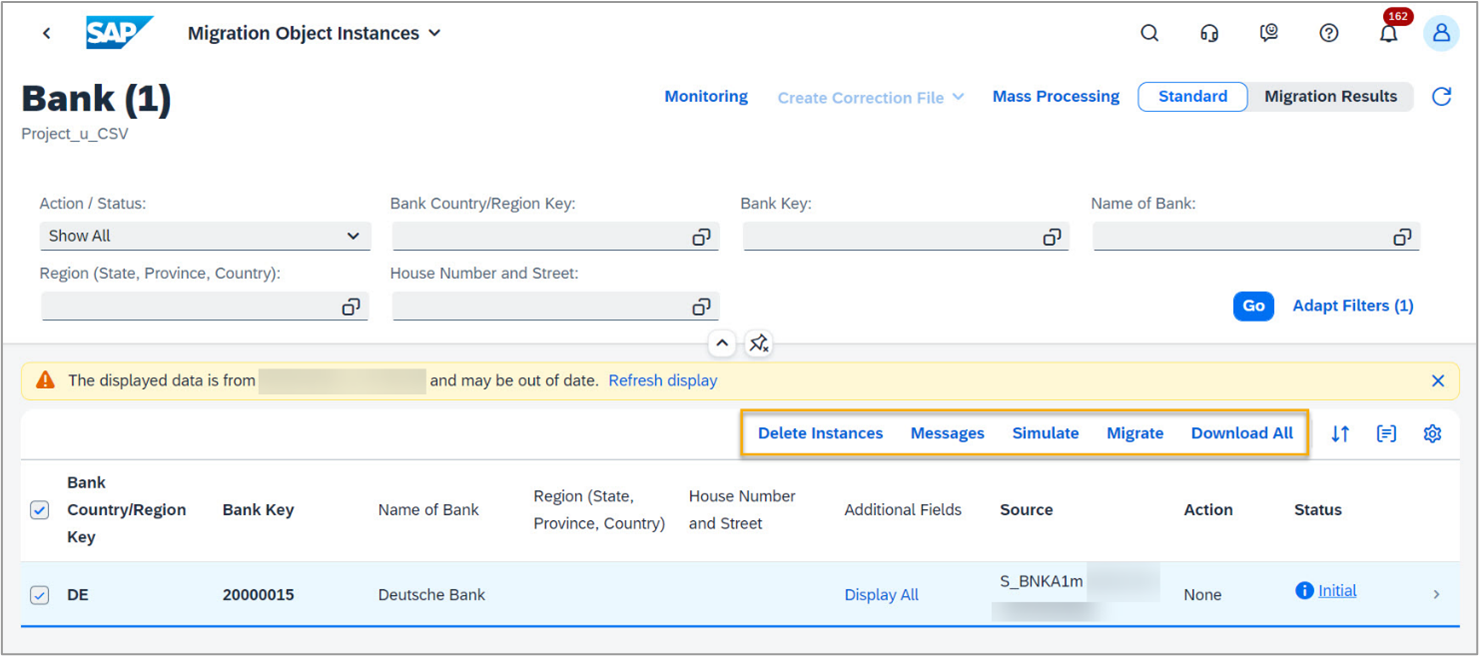
For more details about viewing migration object instances see: Viewing Migration Object Instances | SAP Help Portal and The Migration Object Instances Screen | SAP Help Portal.
Relevant Information, Documentation and Links
SAP Help Portal:
– On-Premise:
- Data Migration – SAP S/4HANA Migration Cockpit (Landing page S/4 HANA migration cockpit)
- SAP S/4 HANA On-premise
- SAP S/4HANA Migration Cockpit migrations objects for the On-premise – Enterprise – Available Migrati...
- Transferring Data to SAP S/4HANA Using Staging Tables
– Cloud:
- Data Migration – SAP S/4HANA Cloud (Landing page S/4 HANA migration cockpit (Cloud))
- SAP S/4 HANA Cloud
- Migration Objects for SAP S/4HANA Cloud – Available Migration Objects
- Transferring Data to SAP S/4HANA Using Staging Tables
Frequently Asked Questions (FAQs):
– On-Premise:
- FAQs – SAP S/4HANA migration cockpit for SAP S/4HANA 2021
- FAQs – SAP S/4HANA Migration Cockpit for SAP S/4HANA 2020
- FAQs – SAP S/4HANA Migration Cockpit for SAP S/4HANA 1909
– Cloud:
SAP Communities:
SAP Help Notes and Knowledge Base Articles (KBAs):
- KBA 2733253 - FAQ for SAP S/4HANA migration cockpit - Transfer option: Transfer data from staging tables
- 2537549 – Collective SAP Note and FAQ for SAP S/4HANA Migration Cockpit (On-Premise)
- 2538700 – Collective SAP Note and FAQ for SAP S/4HANA Migration Cockpit (Cloud)
- 2733253 – FAQ for SAP S/4HANA migration cockpit – Transfer option: Transfer data from staging tables
- 2596400 – Migration objects available in the Migration Cockpit
- 2778320 – SAP Release Comparison for SAP S/4HANA (on premise) Data Migration content
- 2778319 – SAP Release Comparison for SAP S/4HANA Cloud Data Migration content
- 3066336 – Modifying Data Transfer Jobs to improve the data transfer performance of the SAP S/4HANA M...
- 3065607 – Performance tips & tricks for SAP S/4HANA Migration Cockpit: Migrate Data Using Staging Ta...
- 3104790 – Modifiable Systems and Transport Concept, SAP S/4HANA Migration Cockpit – Migrate Data Usi...
Training Materials & Videos:
- Intro Video: SAP S/4HANA Migration Cockpit – Migrate your Data
- Open SAP course Data Migration to SAP S/4HANA
- Video: SAP HANA Academy – Migration Cockpit
- Video: SAP HANA Academy – Migration Object Modeler
- Training Material – SAP S/4HANA Migration Cockpit
- Training Material – SAP S/4HANA Migration Cockpit – Overview – SAP Help Portal
- Tutorials – SAP S/4HANA Data Migration (SAP S/4HANA on-premise 2020). Note: SAP Learning Hub User is required to access these tutorials
SAP S/4HANA Migration Cockpit – Create your Test System – Fully Activated Appliance
Newsletters:
- SAP S/4HANA Migration Cockpit – Development Newsletter
- SAP S/4HANA Data Migration Content Development Newsletter
- Sign up – SAP S/4HANA Migration Cockpit Newsletter
Other relevant Blogs:
- Part 1: Migrate your Data – Migration Cockpit (from SAP S/4HANA 2020, SAP S/4HANA Cloud 2008), Migra...
- Part 2: SAP S/4HANA migration cockpit – Using SAP Data Services to load data to the staging tables
- Part 3: SAP S/4HANA Migration Cockpit – Using SAP HANA Smart Data Integration (SDI) to load data to ...
- Part 4: SAP S/4HANA migration cockpit – Using SAP HANA Studio to load data to the staging tables
- Top 5 FAQs (Frequently Asked Questions) - SAP S/4HANA Migration Cockpit – Migrate Data Using Staging...
- SAP Managed Tags:
- SAP S/4HANA,
- SAP S/4HANA migration cockpit,
- SAP S/4HANA Public Cloud
Labels:
2 Comments
You must be a registered user to add a comment. If you've already registered, sign in. Otherwise, register and sign in.
Labels in this area
-
Artificial Intelligence (AI)
1 -
Business Trends
363 -
Business Trends
21 -
Customer COE Basics and Fundamentals
1 -
Digital Transformation with Cloud ERP (DT)
1 -
Event Information
461 -
Event Information
24 -
Expert Insights
114 -
Expert Insights
153 -
General
1 -
Governance and Organization
1 -
Introduction
1 -
Life at SAP
415 -
Life at SAP
2 -
Product Updates
4,685 -
Product Updates
208 -
Roadmap and Strategy
1 -
Technology Updates
1,502 -
Technology Updates
88
Related Content
- Migrating data from SAP ECC to SAP S4/HANA with the migration cockpit in Enterprise Resource Planning Blogs by Members
- How to set up the Data Migration Cockpit in Enterprise Resource Planning Blogs by Members
- How to Migrate of Product variant configuration data ? in Enterprise Resource Planning Q&A
- Can I apply WBS elements at item level on service orders using migration cockpit? in Enterprise Resource Planning Q&A
- Edit a migration template in Enterprise Resource Planning Q&A
Top kudoed authors
| User | Count |
|---|---|
| 11 | |
| 10 | |
| 6 | |
| 6 | |
| 4 | |
| 4 | |
| 4 | |
| 4 | |
| 3 | |
| 3 |