
- SAP Community
- Products and Technology
- Human Capital Management
- HCM Blogs by Members
- Generic Objects as a filter in Position Tile in Su...
Human Capital Management Blogs by Members
Gain valuable knowledge and tips on SAP SuccessFactors and human capital management from member blog posts. Share your HCM insights with a post of your own.
Turn on suggestions
Auto-suggest helps you quickly narrow down your search results by suggesting possible matches as you type.
Showing results for
SachinPachauri
Active Contributor
Options
- Subscribe to RSS Feed
- Mark as New
- Mark as Read
- Bookmark
- Subscribe
- Printer Friendly Page
- Report Inappropriate Content
02-06-2023
7:29 AM
As we know the generic objects fields cannot be added as a filter option in the position tile. However, many clients need department, division, business unit, location, etc. fields in the position tile search to filter the positions for Succession Planning. To meet this requirement, I have found a solution which is explained below in detailed steps, so that if anyone has the same request by the client, they can also benefit from this and fulfill the client’s request.
In this example, I have used the Department field to be added as a filter.
Configuration Steps:
Admin Center>Picklist Center
Select the + icon to create a new picklist
Provide the Code, Name, Status, and Effective Start Date details and click on the “Save” button.
Below are the steps to configure the custom field in position object:
Admin Center>Company Settings>Configure Object Definition.
In “Configure Object Definition” search Object Defination and select Position.
Edit the Position” object and add a new custom field cust_newdepartment as Picklist Type
Click on “Details” to link the picklist which was created on the first step.
Once updated, click on the Done button to save the data.
Below are the steps to configure the searchable field in the position object:
Admin Center>Company Settings>Configure Object Definition>Select Position Object
Update the External Code of the custom field in the searchable fields.
Once, the above configuration is completed, save the object.
Below are the steps to build integration using the integration center:
Admin Center>Company Settings>Integration Center>My Integrations
Select My Integration to access the existing integrations.
Click on +Create to create a new integration and select the More Integration Type option.
Choose Integration Type, select Trigger type as scheduled, Source Type as SuccessFactors, and Destination type as SuccessFactors and click on the Create button.
Select EC- Foundation/Organization as Tag for the integration.

Select Department from Recommended Starting Entities and click on the Select button.
Update the basic details of the integration such as Name, Description, and Page Size and click on the Next button.
Under Configure Fields View, click on the Switch to field mapping view icon to start the mapping of Department generic object values to the picklist.
Click on the + Icon and search Picklist as an Entity, Select Picklist Value (PickListValueV2), and click on Add button.
Now, map the Department External Code to External_Code, and map the Department Name to Picklist Label by performing the drag and drop from the Department object to the picklist value.
Click on Switch to the detail view and click on Picklist_Effective Start Date and enter 1900-01-01T20:00:00Z as the default date and Click on Picklist_Code (PickListV2_id) String(128) and enter Department as the default value.
Once the above steps are done click on the Next button to set the filter if required.
Click on the Next button to Schedule the integration.
Click on the Next button to complete the integration schedule.
Once, the job is successfully completed without any error. Access the Picklist Center and check the Department Picklist.
It should show you all the values of Generic Object (Department).
End User Action:
End users can access the SuccessFactors’ Position Tile to filter the data based on the department field.
Below are the steps to access the Position Tile.
Home>Succession>Position Tile
Click on the Filter icon to see the filter options.
Select Department and check the Drop-Down Values.
References:
All images are taken from SAP SuccessFactors Sales Demo with Dummy Data
https://wiki.scn.sap.com/wiki/display/SAPSF/Position+Tile+View+-+Overview+and+Getting+Started
Succession Management Implementation Guide.
Note:
The system will display only 200 values for a picklist field.
In Part-2 of this blog, I'll explain how to map the department field value to a custom field so that the system automatically captures the same value when creating a new position.
Please feel free to provide your feedback or thoughts in the comments.
In this example, I have used the Department field to be added as a filter.
Configuration Steps:
- Create Picklist for Department: Initially, we need to create a picklist to capture the values of the department (generic object) field.
Admin Center>Picklist Center
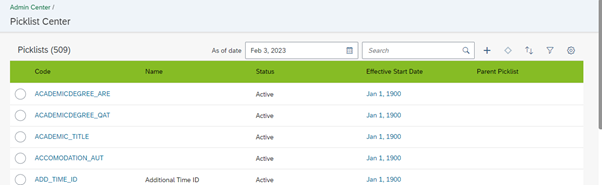
Picklist Center
Select the + icon to create a new picklist

Picklist Detail Page
Provide the Code, Name, Status, and Effective Start Date details and click on the “Save” button.
- Create Custom Field for Department: Then, we need to create a custom field for the department in the position object.
Below are the steps to configure the custom field in position object:
Admin Center>Company Settings>Configure Object Definition.

Configure Object Definition
In “Configure Object Definition” search Object Defination and select Position.
Edit the Position” object and add a new custom field cust_newdepartment as Picklist Type

cust_newdepartment
Click on “Details” to link the picklist which was created on the first step.

Details
Once updated, click on the Done button to save the data.
- Add custom department field in Searchable Fields: The next step is to add the newly created custom department field in the position object.
Below are the steps to configure the searchable field in the position object:
Admin Center>Company Settings>Configure Object Definition>Select Position Object

Searchable field
Update the External Code of the custom field in the searchable fields.

Searchable field
Once, the above configuration is completed, save the object.
- Create an Integration job: The last step is to create an integration job using Integration Center to pull the generic object (Department) values to the picklist.
Below are the steps to build integration using the integration center:
Admin Center>Company Settings>Integration Center>My Integrations

Integration Center
Select My Integration to access the existing integrations.

My Integration Page
Click on +Create to create a new integration and select the More Integration Type option.

+ Create and More Integration Type
Choose Integration Type, select Trigger type as scheduled, Source Type as SuccessFactors, and Destination type as SuccessFactors and click on the Create button.

Choose Integration Type
Select EC- Foundation/Organization as Tag for the integration.
EC- Foundation/Organization as Tag
Select Department from Recommended Starting Entities and click on the Select button.
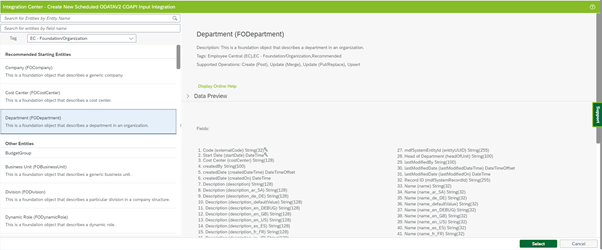
Department
Update the basic details of the integration such as Name, Description, and Page Size and click on the Next button.

Updated the basic details of the integration
Under Configure Fields View, click on the Switch to field mapping view icon to start the mapping of Department generic object values to the picklist.

Configure Fields View
Switch to the field mapping view
Click on the + Icon and search Picklist as an Entity, Select Picklist Value (PickListValueV2), and click on Add button.
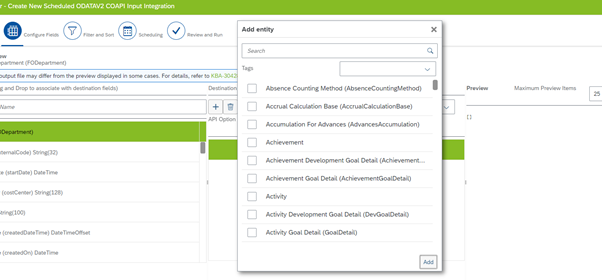

Add Entity Screen

Entity Visible
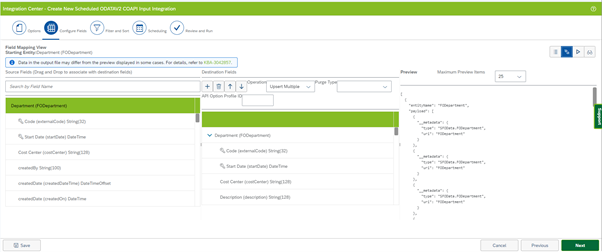
Now, map the Department External Code to External_Code, and map the Department Name to Picklist Label by performing the drag and drop from the Department object to the picklist value.
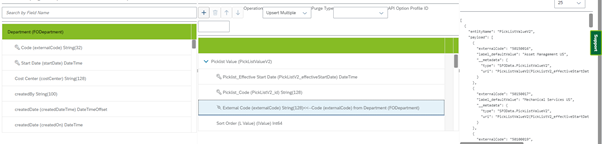

Field Mapping View
Click on Switch to the detail view and click on Picklist_Effective Start Date and enter 1900-01-01T20:00:00Z as the default date and Click on Picklist_Code (PickListV2_id) String(128) and enter Department as the default value.


Field Mapping View
Once the above steps are done click on the Next button to set the filter if required.

Filter and Sort Screen
Click on the Next button to Schedule the integration.

Scheduling Screen
Click on the Next button to complete the integration schedule.


Review and Run Screen
Once, the job is successfully completed without any error. Access the Picklist Center and check the Department Picklist.
It should show you all the values of Generic Object (Department).

Department Picklist
End User Action:
End users can access the SuccessFactors’ Position Tile to filter the data based on the department field.
Below are the steps to access the Position Tile.
Home>Succession>Position Tile

Position Tile
Click on the Filter icon to see the filter options.

Filter Options
Select Department and check the Drop-Down Values.

Drop-Down Values
References:
All images are taken from SAP SuccessFactors Sales Demo with Dummy Data
https://wiki.scn.sap.com/wiki/display/SAPSF/Position+Tile+View+-+Overview+and+Getting+Started
Succession Management Implementation Guide.
Note:
The system will display only 200 values for a picklist field.
In Part-2 of this blog, I'll explain how to map the department field value to a custom field so that the system automatically captures the same value when creating a new position.
Please feel free to provide your feedback or thoughts in the comments.
5 Comments
You must be a registered user to add a comment. If you've already registered, sign in. Otherwise, register and sign in.
Labels in this area
-
1H 2024 Product Release
5 -
2H 2023 Product Release
1 -
ACCRUAL TRANSFER
1 -
Advanced Workflow
1 -
Anonymization
1 -
BTP
1 -
Business Rules
1 -
Canvas Report
1 -
Career Development
1 -
Certificate-Based Authentication
1 -
Cloud Platform Integration
1 -
Compensation
1 -
Compensation Information Management
1 -
Compensation Management
1 -
Compliance
2 -
Content
1 -
Conversational AI
2 -
Custom Data Collection
1 -
custom portlet
1 -
Data & Analytics
1 -
Data Integration
1 -
Dayforce
1 -
deep link
1 -
deeplink
1 -
Delimiting Pay Components
1 -
Deprecation
1 -
Employee Central
1 -
Employee Central Global Benefits
1 -
Employee Central Payroll
1 -
employee profile
1 -
Employee Rehires
1 -
external terminal
1 -
external time events
1 -
Generative AI
2 -
Getting Started
1 -
Global Benefits
1 -
Guidelines
1 -
H2 2023
1 -
HR
2 -
HR Data Management
1 -
HR Transformation
1 -
ilx
1 -
Incentive Management Setup (Configuration)
1 -
Integration Center
2 -
Integration Suite
1 -
internal mobility
1 -
Introduction
1 -
learning
3 -
LMS
2 -
LXP
1 -
Massively MDF attachments download
1 -
Mentoring
1 -
Metadata Framework
1 -
Middleware Solutions
1 -
OCN
1 -
OData APIs
1 -
ONB USA Compliance
1 -
Onboarding
2 -
Opportunity Marketplace
1 -
Pay Component Management
1 -
Platform
1 -
portlet
1 -
POSTMAN
1 -
Predictive AI
2 -
Recruiting
1 -
recurring payments
1 -
Role Based Permissions (RBP)
2 -
SAP Build CodeJam
1 -
SAP Build Marketplace
1 -
SAP CPI (Cloud Platform Integration)
1 -
SAP HCM (Human Capital Management)
2 -
SAP HR Solutions
2 -
SAP Integrations
1 -
SAP release
1 -
SAP successfactors
5 -
SAP SuccessFactors Customer Community
1 -
SAP SuccessFactors OData API
1 -
SAP Workzone
1 -
SAP-PAYROLL
1 -
skills
1 -
Skills Management
1 -
sso deeplink
1 -
Stories in People Analytics
3 -
Story Report
1 -
SuccessFactors
2 -
SuccessFactors Employee central home page customization.
1 -
SuccessFactors Onboarding
1 -
successfactors onboarding i9
1 -
Table Report
1 -
talent
1 -
Talent Intelligence Hub
2 -
talents
1 -
Tax
1 -
Tax Integration
1 -
Time Accounts
1 -
Workflows
1 -
XML Rules
1
Related Content
- 1H 2024 - Release highlights of SuccessFactors Succession Planning in Human Capital Management Blogs by Members
- When I enter the position in the system, it loads twice in Success Factors in Human Capital Management Q&A
- Is Your Organisation Future Ready ? Beginning the Journey with Skill Development ! in Human Capital Management Blogs by Members
- Talent Intelligence Hub Migration and Impacts in Human Capital Management Q&A
- Demystifying SAP SuccessFactors Suite Abbreviations and Terms for New Users in Human Capital Management Blogs by Members
Top kudoed authors
| User | Count |
|---|---|
| 15 | |
| 12 | |
| 4 | |
| 3 | |
| 3 | |
| 1 | |
| 1 | |
| 1 | |
| 1 | |
| 1 |