
- SAP Community
- Products and Technology
- Technology
- Technology Blogs by SAP
- Using OpenAI Models in SAP Build Apps
Technology Blogs by SAP
Learn how to extend and personalize SAP applications. Follow the SAP technology blog for insights into SAP BTP, ABAP, SAP Analytics Cloud, SAP HANA, and more.
Turn on suggestions
Auto-suggest helps you quickly narrow down your search results by suggesting possible matches as you type.
Showing results for
Product and Topic Expert
Options
- Subscribe to RSS Feed
- Mark as New
- Mark as Read
- Bookmark
- Subscribe
- Printer Friendly Page
- Report Inappropriate Content
02-02-2023
9:58 AM
Introduction
AI or Artificial Intelligence is an idea to teach computers to perform human tasks at a much greater speed and efficiency. What makes AI even more useful is an ability to learn, based on the provided context and material. Furthermore, AI is usually taught to respond in a human manner, often creating a feeling of conversation and familiarity.
In particular, ChatGPT has truly taken internet by storm. Released in November 2022, this OpenAI language model was able to get 1 million users in just 5 days. This is a record-breaking performance, as other popular tech products took months, sometimes even years to reach that capability.
In short, ChatGPT is a chatbot that tries to answer any given question. It has proven to shorten research time for unfamiliar topics. For instance, figuring out an answer to a common question has become a matter of asking the AI, not reading several resources.
In this blog, let's create a Q&A application, based on OpenAI's language models, similar to ChatGPT.

ChatGPT and AI trend lines
Prerequisites
First, make sure to subscribe to SAP Build Apps and create a new SAP Build Apps - Web & Mobile project. I encourage you to complete a series of onboarding videos, found at the bottom of the screen. This will allow you to better understand further instructions.
Next, sign-up for a free user account at platform.openai.com and generate a new API key in platform.openai.com/api-keys. Take note of the key, as you will need it later. Remember not to share it with others, as the following key can be used to make requests from your account.
Optionally familiarize yourself with OpenAI's documentation to get a better understanding of the technology. In particular, Text completion is the main topic of this blog.
Building your application
Let's start by building the foundation of the User Interface. With the use of drag and drop, put the following components to the view canvas: Title, Input field, Button, Spinner and Text. Feel free to change the title label and apply styling to the components.

User Interface
Switch over to the Variables view via a slider and open the Page Variables tab.
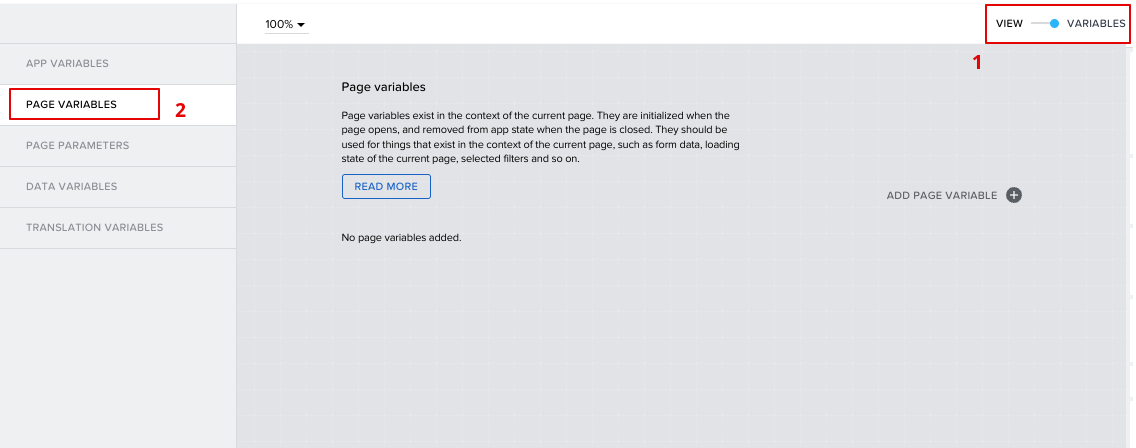
Page Variables configuration view
Here, we want to define all variables that we are going to use in the application. We would need three:
- question
- This variable will handle user input
- Variable value type should be Text
- answer
- Stores the response from the AI model
- Text type as well
- thinkingInProgress
- Tracks the progress of the execution
- Type: True/false
You can create all three by clicking the Plus icon and entering a name in the "Variable name" section on the right. Please pay attention to the variable types, whereas thinkingInProgress will require a type change to True/false.

All the required page variables
Switch back to the view canvas with the same slider and click on the Input field component. From the properties view on the right, you should notice that the Value field has no value. Here, we want to bind it to our question variable. To do so, click on the binding icon (square icon with a cross), then choose "Data and Variables". Select "Page variable" and lastly question. Click Save to apply the binding. You should now see the following:

question page variable bound to input field's value
Select the Text component, and with the same exact procedure, bind the "Content" property to the page variable answer. Afterward, expand the Advanced Properties drop-down to reveal the "Visible" property. Click on the binding icon (square box) and choose "Formula". Click on the white field with a word 'true' to enter the formula editor. Here, erase all content and paste the following:
NOT(pageVars.thinkingInProgress)To finalize the visibility login, choose the Spinner component and expand the advanced properties. Bind the "Visible" property to variable thinkingInProgress. The idea here is to reverse the visibility of Text and Spinner, making the application show just the spinner when the execution is still in progress. A formula
NOT() will modify a True/false variable to the exact opposite value.Find the final result of all bindings below (Spinner on the left, Text on the right):

Final Properties Configuration
Now we approach the last and the most important step: configuring the execution logic. Choose the Button component and expand the Logic Canvas from the bottom of the screen. An image below portrays the final logic. Let's work through each flow function separately.
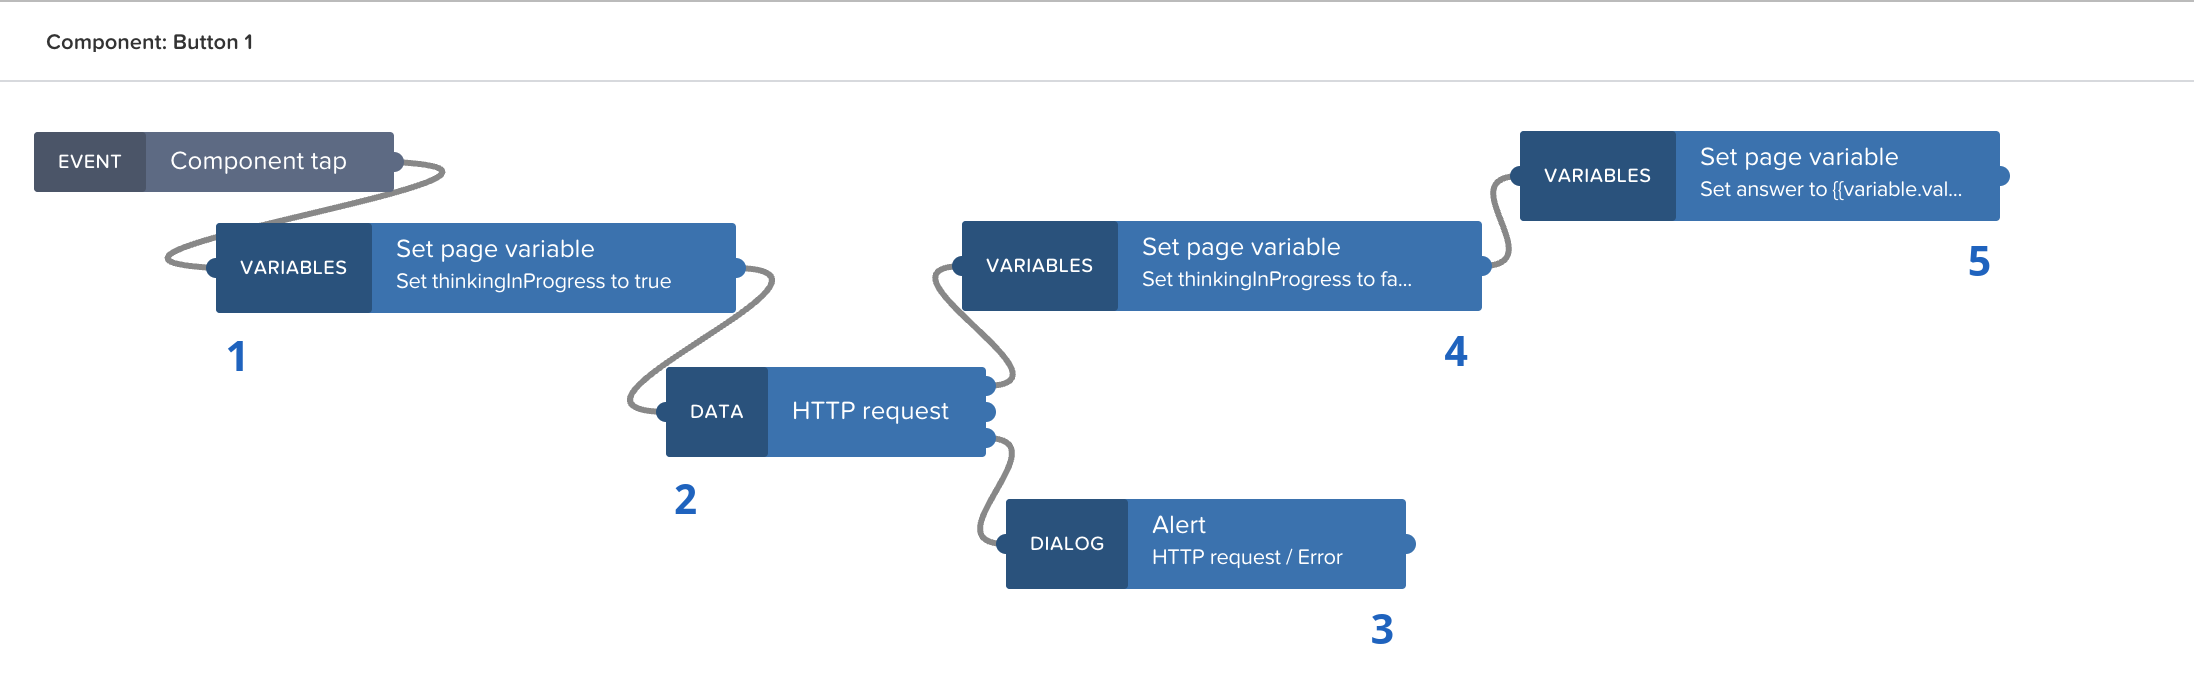
Button Component logic
1 - Set page variable
This flow function will be executed first. Here, we want to set the thinkingInProgress variable to True to indicate that the execution has begun. Choose thinkingInProgress in the "Variable name" property and choose True as the "Assigned value".
2 - HTTP request
Let's design this flow function according to the OpenAI API Reference. We can see the following cURL POST request example available:
curl https://api.openai.com/v1/completions \

  -H 'Content-Type: application/json' \

  -H 'Authorization: Bearer YOUR_API_KEY' \

  -d '{

  "model": "gpt-3.5-turbo",

  "prompt": "Say this is a test",

  "max_tokens": 7,

  "temperature": 0

}'
Firstly, we can deduct that
https://api.openai.com/v1/completions is the destination URL. Secondly, there are 2 required headers: Content-Type and Authorization, and the body of the request is a JSON object with four keys.Begin by installing the HTTP Request flow function from the Marketplace (Relevant Documentation). Connect it to the end of the Set page variable.
For URL, put the destination URL mentioned previously. Choose POST as the HTTP method. Expand the "Optional Inputs" drop-down to reveal more settings. Open the Headers list and fill in the values in the following way, substituting
<API_KEY> with the key obtained on OpenAI's website:- Header 1
- header: Content-Type
- value: application/json
- Header 2
- header: Authorization
- value: Bearer <API_KEY>
Your list should look the following way:

Headers List
Next, open the binding icon for "Request body" and choose 'Formula'. Paste the following:
{ "model": "gpt-3.5-turbo", "prompt": pageVars.question, "max_tokens": 250, "temperature": 0.5 }Here, we define 4 core values: AI model to be used (
model), the question (prompt), measure of randomness (max_tokens) and originality (temperature). The following request is compatible with all GPT-3 and Codex models, so feel free to modify the model value. Use gpt-3.5-turbofor the most advanced model. The max_token value allows you to define the maximum randomness and length of a response, check out the Tokenizer tool to explore the correlation between sentence complexity and amount of tokens needed. Temperature is the measure of 'creativity' which takes values between 0 and 1. Finally, save the formula.3 - Alert (Optional)
Alert is responsible for error handling. Connect it to the third output of HTTP request and bind its "Dialog title" to 'Output value of another node' → 'HTTP request' → 'Error' → Save. This way, you will get an error message if the API request fails.
4 - Set page variable
Connect this flow function to the first output of the HTTP request. Since this output means success, we need to indicate that the execution has concluded. To do so, simply reverse step 1 - bind thinkingInProgress to False.
5 - Set page variable
Lastly, let's input the result of the API request to the answer variable. Bind the "Assigned value" to the following formula:
STRING(outputs["HTTP request"].resBodyParsed.choices[0].text)You may notice that the formula editor will show a warning. This happens because the formula does not have access to HTTP requests' result just yet, so it does not guarantee that the desired object will be available. Since we are sure of the response existing, this warning can be dismissed.
Conclusion
The app is now ready! We can test it by navigating to the Launch tab and opening the preview portal. Kindly find a video demonstration below:
In this blog, we have built a simple app, powered by GPT-3. With the same concept, you can now go far and beyond and create anything you put your mind to. While AI is a fast-growing field, it is still far from being even close to humans, so always be tolerant of mistakes that the language model can make.
👉 Stay tuned for more.
Disclaimer:
SAP notes that posts about potential uses of generative AI and large language models are merely the individual poster's ideas and opinions, and do not represent SAP's official position or future development roadmap. SAP has no legal obligation or other commitment to pursue any course of business, or develop or release any functionality, mentioned in any post or related content on this website.
- SAP Managed Tags:
- Artificial Intelligence,
- SAP Build Apps,
- SAP Build,
- SAP Business Technology Platform
Labels:
18 Comments
You must be a registered user to add a comment. If you've already registered, sign in. Otherwise, register and sign in.
Labels in this area
-
ABAP CDS Views - CDC (Change Data Capture)
2 -
AI
1 -
Analyze Workload Data
1 -
BTP
1 -
Business and IT Integration
2 -
Business application stu
1 -
Business Technology Platform
1 -
Business Trends
1,661 -
Business Trends
88 -
CAP
1 -
cf
1 -
Cloud Foundry
1 -
Confluent
1 -
Customer COE Basics and Fundamentals
1 -
Customer COE Latest and Greatest
3 -
Customer Data Browser app
1 -
Data Analysis Tool
1 -
data migration
1 -
data transfer
1 -
Datasphere
2 -
Event Information
1,400 -
Event Information
65 -
Expert
1 -
Expert Insights
178 -
Expert Insights
280 -
General
1 -
Google cloud
1 -
Google Next'24
1 -
Kafka
1 -
Life at SAP
784 -
Life at SAP
11 -
Migrate your Data App
1 -
MTA
1 -
Network Performance Analysis
1 -
NodeJS
1 -
PDF
1 -
POC
1 -
Product Updates
4,577 -
Product Updates
330 -
Replication Flow
1 -
RisewithSAP
1 -
SAP BTP
1 -
SAP BTP Cloud Foundry
1 -
SAP Cloud ALM
1 -
SAP Cloud Application Programming Model
1 -
SAP Datasphere
2 -
SAP S4HANA Cloud
1 -
SAP S4HANA Migration Cockpit
1 -
Technology Updates
6,886 -
Technology Updates
408 -
Workload Fluctuations
1
Related Content
- ABAP Cloud Developer Trial 2022 Available Now in Technology Blogs by SAP
- SAP Partners unleash Business AI potential at global Hack2Build in Technology Blogs by SAP
- SAP HANA Cloud Vector Engine: Quick FAQ Reference in Technology Blogs by SAP
- 10+ ways to reshape your SAP landscape with SAP Business Technology Platform - Blog 7 in Technology Blogs by SAP
- Top Picks: Innovations Highlights from SAP Business Technology Platform (Q1/2024) in Technology Blogs by SAP
Top kudoed authors
| User | Count |
|---|---|
| 13 | |
| 11 | |
| 10 | |
| 9 | |
| 9 | |
| 7 | |
| 6 | |
| 5 | |
| 5 | |
| 5 |