
- SAP Community
- Products and Technology
- Technology
- Technology Blogs by SAP
- Get to Know RAP: Define CDS-based data model – Par...
Technology Blogs by SAP
Learn how to extend and personalize SAP applications. Follow the SAP technology blog for insights into SAP BTP, ABAP, SAP Analytics Cloud, SAP HANA, and more.
Turn on suggestions
Auto-suggest helps you quickly narrow down your search results by suggesting possible matches as you type.
Showing results for
Developer Advocate
Options
- Subscribe to RSS Feed
- Mark as New
- Mark as Read
- Bookmark
- Subscribe
- Printer Friendly Page
- Report Inappropriate Content
02-02-2023
8:54 PM
Welcome back!
In the previous blog post, I covered my experience with creating a CDS data model and filling in some data. In this post, I'll continue with the tutorials to develop a Fiori app using the ABAP RESTful Application Programming Model. I'll also share key takeaways from my experience defining and exposing a CDS-based travel data model.
We went over the development flow in the introduction of this series. In the last post, we created a database table. This time, I'll take you through my experience of exposing a CDS-based travel data model for the Fiori app. We'll use it to define the data model of the travel and booking business object.
For those unfamiliar, CDS stands for Core Data Services. It's the next-gen data modeling infrastructure on the ABAP platform, offering a declarative approach to defining domain-specific, semantically rich data models. CDS Views can be consumed in many ways, including as a data source for SAP Fiori apps, exposed using SAP Gateway in the OData format. You can also build Fiori apps on top of CDS Views using SAP Fiori Elements templates.
Okay, let's switch things up a bit! So, in this tutorial we're diving into the world of the CDS travel data model. We start by defying the CDS travel data model. You'll need to make a data definition for the travel root business object, which is pretty simple. Just right-click on your package and choose "Other ABAP Repository Object." And don't forget, as we mentioned in the last post, to change the suffix to something that suits you best.
Once the data definition was established, I proceeded to add the necessary components for the association, fields, and UI semantics to the root node.The tutorial provided a code snippet which I replaced in the editor. Essentially, what we're doing is using the travel table as a data source and inserting its fields into the projection list between the curly brackets. As always, I’ll provide an explanation of the steps taken in the code for your understanding and reference. It is important to make sure you get a good idea on CDS view to be able to fully understand the code.
Code Element Information for Data Definitions:
While working on this step, I came across the Element Information popup and ABAP Element Info view. These displays provide information about the ABAP dictionary objects used in CDS. This can be extremely useful when coding, as it provides further details about the elements being used.
You can access the Element Information popup by clicking on the relevant element in the CDS source code and selecting "Show Code Element Information" from the context menu. The ABAP Element Info view can then be opened from the popup by clicking the "Show in ABAP Element Info view" icon. This view allows you to view both your CDS source code and the related element information simultaneously.
The next step was to activate and save the code. After activation, you will be able to preview the data in ADT. During my preview of the data, I discovered various features that can be toggled. For instance, it is possible to navigate to the associated data when previewing the CDS views. I found this feature helpful and believe it could also be of benefit to others.
Once we defined the data model for our travel data, we proceeded to the next step of creating a projection view. This is essentially a subset of the fields from the travel data model that are deemed relevant for our travel booking application. We'll be diving into creating the projection view, following the development flow below.
In this step, we created a projection view by defining a data definition. The steps are similar to those we followed when we created the data model for travel. The process involved right-clicking the package and selecting "Other ABAP Repository Object." The naming convention for the projection view follows the SAP S/4HANA data model, starting with the namespace and a capital letter "C" followed by the suffix "_M" to indicate it is specific for the managed implementation type scenario. For example, we named our projection view "ZC_TRAVEL_M_000" and provided the description "projection view for travel." It is important to note that the projection view is a subset of the fields of the travel data model that are relevant for the travel booking application.
The new data definition appeared in the editor, and we replaced the code with the code snippet from the tutorial. Understanding the code and its purpose is important for being able to effectively use the projection view in your application. That's why I will provide an explanation of the code so you can have a clear understanding of what we have accomplished in this step.
Code Explanation:
The next step in the tutorial was to create the OData service and preview the app. This is a crucial step as it brings our travel data model and projection view to life by enabling it to be accessed and consumed by external applications. By creating the OData service and previewing the app, we will be able to validate the correctness of our implementation and ensure that everything is working as expected.
The service definition outlines the scope of the OData service, while the service binding connects it to the OData protocol as a UI service.
To preview the app, open the Fiori Elements App Preview by right-clicking on it in the project explorer and selecting the option "Open Fiori Elements App Preview" from the context menu. This allows you to see how your app looks and functions before actually deploying it.
You will then see the travel list report app. Just a heads up, once you open the travel list report app, don't forget to press "GO" to load the back-end data. I got stuck there for a bit, so no worries, I got you covered!
In this blog post, I walk you through the steps in the tutorial to define and expose a CDS-based travel data model. We went over the codes that were provided in the tutorial and learned about service definition and service binding. We then previewed the SAP Fiori elements app in ADT. In the next blog post we will create behavior definition and implementation for managed scenario.
Previous Blog Post:
Get to Know RAP: Introduction
Get to Know RAP: Define Data Model – Part 1
In the previous blog post, I covered my experience with creating a CDS data model and filling in some data. In this post, I'll continue with the tutorials to develop a Fiori app using the ABAP RESTful Application Programming Model. I'll also share key takeaways from my experience defining and exposing a CDS-based travel data model.
CDS- Based Data Model
We went over the development flow in the introduction of this series. In the last post, we created a database table. This time, I'll take you through my experience of exposing a CDS-based travel data model for the Fiori app. We'll use it to define the data model of the travel and booking business object.

RAP Development Flow
For those unfamiliar, CDS stands for Core Data Services. It's the next-gen data modeling infrastructure on the ABAP platform, offering a declarative approach to defining domain-specific, semantically rich data models. CDS Views can be consumed in many ways, including as a data source for SAP Fiori apps, exposed using SAP Gateway in the OData format. You can also build Fiori apps on top of CDS Views using SAP Fiori Elements templates.
For more information on CDS view: https://help.sap.com/docs/btp/sap-abap-cds-development-user-guide/about-abap-cds-development-user-gu...
Defining CDS-based travel data model
Okay, let's switch things up a bit! So, in this tutorial we're diving into the world of the CDS travel data model. We start by defying the CDS travel data model. You'll need to make a data definition for the travel root business object, which is pretty simple. Just right-click on your package and choose "Other ABAP Repository Object." And don't forget, as we mentioned in the last post, to change the suffix to something that suits you best.
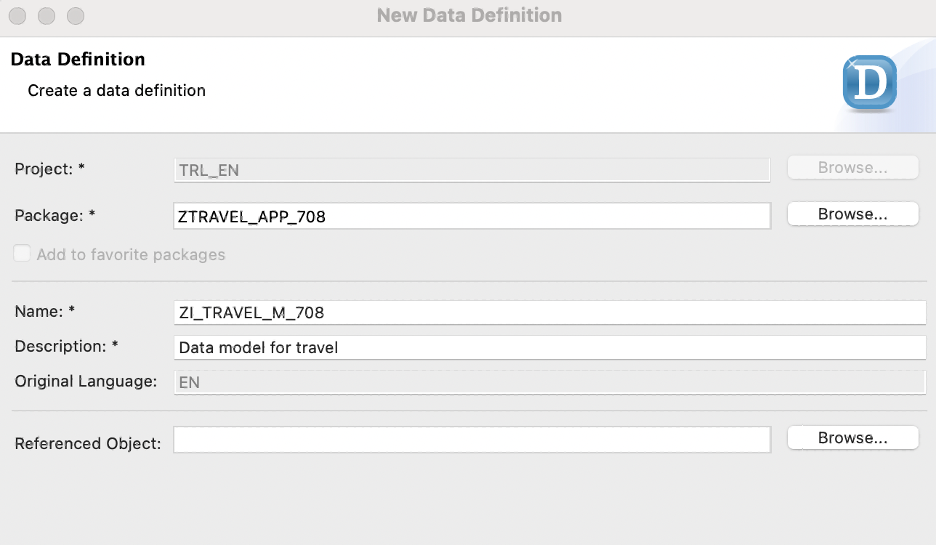
Data Model for Travel
Note: Since CDS views are (public) interface views, they are prefixed with I_ in accordance with the VDM (virtual data model) naming convention. In addition, we add the suffix _M to the view name in case it is specific for our managed implementation type scenario. For detailed information, see: Naming Conventions for Development Objects
Once the data definition was established, I proceeded to add the necessary components for the association, fields, and UI semantics to the root node.The tutorial provided a code snippet which I replaced in the editor. Essentially, what we're doing is using the travel table as a data source and inserting its fields into the projection list between the curly brackets. As always, I’ll provide an explanation of the steps taken in the code for your understanding and reference. It is important to make sure you get a good idea on CDS view to be able to fully understand the code.

CDS-based Travel Data Model
Code Explanation:
- This code defines a root view entity for the travel root business object, named "ZI_TRAVEL_M_000" (with "000" replaced with your desired suffix). It's created by selecting data from the "ztravel_000" entity.
- Associations are defined in the CDS code to access master data from other entities. These associations refer to CDS entities in the demo app scenario. The entity "ZI_TRAVEL_M_000" has a relationship with these entities and the associations are defined with cardinality [0..*]. This means that any number of booking instances can be assigned to each travel instance. The [0..1] indicates that there can be zero or one entity associated with each association.
- The select list includes standard administration data fields, with semantic annotations for the currency and administrative fields for uniform data processing. The currencyCode field is specified as a reference field for the currency fields Booking_Fee and Total_Price. The "@Semantics.user.createdBy: true" annotation indicates that the created_by field stores the user who created the data, while the "@Semantics.systemDateTime.creationAt: true" indicates that the created_at field stores the creation time and date. The administrative field annotations are necessary to allow automatic updates of the admin fields on every operation.
Code Element Information for Data Definitions:
While working on this step, I came across the Element Information popup and ABAP Element Info view. These displays provide information about the ABAP dictionary objects used in CDS. This can be extremely useful when coding, as it provides further details about the elements being used.
You can access the Element Information popup by clicking on the relevant element in the CDS source code and selecting "Show Code Element Information" from the context menu. The ABAP Element Info view can then be opened from the popup by clicking the "Show in ABAP Element Info view" icon. This view allows you to view both your CDS source code and the related element information simultaneously.

Element Information popup and ABAP Element Info view
The next step was to activate and save the code. After activation, you will be able to preview the data in ADT. During my preview of the data, I discovered various features that can be toggled. For instance, it is possible to navigate to the associated data when previewing the CDS views. I found this feature helpful and believe it could also be of benefit to others.

Projection Views for travel
Once we defined the data model for our travel data, we proceeded to the next step of creating a projection view. This is essentially a subset of the fields from the travel data model that are deemed relevant for our travel booking application. We'll be diving into creating the projection view, following the development flow below.

RAP Development Flow
In this step, we created a projection view by defining a data definition. The steps are similar to those we followed when we created the data model for travel. The process involved right-clicking the package and selecting "Other ABAP Repository Object." The naming convention for the projection view follows the SAP S/4HANA data model, starting with the namespace and a capital letter "C" followed by the suffix "_M" to indicate it is specific for the managed implementation type scenario. For example, we named our projection view "ZC_TRAVEL_M_000" and provided the description "projection view for travel." It is important to note that the projection view is a subset of the fields of the travel data model that are relevant for the travel booking application.
The new data definition appeared in the editor, and we replaced the code with the code snippet from the tutorial. Understanding the code and its purpose is important for being able to effectively use the projection view in your application. That's why I will provide an explanation of the code so you can have a clear understanding of what we have accomplished in this step.
@EndUserText.label: 'Travel projection view - Processor'

@AccessControl.authorizationCheck: #NOT_REQUIRED


@UI: {

 headerInfo: { typeName: 'Travel', typeNamePlural: 'Travels', title: { type: #STANDARD, value: 'TravelID' } } }


@Search.searchable: true


define root view entity ZC_TRAVEL_M_000

  as projection on ZI_TRAVEL_M_000

{

      @UI.facet: [ { id:              'Travel',

                     purpose:         #STANDARD,

                     type:            #IDENTIFICATION_REFERENCE,

                     label:           'Travel',

                     position:        10 } ]


      @UI.hidden: true

  key mykey              as TravelUUID,


      @UI: {

          lineItem:       [ { position: 10, importance: #HIGH } ],

          identification: [ { position: 10, label: 'Travel ID [1,...,99999999]' } ] }

      @Search.defaultSearchElement: true

      travel_id          as TravelID,


      @UI: {

          lineItem:       [ { position: 20, importance: #HIGH } ],

          identification: [ { position: 20 } ],

          selectionField: [ { position: 20 } ] }

      @Consumption.valueHelpDefinition: [{ entity : {name: '/DMO/I_Agency', element: 'AgencyID'  } }]


      @ObjectModel.text.element: ['AgencyName']

      @Search.defaultSearchElement: true

      agency_id          as AgencyID,

      _Agency.Name       as AgencyName,


      @UI: {

          lineItem:       [ { position: 30, importance: #HIGH } ],

          identification: [ { position: 30 } ],

          selectionField: [ { position: 30 } ] }

      @Consumption.valueHelpDefinition: [{ entity : {name: '/DMO/I_Customer', element: 'CustomerID'  } }]


      @ObjectModel.text.element: ['CustomerName']

      @Search.defaultSearchElement: true

      customer_id        as CustomerID,


      @UI.hidden: true

      _Customer.LastName as CustomerName,


      @UI: {

          lineItem:       [ { position: 40, importance: #MEDIUM } ],

          identification: [ { position: 40 } ] }

      begin_date         as BeginDate,


      @UI: {

          lineItem:       [ { position: 41, importance: #MEDIUM } ],

          identification: [ { position: 41 } ] }

      end_date           as EndDate,


      @UI: {

          lineItem:       [ { position: 50, importance: #MEDIUM } ],

          identification: [ { position: 50, label: 'Total Price' } ] }

      @Semantics.amount.currencyCode: 'CurrencyCode'

      total_price        as TotalPrice,


      @Consumption.valueHelpDefinition: [{entity: {name: 'I_Currency', element: 'Currency' }}]

      currency_code      as CurrencyCode,


      @UI: {

      lineItem:       [ { position: 60, importance: #HIGH },

                        { type: #FOR_ACTION, dataAction: 'acceptTravel', label: 'Accept Travel' } ],

      identification: [ { position: 60, label: 'Status [O(Open)|A(Accepted)|X(Canceled)]' } ]  }

      overall_status     as TravelStatus,


      @UI.identification: [ { position: 70, label: 'Remarks' } ]

      description        as Description,


      @UI.hidden: true

      last_changed_at    as LastChangedAt


}
Code Explanation:
- @UI: Specifies the user interface (UI) attributes of the view entity, including the header information, line item display, identification, selection field, and facet display
- @Search.searchable: true enables the full-text search, making the entity searchable
- @Search.DefaultSearchElement enables the freestyle search for the view columns
- agency_id as AgencyID: is used to store the agency ID and is defined as AgencyID. The @Consumption.valueHelpDefination annotation specifies that a value help should be provided for this attribute and the entity to be used for value help is /DMO/I_Agency and its local element is ‘AgencyID’. The @ObjectModel.text.element annotation specifies that the text to displayed for this attribute is ‘AgencyName’
- begin_date as BeginDate and end_date as EndDate: The begin_date and end_date attribute is used to store the start and end date of the travel.
- Total_price as TotalPrice: This attribute is used to store the total price of the travel. The @Semenatics.amount.currencyCode annotation specifies that the currency code should be used for this attribute.
- overall_status as TravelStatus: This attribute is used to store the status of the travel (Open, Accepted, Canceled). The UI annotations specify its position, importance, and label in the UI.
Service Definition and Service Binding

The next step in the tutorial was to create the OData service and preview the app. This is a crucial step as it brings our travel data model and projection view to life by enabling it to be accessed and consumed by external applications. By creating the OData service and previewing the app, we will be able to validate the correctness of our implementation and ensure that everything is working as expected.
The service definition outlines the scope of the OData service, while the service binding connects it to the OData protocol as a UI service.

The tutorial guides you through creating the service definition and service binding. Remember to activate the service binding after creation and publish it. The activation and publishing process may take a few minutes, so feel free to grab a coffee or check your emails while you wait. Once the process is complete, you will be able to view your service along with its entities and associations.
To preview the app, open the Fiori Elements App Preview by right-clicking on it in the project explorer and selecting the option "Open Fiori Elements App Preview" from the context menu. This allows you to see how your app looks and functions before actually deploying it.
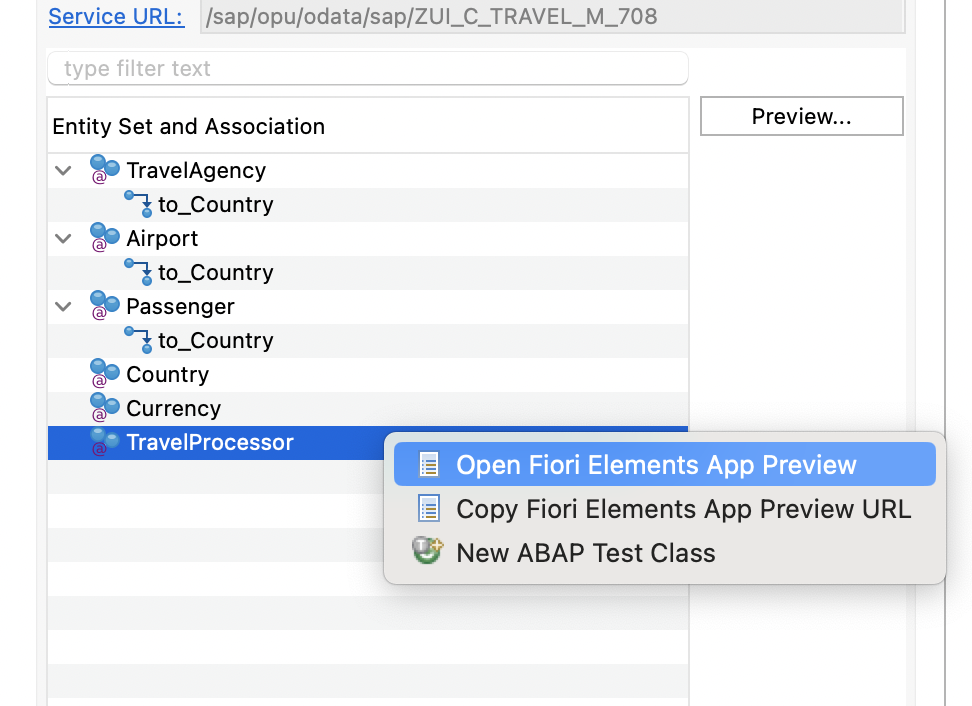
You will then see the travel list report app. Just a heads up, once you open the travel list report app, don't forget to press "GO" to load the back-end data. I got stuck there for a bit, so no worries, I got you covered!

What’s Next:
In this blog post, I walk you through the steps in the tutorial to define and expose a CDS-based travel data model. We went over the codes that were provided in the tutorial and learned about service definition and service binding. We then previewed the SAP Fiori elements app in ADT. In the next blog post we will create behavior definition and implementation for managed scenario.
Previous Blog Post:
Get to Know RAP: Introduction
Get to Know RAP: Define Data Model – Part 1
- SAP Managed Tags:
- SAP Fiori,
- ABAP Development,
- ABAP RESTful Application Programming Model
Labels:
3 Comments
You must be a registered user to add a comment. If you've already registered, sign in. Otherwise, register and sign in.
Labels in this area
-
ABAP CDS Views - CDC (Change Data Capture)
2 -
AI
1 -
Analyze Workload Data
1 -
BTP
1 -
Business and IT Integration
2 -
Business application stu
1 -
Business Technology Platform
1 -
Business Trends
1,661 -
Business Trends
88 -
CAP
1 -
cf
1 -
Cloud Foundry
1 -
Confluent
1 -
Customer COE Basics and Fundamentals
1 -
Customer COE Latest and Greatest
3 -
Customer Data Browser app
1 -
Data Analysis Tool
1 -
data migration
1 -
data transfer
1 -
Datasphere
2 -
Event Information
1,400 -
Event Information
64 -
Expert
1 -
Expert Insights
178 -
Expert Insights
281 -
General
1 -
Google cloud
1 -
Google Next'24
1 -
Kafka
1 -
Life at SAP
784 -
Life at SAP
11 -
Migrate your Data App
1 -
MTA
1 -
Network Performance Analysis
1 -
NodeJS
1 -
PDF
1 -
POC
1 -
Product Updates
4,577 -
Product Updates
330 -
Replication Flow
1 -
RisewithSAP
1 -
SAP BTP
1 -
SAP BTP Cloud Foundry
1 -
SAP Cloud ALM
1 -
SAP Cloud Application Programming Model
1 -
SAP Datasphere
2 -
SAP S4HANA Cloud
1 -
SAP S4HANA Migration Cockpit
1 -
Technology Updates
6,886 -
Technology Updates
408 -
Workload Fluctuations
1
Related Content
- Analyze Expensive ABAP Workload in the Cloud with Work Process Sampling in Technology Blogs by SAP
- Magic Numbers : A Solution to Foreign Characters in SAP CPI in Technology Blogs by Members
- New Machine Learning features in SAP HANA Cloud in Technology Blogs by SAP
- SAP Analytics Cloud - Performance statistics in Technology Blogs by SAP
- CF Deployment Error: Error getting tenant t0 in Technology Q&A
Top kudoed authors
| User | Count |
|---|---|
| 13 | |
| 10 | |
| 10 | |
| 7 | |
| 6 | |
| 5 | |
| 5 | |
| 5 | |
| 5 | |
| 4 |