Web Service for Concur Expense contains a vast array of APIs that can do almost anything within SAP Concur. Most of the APIs are customer-initiated calls into Concur Expense. As such, security and authentication are critical.
I have been a Technical Consultant at SAP Concur for many years and work on the data interfaces between SAP Concur and it's customers. I have found the hardest issue facing clients is how to get started with Web Services. Everything begins with Authentication. Once you have been authenticated, you can use the other APIs accordingly.
In this post, I will explain the basics of authentication and the most common implementation of it for customers (versus partners). The complete authentication documentation
can be found here.

Introduction
The following steps need to be performed
- Create a web application - A web application is used to connect to Concur Expense. The application has permissions (called grants and scopes) of what it is allowed to do within Concur Expense. When you create a web application, it is best practice to give it the minimum permissions necessary to perform its function. That way if it ever got compromised, you know what it could have been used for.
- Obtain a request token - a request token could be thought of as a "temporary password". It is good for 24 hours and should be safeguarded accordingly.
- Convert the request token to a refresh token - a refresh token could be thought of as a password. This value should be protected. Ideally, only the program needs to know this value.
- Get an access token - an access token is used by the APIs to interface with Concur Expense. It is good for 60 minutes. This token is what Concur Expense will use to know the authentication is successful and what APIs can use the access token.
Applications and Tokens have an expiration date. If not used, they will be deactivated and will need to be setup again. It is critical for customers who have Production Sandbox Entities ensure their applications continue to run.
The following is a flow diagram of an ongoing web application once the setup is complete (Steps 1-3)

Ongoing Authentication Flow
Using the detailed instructions below, you should be able to create a web application within your Concur Expense environment and authenticate. From there, you can explore other APIs to interact with SAP Concur.
Detailed Walkthrough
The following instructions can be used for performing these 4 steps. I have created a Authentication repository written for Postman
(found here) to support these steps. Within the repository are two JSONs. One is for the authentication collection and the other is a Postman Environment. I am using a Postman Environment so a customer can create multiple web applications and freely flip between them within Postman by changing the environment.
Step 1 - create the Web Application within SAP Concur (one time setup)
- Log into SAP Concur with a User with Web Service Administration permission.
- Navigate to Administration->Company->Authentication Admin
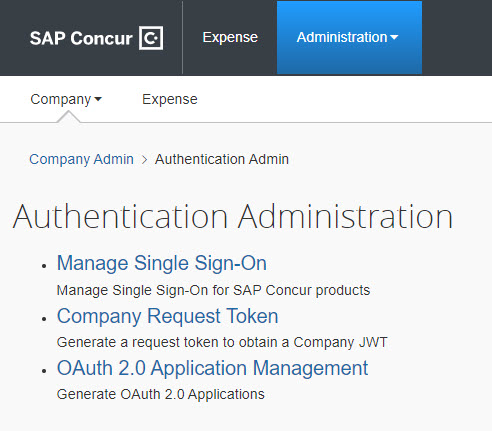
- Choose OAuth 2.0 Application Management. Please note that if you do not have this option, contact you SAP Account Manager to discuss using Web Services.
- Click the blue button "+ Create New App"
- Ensure the App Description is meaningful. SAP Concur knows if an app is being used, but will not know who is using it. this description should contain a purpose, a name, an organization that can be used years down the road to understand why it exists.
- Allow Grants are used for authentication. For this collection, you need to have refresh_token and password.
- Allow Scopes define what authority the application needs. Each API requires a minimal set of scopes to work. It is best practice to provide the minimum necessary "just in case" of a security breach. You can always add/remove values later. For this collection to work, you don't need any scopes (but you must have at least one for the app to save). For a detailed list of scopes and corresponding APIs, go here
- Upon clicking Create, you will be presented with the Client ID and Client Secret. SAVE THESE. For the postman collection, these go into the "Current Value" of environment variables clientId and clientSecret

Step 2 - Obtain a temporary Request Token (one time setup)
A request token is only good for 24 hours and is the first step towards a more permanent Token
- Log into SAP Concur with a User with Web Service Administration permission.
- Navigate to Administration->Company->Authentication Admin
- Choose Company Request Token
- For App ID, put in the ClientID from step 1.5 and click the orange Submit button
- On the next screen, you will be presented with the Company UUID and the Company request token. SAVE THESE. For the postman collection, these go in to the "Current Value" of the environment variables companyUUID and requestToken.
Step 3 - Convert the Request Token to a Refresh Token (one time setup)
A refresh token is good more 6 months every time it is used. You only need to convert from a request token to a refresh token
once.
- Review your environment variables. There is one for datacenterURI. It is currently set for the US2 datacenter. You can use the value at the top of the web browser when you are logged in to determine which data center your entity is on. Besides us2.api.concursolutions.com, ihe other common value is eu2.api.concursolutions.com. Note that various pages on the developer portal may reference this value using several names. Despite these differences in naming conventions, they are all referencing the same thing.
- geolocation
- baseURI
- datacenterURI
- InstanceURL
- datacenter
- Assuming you put the values in the correct environment variables, and you saved the environment, you can just run the "(Onetime) Convert Request Token to Refresh Token"
- This HTTP Request will update the refreshToken of the environment variables for you based on the "refresh_token" return value.
Step 4 - Get an Access Token (before every call)
An Access Token has a life expectancy of about 60 minutes before it expires. It is best practice to obtain an access token before each set of calls, or, trap the error from the API call and get a new access token before continuing.
- Run the "Obtain Access Token" request
- This HTTP Request will update the accessToken of the environment variables for you based on the "access_token" return value.
Conclusion
Using the information in this post, you should be able to build an application and authenticate with Concur Expense. That is the beginning of your Web Services journey. From there you can explore the multitude of APIs available and solve you business problem.
Share and Connect
What do you think? Do you have anything to add? Leave a comment below.
Did you find it useful? Give us a like and share on social media.
Want to know more about SAP Concur? Please follow
here.
Want to ask questions about SAP Concur and its offerings? Ask
here
Follow my profile for similar content.
Thank you!
