
- SAP Community
- Products and Technology
- Financial Management
- Financial Management Blogs by SAP
- SAP Profitability and Performance Management - Sno...
Financial Management Blogs by SAP
Get financial management insights from blog posts by SAP experts. Find and share tips on how to increase efficiency, reduce risk, and optimize working capital.
Turn on suggestions
Auto-suggest helps you quickly narrow down your search results by suggesting possible matches as you type.
Showing results for
Associate
Options
- Subscribe to RSS Feed
- Mark as New
- Mark as Read
- Bookmark
- Subscribe
- Printer Friendly Page
- Report Inappropriate Content
01-06-2023
5:04 PM
Introduction
Hello everyone,
Hope you are doing great! My name is Novak and I am very pleased to have the opportunity to share with you the progress made in the field of integration of SAP Profitability and Performance Management with other technologies. This blog is a continuation of the story that my colleague milivj described in the previous part of this series of two blogs. In the past period, I worked on projects integrating SAP Profitability and Performance Management with other systems, technologies and software with the aim of making SAP Profitability and Performance Management an even more valuable and powerful tool. I hope this blog will help you to, using Python programming language, connect SAP Profitability and Performance Management not only with Snowflake, but with any system that supports REST API. The idea of prototype that Jana and I developed is to use SAP Profitability and Performance Management to retrieve data stored on the Snowflake Cloud, perform complex calculations on that data using SAP Profitability and Performance Management and send the result of those calculations back, in order to save them on Snowflake Cloud.
Approach
It is known that SAP Profitability and Performance Management includes the Python Remote Function Adapter in the wide range of functions it offers. This feature allows users to create advanced scripts for API integration, machine learning, and more. Just Python RFA is used to connect to the Snowflake REST API and retrieve data from this advanced data warehouse. The technical details related to access to Snowflake endpoint using Python script will be explained below.
Python RFA can be viewed as a black box that receives certain input from some other function in SAP Profitability and Performance Management , performs data processing using a Python script and presents the result of that script as its output.
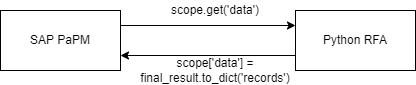
Python RFA as a Black Box
There is a unique interface through which Python RFA communicates with other functions. That is JSON variable scope, more precisely its parameter data. In Python script, Python RFA input data is accessed through this variable, and the output of the function is also defined by assigning data to this variable. Given that one of the most famous data structures used in the Python programming language is Pandas Dataframe, the input parameters will be converted into a Dataframe structure, and also the final result whose structure is Dataframe will be converted into JSON format and it will be assigned to the parameter ‘data’ of the variable scope.

Converting input data to Pandas Dataframe

Defining function output by converting Dataframe to JSON and assigning to variable scope
Assuming that we have an account (with account id = ‘abc123’) on the Snowflake platform and on it the data that we want to load into Profitability and Performance Management. Snowflake provides its users ability to access their data using REST API. You can read more about this here https://docs.snowflake.com/en/developer-guide/sql-api/index.html .
However, in order for the user to access their data, they must be authorized. It is known that communication with REST API server is done using HTTP requests, which means that these requests must possess a token (usually bearer token) to be considered as authorized. Following sequence diagram shows the procedure how that token can be obtained, i.e. how user can be authorized.

Sequence diagram for SAP Profitability and Performance Management - Snowflake communication
Authentication
Before start HTTP communication, we must establish OAuthorization on Snowlake. This can be easily performed my running following lines of code. System will then provide us client id and client secret that we need for authenticated communication.

Snowflake OAuthorization initialization
After everyting is set up on server (Snowflake) side, we can move on to client (Python RFA) side. First thing first, we need to import some packages into our script that we will use later on:
import requests

import json

import pandas as pd

import numpy as np
After import is done, first step on client side is that we must make in order to get authentication token (Bearer token) is to get master token. We can request this token from Snowflake endpoint by providing our account id, username, password and client id. Using master token we can request from server to provide us authorization code, which is necessary if we want to get bearer token. In order to get authorization code, we must send client id, master token and redirect uri to Snowflake endpoint. Finally, using authorization code, client id and client secret we can ask server for bearer token. After the server has provided the bearer token we can assign it to our HTTP requests and make them authorized. Snowflake will response only to authorized request, i.e. those containg valid bearer token. Now that we have explained the entire procedure, we can move on to the code!
As explained in previous part of this blog, we need mapping informations and parameters from our input table. After we have accessed the input data and saved it into our variable src, next step is to separate data into parameters and informations about mapping (which columns from table on Snowflake will be mapped into which environment fields).
fields = src[src['PARCOLTYPE'] == 'COLUMN']

params = src[src['PARCOLTYPE'] == 'PARAMETER']

columns = fields.sort_values('ORD')['PARAMCOL']
With first line of code we are extracting just parameters:

Extracting parameters

Extracting mapping information
Purpose of third line of code is to sort environment fields by defined order, so order of environment fields matches order of columns in table on Snowflake. This is very important, because otherwise the data from one Snowflake column will be placed in the wrong environment field (for example, it may happen that textual data is placed in environment fields that is made to store just numeric data) and an error may be raised.
The following text will show the implementation of the function used to get the master token:
def get_master_token(username, password, account, client_id, client_secret, redirect_uri):

response = requests.post('https://abc123.europe-west4.gcp.snowflakecomputing.com/session/authenticate-request?__uiAppName=Login', verify = False,

                            headers={'client_id': client_id ,

                                    'client_secret' : client_secret,

                                    'response_type' : 'code',

                                    },

                             json = {"data":{"ACCOUNT_NAME":account,

                                             "LOGIN_NAME":username,

                                             "PASSWORD":password,

                                             "redirectUri":redirect_uri,

                                             "responseType":"code",

                                             "CLIENT_APP_ID":"Snowflake UI",

                                             "CLIENT_APP_VERSION":'20221018225847',

                                             "CLIENT_ENVIRONMENT":{"BROWSER_VERSION":"Chrome 106.0.0.0",

                                                                   "OS_VERSION":"Windows 10"}}})

    return json.loads(response.content)['data']['masterToken']
This function sends HTTP POST request to dummy-link https://abc123.europe-west4.gcp.snowflakecomputing.com/session/authenticate-request?uiAppName=Login . Fragment ‘abs123’ needs to be replaced with Snowflake account ID. Request contains client ID and client secret in request header and account ID, username, password and redirect URI in payload. With the last line of code, we convert the server's response into JSON format and then extract property ‘master token’.
After the master token is secured an authorization code can be requested:
def get_code(master_token, client_id, redirect_uri):

response = requests.post('https://abc123.europe-west4.gcp.snowflakecomputing.com/oauth/authorization-request', verify = False,

                            headers={

                                    'content-type': 'application/json',

                                    'response_type' : 'code',

                                    },

                             json={"masterToken":master_token,

                                   "clientId":client_id,

                                   "redirectUri":redirect_uri,

                                   "responseType":"code"}

                            )

    return json.loads(response.content)['data']['redirectUrl'].split('code=', )[1]
The authorization code is reached in a similar way. Finally, we can request a token with authorization code, client ID and client secret:
def get_bearer_token(code, client_id, client_secret, redirect_uri):

response = requests.post('https://abc123.europe-west4.gcp.snowflakecomputing.com/oauth/token-request', verify = False,

                        headers={

                                'Accept': 'application/json',

                                'response_type' : 'token',

                                'Content-Type' : 'application/x-www-form-urlencoded'

                                },

                            data={'code': code,

                                'grant_type': 'authorization_code',

                                'redirect_uri':redirect_uri,

                                'name':'token',

                                'client_id' : client_id,

                                'client_secret':client_secret,

                            })


    return json.loads(response.content)['access_token']
Now that we have authenticated, we can move on to executing queries on our Snowflake account.
Data Exchange
The Snowflake REST API works by accepting a statement sent by a client, executing that statement, and at the end sending the result of that query or an information message back to the client. This blog will only be limited to pushing and storing data on Snowflake, as well as pulling data from Snowflake, although user can send many other types of statements and commands on order to maintain account or manipulate with data. The following text will show the implementation of a function for execution of SELECT and INSERT statements. If we want to execute statement on Snowflake, we need to provide the following information to the server:
- Statement that we want to execute
- Database in which we want to execute statement
- Warehouse where database is located
- Role
- Timeout
- Schema
As explained at the beginning, we get this data from input model table, more precisely from our variable params into which we have already extracted the parameters:
parameters = {

    'statement': params[params['PARAMCOL'] == 'STATEMENT']['VALTYPE'].item(),

    'database': params[params['PARAMCOL'] == 'DATABASE']['VALTYPE'].item(),

    'warehouse': params[params['PARAMCOL'] == 'WAREHOUSE']['VALTYPE'].item(),

    'role': params[params['PARAMCOL'] == 'ROLE']['VALTYPE'].item(),

    'timeout': params[params['PARAMCOL'] == 'TIMEOUT']['VALTYPE'].item(),

    'schema': params[params['PARAMCOL'] == 'SCHEMA']['VALTYPE'].item()

}
Now we have all necessary inputs (bearer token as well as parameters) and we are ready to execute statement on Snowflake!
def data_exchange(token, params):

response = requests.post('https://abc123.europe-west4.gcp.snowflakecomputing.com/api/v2/statements', verify = False,

                            headers={'Authorization': 'Bearer ' + token,

                                    'Content-Type' : 'application/json',

                                    'Connection' : 'keep-alive'},

                             json = params

                            )

    data = json.loads(response.content)

    if (params['statement'].upper()).startswith('SELECT'):

        all_data = json.loads(response.content)['data']

        partitions = data['resultSetMetaData']['partitionInfo']

        handle = data['statementHandle']

        for i in range(1, len(partitions)):

            part_response = requests.get(f'https://abc123.europe-west4.gcp.snowflakecomputing.com/api/v2/statements/{handle}?partition={i}', verify = False,

                                 headers={'Authorization': 'Bearer ' + token,

                                        'Content-Type' : 'application/json',

                                        'Connection' : 'keep-alive'})

            all_data = all_data + (json.loads(part_response.content))['data']

        data['data'] = all_data

    else:

        data = data['message']

    return data
On the beginning of the function, we attach the token, define the header and payload of the request and send the request to the server. This is followed by conditional branching. We check if the statement starts with ‘SELECT’. If this is true, it means that we want to pull data from Snowflake, and if this condition is not met, it means that we are sending data.
In the first case we are expecting data from tables on Snowflake. It may happen that we are requiring big amount and that means that server will send us data in partitions. We check in the meta data if the server sends the response in partitions. If this is the case, we must send a request to the server for each partition of data. We enter a loop, send a request for each partition by changing the endpoint URL and merge all data together into data[‘data’] variable.
If case when condition is not met, we are just expecting return message from Snowflake, because we want to push the data to database and check if it was saved successfully.
At the end we can combine all previously explained functions into a new function that will match our sequence diagram
def connect_to_snowflake(username, password, account, client_id, client_secret, redirect_uri, params):

    masterToken = get_master_token(username, password, account, client_id, client_secret, redirect_uri)

    code = get_code(masterToken, client_id, redirect_uri)

    token = get_bearer_token(code, client_id, client_secret, redirect_uri)

    return get_data(token, params)
and easily get data by calling this function:
data=connect_to_snowflake(username, password "abc123", client_id, client_secret, redirect_uri, parameters)

final_data = pd.DataFrame(data['data'], columns=columns)
As explained at the beginning of our blog, if we want our data from Python script to be visible to other functions in Profitability and Performance Management, we need to assign it to scope[‘data’] variable.
scope['data'] = final_data.to_dict('records')Hope that this is something new and interesting for you. I was really enjoying working on this connection and hope that this blog will be useful for you, not just for making connection between SAP Profitability and Performance Management and Snowflake, but for connecting to any REST API using Python programming language. If you have any question or doubt, please feel free to write a comment and I will be more than glad to help you! For the end I would like to suggest you to follow SAP Profitability and Performance Management topic page as well as blog feed so you can be up-to-date with all topics and innovations and ask and answer questions you are interested in here.
- SAP Managed Tags:
- Python,
- SAP Profitability and Performance Management
Labels:
You must be a registered user to add a comment. If you've already registered, sign in. Otherwise, register and sign in.
Labels in this area
Related Content
- GRC Tuesdays: Takeaways from the 2024 Internal Controls, Compliance and Risk Management Conference in Financial Management Blogs by SAP
- SAP PaPM Cloud Universal Model: Deploy your environment via Manage Containers in Financial Management Blogs by SAP
- Scale Up Subscription Initiatives with SAP Billing and Revenue Innovation Management in Financial Management Blogs by SAP
- SAP ECC Conversion to S/4HANA - Focus in CO-PA Costing-Based to Margin Analysis in Financial Management Blogs by SAP
- SAP PaPM Cloud: What’s New as of 2024-04-02? in Financial Management Blogs by SAP
Top kudoed authors
| User | Count |
|---|---|
| 6 | |
| 3 | |
| 2 | |
| 2 | |
| 2 | |
| 1 | |
| 1 | |
| 1 | |
| 1 | |
| 1 |