
- SAP Community
- Products and Technology
- Technology
- Technology Blogs by SAP
- SAP BTP Security: How to realize client-credential...
Technology Blogs by SAP
Learn how to extend and personalize SAP applications. Follow the SAP technology blog for insights into SAP BTP, ABAP, SAP Analytics Cloud, SAP HANA, and more.
Turn on suggestions
Auto-suggest helps you quickly narrow down your search results by suggesting possible matches as you type.
Showing results for
Product and Topic Expert
Options
- Subscribe to RSS Feed
- Mark as New
- Mark as Read
- Bookmark
- Subscribe
- Printer Friendly Page
- Report Inappropriate Content
11-25-2022
1:58 PM
This blog post shows how to get a client certificate in an easy way.
We do the required steps with respect to the certificate in understandable manual way.
The goal is to replace the X509_GENERATED statement, which we used in previous tutorial.
The setup is a simple client-credentials scenario.
Used technologies:
SAP Business Technology Platform (SAP BTP), Cloud Foundry Environment,
SAP Cloud Identity Services – Identity Authentication (IAS),
Node.js.
0. Introduction
1. Preparation
2. Client Certificate
2.1. Generate Certificate
2.2. Adapt Certificate
3. Sample Scenario
3.1. Identity Service
3.2. Backend Application
3.3. Frontend Application
3.4. Deploy
4. Run
Appendix: Sample Code
In this hands-on tutorial, we're using the same setup and scenario like in previous tutorial, so please see here for the description.
Just a few words to introduce the focus of the tutorial.
In the previous tutorial we learned how to use a client certificate to request a JWT token (instead of user/password, i.e. clientid/secret).
We didn’t care about how to obtain the certificate itself.
In our manifest, we used the binding parameter X509_GENERATED which means that the identity service generates a certificate for us, on the fly, during binding.
However, this is not the recommended way, as it reveals the private key in the binding.
It is just faster for prototyping, as it doesn’t require any additional steps.
So it is typically used for quick sample apps, like the one in the previous tutorial.
Today, we’re going through the longer way.
In the manifest (or service-key), for binding parameters, there’s a different option: X509_PROVIDED.
We’ve seen it already and always wondered what it means and how to use it...?
What it means:
In our manifest file, we specify this binding parameter for the identity service
(alternatively, it can be specified for service key or for manually binding command).
By using this option, we’re saying that WE are going to provide the certificate.
Means, we HAVE the client certificate.
As a consequence, this setting requires that we SEND it.
Means, that in this case a second setting becomes mandatory: the certificate parameter.
As value of this param, we specify our certificate itself.
That’s all about the X509_PROVIDED.
Now we’re wondering: how to obtain a client certificate?
In this blog post we’re learning a very simple way.
It is not the recommended approach for professional enterprise development, but it is easy to follow and helps to learn the basics.
What we’re going to do:
Go to IAS to generate a certificate.
Convert the result to make it usable in our sample application.
Use the result in X509_PROVIDED parameter instead of X509_GENERATED.
Run the sample application (same as before) with that certificate.
Scenario:
For your convenience, a quick look at the scenario:
Out of scope:
Authorization handling. The backend application doesn’t require any scope/role for accessing the endpoint.
Disclaimer:
The procedure explained here is meant to show usage of certificates in a simple way.
Although better than using the “GENERATED” statement, it is still not the recommended way for enterprise applications.
Furthermore, this is not an official reference application, I’m just sharing my personal experiences.
To follow this tutorial, we need
Before we start with the sample application, we need 2 preparation tasks:
Establish trust between IAS and BTP
Create project
If not already done, you need to connect your subaccount to the IAS tenant.
Go to your subaccount -> Security -> Trust Configuration and press “Establish Trust”
Afterwards, we can check the IAS tenant and view the newly created Application entry at
https://<tenant>.accounts400.ondemand.com/admin/#/applications
To follow this tutorial, we create a project iasclicre which contains our scenario with 2 apps:
C:\iasclicre
backend
package.json
server.js
frontend
cert
privateKey.txt
package.json
server.js
config-ias.json
manifest.yml
Or see this screenshot:
The file content can be copied from the appendix.
In this tutorial, we’re manually generating a client certificate, with the help of IAS.
In a professional setup, we would compose a Certificate Signing Request (CSR), we would generate a key-pair (public/private key) very privately on our local machine and ask a Certification Authority (CA) to sign it, and as such, proof that the resulting certificate is trustworthy and gets its place in a certificate chain.
To generate a certificate, we need an "Application" entry in IAS, can be any existing, but we rather create a new dummy one.
So we go to our IAS tenant -> Applications & Resources -> Applications.
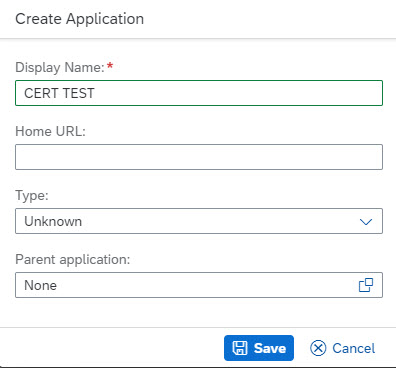
We press "Create" and enter any arbitrary dummy name, it doesn’t matter as it is never used.
And press "Save"
Afterwards, we select the newly created application and in the details screen, we click on Application APIs -> Client Authentication.
We go to the “Certificates” section and press on “+ Add”.
In the dialog, we enter any data of our choice, specific to our client application:
Description: Client Certificate to be used by Frontend Application when requesting JWT token at IAS
Common Name: FrontendApp
Password: Abcd1234
Note that we’ll need the password later.
That’s enough, we can go ahead and press “Generate”.
Immediately, a file with name "cert.p12" is downloaded automatically to our local PC.
This is nice and we can continue working with it.
OK.we have the certificate now, so we can cancel the dialog and delete the dummy application entry in IAS.
Now we have a cert.p12 file.
Feels good - but what is it??
This file extension is typically used for storing certificates with PKCS#12 format.
This is suitable for export/import, like we’ve done.
Cool - and what is PKbla#bla?
The PKCS#12 is a binary format, so we need a tool to convert.
The name stands for Public Key Cryptography Standard number 12.
And what is x.509?
It is a standard for certificate system.
BTW, the most common format for the content of certificates.
I mean, anyways, a certificate is a crazy bunch of silly characters.
But nevertheless, there's an agreement to define a structure, a format for organizing those silly characters.
So now we want to convert the binary file to something which we can use in our application.
For the sake of simplicity, we’re using a public tool in the internet for conversion.
This is of course not good practice and the better option is to use openssl command line tool.
2.2.1. Extract the .p12
Although we know that it is not good practice to upload certificates (even including private key), to the internet, we confirm that we’ve understood the disclaimer and open the website at
https://www.sslshopper.com/ssl-converter.html
There, we upload our "cert.p12" file.
We have to enter the password, which we gave when generating in IAS.
In our example: Abcd1234
It is just like entering a password for opening a zip archive file.
The tool automatically detects the type of the certificate as PKCS#12.
Also, the target format is prefilled as PEM format.
We press "convert" and after some time, the "cert.pem" file is downloaded to our computer.
2.2.2. Convert the .pem
What is pem?
This is the usual format for certificates in the X509 world.
It is a text format, contains encoded certificates and keys, like a container.
The certificates and keys are recognized by the BEGIN and END statements.
PEM files can have file extensions as .pem, .crt, .cer or basically any desired extension, as they are anyways just text files.
Let’s have a look at the content of our converted pem file.
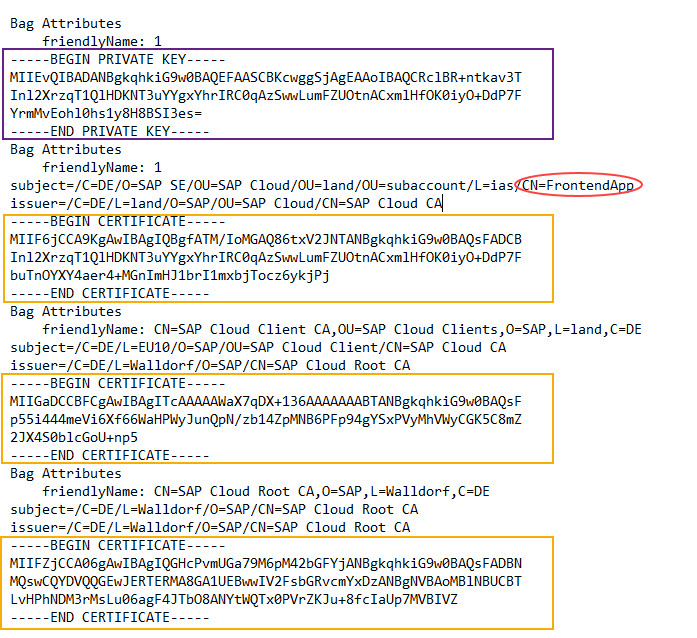
In our example, the pem file contains 4 sections:
1 private key
3 certificates (the chain)
Each section starts with a sub-section containing attributes.
Below snippet is intended as shortened overview:
Or let's try to get a better overview with a screenshot:
OK, but what's about that at all?
From what we’ve seen above, we’ve learned:
We need the private key, such that others would trust our certificate.
We don’t get the public key, as we don’t need it (only IAS will need it).
We get the chain of certificates, starting with the certificate of our own.
We see the common name (CN) which we gave in the IAS: FrontendApp.
We see who issued our certificate: it is the Cloud CA (CA = Certification Authority)
The second certificate, the intermediate certificate has the same name as Cloud CA.
It is the one that issued our own certificate.
Since it is a CA, we can trust.
Nevertheless, it has to prove its trustworthiness.
As such, we can see the issuer of this intermediate certificate: the SAP Cloud Root CA.
The third certificate is the certificate of this root CA.
It is trusted anyways, so the issuer is the same.
It is self-signed, which is usual for root CAs, because they are proved trusted CAs.
Fine.... Ehmm, what to do with this PEM?
We need only 2 sections out of the 4:
The private key for the request.
The client certificate for the binding.
2.2.3. Private Key
We copy the private key section out of the pem file and paste it into the empty file which was prepared for it:
C:\iasclicer\frontend\cert\privateKey.txt
Note:
As it is an ASCII text file, the file extension doesn’t matter.
Note:
Depending on the usage of the key, it might make a difference if we copy only the key itself, or if we copy the additional (useless) Bag Attributes as well.
In my example, we could copy the attributes as well, because they would be ignored in our coding.
But for the sake of clearness, we copy only the key section, including the surrounding hyphens:
Note:
This file is intended to be loaded from within our application coding.
So here we don’t need to convert the key payload into a single line.
2.2.4 Client Certificate
Forgot why we need the client certificate
It is specified, when binding our app to the identity service.
We need only the client certificate, not the whole chain, no bag attributes and no key.
Why do we need it in the binding?
During binding, the identity service will generate an "application" entry in IAS.
There, our client certificate will be configured for client authentication.
Means, when we use this certificate for authenticating against IAS, the IAS will be happy, as it knows that we're a registered client.
However, the certificate won't be enough, as it is just a piece of paper which anyone could send.
It must be confirmed by private key, which takes place during handshake in mTLS procedure.
OK, so now we want to copy the client certificate.
We have 3 certificates, which one is the right one?
Let's look at the first of the 3 certificates.
In the Bag Attributes, we can find the attribute CN=Frontendapp
This is "our name", so it indicates that indeed, the first certificate is our client certificate.
However, it might be the case that the bag attributes were removed while extracting the .p12 file (e.g. with different tool or command).
In such case, we’d need to decode the certificate to see the attributes.
To do so, we copy the payload (without the BEGIN and END statements) into our clipboard and paste it into a decoding website.
Again, with the disclaimer that this is not recommended, we open
https://www.sslshopper.com/certificate-decoder.html
As we can see in the Common Name attribute, it is the certificate of our own.
OK. we can now just copy the first certificate, without bag attributes.
However, there’s a problem with the format:
The format of X.509 certificates is of multiple lines with 64 characters.
For the binding, we need one string, one line. Otherwise it would not fit into a JSON or yaml property.
We need to adapt the certificate into one single line.
This could be done with a command line command, but since our tutorial is for dummies like me, we use a text editor for reformatting the certificate.
We open the "cert.pem" file with e.g. Visual Stuidio Code editor.
- We need to type an explicit \n after BEGIN statement and before END statement.
- Afterwards, the whole payload has to be one line. No line feeds, only the 2 explicit \n
So first, enter the two \n
Next, we want to remove all Line Feeds.
To do so, we mark the payload, including the BEGIN line (not the END line).
We press Ctrl+H
On the search popup, we press the “Regular Expression” button.
And press the “Find in selection” button.
In the search field, we enter \n
In the replace field, we enter nothing, we leave it empty.
Then press "Replace All" button
As a result, we get one single line, which starts with "-" and ends with "-"
To give a better impression:
Now that we have the certificate in the desired format, we can use it in the binding parameters for the identity service.
We will use it in the manifest.yml file:
Note:
Alternatively, the certificate can be used in a JSON file that is passed as config file on command line, when creating service key or running bind-service command.
In that case, the above line needs to be put into a JSON object containing the 2 properties.
Note:
We're now using only the client certificate, however, it might be necessary to use the whole chain.
The procedure would be the same: Just the whole chain in one single line, but always with explicit \n before and after the hyphens.
Coming to the sample application, there’s nothing more to describe, as it was described in the previous blog post.
So we’re quickly going through the single steps and for the details we can refer to previous explanations.
We're creating 2 apps that are bound to the same instance of identity service.
Both apps are deployed together.
The only thing worth mentioning about instance creation:
We don’t need to configure anything with respect to mTLS here:
config_ias.json
To create the instance:
cf cs identity application clicerIas -c config_ias.json
The backend application does nothing than provide a protected endpoint.
This proves that the JWt token which is fetched by the frontend app, to call the backend app, is valid.
The backend app decodes and returns this token, just for our interest.
The full code can be found in the appendix.
The frontend app has nothing more to do than calling the backend app.
Beforehand, it needs to fetch a JWT token, in order to authenticate at the backend app.
Just like in previous tutorial, the frontend app uses the certificate and the private key in order to authenticate when fetching a JWT token.
The difference today: the private key is not read from the binding (as it is not there).
Instead, we’ve copied the key into a file, which is deployed along with the frontend application.
In our app code, we just read the file and pass the content to the request:
The full file content can be found in appendix.
Before we deploy we need to have a look at the manifest.yml:
The interesting part is the binding parameter of the identity service:
Here we have to specify that we want mTLS.
We say that we’re providing the certificate, and as a logical consequence, we do provide the certificate.
For certificate, see reference for Params.
To deploy the 2 apps we run
cf push
Afterwards we can check the certificate in the environment:
cf env frontendclicer
In the result, we can see that there’s our certificate, the same which we’ve sent in the manifest.
And what I wanted to point out: there’s no private key in the binding.
After deploy, we open our frontend app at
https://frontendclicer.cfapps.eu11.hana.ondemand.com/homepage
(you might need to adapt the URL)
As a result, the browser displays the JWT token data, as decoded by the backend app.
For your convenience, here are the commands to remove the artifacts created within this tutorial:
cf d -r -f frontendclicer
cf d -r -f backendclicer
cf ds -f clicerIas
In this blog post, we’ve learned how to obtain a client certificate (manually) from IAS.
We’ve also learned about the generated result: a binary .p12 file with content in PKCS#12.
We’ve learned how to manually convert it to PEM format.
We’ve seen the content, which is 1 private key and the chain of 3 certificates.
We’ve found and reformatted the client certificate.
We’ve used key and certificate for the HTTP request to fetch a JWT token from IAS.
How to obtain and use a client certificate from IAS:
IAS in SAP Help Portal
IAS main entry: https://help.sap.com/docs/IDENTITY_AUTHENTICATION
IAS main docu page.
OpenID Connect with client credentials flow
Configure Secrets in IAS
Identity Service
Main docu entry page
Reference for Params
Client libs
Passport homepage and download.
Node.js package xssec.
OAuth 2.0
Main: OAuth 2.0.
Grant Type Client Credentials.
The spec.
Some more info
Understanding of OAuth for dummies like me.
More blog posts
What is mTLS?
mTLS with Destinations.
Glossary and link list.
Note:
You might need to adapt the app names in manifest and the domain of the routes.
Also, the hardcoded URL pointing to backendapp would have to be adapted accordingly.
config-ias.json
manifest.yml
backend
package.json
server.js
frontend
package.json
server.js
privateKey.txt
We do the required steps with respect to the certificate in understandable manual way.
The goal is to replace the X509_GENERATED statement, which we used in previous tutorial.
The setup is a simple client-credentials scenario.
Used technologies:
SAP Business Technology Platform (SAP BTP), Cloud Foundry Environment,
SAP Cloud Identity Services – Identity Authentication (IAS),
Node.js.
Quicklinks:
Quick Guide
Sample Code
Content
0. Introduction
1. Preparation
2. Client Certificate
2.1. Generate Certificate
2.2. Adapt Certificate
3. Sample Scenario
3.1. Identity Service
3.2. Backend Application
3.3. Frontend Application
3.4. Deploy
4. Run
Appendix: Sample Code
0.1. Introduction
In this hands-on tutorial, we're using the same setup and scenario like in previous tutorial, so please see here for the description.
Just a few words to introduce the focus of the tutorial.
In the previous tutorial we learned how to use a client certificate to request a JWT token (instead of user/password, i.e. clientid/secret).
We didn’t care about how to obtain the certificate itself.
In our manifest, we used the binding parameter X509_GENERATED which means that the identity service generates a certificate for us, on the fly, during binding.
However, this is not the recommended way, as it reveals the private key in the binding.
It is just faster for prototyping, as it doesn’t require any additional steps.
So it is typically used for quick sample apps, like the one in the previous tutorial.
Today, we’re going through the longer way.
In the manifest (or service-key), for binding parameters, there’s a different option: X509_PROVIDED.
We’ve seen it already and always wondered what it means and how to use it...?
What it means:
In our manifest file, we specify this binding parameter for the identity service
(alternatively, it can be specified for service key or for manually binding command).
By using this option, we’re saying that WE are going to provide the certificate.
Means, we HAVE the client certificate.
As a consequence, this setting requires that we SEND it.
Means, that in this case a second setting becomes mandatory: the certificate parameter.
As value of this param, we specify our certificate itself.
That’s all about the X509_PROVIDED.
Now we’re wondering: how to obtain a client certificate?
In this blog post we’re learning a very simple way.
It is not the recommended approach for professional enterprise development, but it is easy to follow and helps to learn the basics.
What we’re going to do:
Go to IAS to generate a certificate.
Convert the result to make it usable in our sample application.
Use the result in X509_PROVIDED parameter instead of X509_GENERATED.
Run the sample application (same as before) with that certificate.
Scenario:
For your convenience, a quick look at the scenario:

Out of scope:
Authorization handling. The backend application doesn’t require any scope/role for accessing the endpoint.
Disclaimer:
The procedure explained here is meant to show usage of certificates in a simple way.
Although better than using the “GENERATED” statement, it is still not the recommended way for enterprise applications.
Furthermore, this is not an official reference application, I’m just sharing my personal experiences.
0.2. Prerequisites
To follow this tutorial, we need
- Access to an IAS tenant with admin permission.
- Access to SAP Business Technology Platform (SAP BTP) and permission to create instances and to deploy applications.
- Basic Node.js skills.
- Some basic understanding of OAuth and JWT token.
- The tutorial is using the Cloud Foundry command line client, but all tasks can be done in the cockpit as well
1. Preparation
Before we start with the sample application, we need 2 preparation tasks:
Establish trust between IAS and BTP
Create project
1.1. Configure Trust
If not already done, you need to connect your subaccount to the IAS tenant.
Go to your subaccount -> Security -> Trust Configuration and press “Establish Trust”
Afterwards, we can check the IAS tenant and view the newly created Application entry at
https://<tenant>.accounts400.ondemand.com/admin/#/applications
1.2. Create Project Structure
To follow this tutorial, we create a project iasclicre which contains our scenario with 2 apps:
C:\iasclicre
backend
package.json
server.js
frontend
cert
privateKey.txt
package.json
server.js
config-ias.json
manifest.yml
Or see this screenshot:

The file content can be copied from the appendix.
2. Client Certificate
In this tutorial, we’re manually generating a client certificate, with the help of IAS.
In a professional setup, we would compose a Certificate Signing Request (CSR), we would generate a key-pair (public/private key) very privately on our local machine and ask a Certification Authority (CA) to sign it, and as such, proof that the resulting certificate is trustworthy and gets its place in a certificate chain.
2.1. Generate Certificate in IAS
To generate a certificate, we need an "Application" entry in IAS, can be any existing, but we rather create a new dummy one.
So we go to our IAS tenant -> Applications & Resources -> Applications.
We press "Create" and enter any arbitrary dummy name, it doesn’t matter as it is never used.
And press "Save"
Afterwards, we select the newly created application and in the details screen, we click on Application APIs -> Client Authentication.
We go to the “Certificates” section and press on “+ Add”.
In the dialog, we enter any data of our choice, specific to our client application:
Description: Client Certificate to be used by Frontend Application when requesting JWT token at IAS
Common Name: FrontendApp
Password: Abcd1234
Note that we’ll need the password later.
That’s enough, we can go ahead and press “Generate”.
Immediately, a file with name "cert.p12" is downloaded automatically to our local PC.
This is nice and we can continue working with it.
OK.we have the certificate now, so we can cancel the dialog and delete the dummy application entry in IAS.
2.2. Adapt Certificate
Now we have a cert.p12 file.
Feels good - but what is it??
This file extension is typically used for storing certificates with PKCS#12 format.
This is suitable for export/import, like we’ve done.
Cool - and what is PKbla#bla?
The PKCS#12 is a binary format, so we need a tool to convert.
The name stands for Public Key Cryptography Standard number 12.
And what is x.509?
It is a standard for certificate system.
BTW, the most common format for the content of certificates.
I mean, anyways, a certificate is a crazy bunch of silly characters.
But nevertheless, there's an agreement to define a structure, a format for organizing those silly characters.
So now we want to convert the binary file to something which we can use in our application.
For the sake of simplicity, we’re using a public tool in the internet for conversion.
This is of course not good practice and the better option is to use openssl command line tool.
2.2.1. Extract the .p12
Although we know that it is not good practice to upload certificates (even including private key), to the internet, we confirm that we’ve understood the disclaimer and open the website at
https://www.sslshopper.com/ssl-converter.html
There, we upload our "cert.p12" file.
We have to enter the password, which we gave when generating in IAS.
In our example: Abcd1234
It is just like entering a password for opening a zip archive file.
The tool automatically detects the type of the certificate as PKCS#12.
Also, the target format is prefilled as PEM format.

We press "convert" and after some time, the "cert.pem" file is downloaded to our computer.
2.2.2. Convert the .pem
What is pem?
This is the usual format for certificates in the X509 world.
It is a text format, contains encoded certificates and keys, like a container.
The certificates and keys are recognized by the BEGIN and END statements.
PEM files can have file extensions as .pem, .crt, .cer or basically any desired extension, as they are anyways just text files.
Let’s have a look at the content of our converted pem file.
In our example, the pem file contains 4 sections:
1 private key
3 certificates (the chain)
Each section starts with a sub-section containing attributes.
Below snippet is intended as shortened overview:
Bag Attributes

    friendlyName: 1

-----BEGIN PRIVATE KEY-----

MIIEvQIBADANBgkqhkiG9w0BAQEFAASCBKcwggSjAgEAAoIBAQCRclBR+ntkav3T

Inl2XrzqT1QlHDKNT3uYYgxYhrIRC0qAzSwwLumFZUOtnACxmlHfOK0iyO+DdP7F

YrmMvEohl0hs1y8H8BSI3es=

-----END PRIVATE KEY-----

Bag Attributes

    friendlyName: 1

subject=/C=DE/O=SAP SE/OU=SAP Cloud/OU=land/OU=subaccount/L=ias/CN=FrontendApp

issuer=/C=DE/L=land/O=SAP/OU=SAP Cloud/CN=SAP Cloud CA

-----BEGIN CERTIFICATE-----

MIIF6jCCA9KgAwIBAgIQBgfATM/IoMGAQ86txV2JNTANBgkqhkiG9w0BAQsFADCB

buTnOYXY4aer4+MGnImHJ1brI1mxbjTocz6ykjPj

-----END CERTIFICATE-----

Bag Attributes

    friendlyName: CN=SAP Cloud Client CA,OU=SAP Cloud Clients,O=SAP,L=land,C=DE

subject=/C=DE/L=EU10/O=SAP/OU=SAP Cloud Client/CN=SAP Cloud CA

issuer=/C=DE/L=Walldorf/O=SAP/CN=SAP Cloud Root CA

-----BEGIN CERTIFICATE-----

MIIGaDCCBFCgAwIBAgITcAAAAAWaX7qDX+136AAAAAAABTANBgkqhkiG9w0BAQsF

p55i444meVi6Xf66WaHPWyJunQpN/zb14ZpMNB6PFp94gYSxPVyMhVWyCGK5C8mZ

2JX4S0blcGoU+np5

-----END CERTIFICATE-----

Bag Attributes

    friendlyName: CN=SAP Cloud Root CA,O=SAP,L=Walldorf,C=DE

subject=/C=DE/L=Walldorf/O=SAP/CN=SAP Cloud Root CA

issuer=/C=DE/L=Walldorf/O=SAP/CN=SAP Cloud Root CA

-----BEGIN CERTIFICATE-----

MIIFZjCCA06gAwIBAgIQGHcPvmUGa79M6pM42bGFYjANBgkqhkiG9w0BAQsFADBN

MQswCQYDVQQGEwJERTERMA8GA1UEBwwIV2FsbGRvcmYxDzANBgNVBAoMBlNBUCBT

LvHPhNDM3rMsLu06agF4JTbO8ANYtWQTx0PVrZKJu+8fcIaUp7MVBIVZ

-----END CERTIFICATE-----
Or let's try to get a better overview with a screenshot:
OK, but what's about that at all?
From what we’ve seen above, we’ve learned:
We need the private key, such that others would trust our certificate.
We don’t get the public key, as we don’t need it (only IAS will need it).
We get the chain of certificates, starting with the certificate of our own.
We see the common name (CN) which we gave in the IAS: FrontendApp.
We see who issued our certificate: it is the Cloud CA (CA = Certification Authority)
The second certificate, the intermediate certificate has the same name as Cloud CA.
It is the one that issued our own certificate.
Since it is a CA, we can trust.
Nevertheless, it has to prove its trustworthiness.
As such, we can see the issuer of this intermediate certificate: the SAP Cloud Root CA.
The third certificate is the certificate of this root CA.
It is trusted anyways, so the issuer is the same.
It is self-signed, which is usual for root CAs, because they are proved trusted CAs.
Fine.... Ehmm, what to do with this PEM?
We need only 2 sections out of the 4:
The private key for the request.
The client certificate for the binding.
2.2.3. Private Key
We copy the private key section out of the pem file and paste it into the empty file which was prepared for it:
C:\iasclicer\frontend\cert\privateKey.txt
Note:
As it is an ASCII text file, the file extension doesn’t matter.
Note:
Depending on the usage of the key, it might make a difference if we copy only the key itself, or if we copy the additional (useless) Bag Attributes as well.
In my example, we could copy the attributes as well, because they would be ignored in our coding.
But for the sake of clearness, we copy only the key section, including the surrounding hyphens:

Note:
This file is intended to be loaded from within our application coding.
So here we don’t need to convert the key payload into a single line.
2.2.4 Client Certificate
Forgot why we need the client certificate
It is specified, when binding our app to the identity service.
We need only the client certificate, not the whole chain, no bag attributes and no key.
Why do we need it in the binding?
During binding, the identity service will generate an "application" entry in IAS.
There, our client certificate will be configured for client authentication.
Means, when we use this certificate for authenticating against IAS, the IAS will be happy, as it knows that we're a registered client.
However, the certificate won't be enough, as it is just a piece of paper which anyone could send.
It must be confirmed by private key, which takes place during handshake in mTLS procedure.
OK, so now we want to copy the client certificate.
We have 3 certificates, which one is the right one?
Let's look at the first of the 3 certificates.
In the Bag Attributes, we can find the attribute CN=Frontendapp
This is "our name", so it indicates that indeed, the first certificate is our client certificate.
However, it might be the case that the bag attributes were removed while extracting the .p12 file (e.g. with different tool or command).
In such case, we’d need to decode the certificate to see the attributes.
To do so, we copy the payload (without the BEGIN and END statements) into our clipboard and paste it into a decoding website.
Again, with the disclaimer that this is not recommended, we open
https://www.sslshopper.com/certificate-decoder.html

As we can see in the Common Name attribute, it is the certificate of our own.
OK. we can now just copy the first certificate, without bag attributes.
However, there’s a problem with the format:
The format of X.509 certificates is of multiple lines with 64 characters.
For the binding, we need one string, one line. Otherwise it would not fit into a JSON or yaml property.
We need to adapt the certificate into one single line.
This could be done with a command line command, but since our tutorial is for dummies like me, we use a text editor for reformatting the certificate.
We open the "cert.pem" file with e.g. Visual Stuidio Code editor.
- We need to type an explicit \n after BEGIN statement and before END statement.
- Afterwards, the whole payload has to be one line. No line feeds, only the 2 explicit \n
So first, enter the two \n

Next, we want to remove all Line Feeds.
To do so, we mark the payload, including the BEGIN line (not the END line).
We press Ctrl+H
On the search popup, we press the “Regular Expression” button.
And press the “Find in selection” button.
In the search field, we enter \n
In the replace field, we enter nothing, we leave it empty.
Then press "Replace All" button

As a result, we get one single line, which starts with "-" and ends with "-"
To give a better impression:
-----BEGIN CERTIFICATE-----\nMIIF6jCCA9KgAwI...UaG1xZH47ezshq8\n-----END CERTIFICATE-----Now that we have the certificate in the desired format, we can use it in the binding parameters for the identity service.
We will use it in the manifest.yml file:

Note:
Alternatively, the certificate can be used in a JSON file that is passed as config file on command line, when creating service key or running bind-service command.
In that case, the above line needs to be put into a JSON object containing the 2 properties.
Note:
We're now using only the client certificate, however, it might be necessary to use the whole chain.
The procedure would be the same: Just the whole chain in one single line, but always with explicit \n before and after the hyphens.
3. Create Sample Scenario
Coming to the sample application, there’s nothing more to describe, as it was described in the previous blog post.
So we’re quickly going through the single steps and for the details we can refer to previous explanations.
We're creating 2 apps that are bound to the same instance of identity service.
Both apps are deployed together.
3.1. Create instance of Identity Service
The only thing worth mentioning about instance creation:
We don’t need to configure anything with respect to mTLS here:
config_ias.json
"display-name": "clicerias"To create the instance:
cf cs identity application clicerIas -c config_ias.json
3.2. Create Backend Application
The backend application does nothing than provide a protected endpoint.
This proves that the JWt token which is fetched by the frontend app, to call the backend app, is valid.
The backend app decodes and returns this token, just for our interest.
app.get('/endpoint', async (req, res) => {

    const claims = _formatClaims(req.tokenInfo)

    res.send(`<h5>Content of received JWT:</h5>${claims}`)

})
The full code can be found in the appendix.
3.3. Create Frontend Application
The frontend app has nothing more to do than calling the backend app.
Beforehand, it needs to fetch a JWT token, in order to authenticate at the backend app.

Just like in previous tutorial, the frontend app uses the certificate and the private key in order to authenticate when fetching a JWT token.
The difference today: the private key is not read from the binding (as it is not there).
Instead, we’ve copied the key into a file, which is deployed along with the frontend application.
In our app code, we just read the file and pass the content to the request:
httpsAgent: new https.Agent({

    cert: CREDENTIALS.certificate,

    key: fs.readFileSync(__dirname + '/cert/privateKey.txt')

})
The full file content can be found in appendix.
3.4. Deploy
Before we deploy we need to have a look at the manifest.yml:
    services:

    - name: clicerIas

      parameters:

        credential-type: "X509_PROVIDED"

        certificate: "-----BEGIN CERTIFICATE-----\nMIIF6jCCA9KgAwIBA...iJdHNBOnwVvaz0CQBuflNWivJZE/UaG1xZH47ezshq8\n-----END CERTIFICATE-----"
The interesting part is the binding parameter of the identity service:
Here we have to specify that we want mTLS.
We say that we’re providing the certificate, and as a logical consequence, we do provide the certificate.
For certificate, see reference for Params.
To deploy the 2 apps we run
cf push
Afterwards we can check the certificate in the environment:
cf env frontendclicer
In the result, we can see that there’s our certificate, the same which we’ve sent in the manifest.
And what I wanted to point out: there’s no private key in the binding.
4. Run
After deploy, we open our frontend app at
https://frontendclicer.cfapps.eu11.hana.ondemand.com/homepage
(you might need to adapt the URL)
As a result, the browser displays the JWT token data, as decoded by the backend app.
5. Cleanup
For your convenience, here are the commands to remove the artifacts created within this tutorial:
cf d -r -f frontendclicer
cf d -r -f backendclicer
cf ds -f clicerIas
Summary
In this blog post, we’ve learned how to obtain a client certificate (manually) from IAS.
We’ve also learned about the generated result: a binary .p12 file with content in PKCS#12.
We’ve learned how to manually convert it to PEM format.
We’ve seen the content, which is 1 private key and the chain of 3 certificates.
We’ve found and reformatted the client certificate.
We’ve used key and certificate for the HTTP request to fetch a JWT token from IAS.
Quick Guide
How to obtain and use a client certificate from IAS:
| - In IAS, create an “application”, go to “Client Authentication”-> Certificates -> Add - Convert the downloaded .p12 file to PEM format (with tool or openssl) - Find the client cert (usually the first) by checking the CN - Convert the cert to single line with two \n - Find the private key, copy it to file, read it from code fs.readFileSync(__dirname + '/cert/privateKey.txt') - configure X509 binding parameter for identity service in manifest parameters: {"credential-type": "X509_PROVIDED", "certificate": "---BEGIN....."} - tokenendpoint is: /oauth2/token |
Links
IAS in SAP Help Portal
IAS main entry: https://help.sap.com/docs/IDENTITY_AUTHENTICATION
IAS main docu page.
OpenID Connect with client credentials flow
Configure Secrets in IAS
Identity Service
Main docu entry page
Reference for Params
Client libs
Passport homepage and download.
Node.js package xssec.
OAuth 2.0
Main: OAuth 2.0.
Grant Type Client Credentials.
The spec.
Some more info
Understanding of OAuth for dummies like me.
More blog posts
What is mTLS?
mTLS with Destinations.
Glossary and link list.
Appendix: Sample Code
Note:
You might need to adapt the app names in manifest and the domain of the routes.
Also, the hardcoded URL pointing to backendapp would have to be adapted accordingly.
config-ias.json
{

  	"display-name": "clicerias"

}
manifest.yml
---

applications:

  - name: backendclicer

    path: backend

    memory: 64M

    routes:

    - route: backendclicer.cfapps.eu11.hana.ondemand.com

    services:

    - name: clicerIas

  - name: frontendclicer

    path: frontend

    memory: 64M

    routes:

    - route: frontendclicer.cfapps.eu11.hana.ondemand.com

    services:

    - name: clicerIas

      parameters:

        credential-type: "X509_PROVIDED"

        certificate: "-----BEGIN CERTIFICATE-----\nMIIF6jCCA9KgAwIBAgIQFbhDcuOgNO/rn/sXUtRD/TANBgkqhkiG9w0BAQsFADCBgDELMAkGA1UEBhMCREUxFDASBgNVBAcMC0VVMTAtfySBsp55sT/UuqWbu48r8mRcKgL1iJdHNBOnwVvaz0CQBuflNWivJZE/UaG1xZH47ezshq8\n-----END CERTIFICATE-----"
backend
package.json
{

  "dependencies": {

    "@sap/xsenv": "latest",

    "@sap/xssec": "^3.2.13",

    "express": "^4.17.1",

    "passport": "^0.4.0"

  }

}
server.js
const xsenv = require('@sap/xsenv')

const IAS_CREDENTIALS = xsenv.getServices({myIas: {label:'identity'}}).myIas  // tag:'ias'  not present


const xssec = require('@sap/xssec')

const passport = require('passport')

const JWTStrategy = xssec.JWTStrategy

passport.use('JWT', new JWTStrategy(IAS_CREDENTIALS, "IAS"))

const express = require('express')

const app = express();

app.use(passport.initialize())

app.use(passport.authenticate('JWT', { session: false, failWithError: true }));


app.listen(process.env.PORT)


app.get('/endpoint', async (req, res) => {

    const claims = _formatClaims(req.tokenInfo)

    res.send(`<h5>Content of received JWT:</h5>${claims}`)

})


/* HELPER */

function _formatClaims(tokenInfo){

    const jwtEncoded = tokenInfo.getTokenValue()

    console.log(`===> The full JWT: ${jwtEncoded}`)


    const jwtDecoded = tokenInfo.getPayload()

    console.log(`===> The full JWT decoded: ${JSON.stringify(jwtDecoded)}`)


     const claims = new Array()

     claims.push(`subject: ${tokenInfo.getSubject()}`)

     claims.push(`<br>zone_uuid: ${tokenInfo.getZoneId()}</br>`)

     claims.push(`issuer: ${tokenInfo.getIssuer()}`)

     claims.push(`<br>aud: ${jwtDecoded.aud}</br>`)

     claims.push(`cnf: ${JSON.stringify(jwtDecoded.cnf)}`)


     return claims.join('')

}
frontend
package.json
{

  "dependencies": {

    "@sap/xsenv": "latest",

    "@sap/xssec": "^3.2.13",

    "express": "^4.17.1",

    "passport": "^0.4.0",

    "axios": "^1.1.2"

  }

}
server.js
const xsenv = require('@sap/xsenv')

const CREDENTIALS = xsenv.getServices({myIas: {label:'identity'}}).myIas


const fs = require('fs');

const axios = require('axios')

const url = require('url');

const https = require('https');

const express = require('express')

const app = express();


app.listen(process.env.PORT)


app.get('/homepage', async (req, res) => {


    const jwtToken = await _fetchJwtToken()

    const result = await _callBackend(jwtToken)

    res.send(`<h3>Response from backend:</h3><p>${result}</p>`)

})


/* HELPER */

async function _fetchJwtToken() {


    const requestBody = new url.URLSearchParams({

        grant_type: 'client_credentials',

        response_type: 'token',

        client_id: CREDENTIALS.clientid

    }).toString()


    const options = {

        headers: {

            'Accept': 'application/json',

            'Content-Type': 'application/x-www-form-urlencoded'

        },

        url: CREDENTIALS.url + '/oauth2/token',

        method: 'POST',

        data: requestBody,

        httpsAgent: new https.Agent({

            cert: CREDENTIALS.certificate,

            key: fs.readFileSync(__dirname + '/cert/privateKey.txt')

        })

    }


    const response = await axios(options);

    return response.data.access_token

}


async function _callBackend(token){

    const options = {

        method: 'GET',

        url: 'https://backendclicer.cfapps.sap.hana.ondemand.com/endpoint',

        headers: {

            'Authorization': 'bearer ' + token

        }

    }

    const response = await axios(options)

    return response.data

}
privateKey.txt
-----BEGIN PRIVATE KEY-----

MIIEvQIBADANBgkqhkiG9w0BAQEFAASCBKcwggSjAgEAAoIBAQDH5ufjVHTJaGCJ

KfxbGgnF/NyU+HDRd+OdLkPSFvT02PECqfE8sLkCXUDv6p8QCVcjFu/F86+1PpgL

4imGNODmVcNqWoOr39GTU9TrIlItGZdwOiMB6RMYVTfl7c2q/TYQcisrFJ8BPBRa

eYDDyc8l5SQbaaH+42aDV6U0sXuTMVM/eKmAZS4/3d2AQAssHSjsn3Qi7+Yke3Zh

etDrQ+dRx20TbByBT0F6PpQyR5/hD8XcNpfyXoDy6I42BpemXgYU06ih2go9eNNm

MHtPHbzCFmqGam31DWySI0etHvO3wje7wjg22z2qYiXX0nd+s44HCOj5hgROu5Pk

oljmYJnVAgMBAAECggEAbBcqOh0XzTQ4RtLCFsy8jicNayvvbQRjukEjAP3S1HZd

06/qtoNkdqfQDiqSecxjJqEnY6VB1EIVWw+enmgHV+T19pMc8Znjq8M/tSjowGQ/

I7r75POPlK+3uwdcF2I1kqz5NKFA3R0McGOUwclkzjvZy0zSAI4bh1ekCBsUE+E5

9IIgHtx15k078pJjF8ttM5rTuISuim7/iMPuFHtDsNjrobj6eoyDNOSWShNGgdnG

MP1WlvitIsyLAwwhBwRmdIaXmZK5mqnuoZfluIOmOPDq/fDYgkYmLRhNHzRlPj4U

q4D0N7HRWQKBgQCCAyuZVu74pZEmyG3iFM8CtinfBT94VXX/2un2v6nLSrljO7LS

fG8K4D/sg16b92j3PwYErOmzH5rRcnWcYf...dTlRiosMB/Qmw0CnEsZ0BdfX57Z

8C5LgfYmxhtvWAMHDU0KLL0DZgZDvVHrFkUbWrJPxxVGCsE88tg0J2VN/QKBgGjW

bK4h68h+W/ILN0vluzQI3fe4eVadkkzK2hLrSvFmXZM5zKgFAZxG+C/Tj8fUZQqU

dS/jGjf/F4BBSQQltEYmT2UsfqQEG7oVTsHE++Y6888Pb2hQe5jYlKWf3jsllfUY

QHiCcxC2Q335Urox+an9py2Qik/ttGpXf3bTmLhJAoGAHm0wMvaVCQu6YQrnYd8J

QPdc30mmDEUAqParpt39AkZb4rr5BmmPNbUJQEgBPehjGqTV7b5lTnl3AjxDRxM0

t0pDyV5sO/3vp6NbwgsFTulEXWbEhm/uvgcEQVrVjFkVEtyqKIUugkvffYVsZWnP

P9Y3OGBfx+QghFVM/ZlJfgY=

-----END PRIVATE KEY-----
Labels:
You must be a registered user to add a comment. If you've already registered, sign in. Otherwise, register and sign in.
Labels in this area
-
ABAP CDS Views - CDC (Change Data Capture)
2 -
AI
1 -
Analyze Workload Data
1 -
BTP
1 -
Business and IT Integration
2 -
Business application stu
1 -
Business Technology Platform
1 -
Business Trends
1,658 -
Business Trends
93 -
CAP
1 -
cf
1 -
Cloud Foundry
1 -
Confluent
1 -
Customer COE Basics and Fundamentals
1 -
Customer COE Latest and Greatest
3 -
Customer Data Browser app
1 -
Data Analysis Tool
1 -
data migration
1 -
data transfer
1 -
Datasphere
2 -
Event Information
1,400 -
Event Information
66 -
Expert
1 -
Expert Insights
177 -
Expert Insights
299 -
General
1 -
Google cloud
1 -
Google Next'24
1 -
Kafka
1 -
Life at SAP
780 -
Life at SAP
13 -
Migrate your Data App
1 -
MTA
1 -
Network Performance Analysis
1 -
NodeJS
1 -
PDF
1 -
POC
1 -
Product Updates
4,577 -
Product Updates
345 -
Replication Flow
1 -
RisewithSAP
1 -
SAP BTP
1 -
SAP BTP Cloud Foundry
1 -
SAP Cloud ALM
1 -
SAP Cloud Application Programming Model
1 -
SAP Datasphere
2 -
SAP S4HANA Cloud
1 -
SAP S4HANA Migration Cockpit
1 -
Technology Updates
6,873 -
Technology Updates
427 -
Workload Fluctuations
1
Related Content
- Consume the SAP Cloud ALM Custom Processes API in Technology Blogs by SAP
- SAP Cloud Integration: How to use mTLS for calling external App from iFlow (Outbound) in Technology Blogs by SAP
- Swagger Implementation for CAP Java for MVC in Technology Blogs by SAP
- SAP BTP Security: How to realize client-credentials flow with IAS [2]: mTLS in Technology Blogs by SAP
Top kudoed authors
| User | Count |
|---|---|
| 40 | |
| 25 | |
| 17 | |
| 14 | |
| 8 | |
| 7 | |
| 7 | |
| 7 | |
| 6 | |
| 6 |