
- SAP Community
- Products and Technology
- Technology
- Technology Blogs by SAP
- Replicate artifacts data from an HDI Container in ...
Technology Blogs by SAP
Learn how to extend and personalize SAP applications. Follow the SAP technology blog for insights into SAP BTP, ABAP, SAP Analytics Cloud, SAP HANA, and more.
Turn on suggestions
Auto-suggest helps you quickly narrow down your search results by suggesting possible matches as you type.
Showing results for
Advisor
Options
- Subscribe to RSS Feed
- Mark as New
- Mark as Read
- Bookmark
- Subscribe
- Printer Friendly Page
- Report Inappropriate Content
11-17-2022
1:23 PM
The SAP HANA Deployment Infrastructure (HDI) is a service layer of the SAP HANA database and helps to create runtime database objects from design-time artifacts.
It uses containers to store design-time artifacts and the corresponding deployed run-time objects.
Inside the database, the HDI container is represented as a schema but is owned by a technical user and isolated from other database objects. Only local object access inside the container is allowed and to access objects outside the container explicit grants is required from the object owner.
In this blog, you will learn to create HDI module for database content in the BAS, enable access to the schema of an HDI container to a database object consumer and replicate the data from object.
1. Create SAP HANA Native Application Dev space
6. Retain the module name as default "db" and click Next
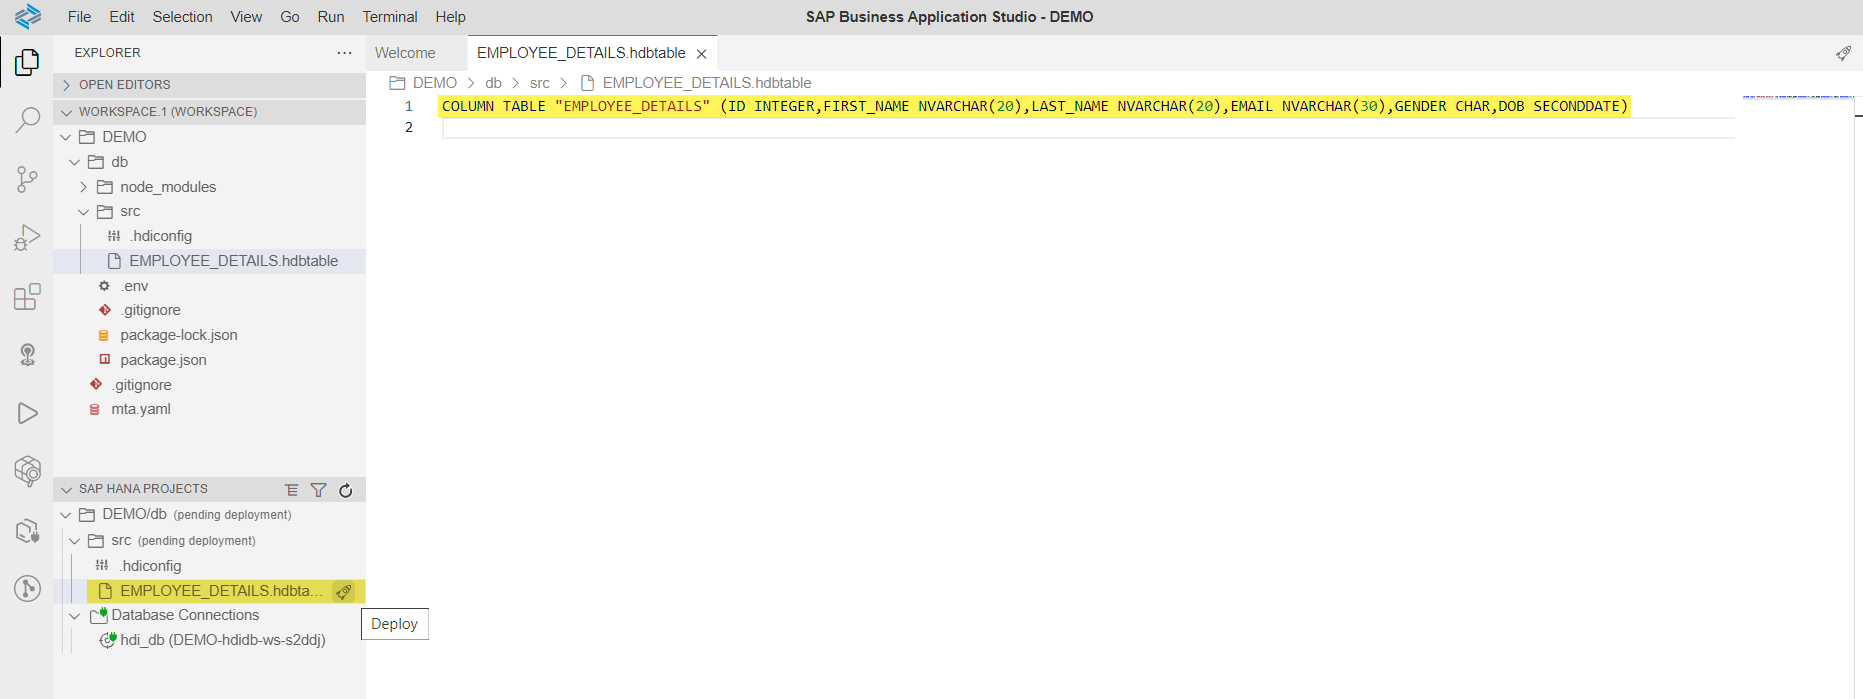
1. Navigate to View > Find Command > Create Database Artifact > Choose Artifact type as Table > Provide Artifact Name > Create

2. Create table with required details and click Deploy in SAP HANA PROJECTS View
3. Create CSV file
4. Enter the data in CSV file and click Deploy in SAP HANA PROJECTS View
5. Create hdbtabledata to import the data from CSV into Table
6. Define the mappings in the hdbtabledata file and click Deploy in SAP HANA PROJECTS View
To grant access privileges for the entire container schema where the database objects are located to a database object consumer USER, perform the following steps.
Grant access to the HDI container's schema by executing the below:
1. In DBX, connect to HDI container and Open SQL Admin Console
2. Grant access to the HDI container's schema by executing the below statements
3. Confirm that the USER can now access the database objects in the container's schema.
Create remote source to the Hana Cloud Database
1. In an SQL console, connected to the SAP HANA on-premise database, create a remote source to the HC database using HANA adapter:
2. Create the virtual table VT in the target system based on the table "EMPLYOEE DETAILS" in the "MY_SCHEMA" schema of the source system
3. Create the replica table RT using the virtual table VT as the source for the definition
4. Create a remote subscription, specifying VT as the virtual table on which the changes are to be captured and RT as the target table to which they are to be applied
5. Initialize real-time data processing using ALTER REMOTE SUBSCRIPTION with QUEUE command
6. Activate replication using the DISTRIBUTE command
7. Check for the real time data replicated on to the target table
8. Deactivate replication and Drop the replication when it is no longer needed
In this blog we have seen how to grant access to HDI's schema, setup real time replication using HANA adapter, create a virtual table, a target table, a remote subscription, and then activate replication on the target system.
It uses containers to store design-time artifacts and the corresponding deployed run-time objects.
Inside the database, the HDI container is represented as a schema but is owned by a technical user and isolated from other database objects. Only local object access inside the container is allowed and to access objects outside the container explicit grants is required from the object owner.
In this blog, you will learn to create HDI module for database content in the BAS, enable access to the schema of an HDI container to a database object consumer and replicate the data from object.
Create Hana Database Project
1. Create SAP HANA Native Application Dev space

2. Once the dev space is running, click the dev space name to open it

3. From Welcome tab, click Start from template to create a new project
4. Choose SAP HANA Database Project and click Start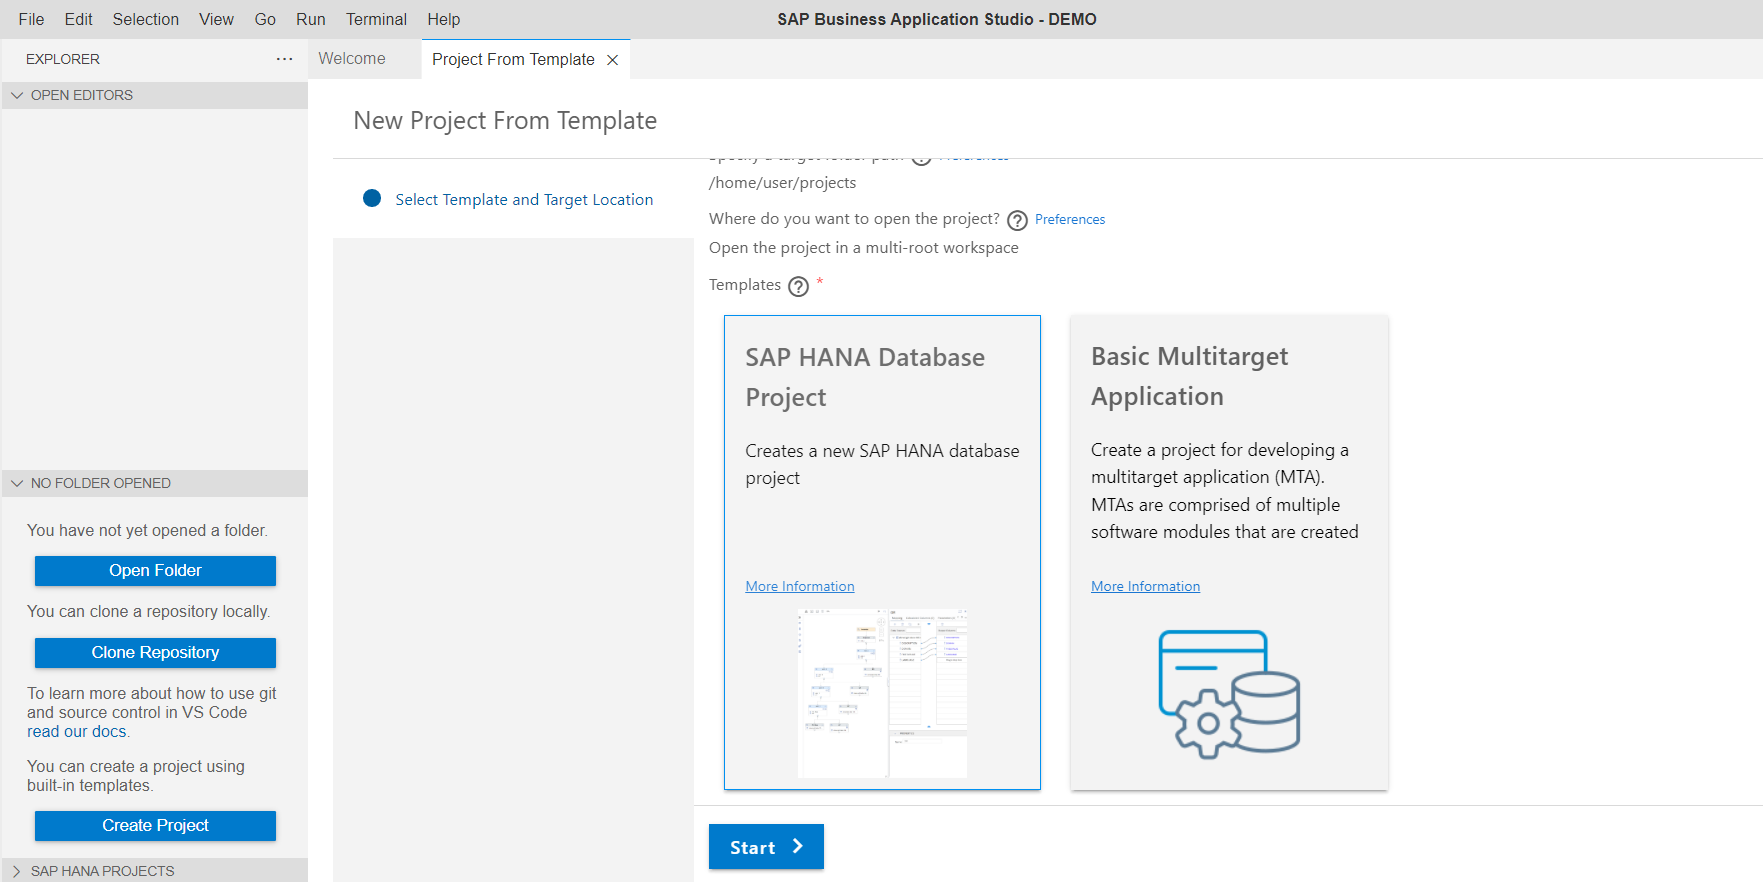
5. Provide the project name as DEMO and click Next
6. Retain the module name as default "db" and click Next
7. Enter schema name "MY_SCHEMA" and choose Database version as "HANA Cloud" and click Next
8. To bind your project to your SAP HANA Cloud, SAP HANA database, you must log on to a Cloud Foundry environment in the SAP BTP subaccount. Once the login is complete, your organization and space are automatically selected
Provide all the necessary details and click on Finish
9. Once the project is complete,Press the Open in New Workspace button in this success message to open the new project in the IDE

Create database artifacts
1. Navigate to View > Find Command > Create Database Artifact > Choose Artifact type as Table > Provide Artifact Name > Create
2. Create table with required details and click Deploy in SAP HANA PROJECTS View
3. Create CSV file

4. Enter the data in CSV file and click Deploy in SAP HANA PROJECTS View

5. Create hdbtabledata to import the data from CSV into Table

6. Define the mappings in the hdbtabledata file and click Deploy in SAP HANA PROJECTS View

Grant Access to an SAP HDI Container's Schema
To grant access privileges for the entire container schema where the database objects are located to a database object consumer USER, perform the following steps.
Grant access to the HDI container's schema by executing the below:
1. In DBX, connect to HDI container and Open SQL Admin Console

2. Grant access to the HDI container's schema by executing the below statements
| CREATE LOCAL TEMPORARY COLUMN TABLE #PRIVILEGES LIKE _SYS_DI.TT_SCHEMA_PRIVILEGES; INSERT INTO #PRIVILEGES ( PRIVILEGE_NAME, PRINCIPAL_SCHEMA_NAME, PRINCIPAL_NAME ) VALUES ( 'SELECT', '', 'USER' ); CALL C#DI.GRANT_CONTAINER_SCHEMA_PRIVILEGES( #PRIVILEGES, _SYS_DI.T_NO_PARAMETERS, ?, ?, ?); DROP TABLE #PRIVILEGES; |

3. Confirm that the USER can now access the database objects in the container's schema.

Replicate artifacts data from HDI container into SAP HANA On Premise
Create remote source to the Hana Cloud Database
1. In an SQL console, connected to the SAP HANA on-premise database, create a remote source to the HC database using HANA adapter:
| CREATE REMOTE SOURCE "<SOURCE_NAME>" ADAPTER "HanaAdapter" AT LOCATION AGENT "<AGENT>" CONFIGURATION '<?xml version="1.0" encoding="UTF-8" standalone="yes"?> <ConnectionProperties name="configurations"> <PropertyGroup name="database" displayName="Database"> <PropertyEntry name="host" displayName="Host"><HANA_CLOUD_HOST></PropertyEntry> <PropertyEntry name="port" displayName="Port Number"><PORT></PropertyEntry> <PropertyEntry name="schema" displayName="Schema"><SCHEMA_NAME></PropertyEntry> </PropertyGroup> <PropertyGroup name="cdc_properties" displayName="CDC Properties"> <PropertyEntry name="prefix" displayName="System Object Prefix">HADP_</PropertyEntry> <PropertyEntry name="ddl_scan_interval" displayName="DDL Scan Interval in Minutes">1</PropertyEntry> </PropertyGroup> </ConnectionProperties> ' WITH CREDENTIAL TYPE 'PASSWORD' USING '<CredentialEntry name="credential"> <user><USERNAME></user> <password><PASSWORD></password> </CredentialEntry>'; |
2. Create the virtual table VT in the target system based on the table "EMPLYOEE DETAILS" in the "MY_SCHEMA" schema of the source system
| CREATE VIRTUAL TABLE VT AT "REMOTE_SOURCE"."<NULL>"."MY_SCHEMA"."EMPLOYEE_DETAILS"; |
3. Create the replica table RT using the virtual table VT as the source for the definition
| CREATE COLUMN TABLE RT LIKE VT; |
4. Create a remote subscription, specifying VT as the virtual table on which the changes are to be captured and RT as the target table to which they are to be applied
| CREATE REMOTE SUBSCRIPTION SUB ON VT TARGET TABLE RT; |
5. Initialize real-time data processing using ALTER REMOTE SUBSCRIPTION with QUEUE command
| ALTER REMOTE SUBSCRIPTION SUB QUEUE ; |
6. Activate replication using the DISTRIBUTE command
| ALTER REMOTE SUBSCRIPTION SUB DISTRIBUTE; |
7. Check for the real time data replicated on to the target table
| SELECT * FROM RT; |
8. Deactivate replication and Drop the replication when it is no longer needed
ALTER REMOTE SUBSCRIPTION SUB RESET; DROP REMOTE SUBSCRIPTION SUB; |
Conclusion
In this blog we have seen how to grant access to HDI's schema, setup real time replication using HANA adapter, create a virtual table, a target table, a remote subscription, and then activate replication on the target system.
- SAP Managed Tags:
- SAP Business Application Studio,
- SAP HANA Cloud, SAP HANA database,
- SAP HANA
Labels:
9 Comments
You must be a registered user to add a comment. If you've already registered, sign in. Otherwise, register and sign in.
Labels in this area
-
ABAP CDS Views - CDC (Change Data Capture)
2 -
AI
1 -
Analyze Workload Data
1 -
BTP
1 -
Business and IT Integration
2 -
Business application stu
1 -
Business Technology Platform
1 -
Business Trends
1,658 -
Business Trends
91 -
CAP
1 -
cf
1 -
Cloud Foundry
1 -
Confluent
1 -
Customer COE Basics and Fundamentals
1 -
Customer COE Latest and Greatest
3 -
Customer Data Browser app
1 -
Data Analysis Tool
1 -
data migration
1 -
data transfer
1 -
Datasphere
2 -
Event Information
1,400 -
Event Information
66 -
Expert
1 -
Expert Insights
177 -
Expert Insights
293 -
General
1 -
Google cloud
1 -
Google Next'24
1 -
Kafka
1 -
Life at SAP
780 -
Life at SAP
12 -
Migrate your Data App
1 -
MTA
1 -
Network Performance Analysis
1 -
NodeJS
1 -
PDF
1 -
POC
1 -
Product Updates
4,577 -
Product Updates
340 -
Replication Flow
1 -
RisewithSAP
1 -
SAP BTP
1 -
SAP BTP Cloud Foundry
1 -
SAP Cloud ALM
1 -
SAP Cloud Application Programming Model
1 -
SAP Datasphere
2 -
SAP S4HANA Cloud
1 -
SAP S4HANA Migration Cockpit
1 -
Technology Updates
6,873 -
Technology Updates
417 -
Workload Fluctuations
1
Related Content
- Personalization for tables in HTML Container for SAP UI5 application in Technology Q&A
- Embracing TypeScript in SAPUI5 Development in Technology Blogs by Members
- ABAP Cloud Developer Trial 2022 Available Now in Technology Blogs by SAP
- CF Deployment Error: Error getting tenant t0 in Technology Q&A
- Kerberos Error when task "deploy" from db-deployer in Technology Q&A
Top kudoed authors
| User | Count |
|---|---|
| 32 | |
| 24 | |
| 8 | |
| 7 | |
| 7 | |
| 6 | |
| 6 | |
| 6 | |
| 5 | |
| 4 |