
- SAP Community
- Products and Technology
- Spend Management
- Spend Management Blogs by Members
- Amazon Punchout Set-up for SAP Ariba
Spend Management Blogs by Members
Check out community member blog posts about spend management and SAP Ariba, SAP Fieldglass, and SAP Concur solutions. Post or comment about your experiences.
Turn on suggestions
Auto-suggest helps you quickly narrow down your search results by suggesting possible matches as you type.
Showing results for
former_member82
Discoverer
Options
- Subscribe to RSS Feed
- Mark as New
- Mark as Read
- Bookmark
- Subscribe
- Printer Friendly Page
- Report Inappropriate Content
11-08-2022
11:26 PM
1. Introduction
Goal of Procurement function is to generate maximum saving with efficient Procurement Process. Punchout catalogs which are very easy to use and integrate and leverages contracts present with suppliers helps to fulfill this objective.
A punchout catalog is a catalog that resides on a supplier’s e-commerce site. It redirects buyers from their procurement app like Ariba to the supplier’s website. From the supplier’s site, they can search for, compare, and select what they want to buy before returning their shopping cart items to their procurement app for approval and purchase.
2. Overview of Amazon Business catalog in SAP Ariba
Widely enabled punchout catalog these days is Amazon catalog where in Amazon Business website would be connected to SAP Ariba Solution so that user can check & select items over Amazon as per organization policy and selected item will be added to Ariba Shopping cart on checkout.
Punchout to the Amazon Business catalog from SAP Ariba solutions to help ensure controls and approval workflows are applied to the items selected for purchase in Amazon Business based on preferences procurement teams set within the SAP Ariba solutions. In addition, end users have access to all payment options available in SAP Ariba solutions.
Benefits with Amazon Punchouts
- Simple Buying Experience
- Increases transparency & Sets Compliant Processes
- Increases visibility on Spend
- Cost effective & Offers Wide selection of products
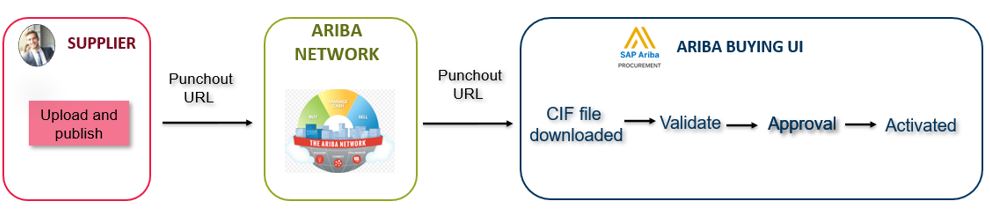
3. Process overview
Let us understand process of Setting up Amazon Punchout in SAP Ariba Solution.

4. Detailed steps for Amazon setup in Ariba
4.1. Creation of Amazon Business Account and enabling punchout settings
- Create an Amazon Business account by registering in Amazon Business website. (Google as Amazon Business).
- Over Amazon Business site, first click over the ‘Your Account’ drop down menu and then Select ‘Business Settings’.

- Under ‘Members’ section, click over ‘Groups’ and then Click on ‘Add Group’ to create a new group. This group can be used as Punch out group

- Select ‘Individual payment methods and addresses’ or ‘Shared payment method and addresses’ depending on how your users can pay for purchases.
i. Individual payment method and addresses: Requisitioners have the flexibility to enter their own purchase card information and ship to address during checkout.
ii. Shared payment methods and addresses: Once shared settings are enabled, Requisitioners cannot add their own payment methods or shipping addresses for a purchase during checkout – they can only choose from the options configured.
iii. Do not allow users to place orders on this group: Users will only have “Read only” access to Amazon Business and are unable to checkout

- Click on newly created group. If it doesn’t show up immediately, please refresh the web page.

6. Under ‘System Integrations’, click on ‘Configure Purchasing System’.

7. The wizard will walk us through the steps to generate your credentials by choosing Ariba as the purchasing system. Enter the ‘Buyer’s AN-ID’ in the Ariba Network ID field.

- In the summary, both the AN-ID details will get displayed.

4.2. Establishing Trading Relationship
Note: To be done in both Test and Production accounts.
You can establish TRR with a supplier on Ariba Network using steps below:
- Sign in to the Ariba Network.
- Click Supplier Enablement > Active Relationships.
- At the bottom of the page, click Search for Suppliers.
- Under Basic Profile, use the search filters to locate the supplier and click Searchat the bottom of the page.
- Under Search Results, click Request Relationshipunder the Actions
- Check the box for I have reviewed and verified the profile and click Request a Trading Relationship.
- The request will have to be accepted by Amazon.
Points to be remembered:
- Payload ID in cXML punchout setup request and Order request should be always unique.
- Amazon supports only new order type. Update and delete are not supported as part of punchout integration.
- Users must contact Customer support to make changes to an existing order.
4.3. Create Supplier in Ariba
Note: To be done in Test and Production accounts. First create Supplier in parent realm and then in child realm.
Create the supplier in SAP ERP. With the generated supplier ID and the other details, load/create the supplier in Ariba Buying or Ariba Buying & Invoicing UI.
Below are the steps to be performed.
- Login to Ariba UI.
- Go to the Core Administration page. Click on Supplier Manager >> Suppliers >> Create New. Enter the supplier details and save it.
- Prepare SupplierConsoldiated.csv and SupplierLocationConsolidated.csv file.
- To get the sample file mentioned in step 3. Go to menu path as Site Manager >> Data Import/Export. Search the below mentioned tasks (in export tab) and click on export. a. Export Supplier Data (Consolidated File) b. Export Supplier Locations Data (Consolidated File)

i. The files will be get downloaded with the name containing “export” in the suffix.
ii. Rename the files by removing the suffix as SupplierConsolidated.csv and SupplierLocationConsolidated.csv respectively. Update the files with the required Amazon supplier id and other details.
Important Note: For test site, ANID should be entered with ‘-t’ in the suffix. Example: If the ANID to be used in production is ‘an123abcd, then for test site it should be mentioned as ‘an123abcd-t’.
5. Import the files prepared in Step 4. Click on Site Manager >> Data Import/Exports.
i. First run the import task ‘Import Supplier Data (Consolidated file)’ – using the file SupplierConsolidated.csv
ii. Second run the Import task ‘Import Supplier Location Data (Consolidated File) – using the file SupplierLocationConsolidated.csv

6. Once both the import task ran successful, Cross-verify the supplier details in Supplier Manager >> Suppliers >> Search with the supplier's name.
7. Thus, Supplier creation in Ariba is done.
4.4. Catalog Sync
Note: To be done in Test and Production in parent realm only.
Contact the Amazon customer administrator to publish the catalog in Ariba network. Once it is published, then it can be downloaded in Ariba Buying / Ariba buying & invoicing through schedule task available provided by Ariba.
Go to Catalog Manager in the Core administration page >> Catalog Manager >> Schedule Tasks. Search the task ‘Ariba Network Full Subscription Synchronization’ and click on Run.

4.5. Activating catalog
Note: To be done in Test and Production in parent realm.
Once the schedule task gets completed, following to be done for activating the catalog:
- Go to Catalog manager >> Catalogs where the downloaded catalog will be listed with the status validating and upon completion, the status gets changed to ‘Validated’ (it is based on system configuration).
- Select the catalog and click on ‘Send for Approval’ button.
- Check with the catalog Manager and get it approved.
- After approval, select the catalog and click on ‘Activate’ and the status will change as ‘Activating’.
- Then the catalog status gets changed to ‘Activated’ (system takes some time to activate the catalog and update the status) which means it is now available to users for purchasing.
Note: In some client’s Ariba system, it can be configured in such a way that catalog gets automatically routed to approval and then for activation. In such cases, manual steps can be ignored.
4.6. Catalog replication to child realm
Note: To be done in Test and Production in parent realm.
After the catalog gets activated, the same must be replicated to child realm by doing the below steps:
- Go to Catalog Manager >> Catalog replication
- In Configuration tab, select the catalog that is activated and click on Actions and then click subscribe.

- Catalog will get replicated to child realm in few minutes.
4.7. Payment Setup in Amazon
Login to amazon business account, click on the Account drop down menu and do the following:
- Select Manage Your Business >> Groups >> Click on Newly created punchout group.
- Click on Payment Methods under ‘Billing & shipping’ and add payment method. It should be in test mode for now.

4.8. Testing
After the setting up the payment mode as test, now proceed with testing by placing some orders in test site.
Note: The test orders will be rejected by default and will be clearly mentioned in the Order confirmation emails.
Here are some suggested test scenarios using Product & Quantity variations:
- 1type of product, quantity1
- 1 type of product, quantity 3
- 2 Different Products, Quantity 1
- 2 Different Products, Quantities 3 &5
4.9. Move to Production
Below steps to be done after testing and received sign offs to move to production.
- Login into Amazon Business account
- Click on Account dropdown menu à Manage your Business >> Groups >> Click on Newly created punchout group
- Click Purchasing System >> System >> Edit. Change the Status to Active and save.

- Select your payment method and save your settings. If you selected individual payment method while creating a group, you will not be asked to select a payment method.

- Amazon catalog enabled in Production.
Note: Now the amazon account is in active mode, so the purchase orders that are created in Production will ship and the selected payment method will be charged.
5. Conclusion
This setup provides a detailed overview of the end-to-end configuration required to setup Amazon Punchout catalog within SAP Ariba
Please provide your feedback/comments/thoughts in the comments section, which will help me to learn more from you and encourage me to improve the content in any of my future blogs. Please do follow the tags and my profile for getting notifications related to any new blog posts.
Additionally, you can also post your questions in the tagged Q&A community to get the answers from the experts of the community.
- SAP Managed Tags:
- SAP Ariba Catalog
1 Comment
You must be a registered user to add a comment. If you've already registered, sign in. Otherwise, register and sign in.
Labels in this area
Related Content
- Suppliers should merge all electronic pipelines into an Omni-channel strategy. in Spend Management Blogs by SAP
- Using CIF Catalogs to Better Index your Punchout Experience. in Spend Management Blogs by SAP
- Why are UNSPSC codes important to a Supplier in the eProcurement space? in Spend Management Blogs by SAP
- SNI enabled website in Spend Management Q&A
- Is Ariba Network required when setting up punchout catalog in Ariba? in Spend Management Q&A