
- SAP Community
- Products and Technology
- Technology
- Technology Blogs by SAP
- Enhance user experience using SAP BTP Mobile Servi...
Technology Blogs by SAP
Learn how to extend and personalize SAP applications. Follow the SAP technology blog for insights into SAP BTP, ABAP, SAP Analytics Cloud, SAP HANA, and more.
Turn on suggestions
Auto-suggest helps you quickly narrow down your search results by suggesting possible matches as you type.
Showing results for
Advisor
Options
- Subscribe to RSS Feed
- Mark as New
- Mark as Read
- Bookmark
- Subscribe
- Printer Friendly Page
- Report Inappropriate Content
11-07-2022
6:51 PM
My name is Nhat Doan. I am currently in SAP Student Training and Rotation (STAR) Program. In my first rotation, I have a chance to join CoE Mobile & UX team. I have learned a lot of things especially about current developments in mobile technology. Today, smartphones become essential for daily life. Businesses are using mobile applications to serve their clients and they will see many benefits such as brand building, customer connection, and profit boosts. I would like to share some topics concerning mobile development.
The application that we are going to build will have the list of products using Northwind OData service.
From the list, users can search, filter, and sort the products basing on name, category, price…
Users can also click on the product to see the detail of the product.
We need to finish these steps to develop the application:
1.Create SAP BTP account
Visit https://www.sap.com and click Log On. Click Register to create new Account. Fill the require information and click Save and Continue.
Create subaccount
Login to SAP BTP account. Select the location and click Create Account. We will have a global trial account with one subaccount and space.
2.Launch SAP Mobile Service cockpit
Open the link https://account.hanatrial.ondemand.com/cockpit. Log on to SAP Trial Account. Go to trial global account by clicking Go To Your Trial Account. Click to subaccount in global account. In the left pane, click Services -> Service Marketplace. Type Mobile in the search bar and click Mobile Services tile.
3.Create new application in SAP Mobile Service cockpit
Navigate to SAP Mobile Service cockpit. Click Create new app. Provide the information to create the new application.
4.Create a destination for MDK Mobile application
Click on Mobile Connectivity and Create new Mobile Destination.
Set the Destination Name to productcatalog. Set the url to: https://services.odata.org/V2/Northwind/Northwind.svc/.
Click Next and keep the default value for step 2 and step 3. In step 4, set the value for SSO Mechanism to Forward Authentication.
Click Next and click Finish.
5.Create a destination for MDK Web application
Log on to SAP Trial Account. Go to trial global account by clicking Go To Your Trial Account. Click to subaccount in global account. In the left pane, click Destinations. Click New Destination. Input the information for new destination. Destination name for MDK Mobile Application and MDK Web Application should be the same. We use productcatalog for these two destinations.
Click Create Dev Space. Select SAP Mobile Application. Provide the name for the new dev space.
7.Create the new Application in SAP Business Application Studio
Click on the Dev Space for SAP Mobile Application. Click Start Project From Template. Select MDK Project.
Create Product List page
Create a new folder Product inside Pages folder
Right click on the Product folder and select MDK: New Page. Select Section Page and name the page to Product_List
Drag Object Table from the Control section to the Product_List page.
Service:com_sap_mdk_productcatalog.service
EntitySet: Products
QueryOptions: $expand=Category&$orderby=ProductName
In the Property section, delete the value of Description, DetailImage. Set the value of PreserveIconStackSpacing to false. Set the value of ProgressIndicator to empty. Delete the value of Substatus. Delete the value of Tags. Delete the value of Footnote. Delete the value of Avatars. Set the value of Status to: $(C,{UnitPrice},'USD','',{minimumIntegerDigits:1,minimumFractionDigits:0,maximumFractionDigits:2,useGrouping:true}). This value is used to display the price of the product. Set the value of Title to {ProductName}. Set the value of Subhead to {Category/CategoryName}.
Set Product_List page to Main Page
Open Application.app. Set the value of Main Page to Product_List.page.
Run the application
Right click on Application.app. Select MDK: Deploy. Select Mobiles Service Run as mobile app. Click on the icon next to Application QR Code to show the QR code. Download SAP Mobile Services Client on the phone. Open SAP Mobile Services Client on the phone. Scan the QR code from the application to run the app. We will see the list of the product.
Create Product Detail page
Go to folder Pages/Product. Right click on the Product folder select MDK: Name Page. Create new Section Page with name Product_Detail. Drag Static Key Value to the Product_Detail page. Set the Property NumberOfColumns to 1. Drag the Header in to Static Key Value. Remove the value of Caption property. Drag Key Value Item into Static Key Value. Set KeyName to Product name. Set Value to {ProductName}. Do the same for the other fields:
KeyName: Price
Value: {UnitPrice}
KeyName: Category
Value: {Category/CategoryName}
KeyName: Unit In Stock
Value: {UnitsInStock}
KeyName: Reorder Level
Value: {ReorderLevel}
Create action to navigate to Product Detail page
Right click on Action folder. Select New Folder to create new Product folder. Right click on Product folder. Select MDK: New Action. Create new Navigation Action. Set PageToOpen to Product_Detail page
Name the action to NaviToProduct_Detail.
Show product detail when user click on an item of Product List page
Go to Product List page. Click on Object Table. Select Event tab. Assign OnPress event to NaviToProduct_Detail.action
Create Filter Page
Navigate to folder Pages/Product. Create new Section Page with name Product_Filter
Drag Section to Product_Filter page. Set Caption property to Sort By. Drag Sorter to Section. Delete the Caption property of Sorter. Select Object collection for SortByItems property. Add four items to SortByItem with the value:
DisplayValue: Product Name
ReturnValue: ProductName
DisplayValue: Category
ReturnValue: Category
DisplayValue: Price (Low to High)
ReturnValue: UnitPrice asc
DisplayValue: Price (High to Low)
ReturnValue: UnitPrice desc
Drag another Section to the Product_Filter page. Set the Caption property to Filter by. Drag a List Picker into this Section. Set these properties for List Picker:
Service: /ProductCatalog_MDK/Services/
com_sap_mdk_productcatalog.service
EntitySet: Category
DisplayValue: {CategoryName}
ReturnValue: {CategoryName}
Assign property for Product Filter page
Click on title of Product_Filter page. Assign the Result property with this value:
#Page:Product_Filter/#Control:SortBy/#Value
#Page:Product_Filter/#Control:CategoryFilter/#FilterValue
Create Action to navigate to Filter Page
Navigate to Actions/Product. Create new Filter action. Set PageToOpen to Product_Filter.page. Name the action to NaviToProduct_Filter.
Create Filter Action Bar Item
Go to Product_List page. Drag an Action Bar Item to the top right corner of Product_List page. Set the Caption to Filter.
Assign event for Filter Action Bar Item
Click on the Filter Action Bar Item. Click to the Event tab. Assign OnPress event to NaviToProduct_Filter.action.
Assign event for Filter Action Bar Item
Click on the Filter Action Bar Item. Click to the Event tab. Assign OnPress event to NaviToProduct_Filter.action.
Create ResetFilter.js Rule file
Right click on Rules folder. Create new folder Product. Right click on the Product folder. Select MDK: New Rule File. Select Empty JS Rule. Set the Name to ResetFilter.js. Copy this value for the Rule File. This file helps to reset all the value of the controller when user click on the Rese toolbar.
Assign ResetFilter.js to Reset Toolbar Item
Go to Product_Filter page. Click to Reset. Click to Event tab. Assign OnPress event to ResetFilter.js
8.Reference
This tutorial based on
Create BTP account: https://developers.sap.com/tutorials/hcp-create-trial-account.html
Set Up Initial Configuration for an MDK App: https://developers.sap.com/tutorials/cp-mobile-dev-kit-ms-setup.html
Set Up SAP Business Application Studio for Multi-Channel Development: https://developers.sap.com/tutorials/cp-mobile-bas-setup.html
This tutorial uses
Northwind oData service: https://services.odata.org/V2/Northwind/Northwind.svc/
Conclusion
We have just finished the Product Catalog application. The application shows the list of the product. Users can search product by name, sort product by name, category, price, and filter product by category. Beside that, users can click on the product from the list to see the detail of the product.
Please let me know your feedback, questions in the comments. I would be happy to get back to you.
Check for the full implementation: https://github.com/barrydoan/ProductCatalog_MDK.git
Other helpful links in the SAP Community please visit https://blogs.sap.com/tags/668874921104038800958643358380369/
- Build ProductCatalog application with AppGyver and Northwind OData service.
- Build ProductCatalog application with SAP MDK and Northwind OData service.
- How to style the MDK application.
- How to run MDK application on virtual device and override resources.
- How to reads log, traces issue, and measures performance for MDK application.
Build ProductCatalog application with SAP MDK and Northwind OData service
The application that we are going to build will have the list of products using Northwind OData service.

Figure 1: Product List page
From the list, users can search, filter, and sort the products basing on name, category, price…

Figure 2: Product Filter page
Users can also click on the product to see the detail of the product.

Figure 3: Product Detail page
We need to finish these steps to develop the application:
- Create SAP BTP account
- Create new application in SAP Mobile Service cockpit
- Create a destination for MDK Mobile application
- Create a destination for MDK Web application
- Create SAP Mobile Application Dev Space
- Create the new Application in SAP Business Application Studio
1.Create SAP BTP account
Visit https://www.sap.com and click Log On. Click Register to create new Account. Fill the require information and click Save and Continue.

Figure 4: Register for an account
Create subaccount
Login to SAP BTP account. Select the location and click Create Account. We will have a global trial account with one subaccount and space.

Figure 5: Global account with a subaccount
2.Launch SAP Mobile Service cockpit
Open the link https://account.hanatrial.ondemand.com/cockpit. Log on to SAP Trial Account. Go to trial global account by clicking Go To Your Trial Account. Click to subaccount in global account. In the left pane, click Services -> Service Marketplace. Type Mobile in the search bar and click Mobile Services tile.

Figure 6: Mobile Service in Service Marketplace
3.Create new application in SAP Mobile Service cockpit
Navigate to SAP Mobile Service cockpit. Click Create new app. Provide the information to create the new application.

Figure 7: Create new application in Mobile Service
4.Create a destination for MDK Mobile application
Click on Mobile Connectivity and Create new Mobile Destination.

Figure 8: Mobile Connectivity in Assigned Features
Set the Destination Name to productcatalog. Set the url to: https://services.odata.org/V2/Northwind/Northwind.svc/.

Figure 9: Set destination
Click Next and keep the default value for step 2 and step 3. In step 4, set the value for SSO Mechanism to Forward Authentication.

Figure 10: Set Forward Authentication for SSO Mechanism
Click Next and click Finish.
5.Create a destination for MDK Web application
Log on to SAP Trial Account. Go to trial global account by clicking Go To Your Trial Account. Click to subaccount in global account. In the left pane, click Destinations. Click New Destination. Input the information for new destination. Destination name for MDK Mobile Application and MDK Web Application should be the same. We use productcatalog for these two destinations.

Figure 11: Set destination for MDK web application
Click Next and click Finish.
5.Create a destination for MDK Web application
Log on to SAP Trial Account. Go to trial global account by clicking Go To Your Trial Account. Click to subaccount in global account. In the left pane, click Destinations. Click New Destination. Input the information for new destination. Destination name for MDK Mobile Application and MDK Web Application should be the same. We use productcatalog for these two destinations.

Figure 12: Dev Space screen
Click Create Dev Space. Select SAP Mobile Application. Provide the name for the new dev space.

Figure 13: Select what kind of application for Dev Space
7.Create the new Application in SAP Business Application Studio
Click on the Dev Space for SAP Mobile Application. Click Start Project From Template. Select MDK Project.

Figure 14: MDK Project template
Provide the application name. Select the Application Id. Select the Destination.

Figure 15: Select Application Id and Destination for new project
Create Product List page
Create a new folder Product inside Pages folder

Figure 16: Product folder insides Page folder
Right click on the Product folder and select MDK: New Page. Select Section Page and name the page to Product_List

Figure 17: Select Section Page
Drag Object Table from the Control section to the Product_List page.

Figure 18: Object Table in Product_List page
Service:com_sap_mdk_productcatalog.service
EntitySet: Products
QueryOptions: $expand=Category&$orderby=ProductName

Figure 19: Set value for Service, EntitySet, QueryOptions
In the Property section, delete the value of Description, DetailImage. Set the value of PreserveIconStackSpacing to false. Set the value of ProgressIndicator to empty. Delete the value of Substatus. Delete the value of Tags. Delete the value of Footnote. Delete the value of Avatars. Set the value of Status to: $(C,{UnitPrice},'USD','',{minimumIntegerDigits:1,minimumFractionDigits:0,maximumFractionDigits:2,useGrouping:true}). This value is used to display the price of the product. Set the value of Title to {ProductName}. Set the value of Subhead to {Category/CategoryName}.
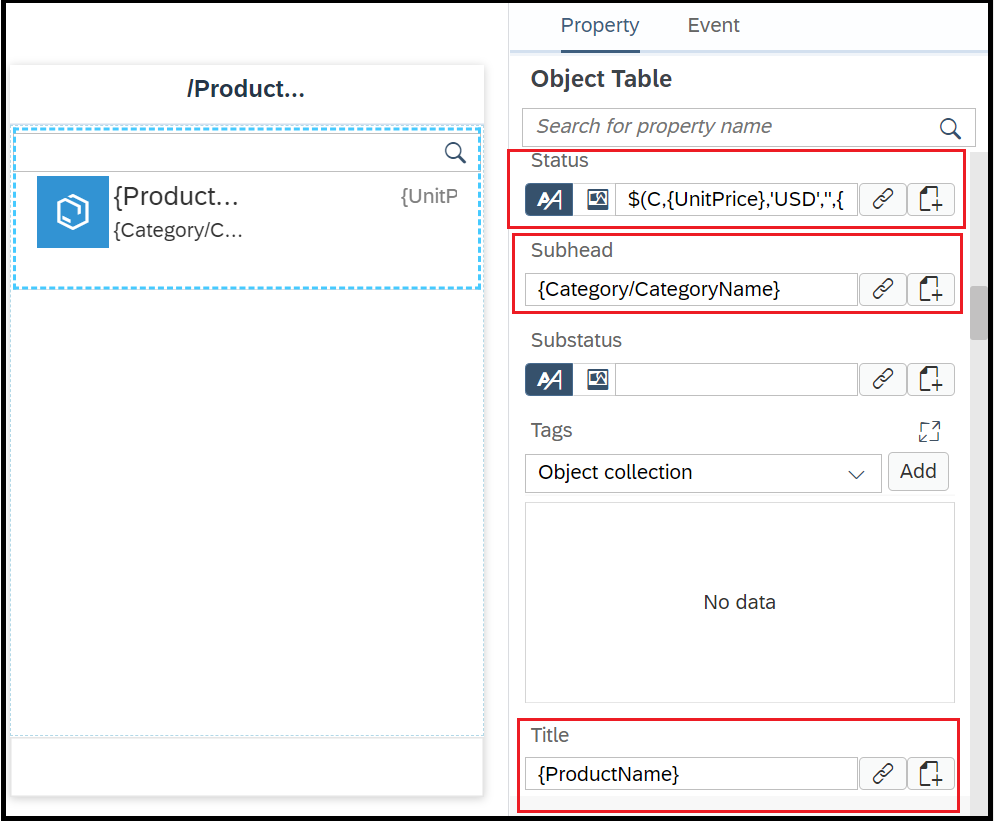
Figure 20: Set properties for displaying product in product list
Set Product_List page to Main Page
Open Application.app. Set the value of Main Page to Product_List.page.

Figure 21: Product_List page becomes Main Page
Run the application
Right click on Application.app. Select MDK: Deploy. Select Mobiles Service Run as mobile app. Click on the icon next to Application QR Code to show the QR code. Download SAP Mobile Services Client on the phone. Open SAP Mobile Services Client on the phone. Scan the QR code from the application to run the app. We will see the list of the product.
Create Product Detail page
Go to folder Pages/Product. Right click on the Product folder select MDK: Name Page. Create new Section Page with name Product_Detail. Drag Static Key Value to the Product_Detail page. Set the Property NumberOfColumns to 1. Drag the Header in to Static Key Value. Remove the value of Caption property. Drag Key Value Item into Static Key Value. Set KeyName to Product name. Set Value to {ProductName}. Do the same for the other fields:
KeyName: Price
Value: {UnitPrice}
KeyName: Category
Value: {Category/CategoryName}
KeyName: Unit In Stock
Value: {UnitsInStock}
KeyName: Reorder Level
Value: {ReorderLevel}

Figure 22: Product_Detail page structure
Create action to navigate to Product Detail page
Right click on Action folder. Select New Folder to create new Product folder. Right click on Product folder. Select MDK: New Action. Create new Navigation Action. Set PageToOpen to Product_Detail page
Name the action to NaviToProduct_Detail.

Figure 23: NaviToProduct_Detail action
Show product detail when user click on an item of Product List page
Go to Product List page. Click on Object Table. Select Event tab. Assign OnPress event to NaviToProduct_Detail.action

Figure 24: Set Event for Product List
Create Filter Page
Navigate to folder Pages/Product. Create new Section Page with name Product_Filter
Drag Section to Product_Filter page. Set Caption property to Sort By. Drag Sorter to Section. Delete the Caption property of Sorter. Select Object collection for SortByItems property. Add four items to SortByItem with the value:
DisplayValue: Product Name
ReturnValue: ProductName
DisplayValue: Category
ReturnValue: Category
DisplayValue: Price (Low to High)
ReturnValue: UnitPrice asc
DisplayValue: Price (High to Low)
ReturnValue: UnitPrice desc

Figure 25: Product_Filter page Sort By structure
Drag another Section to the Product_Filter page. Set the Caption property to Filter by. Drag a List Picker into this Section. Set these properties for List Picker:
Service: /ProductCatalog_MDK/Services/
com_sap_mdk_productcatalog.service
EntitySet: Category
DisplayValue: {CategoryName}
ReturnValue: {CategoryName}

Figure 26: Product_Filter page Filter by structure
Assign property for Product Filter page
Click on title of Product_Filter page. Assign the Result property with this value:
#Page:Product_Filter/#Control:SortBy/#Value
#Page:Product_Filter/#Control:CategoryFilter/#FilterValue

Figure 27: Set the Result for Product_Filter page
Create Action to navigate to Filter Page
Navigate to Actions/Product. Create new Filter action. Set PageToOpen to Product_Filter.page. Name the action to NaviToProduct_Filter.

Figure 28: NaviToProduct_Filter action
Create Filter Action Bar Item
Go to Product_List page. Drag an Action Bar Item to the top right corner of Product_List page. Set the Caption to Filter.

Figure 29: Action Bar Item to go Product_Filter page
Assign event for Filter Action Bar Item
Click on the Filter Action Bar Item. Click to the Event tab. Assign OnPress event to NaviToProduct_Filter.action.

Figure 30: Assign Event for Filter Action Bar Item
Assign event for Filter Action Bar Item
Click on the Filter Action Bar Item. Click to the Event tab. Assign OnPress event to NaviToProduct_Filter.action.

Figure 31: Reset Toolbar Item for Product_Filter page
Create ResetFilter.js Rule file
Right click on Rules folder. Create new folder Product. Right click on the Product folder. Select MDK: New Rule File. Select Empty JS Rule. Set the Name to ResetFilter.js. Copy this value for the Rule File. This file helps to reset all the value of the controller when user click on the Rese toolbar.
export default function ResetFilter(context) {

    let formCellContainer = context.getPageProxy().getControl('FormCellContainer0');

    let controls = formCellContainer.getControls();


    if (controls && controls.length > 0) {

        for (let i = 0; i < controls.length; i++) {

            if (controls[i].getName() === 'SortBy') {

                // Reset the sort control to the first sort option in the group

                // Assumes the first sort option is the default sort order for the list

                controls[i].setValue(controls[i].getCollection()[0].ReturnValue);

            } else {

                // Clear any filter selections

                controls[i].setValue('');

            }

        }

    }

}
Assign ResetFilter.js to Reset Toolbar Item
Go to Product_Filter page. Click to Reset. Click to Event tab. Assign OnPress event to ResetFilter.js

Figure 32: Assign Event for Reset Toolbar Item
8.Reference
This tutorial based on
Create BTP account: https://developers.sap.com/tutorials/hcp-create-trial-account.html
Set Up Initial Configuration for an MDK App: https://developers.sap.com/tutorials/cp-mobile-dev-kit-ms-setup.html
Set Up SAP Business Application Studio for Multi-Channel Development: https://developers.sap.com/tutorials/cp-mobile-bas-setup.html
This tutorial uses
Northwind oData service: https://services.odata.org/V2/Northwind/Northwind.svc/
Conclusion
We have just finished the Product Catalog application. The application shows the list of the product. Users can search product by name, sort product by name, category, price, and filter product by category. Beside that, users can click on the product from the list to see the detail of the product.
Please let me know your feedback, questions in the comments. I would be happy to get back to you.
Check for the full implementation: https://github.com/barrydoan/ProductCatalog_MDK.git
Other helpful links in the SAP Community please visit https://blogs.sap.com/tags/668874921104038800958643358380369/
- SAP Managed Tags:
- SAP Mobile Services
Labels:
You must be a registered user to add a comment. If you've already registered, sign in. Otherwise, register and sign in.
Labels in this area
-
ABAP CDS Views - CDC (Change Data Capture)
2 -
AI
1 -
Analyze Workload Data
1 -
BTP
1 -
Business and IT Integration
2 -
Business application stu
1 -
Business Technology Platform
1 -
Business Trends
1,658 -
Business Trends
92 -
CAP
1 -
cf
1 -
Cloud Foundry
1 -
Confluent
1 -
Customer COE Basics and Fundamentals
1 -
Customer COE Latest and Greatest
3 -
Customer Data Browser app
1 -
Data Analysis Tool
1 -
data migration
1 -
data transfer
1 -
Datasphere
2 -
Event Information
1,400 -
Event Information
66 -
Expert
1 -
Expert Insights
177 -
Expert Insights
298 -
General
1 -
Google cloud
1 -
Google Next'24
1 -
Kafka
1 -
Life at SAP
780 -
Life at SAP
13 -
Migrate your Data App
1 -
MTA
1 -
Network Performance Analysis
1 -
NodeJS
1 -
PDF
1 -
POC
1 -
Product Updates
4,577 -
Product Updates
344 -
Replication Flow
1 -
RisewithSAP
1 -
SAP BTP
1 -
SAP BTP Cloud Foundry
1 -
SAP Cloud ALM
1 -
SAP Cloud Application Programming Model
1 -
SAP Datasphere
2 -
SAP S4HANA Cloud
1 -
SAP S4HANA Migration Cockpit
1 -
Technology Updates
6,873 -
Technology Updates
421 -
Workload Fluctuations
1
Related Content
- Start page of SAP Signavio Process Insights, discovery edition, the 4 pillars and documentation in Technology Blogs by SAP
- Consuming SAP with SAP Build Apps - Mobile Apps for iOS and Android in Technology Blogs by SAP
- Demystifying the Common Super Domain for SAP Mobile Start in Technology Blogs by SAP
- What’s new in Mobile development kit client 24.4 in Technology Blogs by SAP
- How to use AI services to translate Picklists in SAP SuccessFactors - An example in Technology Blogs by SAP
Top kudoed authors
| User | Count |
|---|---|
| 38 | |
| 25 | |
| 17 | |
| 13 | |
| 7 | |
| 7 | |
| 7 | |
| 7 | |
| 6 | |
| 6 |