
- SAP Community
- Products and Technology
- Technology
- Technology Blogs by SAP
- Commerce Cloud - Exposing Integration APIs to SAP ...
Technology Blogs by SAP
Learn how to extend and personalize SAP applications. Follow the SAP technology blog for insights into SAP BTP, ABAP, SAP Analytics Cloud, SAP HANA, and more.
Turn on suggestions
Auto-suggest helps you quickly narrow down your search results by suggesting possible matches as you type.
Showing results for
Employee
Options
- Subscribe to RSS Feed
- Mark as New
- Mark as Read
- Bookmark
- Subscribe
- Printer Friendly Page
- Report Inappropriate Content
10-14-2022
1:00 PM
Introduction
Integration APIs are a powerful and flexible way to expose new APIs to access and update SAP Commerce Cloud data. We have been using this feature for many years but some recent enhancements have made it even more useful! As of SAP Commerce Cloud release v2011, OAuth2 authentication is now supported for exposed Integration APIs. This article will cover how to update an existing Integration Object (IO) to support OAuth2 authentication and then expose the API and (re-)register it with your SAP BTP Kyma Runtime Destination Target.
The starting point of the process is nicely documented in SAP Help: Exposing an Integration Object as an API. Note this article uses Impex for easy, scripted creation of the necessary objects. This all can be done from the Backoffice UI as well.
Example Integration Object
For our example, we have an Integration Object that exposes the Customer Review item type in order to do some automated sentiment analysis and content moderation in a side-by-side extension in SAP BTP Kyma Runtime. You can review the impex for the integration object in the appendix at the bottom of this article.
Procedure
Once you have the IO created, following the help guide, the first step is to create an InboundChannelConfiguration that specifies OAUTH as the authenticationType:
INSERT_UPDATE InboundChannelConfiguration; integrationObject(code)[unique = true]; authenticationType(code);

;CustomerProductReview;OAUTH;
Next we need to create an IntegrationClientCredentialsDetails which is a subtype of OAUTHClientDetails specifically designed for enabling OAuth2 access to Integration Objects. This type includes a user reference that will be the principal that has the authorization for the item types included in the Integration Object, i.e. CustomerReview, Product, User, etc. The following script includes the user ODATAUSER who is actually an Employee and is a member of the integrationadmingroup. The script also specifies the authorization entries to those objects included in the IO. Finally we need to create an ExposedOAuthCredential that will allow the credentials to be shared with the destination target.
NOTE: The first line is a variable $oAuthPassword with the password for the ODATAUSER and odatauser-client. This value should be changed to ensure your API is secure.
$oAuthPassword=odata1234


INSERT_UPDATE Employee;uid[unique=true];password;groups(uid);

;ODATAUSER;$oAuthPassword;integrationadmingroup;


$START_USERRIGHTS; ; ; ; ; ; ; ; ;

Type      ; UID                          ; MemberOfGroups ; Password ; Target                         ; read ; change ; create ; remove ; change_perm

UserGroup ; integrationadmingroup        ;                ;          ;                                ;      ;        ;        ;        ;

# Access Rights for integrationadmingroup Users ;;;;;;;;;

;                                        ;                ;          ; CustomerReview                 ; +    ; +      ; +      ; +      ; +

;                                        ;                ;          ; Product                        ; +    ; +      ; +      ; +      ; +

;                                        ;                ;          ; CustomerReviewApprovalType     ; +    ; +      ; +      ; +      ; +

;                                        ;                ;          ; Catalog                        ; +    ; +      ; +      ; +      ; +

;                                        ;                ;          ; CatalogVersion                        ; +    ; +      ; +      ; +      ; +

;                                        ;                ;          ; Language                       ; +    ; +      ; +      ; +      ; +

;                                        ;                ;          ; User                           ; +    ; +      ; +      ; +      ; +

;                                        ;                ;          ; Address                        ; +    ; +      ; +      ; +      ; +

$END_USERRIGHTS; ; ; ; ;


INSERT_UPDATE IntegrationClientCredentialsDetails;clientId[unique = true];resourceIds;authorities;clientSecret;registeredRedirectUri;user(uid);

;odatauser-client;hybris;ROLE_INTEGRATIONADMINGROUP;$oAuthPassword;{ccv2.services.api.url.0}/authorizationserver/oauth/token;ODATAUSER;


INSERT_UPDATE ExposedOAuthCredential;id[unique=true];oAuthClientDetails(clientId);password

;odatauser-client;odatauser-client;$oAuthPassword
Verify Your API
Access the Integration API using Rest client such as Postman or command line:
# Set up environment variables


# OSX

export CCHOST={your-sap-commerce-cloud-host}

export CLIENT_SECRET={client secret configured in projectdata-register-integration-object.impex}


# Windows PowerShell

$CCHOST={your-sap-commerce-cloud-host}

$CLIENT_SECRET={client secret configured in projectdata-register-integration-object.impex}


# Get OAuth2 token

curl -X POST -d "client_id=odatauser-client&client_secret=$CLIENT_SECRET&grant_type=client_credentials" https://$CCHOST/authorizationserver/oauth/token


## Extract access_token from response


#Call Integration API

curl -L -X GET https://$CCHOST/odata2webservices/CustomerProductReview/CustomerReviews -H 'Accept: application/json' -H 'Authorization: Bearer {your access_token}'
Expose Your API - Default Template
Now we can expose our IO as an API. The following Impex script can be used if you have not yet registered a DestinationTarget such as SAP BTP Kyma Runtime. We first create an Endpoint. Note that the specUrl includes the placeholder {ccv2.services.api.url.0} which will be filled with the actual URL in the target SAP Commerce Cloud environment. Next we create a ExposedDestination which specifies the destination target Default Template. This configuration will include this API as an `ExposedDestination` when you register a Destination Target.
INSERT_UPDATE Endpoint;id[unique=true];name;version[unique=true];description;specUrl;specData;extensionName

;cc-customerreview;CC Customer Review v1;v1;"Commerce Cloud OData Customer Review Service v1";{ccv2.services.api.url.0}/odata2webservices/CustomerProductReview/$metadata;;odata2webservices


INSERT_UPDATE ExposedDestination;id[unique=true];url;endpoint(id)[unique=true];additionalProperties(key,value)[map-delimiter=|];destinationTarget(id)[default=Default_Template];active[default=true];credential(id)

;cc-customerreview;{ccv2.services.api.url.0}/odata2webservices/CustomerProductReview;cc-customerreview;;;;odatauser-client
Expose Your API - Existing Destination Target
If you want to expose the the new Integration API to an existing SAP BTP Kyma Runtime Destination Target, you must use the Backoffice UI. Navigate to the Integration UI Tool perspective, select Authentication under Integration APIs. Here, select your Integration Object, i.e. InboundCustomerReview. On the Inbound Channel Configuration Details, click the Add Integration API to one or more destination targets action.

Inbound Channel Configuration Details
On the Add Integration API With OAth Credential dialog, select the destination target where you want to expose this API, in this example demo-ccv2-d30-tst-eu20. Then select the OAuth Credential we created in the impex above, `odatauser-client`. Select Done and the system will create the required Endpoint and ExposedDestination.

Add Integration API With OAth Credential
Now you can view the generated ExposedDestination and register the new API with the Destination Target, i.e. SAP BTP Kyma Runtime. Switch to the Administration Cockpit perspective, and navigate to System > API > Exposed Destinations. Find the generated Exposed Destination and on the details panel, select the Register Exposed Destination action. This will run a background job to update the destination target, i.e. SAP BTP Kyma Runtime with the new API and credentials.
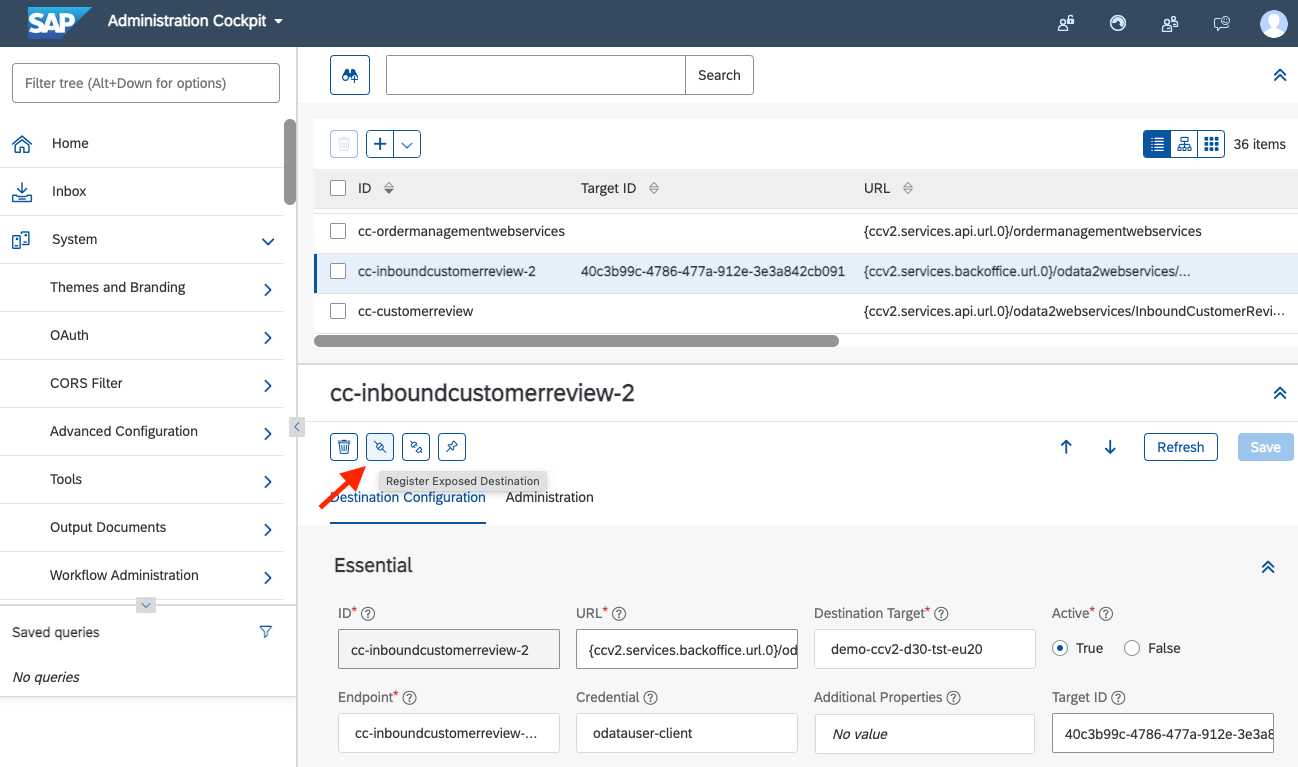
Register Exposed Destination action
API Details in BTP Cockpit
Now you can view the registered API in BTP Cockpit and it will be available in any SAP BTP Kyma Runtime system that is linked to the SAP Commerce Cloud System via a Formation. In BTP Cockpit, in your Global Account, navigate to System Landscape and find your SAP Commerce Cloud system. Find the new API in the list. On the API page, you can select the Display Definition action to see the API specification. The EDMX format of the Integration API is shown.

SAP BTP Cockpit API Details

SAP BTP Cockpit API Specification
API Details in SAP BTP Kyma Runtime Dashboard
In order to use your exposed API in a SAP BTP Kyma workload, you can view the it in the SAP BTP Kyma Runtime Dashboard. Navigate to Applications and select your SAP Commerce Cloud application entry. On that screen you can select the Integration API and view the details. The key piece of information is the Central Gateway URL which can be used in your function or service to call the API. The gateway proxy will take care of all of the authentication for you! It is recommended to store the Central Gateway URL in a ConfigMap or Secret and then add it as an environment variable to your function or service.

SAP BTP Kyma Runtime Dashboard Application Details

SAP BTP Kyma Runtime Dashboard API Details
Conclusion
This article described how to expose an Integration API in SAP Commerce Cloud and register it with SAP BTP Kyma Runtime. This will allow you to extend the API functions of SAP Commerce Cloud in a very flexible way and enable many possibilities for side-by-side extensions. If you have questions or feedback, please reply in the comments. We are always looking for interesting use cases to extend SAP Customer Experience solutions with SAP Business Technology Platform! For more great blog posts, please check out the SAP BTP Kyma Runtime blogs and ask and answer related questions!
Appendix - Integration Object Impex
INSERT_UPDATE IntegrationObject; code[unique = true]; integrationType(code)

; CustomerProductReview; INBOUND


INSERT_UPDATE IntegrationObjectItem; integrationObject(code)[unique = true]; code[unique = true]; type(code); root[default = false]; itemTypeMatch(code)

; CustomerProductReview	; Product                   	; Product                   	; 	; ALL_SUB_AND_SUPER_TYPES	;

; CustomerProductReview	; CustomerReviewApprovalType	; CustomerReviewApprovalType	; 	; ALL_SUBTYPES           	;

; CustomerProductReview	; User                      	; User                      	; 	; ALL_SUB_AND_SUPER_TYPES	;

; CustomerProductReview	; Language                  	; Language                  	; 	; ALL_SUB_AND_SUPER_TYPES	;

; CustomerProductReview	; CatalogVersion            	; CatalogVersion            	; 	; ALL_SUB_AND_SUPER_TYPES	;

; CustomerProductReview	; CustomerReview            	; CustomerReview            	; true	; ALL_SUB_AND_SUPER_TYPES	;

; CustomerProductReview	; Catalog                   	; Catalog                   	; 	; ALL_SUB_AND_SUPER_TYPES	;


INSERT_UPDATE IntegrationObjectItemAttribute; integrationObjectItem(integrationObject(code), code)[unique = true]; attributeName[unique = true]; attributeDescriptor(enclosingType(code), qualifier); returnIntegrationObjectItem(integrationObject(code), code); unique[default = false]; autoCreate[default = false]

; CustomerProductReview:Product                   	; code          	; Product:code                   	;                                                 	; true	;

; CustomerProductReview:Product                   	; catalogVersion	; Product:catalogVersion         	; CustomerProductReview:CatalogVersion            	; true	;

; CustomerProductReview:CustomerReviewApprovalType	; code          	; CustomerReviewApprovalType:code	;                                                 	; true	;

; CustomerProductReview:User                      	; uid           	; User:uid                       	;                                                 	; true	;

; CustomerProductReview:Language                  	; isocode       	; Language:isocode               	;                                                 	; true	;

; CustomerProductReview:CatalogVersion            	; version       	; CatalogVersion:version         	;                                                 	; true	;

; CustomerProductReview:CatalogVersion            	; catalog       	; CatalogVersion:catalog         	; CustomerProductReview:Catalog                   	; true	;

; CustomerProductReview:CustomerReview            	; alias         	; CustomerReview:alias           	;                                                 	; 	;

; CustomerProductReview:CustomerReview            	; user          	; CustomerReview:user            	; CustomerProductReview:User                      	; true	;

; CustomerProductReview:CustomerReview            	; approvalStatus	; CustomerReview:approvalStatus  	; CustomerProductReview:CustomerReviewApprovalType	; 	;

; CustomerProductReview:CustomerReview            	; headline      	; CustomerReview:headline        	;                                                 	; 	;

; CustomerProductReview:CustomerReview            	; comment       	; CustomerReview:comment         	;                                                 	; 	;

; CustomerProductReview:CustomerReview            	; product       	; CustomerReview:product         	; CustomerProductReview:Product                   	; true	;

; CustomerProductReview:CustomerReview            	; rating        	; CustomerReview:rating          	;                                                 	; 	;

; CustomerProductReview:CustomerReview            	; blocked       	; CustomerReview:blocked         	;                                                 	; 	;

; CustomerProductReview:CustomerReview            	; language      	; CustomerReview:language        	; CustomerProductReview:Language                  	; 	;

; CustomerProductReview:CustomerReview            	; creationtime  	; CustomerReview:creationtime    	;                                                 	; true	;

; CustomerProductReview:Catalog                   	; id            	; Catalog:id                     	;                                                 	; true	;
- SAP Managed Tags:
- SAP BTP, Kyma runtime,
- SAP Commerce Cloud
Labels:
1 Comment
You must be a registered user to add a comment. If you've already registered, sign in. Otherwise, register and sign in.
Labels in this area
-
ABAP CDS Views - CDC (Change Data Capture)
2 -
AI
1 -
Analyze Workload Data
1 -
BTP
1 -
Business and IT Integration
2 -
Business application stu
1 -
Business Technology Platform
1 -
Business Trends
1,661 -
Business Trends
91 -
CAP
1 -
cf
1 -
Cloud Foundry
1 -
Confluent
1 -
Customer COE Basics and Fundamentals
1 -
Customer COE Latest and Greatest
3 -
Customer Data Browser app
1 -
Data Analysis Tool
1 -
data migration
1 -
data transfer
1 -
Datasphere
2 -
Event Information
1,400 -
Event Information
66 -
Expert
1 -
Expert Insights
178 -
Expert Insights
293 -
General
1 -
Google cloud
1 -
Google Next'24
1 -
Kafka
1 -
Life at SAP
784 -
Life at SAP
12 -
Migrate your Data App
1 -
MTA
1 -
Network Performance Analysis
1 -
NodeJS
1 -
PDF
1 -
POC
1 -
Product Updates
4,577 -
Product Updates
336 -
Replication Flow
1 -
RisewithSAP
1 -
SAP BTP
1 -
SAP BTP Cloud Foundry
1 -
SAP Cloud ALM
1 -
SAP Cloud Application Programming Model
1 -
SAP Datasphere
2 -
SAP S4HANA Cloud
1 -
SAP S4HANA Migration Cockpit
1 -
Technology Updates
6,886 -
Technology Updates
415 -
Workload Fluctuations
1
Related Content
- Real time access management with SAP BTP Kyma serverless workloads in Technology Blogs by SAP
- What’s New in SAP Analytics Cloud Release 2024.08 in Technology Blogs by SAP
- Consuming CAPM Application's OData service into SAP Fiori Application in Business Application Studio in Technology Blogs by Members
- What’s New in SAP Analytics Cloud Release 2024.07 in Technology Blogs by SAP
- SAP Datasphere - Space, Data Integration, and Data Modeling Best Practices in Technology Blogs by SAP
Top kudoed authors
| User | Count |
|---|---|
| 29 | |
| 21 | |
| 10 | |
| 7 | |
| 7 | |
| 6 | |
| 6 | |
| 5 | |
| 5 | |
| 5 |