
- SAP Community
- Products and Technology
- Technology
- Technology Blogs by SAP
- SAP BTP Security: How to use REST API of XSUAA to ...
Technology Blogs by SAP
Learn how to extend and personalize SAP applications. Follow the SAP technology blog for insights into SAP BTP, ABAP, SAP Analytics Cloud, SAP HANA, and more.
Turn on suggestions
Auto-suggest helps you quickly narrow down your search results by suggesting possible matches as you type.
Showing results for
Product and Topic Expert
Options
- Subscribe to RSS Feed
- Mark as New
- Mark as Read
- Bookmark
- Subscribe
- Printer Friendly Page
- Report Inappropriate Content
10-12-2022
7:03 PM
The XSUAA service of SAP BTP offers a REST API which allows to programmatically handle security artifacts like Roles, Role Collections, Users etc.
This blog post shows how to use it and provides a simple example.
Used technologies:
SAP Business Technology Platform Cloud Foundry environment, SAP Authorization and Trust Management (XSUAA) service, Node.js.
Why do we need to programmatically handle security artifacts?
It allows to avoid many clicks in the cockpit by automating the configuration tasks. Scripts can be written in any language.
Basically, the only thing we need to understand:
We need to create an instance of XSUAA service with service plan apiaccess
The rest is REST.
I mean, managing the security artifacts is just using the REST API in standard way.
The required data - URL and credentials - can be found in the binding info of the service instance.
So let’s introduce the required steps in a little tutorial.
We will create 2 instances of XSUAA to illustrate the difference between the 2 service plans.
And we create a little script to try out the REST API of XSUAA.
To follow this tutorial we need access to an account of SAP Business Technology Platform (SAP BTP).
We need sufficient permission to create artifacts.
This sample is written in Node.js, however, it can be used as template for any other language.
1. Create first instance of XSUAA
2. Create second instance of XSUAA
3. Create Script
4. Run Script
We create a project folder containing 3 files
C:\xsuaaRest
package.json
script.js
xs-security.json
In my example:
The content of the files can be copied from the appendix.
First of all, we create a “normal” instance of XSUAA.
This one is meant to simulate a running application which requires a certain scope.
As such, an admin needs to create a role collection which can then be assigned to an end-user.
This instance of XSUAA has the “normal” service plan “application” and declares a scope and a role-template:
xs-security.json
To create the instance, we jump into our project folder and execute
cf cs xsuaa application testXsuaa -c xs-security.json
Afterwards we can verify in the SAP BTP Cockpit that the new Role Template has appeared:
Subaccount -> Security -> Roles
Now we want to use the REST API to create a Role Collection and assign the default role which we’ve just created.
To use the REST API, we need to create a second instance of XSUAA.
We need a second instance, because the first one doesn’t provide access to the REST API of XSUAA.
Let’s learn about the service offering XSUAA:
cf marketplace -e xsuaa
We can see the service plans and we can see the service plan “apiaccess” which we might have seen before but never understood:
To create an instance with this service plan, we don't need parameters, so no need of a second xs-security.json file.
We can just go ahead and run the following command:
cf cs xsuaa apiaccess apiXsuaa
We won’t create an application bound to this instance.
As such, to get a hold of the credentials, we need a service key:
cf csk apiXsuaa sk
To view the content of the service key:
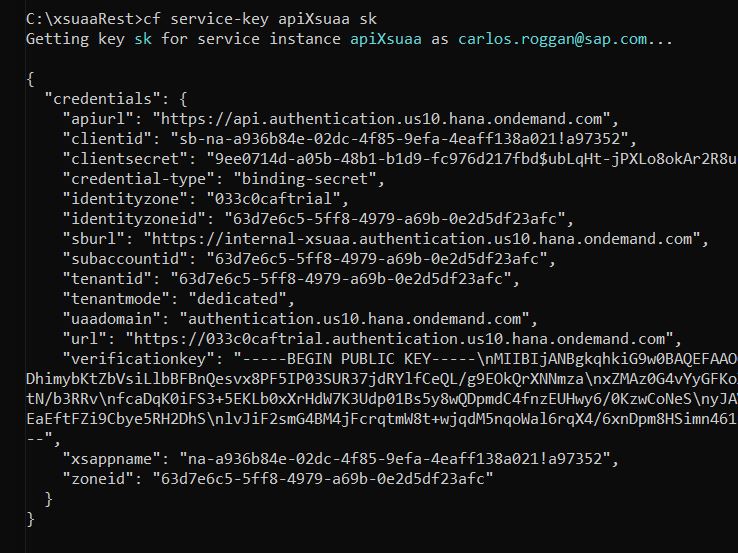
cf service-key apiXsuaa sk
The result looks like this:
We can see the interesting property:
This is the base URL of the REST API of XSUAA.
The API is protected with OAuth, so we need to fetch a JWT token.
To do so, we get the required info as well in the service key:
url and clientid and clientsecret.
The script is very basic and meant to get you started and ready for further enhancements.
We’re using 2 helper libraries to make the code shorter:
@Sap/xssec for fetching the JWT token
axios for executing the HTTP request
First thing we need to do is to copy the credentials from the command line to the script:
This is required by the xssec library. Not all properties are required, but we don’t need to bother about it, just copy and paste.
The constants ROLE_TEMPLATE_NAME and ROLE_NAME are copied from the xs-security.json file and you’d need to adapt them in case you're using different values.
The API_PATH is copied from the documentation.
The script performs the following 3 steps:
1. Fetch JWT Token
2. Retrieve role template
3. Create role collection
Let’s have a closer look at the steps:
1. Fetch JWT Token
As mentioned, the REST API is protected with OAuth, so to use it, we need to first fetch a JWT token.
The supported OAuth flow is client credentials.
To make life easy, we’re using the security library provided by SAP, it offers a convenience method:
We have to pass the credentials object which we’ve copied from the service key.
The library will extract the necessary information from there.
2. Retrieve role template
We need the role template object in order to use it when creating the role collection. This is required because we want to assign the role template to the role collection during creation.
Although we have the information about the role template in the xs-security.json file, there’s one detail missing:
In order to identify the role template, the full xsappname is required.
Yes, we provided the xsappname in the xs-security.json file, but this is not the full truth.
When creating the service instance, the xsappname is enriched with some generated hash.
In my example it looks like this:
testxsappname!t97352
This is what we need and this is the reason why we need to search for it.
We can find it in the cockpit, along with the role, but we can also retrieve it programmatically.
To do so, we fetch all existing role templates with API call
Then we find the correct one in the list by comparing the role template name which we take from the xs-security.json file:
Once we have retrieved the role template object, we can access the corresponding full xsappname via the property appId:
3. Create role collection
To create a role collection, we use the /rolecollections endpoint and send a POST request with the fetched JWT token in the header.
The URL is composed by the base URL (copied from service key), the path of the API (from documentation) the endpoint (from docu).
We pass the desired data in the request body.
The data contains a role collection name of our choice,
some useless description and
the information about the role which should be contained in this role collection.
So far, we have everything in place:
Created instance of XSUAA which created a role template.
Created instance of XSUAA which allows using API.
Created script to call the API, along with package.json.
Opened the BTP cockpit.
Now we’re ready to run the script from our local laptop.
However, before we can execute the script, we need to download the required libraries.
To do so, we open the command shell, jump into our project folder and execute
npm install
This command creates a node_modules folder and copies all dependencies into it.
Now we run the script with command
node script.js
It should print status 200 and exit without exceptions.
The result can be viewed in the SAP BTP cloud cockpit:
We navigate to subaccount -> Security -> Role Collections
There we can see the newly generated role collection along with the added role.
For your convenience, find below the commands to delete the artifacts which we created above:
cf ds testXsuaa -f
cf dsk apiXsuaa sk -f
cf ds apiXsuaa -f
In this blog post we’ve learned how to use the REST API of XSUAA to programmatically handle security artifacts.
At least, we’ve done a first step which should be good to continue investigating.
The REST API is easy to use, with the help of the documentation.
The only little piece of information that might be helpful in today’s blog post:
Remember the service plan apiaccess.
It might be confusing at first sight, that we already have an XSUAA instance, but cannot use it to call APIs.
But indeed: we need to create a separate instance of XSUAA with service plan apiaccess.
From there we can obtain the URL and the credentials for the APIs.
In order to use the REST API of XSUAA, create an instance with service plan apiaccess:
cf cs xsuaa apiaccess myName
Create a service key to access
-> the API URL
-> and the properties to fetch JWT token: OAuth URL, clientid and clientsecret
To use the API: refer to the documentation for the path that needs to be appended to the API base URL.
Example: https://api.authentication.us10.hana.ondemand.com/sap/rest/authorization/v2/rolecollections
The documentation also informs about the endpoints and supported HTTP methods and request / response data.
See SAP API Business Hub main entry: https://api.sap.com/package/authtrustmgmnt/overview
Some example URL:
Get roles (Authorization API😞
https://api.authentication.us10.hana.ondemand.com/sap/rest/authorization/v2/roles
Get role collections with or without content:
https://api.authentication.us10.hana.ondemand.com/sap/rest/authorization/v2/rolecollections?showUser...
Get instances of XSUAA service:
https://api.authentication.us10.hana.ondemand.com/sap/rest/authorization/v2/apps
Get users (Platform API😞
https://api.authentication.us10.hana.ondemand.com/Users
Get Identity Providers (Trust Configuration API😞
https://api.authentication.us10.hana.ondemand.com/sap//sap/rest/identity-providers
Alternative: the BTP CLI:
See Docu: Managing Users and Their Authorizations Using the btp CLI
Documentation main entry point
API reference on SAP API Business Hub: https://api.sap.com/package/authtrustmgmnt/overview
The REST API of XSUAA used in this blog post: https://api.sap.com/api/AuthorizationAPI/overview
xs-security.json
package.json
script.js
This blog post shows how to use it and provides a simple example.
Used technologies:
SAP Business Technology Platform Cloud Foundry environment, SAP Authorization and Trust Management (XSUAA) service, Node.js.
Quicklinks:
Quick Guide
Sample Code
Why do we need to programmatically handle security artifacts?
It allows to avoid many clicks in the cockpit by automating the configuration tasks. Scripts can be written in any language.
Basically, the only thing we need to understand:
We need to create an instance of XSUAA service with service plan apiaccess
The rest is REST.
I mean, managing the security artifacts is just using the REST API in standard way.
The required data - URL and credentials - can be found in the binding info of the service instance.
So let’s introduce the required steps in a little tutorial.
We will create 2 instances of XSUAA to illustrate the difference between the 2 service plans.
And we create a little script to try out the REST API of XSUAA.
Prerequisites
To follow this tutorial we need access to an account of SAP Business Technology Platform (SAP BTP).
We need sufficient permission to create artifacts.
This sample is written in Node.js, however, it can be used as template for any other language.
Content
1. Create first instance of XSUAA
2. Create second instance of XSUAA
3. Create Script
4. Run Script
Preparation
We create a project folder containing 3 files
C:\xsuaaRest
package.json
script.js
xs-security.json
In my example:

The content of the files can be copied from the appendix.
1. Create first instance of XSUAA
First of all, we create a “normal” instance of XSUAA.
This one is meant to simulate a running application which requires a certain scope.
As such, an admin needs to create a role collection which can then be assigned to an end-user.
This instance of XSUAA has the “normal” service plan “application” and declares a scope and a role-template:
xs-security.json
{

    "xsappname": "testxsappname",

    "scopes": [{

            "name": "$XSAPPNAME.scopefortest"

        }],

    "role-templates": [{

            "name": "TestRoleTemplate",

            "default-role-name": "TestRole",

            "scope-references": ["$XSAPPNAME.scopefortest"]
To create the instance, we jump into our project folder and execute
cf cs xsuaa application testXsuaa -c xs-security.json
Afterwards we can verify in the SAP BTP Cockpit that the new Role Template has appeared:
Subaccount -> Security -> Roles
Now we want to use the REST API to create a Role Collection and assign the default role which we’ve just created.
2. Create second instance of XSUAA
To use the REST API, we need to create a second instance of XSUAA.
We need a second instance, because the first one doesn’t provide access to the REST API of XSUAA.
Let’s learn about the service offering XSUAA:
cf marketplace -e xsuaa
We can see the service plans and we can see the service plan “apiaccess” which we might have seen before but never understood:

To create an instance with this service plan, we don't need parameters, so no need of a second xs-security.json file.
We can just go ahead and run the following command:
cf cs xsuaa apiaccess apiXsuaa
We won’t create an application bound to this instance.
As such, to get a hold of the credentials, we need a service key:
cf csk apiXsuaa sk
To view the content of the service key:
cf service-key apiXsuaa sk
The result looks like this:
We can see the interesting property:
"apiurl": https://api.authentication.us10.hana.ondemand.comThis is the base URL of the REST API of XSUAA.
The API is protected with OAuth, so we need to fetch a JWT token.
To do so, we get the required info as well in the service key:
url and clientid and clientsecret.
3. Create Script
The script is very basic and meant to get you started and ready for further enhancements.
We’re using 2 helper libraries to make the code shorter:
@Sap/xssec for fetching the JWT token
axios for executing the HTTP request
First thing we need to do is to copy the credentials from the command line to the script:
const CREDENTIALS = {

    "apiurl": "https://api.authentication.us10.hana.ondemand.com",

    "clientid": . . .

       COPY YOUR SERVICE KEY HERE

    . . .
This is required by the xssec library. Not all properties are required, but we don’t need to bother about it, just copy and paste.
The constants ROLE_TEMPLATE_NAME and ROLE_NAME are copied from the xs-security.json file and you’d need to adapt them in case you're using different values.
const API_PATH = "/sap/rest/authorization/v2"

const API_FULL_URL = CREDENTIALS.apiurl + API_PATH

const ROLE_TEMPLATE_NAME = "TestRoleTemplate"
The API_PATH is copied from the documentation.
The script performs the following 3 steps:
1. Fetch JWT Token
2. Retrieve role template
3. Create role collection
async function runScript(){

    const jwtToken = await _fetchJwtToken()


    const roleTemplate = await _findRoleTemplate(ROLE_TEMPLATE_NAME, jwtToken)


    await _createRoleCollection('TestRoleCollection', roleTemplate, jwtToken)
Let’s have a closer look at the steps:
1. Fetch JWT Token
As mentioned, the REST API is protected with OAuth, so to use it, we need to first fetch a JWT token.
The supported OAuth flow is client credentials.
To make life easy, we’re using the security library provided by SAP, it offers a convenience method:
xssec.requests.requestClientCredentialsToken(null, CREDENTIALS, null, null, (err, token)=>{We have to pass the credentials object which we’ve copied from the service key.
The library will extract the necessary information from there.
2. Retrieve role template
We need the role template object in order to use it when creating the role collection. This is required because we want to assign the role template to the role collection during creation.
Although we have the information about the role template in the xs-security.json file, there’s one detail missing:
In order to identify the role template, the full xsappname is required.
Yes, we provided the xsappname in the xs-security.json file, but this is not the full truth.
When creating the service instance, the xsappname is enriched with some generated hash.
In my example it looks like this:
testxsappname!t97352
This is what we need and this is the reason why we need to search for it.
We can find it in the cockpit, along with the role, but we can also retrieve it programmatically.
To do so, we fetch all existing role templates with API call
const allTemplates = await _getRoleTemplates(jwtToken)Then we find the correct one in the list by comparing the role template name which we take from the xs-security.json file:
const foundTemplate = allTemplates.find(template => {

   return template.name.includes(templateName)
Once we have retrieved the role template object, we can access the corresponding full xsappname via the property appId:
"roleTemplateAppId": roleTemplate.appId,
3. Create role collection
To create a role collection, we use the /rolecollections endpoint and send a POST request with the fetched JWT token in the header.
The URL is composed by the base URL (copied from service key), the path of the API (from documentation) the endpoint (from docu).
We pass the desired data in the request body.
The data contains a role collection name of our choice,
some useless description and
the information about the role which should be contained in this role collection.
async function _createRoleCollection(name, roleTemplate, jwtToken){

    const options = {

        method: 'POST',

        url: API_FULL_URL + '/rolecollections',

        headers: {

            'Accept': 'application/json',

            'Content-Type': 'application/json',

            'Authorization': 'bearer ' + jwtToken

        },

        data:{

            'name': name,

            'description': 'Generated programmatically',

            "roleReferences": [{

                "roleTemplateAppId": roleTemplate.appId,

                "roleTemplateName": roleTemplate.name,

                "name": roleTemplate['default-role-name']

            }]

        }

    }

    const response = await axios(options);
4. Run Script
So far, we have everything in place:
Created instance of XSUAA which created a role template.
Created instance of XSUAA which allows using API.
Created script to call the API, along with package.json.
Opened the BTP cockpit.
Now we’re ready to run the script from our local laptop.
However, before we can execute the script, we need to download the required libraries.
To do so, we open the command shell, jump into our project folder and execute
npm install
This command creates a node_modules folder and copies all dependencies into it.
Now we run the script with command
node script.js
It should print status 200 and exit without exceptions.
The result can be viewed in the SAP BTP cloud cockpit:
We navigate to subaccount -> Security -> Role Collections
There we can see the newly generated role collection along with the added role.
5. Clean up
For your convenience, find below the commands to delete the artifacts which we created above:
cf ds testXsuaa -f
cf dsk apiXsuaa sk -f
cf ds apiXsuaa -f
Summary
In this blog post we’ve learned how to use the REST API of XSUAA to programmatically handle security artifacts.
At least, we’ve done a first step which should be good to continue investigating.
The REST API is easy to use, with the help of the documentation.
The only little piece of information that might be helpful in today’s blog post:
Remember the service plan apiaccess.
It might be confusing at first sight, that we already have an XSUAA instance, but cannot use it to call APIs.
But indeed: we need to create a separate instance of XSUAA with service plan apiaccess.
From there we can obtain the URL and the credentials for the APIs.
Quick Guide
In order to use the REST API of XSUAA, create an instance with service plan apiaccess:
cf cs xsuaa apiaccess myName
Create a service key to access
-> the API URL
-> and the properties to fetch JWT token: OAuth URL, clientid and clientsecret
To use the API: refer to the documentation for the path that needs to be appended to the API base URL.
Example: https://api.authentication.us10.hana.ondemand.com/sap/rest/authorization/v2/rolecollections
The documentation also informs about the endpoints and supported HTTP methods and request / response data.
See SAP API Business Hub main entry: https://api.sap.com/package/authtrustmgmnt/overview
More Info
Some example URL:
Get roles (Authorization API😞
https://api.authentication.us10.hana.ondemand.com/sap/rest/authorization/v2/roles
Get role collections with or without content:
https://api.authentication.us10.hana.ondemand.com/sap/rest/authorization/v2/rolecollections?showUser...
Get instances of XSUAA service:
https://api.authentication.us10.hana.ondemand.com/sap/rest/authorization/v2/apps
Get users (Platform API😞
https://api.authentication.us10.hana.ondemand.com/Users
Get Identity Providers (Trust Configuration API😞
https://api.authentication.us10.hana.ondemand.com/sap//sap/rest/identity-providers
Alternative: the BTP CLI:
See Docu: Managing Users and Their Authorizations Using the btp CLI
Links
Documentation main entry point
API reference on SAP API Business Hub: https://api.sap.com/package/authtrustmgmnt/overview
The REST API of XSUAA used in this blog post: https://api.sap.com/api/AuthorizationAPI/overview
Appendix: Sample Code
xs-security.json
{

    "xsappname": "testxsappname",

    "tenant-mode": "dedicated",

    "scopes": [{

            "name": "$XSAPPNAME.scopefortest"

        }

    ],

    "role-templates": [{

            "name": "TestRoleTemplate",

            "default-role-name": "TestRole",

            "description": "Role template for end users",

            "scope-references": ["$XSAPPNAME.scopefortest"]

        }

    ]

}
package.json
{

  "dependencies": {

    "@sap/xssec": "^3.2.13",

    "axios": "^1.1.2"

  }

}
script.js
const axios = require('axios')

const xssec = require('@sap/xssec')


const CREDENTIALS = {

    "apiurl": "https://api.authentication.us10.hana.ondemand.com",

    "clientid": "sb-na-efa-4eaff138a021!a97352",

    "clientsecret": "9ee0714d-a05b-4E=",

    "identityzone": "mytrial",

    "identityzoneid": "63d7e6c5-5ff8-4979-a69b",

    "subaccountid": "63d7e6c5-5ff8-4979-a69b",

    "tenantid": "63d7e6c5-5ff8-4979-a69b",

    "tenantmode": "dedicated",

    "uaadomain": "authentication.us10.hana.ondemand.com",

    "url": "https://mytrial.authentication.us10.hana.ondemand.com",

    "verificationkey": "-----BEGIN PUBLIC KEY-----\nMIIBIjA...wIDAQAB\n-----END PUBLIC KEY-----",

    "xsappname": "na-a936b84e-02dc-4f85-9efa",

    "zoneid": "63d7e6c5-5ff8-4979-a69b"

}


const API_PATH = "/sap/rest/authorization/v2"

const API_FULL_URL = CREDENTIALS.apiurl + API_PATH

const ROLE_TEMPLATE_NAME = "TestRoleTemplate"


// The script

async function runScript(){

    console.log("START SCRIPT...")

    console.log("Fetching JWT token for XSUAA REST API")

    const jwtToken = await _fetchJwtToken()


    console.log(`Retrieve RoleTemplate object with name ${ROLE_TEMPLATE_NAME}`)

    const roleTemplate = await _findRoleTemplate(ROLE_TEMPLATE_NAME, jwtToken)


    console.log("Generate Role Collection")

    await _createRoleCollection('TestRoleCollection', roleTemplate, jwtToken)


    console.log("DONE")

}


// execute the script

runScript()


/* HELPER */


async function _fetchJwtToken (){

    return new Promise ((resolve, reject) => {

        xssec.requests.requestClientCredentialsToken(null, CREDENTIALS, null, null, (err, token)=>{

            resolve(token)

        })

    })

}


// find the roleTemplate object which matches our given template name

async function _findRoleTemplate(templateName, jwtToken){

    const allTemplates = await _getRoleTemplates(jwtToken)

    const foundTemplate = allTemplates.find(template => {

            return template.name.includes(templateName)

        })

    return foundTemplate

}


async function _getRoleTemplates(jwtToken){

    const options = {

        method: 'GET',

        url: API_FULL_URL + '/apps/roletemplates',

        headers: {

            'Accept': 'application/json',

            'Authorization': 'bearer ' + jwtToken

        }

    }

    const response = await axios(options);

    return response.data

}


async function _createRoleCollection(name, roleTemplate, jwtToken){

    const options = {

        method: 'POST',

        url: API_FULL_URL + '/rolecollections',

        headers: {

            'Accept': 'application/json',

            'Content-Type': 'application/json',

            'Authorization': 'bearer ' + jwtToken

        },

        data:{

            'name': name,

            'description': 'Generated programmatically',

            "roleReferences": [{

                "roleTemplateAppId": roleTemplate.appId,

                "roleTemplateName": roleTemplate.name,

                "name": roleTemplate['default-role-name']

            }]

        }

    }

    const response = await axios(options);

    console.log("Role Collection created with HTTP status: " + response.status)

}
Labels:
17 Comments
You must be a registered user to add a comment. If you've already registered, sign in. Otherwise, register and sign in.
Labels in this area
-
ABAP CDS Views - CDC (Change Data Capture)
2 -
AI
1 -
Analyze Workload Data
1 -
BTP
1 -
Business and IT Integration
2 -
Business application stu
1 -
Business Technology Platform
1 -
Business Trends
1,658 -
Business Trends
91 -
CAP
1 -
cf
1 -
Cloud Foundry
1 -
Confluent
1 -
Customer COE Basics and Fundamentals
1 -
Customer COE Latest and Greatest
3 -
Customer Data Browser app
1 -
Data Analysis Tool
1 -
data migration
1 -
data transfer
1 -
Datasphere
2 -
Event Information
1,400 -
Event Information
66 -
Expert
1 -
Expert Insights
177 -
Expert Insights
293 -
General
1 -
Google cloud
1 -
Google Next'24
1 -
Kafka
1 -
Life at SAP
780 -
Life at SAP
12 -
Migrate your Data App
1 -
MTA
1 -
Network Performance Analysis
1 -
NodeJS
1 -
PDF
1 -
POC
1 -
Product Updates
4,577 -
Product Updates
340 -
Replication Flow
1 -
RisewithSAP
1 -
SAP BTP
1 -
SAP BTP Cloud Foundry
1 -
SAP Cloud ALM
1 -
SAP Cloud Application Programming Model
1 -
SAP Datasphere
2 -
SAP S4HANA Cloud
1 -
SAP S4HANA Migration Cockpit
1 -
Technology Updates
6,873 -
Technology Updates
416 -
Workload Fluctuations
1
Related Content
- Top Picks: Innovations Highlights from SAP Business Technology Platform (Q1/2024) in Technology Blogs by SAP
- Cloud Integration: Manually Sign / Verify XML payload based on XML Signature Standard in Technology Blogs by SAP
- Develop a vue3 application on btp in Technology Q&A
- Cloud Integration: Advanced Event Mesh Adapter, Client Certificate, AEM in Technology Blogs by SAP
- Deliver Real-World Results with SAP Business AI: Q4 2023 & Q1 2024 Release Highlights in Technology Blogs by SAP
Top kudoed authors
| User | Count |
|---|---|
| 31 | |
| 24 | |
| 8 | |
| 7 | |
| 7 | |
| 6 | |
| 6 | |
| 5 | |
| 5 | |
| 4 |