
- SAP Community
- Products and Technology
- Technology
- Technology Blogs by SAP
- SAP Analytics Cloud Planning with SAP SuccessFacto...
Technology Blogs by SAP
Learn how to extend and personalize SAP applications. Follow the SAP technology blog for insights into SAP BTP, ABAP, SAP Analytics Cloud, SAP HANA, and more.
Turn on suggestions
Auto-suggest helps you quickly narrow down your search results by suggesting possible matches as you type.
Showing results for
Advisor
Options
- Subscribe to RSS Feed
- Mark as New
- Mark as Read
- Bookmark
- Subscribe
- Printer Friendly Page
- Report Inappropriate Content
09-27-2022
1:33 PM
This blog illustrates from SuccessFactors standpoint how to create an optimized Planning model in SAP Analytics Cloud.
When you design your SAC Planning model, you create dimensions for data collection and retrieval purposes.
We, currently, witness customers and partners who create for each table of their SuccessFactors query a corresponding dimension in the SAP Analytics Cloud planning model.
They mix the concept of Analytics and Planning models and forget that properties and hierarchies allow to retrieve data. A dimension in the Planning model is required when it allows to differentiate the collected data. This overwhelming number of dimensions can have a very negative impact on the performance of the model, especially if several dimensions have a large numbers of dimensions numbers and the Planning Area option wasn’t configured.
For more detailed use cases see this blog created by charlotte.burnier SAP Analytics Cloud Planning and SuccessFactors – Building a robust Planning Model – Some best pract...
In this blog we will cover the following topics related to Workforce Planning using SAP Analytics Cloud Planning(referenced as SAC Planning) with SuccessFactors Data(referenced as SF).
Topic 1: Create Planning Model with Description and Hierarchy using SF Data Fields:
In this section, we will create a model with SF Data and set the description and hierarchy out of the existing fields in SF.
In this example, we have dimensions like Position/Title, Division, Gender.
Parent-Child Hierarchy: Division as Parent and Position as Dimension (Child)
Description: Position as Dimension and Position Title as Description.
Topic 2: Create Planning Model with Property using SF Data Fields:
In this section we will describe the Usage of Property Attribute with SF Data. Property will be an additional column within the Dimension like Description Attribute we defined in the earlier section.
To illustrate this scenario with example, we have selected User Information like Gender, First Name, Middle Name as the fields from SF and declare them as Property for User ID Field.
Property: User ID as Dimension. Gender, First Name, Last Name as Property.
Topic 3: Creating Public Dimension with Property and its usage in Planning Model using SF Data Fields:
In this section we will describe how we can create Public Dimension with Properties and use them in the Planning Model.
In this section we will illustrate how to set up the incremental load for SF Master Data(Dimension member in SAC).
As a business requirement, when we import master data, we do not want to update the full master data every time the import job is scheduled. Instead, if we set up incremental load option and schedule the import job, after the first full load, only the master data changes happened after the last import will be updated.
This feature is critical for customers having large set of master data with daily/weekly/monthly refresh/update requirements.
Please note that incremental load should be set up during the Query Creation Stage. Once you create the model, you do not have the option to set up the incremental load later.
Please note that, for Planning Model to have master data refresh on regular basis, you need to have both the incremental load setup in the Query Creation section and Repeating Schedule Setup in the Import Job Section.
To Summarize we have covered the best practices for SAC Planning Model and Setting up the incremental load for SF Data.
Do share your feedback or questions about this blog content through comments. Happy to respond with more details if required. You can also follow my Profile for similar contents(manivannan_pachiyappan).
To stay updated with the SAC Product features, do follow the SAC Community (SAP Analytics Cloud)
If you have any queries to search or if you have any generic questions about the product and its features, you can check the SAC community questions section (SAC Questions)
You can follow the other blogs relevant to SAC with the below community blog link(SAC Blogs)
Find out how to apply the basics of modeling, planning, analyzing and administration with SAP’s free learning resources on SAP Analytics Cloud. The learning journey is designed for business users who want to upskill and boost their careers. Check out even more role-based learning resources and opportunities to get certified in one place on SAP Learning site.
When you design your SAC Planning model, you create dimensions for data collection and retrieval purposes.
We, currently, witness customers and partners who create for each table of their SuccessFactors query a corresponding dimension in the SAP Analytics Cloud planning model.
They mix the concept of Analytics and Planning models and forget that properties and hierarchies allow to retrieve data. A dimension in the Planning model is required when it allows to differentiate the collected data. This overwhelming number of dimensions can have a very negative impact on the performance of the model, especially if several dimensions have a large numbers of dimensions numbers and the Planning Area option wasn’t configured.
For more detailed use cases see this blog created by charlotte.burnier SAP Analytics Cloud Planning and SuccessFactors – Building a robust Planning Model – Some best pract...
In this blog we will cover the following topics related to Workforce Planning using SAP Analytics Cloud Planning(referenced as SAC Planning) with SuccessFactors Data(referenced as SF).
- Create Planning Model with Description and Hierarchy using SF Data Fields
- Create Planning Model with Property using SF Data Fields
- Creating Public Dimension with Property and its usage in Planning Model using SF Data Fields
- Setting up the incremental load and schedule settings with SF Data
Topic 1: Create Planning Model with Description and Hierarchy using SF Data Fields:
In this section, we will create a model with SF Data and set the description and hierarchy out of the existing fields in SF.
In this example, we have dimensions like Position/Title, Division, Gender.
Parent-Child Hierarchy: Division as Parent and Position as Dimension (Child)
Description: Position as Dimension and Position Title as Description.
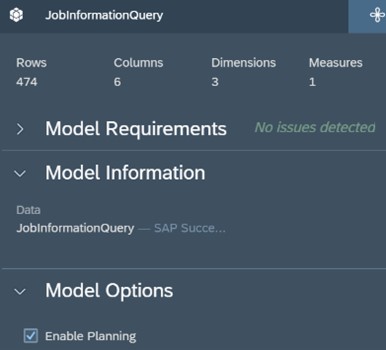
- Create a query using the SF Tables available. For our scenario we have selected Job Information as shown below.

- Search and select the fields available as shown below.
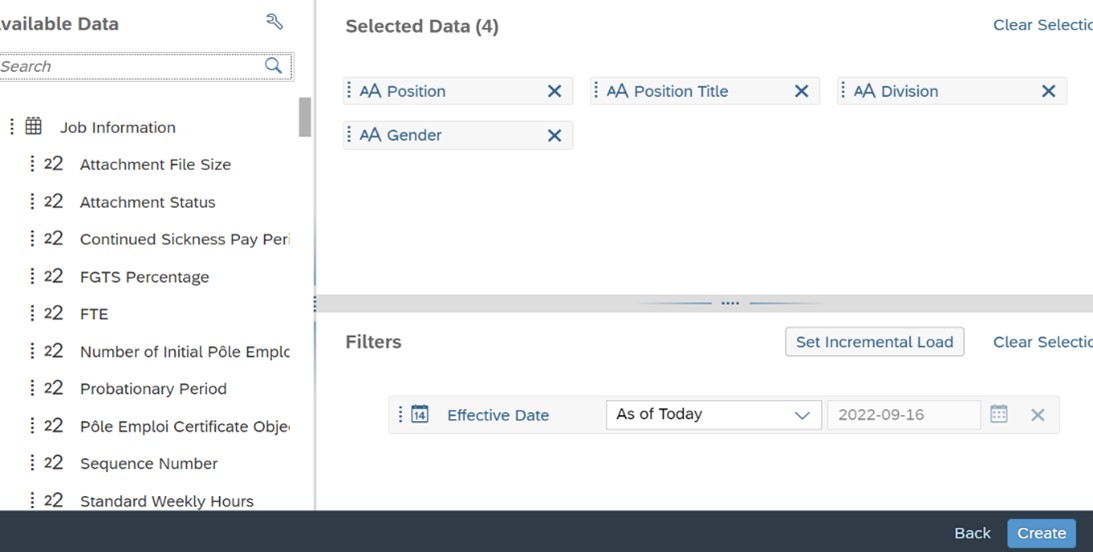
- Once you create your query, it will be available in the Draft Data as shown below.

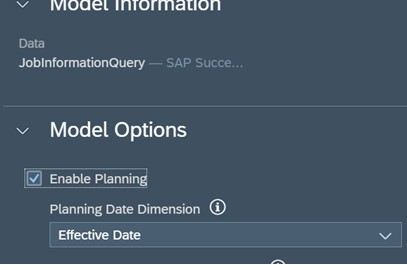
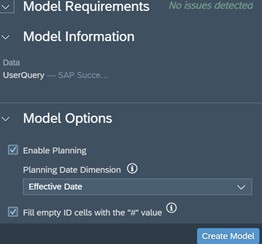
- Once your data is ready, click on the query in Draft data. Your new model will be loaded with the dimensions and data respectively. For Planning Model, first step should be to enable the check box for “Enable Planning”.
- Below is the list of properties available for a dimension. The best practice for a Model is to use these attributes for dimensions which in turn will have better performance in data refresh and data retrieval in your story.

- Select the Column ‘Position’ and in the Details section you can see the options for Dimension type and attributes. Select the Add Dimension Attributes dropdown and select Description. Select Position Title as description. Do check the change in the icon of the fields before and after the attributes selection as shown below.
- Position Title as Dimension before Attribute selection.

- Position Tile as Description Attribute for Position Field.

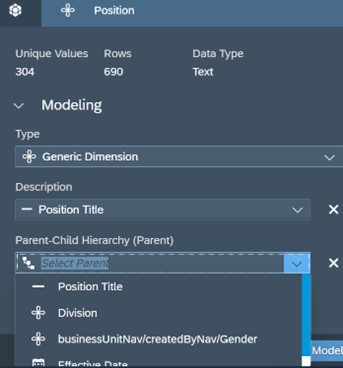
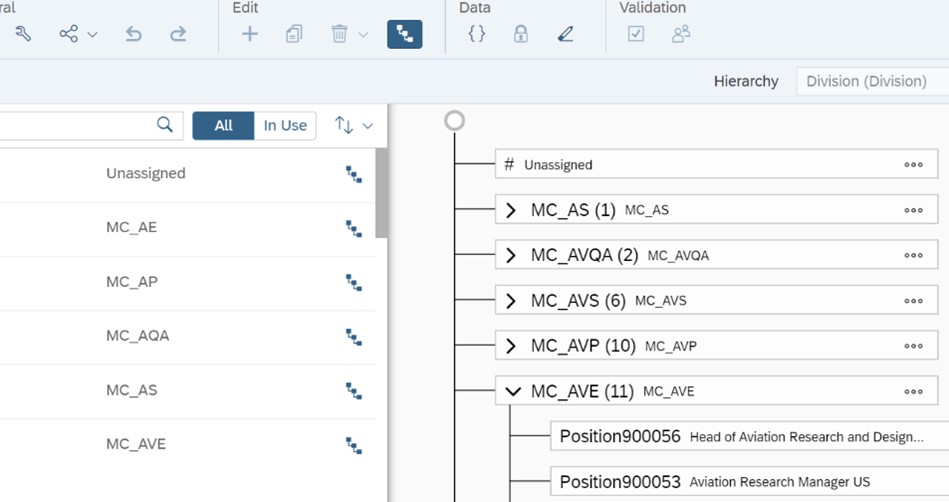
- We can have Parent Child Hierarchy as an attribute for a dimension in SAC. Select the position dimension and add new dimension attribute with Parent-Child Hierarchy. You can see in the below image that ‘Parent’ is mentioned in bracket. It indicates that the dimension you map here in this attribute will be the Parent for the selected Dimension. In our scenario, we can have Division at top level (Parent) and Position as detail level (Child). So, you need to add ‘Division’ as Parent-child hierarchy attribute to ‘Position’ dimension.
- Select position dimension and in the ‘Details’ section select ‘Add Dimension attributes’. Select Parent-Child Hierarchy in the drop-down list. Now select the ‘Division’ dimension as parent for ‘Position’.

- You can see in the below image that Division is now shown as Hierarchy Attribute.

- Please note that for Planning Models, at least one Measure is required. Also make sure there is no data issues in your model before creation. In case of any duplicates or null values in your data those needs to be corrected or it will be ignored during Model Creation.
- After you create your model, you can see that only Position and Gender is available as dimensions as shown below.

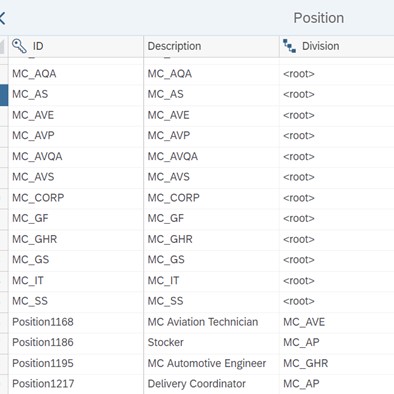
- If you select the Position dimension, then you can see that ‘Description’ and ‘Division’ will have the respective data associated. You can also note that when Hierarchy Attribute is created, the values of the hierarchy will be stored in rows in the dimension directly. To distinguish between the Attribute and Dimension data, you will see <root> in each row representing the attribute value. For Position Dimension rows, you can see Division Values mapped. <root> indicates that its Top-Level in the Hierarchy.
- You can select on the hierarchy button on top to see how the Parent-Child Relationship is established as shown below.
Topic 2: Create Planning Model with Property using SF Data Fields:
In this section we will describe the Usage of Property Attribute with SF Data. Property will be an additional column within the Dimension like Description Attribute we defined in the earlier section.
To illustrate this scenario with example, we have selected User Information like Gender, First Name, Middle Name as the fields from SF and declare them as Property for User ID Field.
Property: User ID as Dimension. Gender, First Name, Last Name as Property.
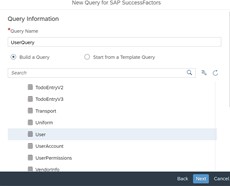
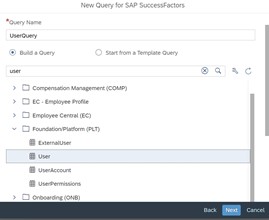
- Select User Table from the SuccessFactors Query Tab.
- Select the fields required for the property along with the dimension field.
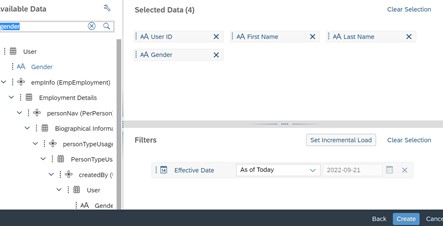
- After the query gets created, select the ‘User ID’ column, and select ‘Add Dimension Attributes’ and select ‘Property’.
- You can properties for the User ID column as shown below.
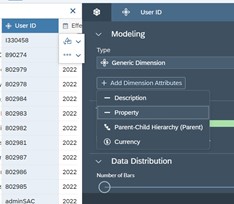
- Do sort out the mapping issues before creating Planning Model. After you create your Model, in the Model Structure you can see only User ID as the Generic Dimension.

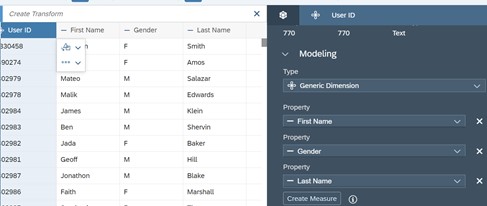
- Once you select the User ID Field, you can see the other SF fields as properties mapped to User ID. Gender, First Name and Last Name are now the properties for User ID.

Topic 3: Creating Public Dimension with Property and its usage in Planning Model using SF Data Fields:
In this section we will describe how we can create Public Dimension with Properties and use them in the Planning Model.
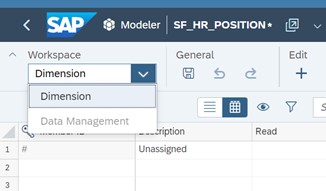
- Go to Modeler Section and select Public Dimensions Tab and create a new dimension.
 In the Create Dimension popup, select the type of dimension you require and provide a unique name for your dimension and select create. Please note that we have selected the Data Access Control Check box here. It can be used to restrict the users in SAC on this field.
 By default, the data will be empty and you will not have access to the Data Management initially. You need to Save the dimension as a first step to use the Data Management Tab.
- You can add the custom properties for this public dimension as shown below.
- Initial view of the dimension with no data and properties.
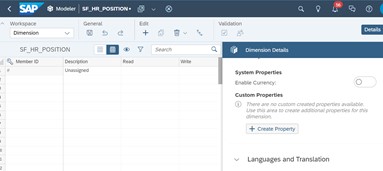
- View after creating Custom Properties.

- Once you save the Dimension, the Data Management Tab will be enabled.

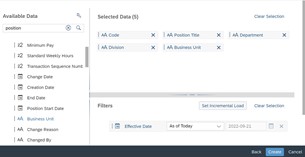
- In the data management tab, Click Import option and select Data Source.

- Select SuccessFactors from the connections and new Query window will appear. To illustrate the Public Dimension with Property, we have select Position Table with ‘Position’ as the Dimension and ‘Division’, ‘Department’, ‘Business Unit’ as Properties and ‘Position Title’ as the Description.
- Selecting Position Query.
- Selecting the Fields required.
- After the query is created, you need to finish the mapping before the data gets imported. Do check the required attributes and select appropriate fields so that there are no mapping issues before data import.

- After you finish the mapping, your attributes would be like below screenshot. Check for the mapping issues and do finish mapping.
- Attributes mapped with the dimension fields from SF.

- No Mapping Issues shown in the below screenshot.

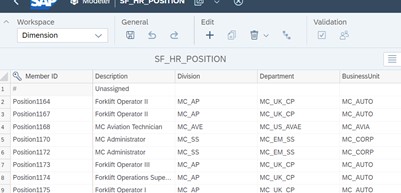
- Once the data import is finished you can switch to the Dimension tab to see the Dimension values and other Attributes as shown below.
- As a next step, we need to add this public dimension to the existing planning model. Go to the planning model created and in the Edit option select ‘Add New Dimension’ button as shown below.

- Select the type of dimension and search for the public dimension you have created. Click on the Add button and you can see that in the Model your public dimension is added.
- Search for the Public Dimension as shown below

- Public Dimension is now added to the planning model.
 Topic 4: Setting up the incremental load and schedule settings with SF Data:
In this section we will illustrate how to set up the incremental load for SF Master Data(Dimension member in SAC).
As a business requirement, when we import master data, we do not want to update the full master data every time the import job is scheduled. Instead, if we set up incremental load option and schedule the import job, after the first full load, only the master data changes happened after the last import will be updated.
This feature is critical for customers having large set of master data with daily/weekly/monthly refresh/update requirements.
Please note that incremental load should be set up during the Query Creation Stage. Once you create the model, you do not have the option to set up the incremental load later.
- For this scenario, I have taken User Table in the SF Query.
- Select the fields required for your model and in the filters section you can see the ‘Set Incremental Load’ option. Do select the same.
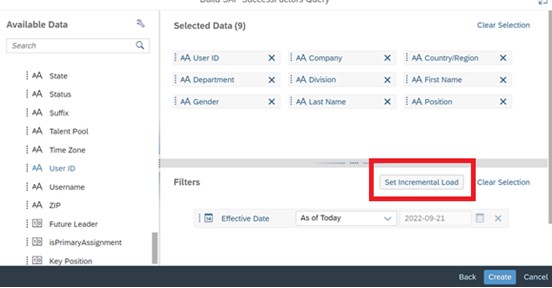
- Once you select the ‘Set Incremental Load’ button you can see two changes one at the Available Data section in the left and other at the Filter Section as shown below.
- Available Data Section: There will be a special icon enabled on the potential fields on which Incremental Load can be Set as shown in the below image. It can be Date Time Field or Numeric Field.
- Filters Section: ‘Drop Token’ option will be enabled where you can drag and drop the field from available Data Section.
- Please note that only selected fields will have the incremental load option enabled. It can be datetime or numeric field.

- After dropping the field, you get a notification stating, ‘Incremental load will start applying after this import’. It means that first import will be of full load and based on the first import date and schedule settings incremental load will be applied.

- After the query section, you can work on the model to enable the planning option and other transformation rules, calculations required and make sure your model have no issues. Select Create Model.
- Once Model is created, go to data management tab and in the import jobs section, you can select ‘Import Settings’.
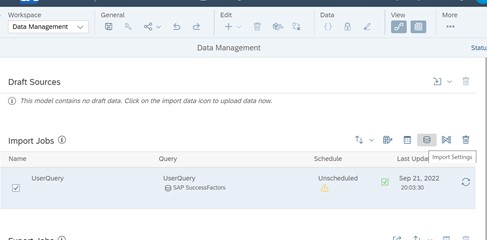
- In the Import Settings, you can set the Import Method and see that Incremental Load is enabled as shown below. Based on your business requirement you can select any of the import method options below.
- Import Setting with Import Method.
- Update: This option must be selected for Master Data, where existing records will get updated with new changes and new records will be added. The dimension of the Planning Model will reflect only the latest state from SF. Example: User Table, Job Info Table.
- Append: This option cannot be used for Master data, because it relates to Data, where you can have multiple rows for one ID. Example: Historical Salary of User.

- Import Setting with Incremental Load.

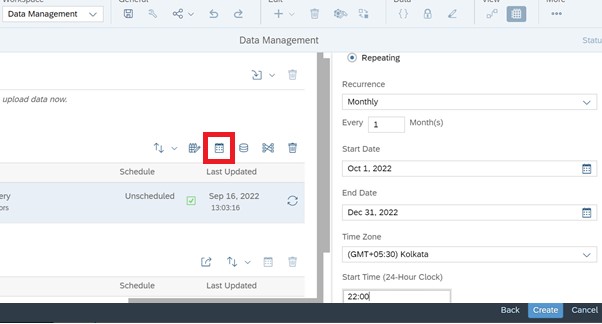
- You need to enable the ‘Schedule Settings’ in your import job so that master data gets refreshed on timely basis. You can select the highlighted Schedule Setting option and set the Frequency as Repeating. You can also select the Recurrence of Schedule either Daily, Weekly or Monthly. There are other options like start date, end date, time zone and start time as shown below.
Please note that, for Planning Model to have master data refresh on regular basis, you need to have both the incremental load setup in the Query Creation section and Repeating Schedule Setup in the Import Job Section.
To Summarize we have covered the best practices for SAC Planning Model and Setting up the incremental load for SF Data.
Do share your feedback or questions about this blog content through comments. Happy to respond with more details if required. You can also follow my Profile for similar contents(manivannan_pachiyappan).
To stay updated with the SAC Product features, do follow the SAC Community (SAP Analytics Cloud)
If you have any queries to search or if you have any generic questions about the product and its features, you can check the SAC community questions section (SAC Questions)
You can follow the other blogs relevant to SAC with the below community blog link(SAC Blogs)
Find out how to apply the basics of modeling, planning, analyzing and administration with SAP’s free learning resources on SAP Analytics Cloud. The learning journey is designed for business users who want to upskill and boost their careers. Check out even more role-based learning resources and opportunities to get certified in one place on SAP Learning site.
- SAP Managed Tags:
- SAP Analytics Cloud,
- SAP Analytics Cloud for planning,
- HCM (Human Capital Management)
Labels:
3 Comments
You must be a registered user to add a comment. If you've already registered, sign in. Otherwise, register and sign in.
Labels in this area
-
ABAP CDS Views - CDC (Change Data Capture)
2 -
AI
1 -
Analyze Workload Data
1 -
BTP
1 -
Business and IT Integration
2 -
Business application stu
1 -
Business Technology Platform
1 -
Business Trends
1,658 -
Business Trends
91 -
CAP
1 -
cf
1 -
Cloud Foundry
1 -
Confluent
1 -
Customer COE Basics and Fundamentals
1 -
Customer COE Latest and Greatest
3 -
Customer Data Browser app
1 -
Data Analysis Tool
1 -
data migration
1 -
data transfer
1 -
Datasphere
2 -
Event Information
1,400 -
Event Information
66 -
Expert
1 -
Expert Insights
177 -
Expert Insights
293 -
General
1 -
Google cloud
1 -
Google Next'24
1 -
Kafka
1 -
Life at SAP
780 -
Life at SAP
12 -
Migrate your Data App
1 -
MTA
1 -
Network Performance Analysis
1 -
NodeJS
1 -
PDF
1 -
POC
1 -
Product Updates
4,577 -
Product Updates
340 -
Replication Flow
1 -
RisewithSAP
1 -
SAP BTP
1 -
SAP BTP Cloud Foundry
1 -
SAP Cloud ALM
1 -
SAP Cloud Application Programming Model
1 -
SAP Datasphere
2 -
SAP S4HANA Cloud
1 -
SAP S4HANA Migration Cockpit
1 -
Technology Updates
6,873 -
Technology Updates
416 -
Workload Fluctuations
1
Related Content
- Strategic Workforce Planning in SAC in Technology Q&A
- New Partner Content on SAP Business Accelerator Hub (Q1 ’24) in Technology Blogs by SAP
- Deliver Real-World Results with SAP Business AI: Q4 2023 & Q1 2024 Release Highlights in Technology Blogs by SAP
- Partner Innovation - eMudhra's Co-Innovation Journey with SAP in Technology Blogs by SAP
- A Global Approach: How SAP Signavio Solutions Helped Transform HR at TE Connectivity in Technology Q&A
Top kudoed authors
| User | Count |
|---|---|
| 31 | |
| 24 | |
| 10 | |
| 7 | |
| 6 | |
| 6 | |
| 5 | |
| 5 | |
| 5 | |
| 4 |