
- SAP Community
- Products and Technology
- Technology
- Technology Blogs by SAP
- Connecting SAP Data Warehouse Cloud OData API with...
Technology Blogs by SAP
Learn how to extend and personalize SAP applications. Follow the SAP technology blog for insights into SAP BTP, ABAP, SAP Analytics Cloud, SAP HANA, and more.
Turn on suggestions
Auto-suggest helps you quickly narrow down your search results by suggesting possible matches as you type.
Showing results for
Product and Topic Expert
Options
- Subscribe to RSS Feed
- Mark as New
- Mark as Read
- Bookmark
- Subscribe
- Printer Friendly Page
- Report Inappropriate Content
09-23-2022
8:42 PM
In a Data Warehousing scenario, integrating complex models to analytics solutions is vital to empower business planning and decision making. The SAP Data Warehouse Cloud Public OData APIs empower customers by enabling programmatical data consumption as plain relational data or even complex analytical models. Such scenario extends the existing integration capabilities with SAP Analytics Cloud and gives customers freedom to build their own solutions or use third-party BI tools such as PowerBI.
The goal of this blog post is serve as a general reference on how to make the integration between SAP Data Warehouse Cloud and PowerBI via OData APIs using a Blank Query data source, enabling the users and customers to further evolve their PowerBI Queries and Data Sources as needed. It will cover the following steps:
The SAP Data Warehouse Cloud OData APIs can be used to replicate data via APIs following the OData version 4 standard. It is divided into two services:
The main entry point for the SAP Data Warehouse Cloud OData API is:
although this secondary entry point could be used as well:
For more details about the SAP Data Warehouse Cloud Public OData APIs, please refer to Official SAP Help Portal.
The first step to setup the connection to SAP Data Warehouse Cloud OData APIs is to prepare and generate all OAuth information required to create the "Blank Query" data source in Microsoft Power BI.
As Power BI does not natively support 3-lagged OAuth flow without a custom connector, the authentication steps will be performed manually outside of PowerBI.
At this point all pre-required authentication information and values have already been generated and it is possible to start devoloping and use a "Blank Query" as form of integration. The "Blank Query" allows PowerBI users to develop a custom data source integration using PowerScript coding language, it gives flexibility to users to define their integration scenario with less limitations than other data sources.
In the context of this blog post, we will take advantage of the "Blank Query" capabilities to expose an OData feed component from PowerBI and also generate the authentication token required by each request. To increase the query flexibility we will create and use a paremeter ("url") that would contain the URL of the SAP Data Warehouse Cloud OData API service desired to be consumed.
Follow the next steps to start creating the query:
To check the result and confirm that everything is working as expected, click on the PowerBI query name on left side. It should consume the SAP Data Warehouse Cloud Public OData API catalog endpoint and display the available services. The result should look like the image bellow:
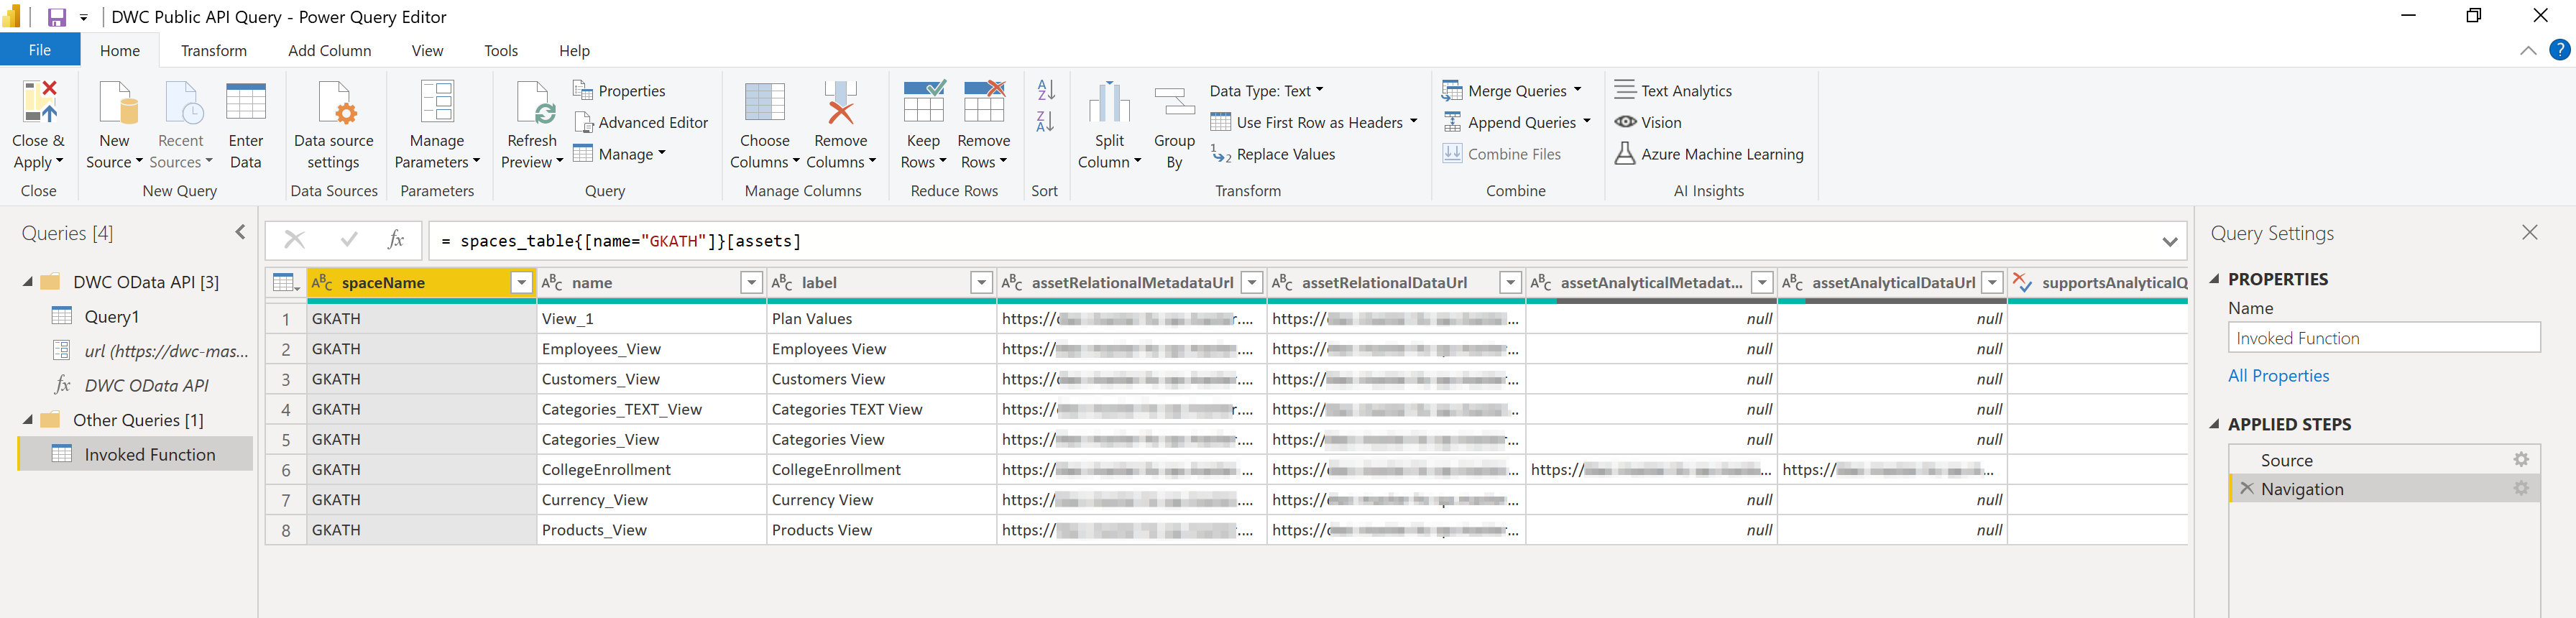
At this point browsing spaces and assets from SAP Data Warehouse Cloud repository is already possible. Clicking into "Table" link of the "Data" column will make PowerBI follow the navigation the next OData request, allowing to see all avialble spaces and assets information.
Although when accesing a list of assets it is possible to see relational and analytical consumption URLs for those entities, it is not quite easy to follow those URLs and check the data of each of them.
To overcome this situation its possible to take advantage of the previous developed query and convert it into a function which receives the URL of the SAP Data Warehouse Cloud OData API service that will be consumed. That way, would be possible to execute the query multiple times for different OData services.
Follow the steps bellow:
To enable the navigation between a table of assets and the assets data, we will include a custom column into the assets table, which will execute our function with assetRelationalDataUrl or assetAnalyticalDataUrl. This will enable a navigation to the URL data service by just clicking in the added custom column for each line.
Follow the steps bellow:
After navigating to the data preview of the chosen entity it is possible to apply and save the current visualization to be consumed by the PowerBI Dashboard builder.
This blog post covered the required concepts and steps to integrate SAP Data Warehouse Cloud with PowerBI using a Blank Query data source. Including how to manually authenticate yourself using the OAuth 3-lagged process, which is the same that should be done for any other 3rd-party application. Also how to start from the OData API catalog service, listing your spaces and assets and navigating all the way to consume entities data from SAP Data Warehouse Cloud.
I’d be happy to hear your thoughts, ideas and comments and discuss further on this topic. Let me know in the comments!
To keep updated about the latest information and blog post about SAP Data Warehouse Cloud follow the topic page, checkout the Q&A section and other related blog posts.
The goal of this blog post is serve as a general reference on how to make the integration between SAP Data Warehouse Cloud and PowerBI via OData APIs using a Blank Query data source, enabling the users and customers to further evolve their PowerBI Queries and Data Sources as needed. It will cover the following steps:
- SAP Data Warehouse Cloud OData API Overview
- OAuth authentication tokens process
- Create "Blank Query" data source
- Connecting to OData source (Catalog or Consumption Model)
- Browsing and Consuming entities
- Creating a simple chart dashboard from the created query
OData API Overview
The SAP Data Warehouse Cloud OData APIs can be used to replicate data via APIs following the OData version 4 standard. It is divided into two services:
- Catalog Service: Allows consumer to list and query all accessible spaces and entities, which are available to a specific user and exposed for consumption. Each entity have reference to their consumption service.
- Consumption Service: Allows the consumption of the data from specified entities in a space. The data can be consumed in 2 fashions: as plain relational tables or as analytical models, also rich metadata definitions about the entity are exposed allowing consumers to derive detailed information about each column, dimension or measure.
The main entry point for the SAP Data Warehouse Cloud OData API is:
https://your-dwc-tenant....sap/api/v1/dwc/catalog/although this secondary entry point could be used as well:
https://your-dwc-tenant....sap/dwaas-core/odata/v4/catalog/For more details about the SAP Data Warehouse Cloud Public OData APIs, please refer to Official SAP Help Portal.
OAuth authentication process
The first step to setup the connection to SAP Data Warehouse Cloud OData APIs is to prepare and generate all OAuth information required to create the "Blank Query" data source in Microsoft Power BI.
As Power BI does not natively support 3-lagged OAuth flow without a custom connector, the authentication steps will be performed manually outside of PowerBI.
1. Create an OAuth Client in SAP Data Warehouse Cloud
- Go to your SAP Data Warehouse Cloud Administration page

- Open "App Integration" tab
- On the OAuth Client section, you will find important URLs for generating the OAuth credentials, save it for later.Later on this blog when there is a reference to the bellow tags replace it by its correspondent:
- <dwc_authorization_url>: Authorization URL
- <dwc_token_url>: Token URL
- Go to your SAP Data Warehouse Cloud Administration page
- Create a New OAuth Client to be used with PowerBI
- Set the name of your OAuth Client
- In Purpose field set "Interactive Usage"
- In Redirect URI field we can set the PowerBI standard: https://oauth.powerbi.com/views/oauthredirect.html

- Once the OAuth Client is created, click on the edit icon to get your client ID and secret

2. Generate Code Grant token
- On a browser, open the URL with pattern (replace parts in red):
- <dwc_authorization_url>?response_type=code&client_id=<clientID>
https:/your-dwc-tenant.authentication....sap/oauth/authorize?response_type=code&client_id=sb-5a0f6ce9-3ac2-4425-9d27-1d78ce6be785!b13811%7Cclient!b2319
In case you have a bad request error, replace the | (pipe) in the clientID by %7C
- <dwc_authorization_url>?response_type=code&client_id=<clientID>
- As a result of your access it will redirect you to a page where you should get the code value presented in the query parameters, copy that value (eg: lxuC1347ZLcNg3gjqFHKjAc6gT4iB0hp). Replace it later on the place of <code> tag

3. Generate Access and Refresh Tokens
- Open an API Client (eg: Postman) and create the following request (replace parts in red)
- Method: POST
- URL: <token_url> - Token URL displayed in App Integration page
- Headers:
- Authorization: Basic <base64 encoded clientId:secret>
- Content-Type: application/x-www-form-urlencoded
- x-sap-sac-custom-auth: true
- Body:
- code: <code from previous step>
- grant_type: authorization_code
- response_type: token
- Make the request and get the "refresh_token" value from the response body, this will be used later on.
- This refresh token will be valid for 30 days, allowing you to use PowerBI without re-authenticating by 30 days from the last access.
Creating PowerBI Blank Query Data Source
At this point all pre-required authentication information and values have already been generated and it is possible to start devoloping and use a "Blank Query" as form of integration. The "Blank Query" allows PowerBI users to develop a custom data source integration using PowerScript coding language, it gives flexibility to users to define their integration scenario with less limitations than other data sources.
In the context of this blog post, we will take advantage of the "Blank Query" capabilities to expose an OData feed component from PowerBI and also generate the authentication token required by each request. To increase the query flexibility we will create and use a paremeter ("url") that would contain the URL of the SAP Data Warehouse Cloud OData API service desired to be consumed.
Follow the next steps to start creating the query:
- Create a new Power BI Query
- As Data Source chose "Blank Query"

- For setting up the data connection the PowerScript language will be used, for that, click on "Advanced Editor"
- Use the following code to create the connection with SAP Data Warehouse Cloud Catalog API (Replace values between marked with <----->):
let

    DwcPubliAPIQuery = let

    auth_host_token_url = <token_url>,

    auth_refresh_token = <refresh_token>,

    client_id = <client_id>,

    secret = <secret>,

    headers_content = [#"Content-Type" = "application/json", #"Authorization" = "Basic " & Binary.ToText(Text.ToBinary(client_id & ":" & secret), 0)],

    query_params = [ #"grant_type" = "refresh_token",  #"refresh_token" = auth_refresh_token ],

    payload = Json.FromValue(""),

    options = [ Query = query_params,

                Headers = headers_content,

                Content = payload ],

    response = Web.Contents(auth_host_token_url, options ),

    jsonResponse = Json.Document(response),

    // we have the authentication token

    access_token = jsonResponse[access_token],

    Headers_Connectivity = [#"Authorization" = "Bearer " & access_token]

in

    // https://docs.microsoft.com/en-us/powerquery-m/odata-feed

    // OData.Feed(serviceUri as text, optional headers as nullable record, optional options as any) as any

    OData.Feed(url, Headers_Connectivity)

in

    DwcPubliAPIQuery
- Replace the required infortmation in th PorwerScript code above. As summary:
- <token_url>: SAP Data Warehouse Cloud token URL, found in "Create an OAuth Client in SAP Data Warehouse Cloud" step;
- <refresh_token>: OAuth Refresh Token, generated in "Generate Access and Refresh Tokens" step;
- <client_id> and <secret>: ClientId and Secret, generated as part of the OAuth client in "Create an OAuth Client in SAP Data Warehouse Cloud" step
- Click "Done" on the "Advanced Editor"
- As next step create a PowerBI Query Parameter, go to "Manage Parameters" and create a "New Parameter" and set the following values:
- Name: url
- Required: checked
- Type: Text
- Suggested Values: Any Value
- Current Value: Use the main entry point as described in "OData API Overview" section of this blog post.

To check the result and confirm that everything is working as expected, click on the PowerBI query name on left side. It should consume the SAP Data Warehouse Cloud Public OData API catalog endpoint and display the available services. The result should look like the image bellow:

At this point browsing spaces and assets from SAP Data Warehouse Cloud repository is already possible. Clicking into "Table" link of the "Data" column will make PowerBI follow the navigation the next OData request, allowing to see all avialble spaces and assets information.
Browsing and consuming entities
Although when accesing a list of assets it is possible to see relational and analytical consumption URLs for those entities, it is not quite easy to follow those URLs and check the data of each of them.
To overcome this situation its possible to take advantage of the previous developed query and convert it into a function which receives the URL of the SAP Data Warehouse Cloud OData API service that will be consumed. That way, would be possible to execute the query multiple times for different OData services.
Follow the steps bellow:
- Right Click on the created query and select "Create Function"

- Enter the name of your function
- To try it out: click on the function name on the left side and provide the OData catalog service URL, like in the parameter setup, and invoke the function

To enable the navigation between a table of assets and the assets data, we will include a custom column into the assets table, which will execute our function with assetRelationalDataUrl or assetAnalyticalDataUrl. This will enable a navigation to the URL data service by just clicking in the added custom column for each line.
Follow the steps bellow:
- Navigate to the list of assets into a space
For performance reasons it's recommended to first filter the assets you want work with and only later apply manipulations to the OData Feed table, like adding columns, as this operation will be applied for each asset and each operation might take a certain amout of time.
- Go to "Add Column" tab
- Click on "Invoke Custom Function" to add a custom column
- New Column Name: Add the custom column name (eg: Relational Data Navigation)
- Function Name: Select the function created previously
- url (parameter): Select one of the 2 data URLs (relational or analytical) - in this case we will use the assetRelatinalDataUrl

- Wait a moment until the services of all assets are check and the metadata preloaded. If everything went successfull, you should see the new column at the end of the table, like the image bellow:

- Click on the "Table" link for the prefered asset: You will see the list of available entities inside this asset. In the example is the CollegeEnrollment entity

- Click "Table" link of the "Data" column to consume the entity data.

Creating a simple chart dashboard
After navigating to the data preview of the chosen entity it is possible to apply and save the current visualization to be consumed by the PowerBI Dashboard builder.
- Click "Close & Apply"
- After applying the available data sources will be displayed at the right left panel. In our case the CollegeEnrollment entity data is being exposed with the dafault name "Invoked Function".

- To add a chart, click on "New Visual"
- Select the measures and dimensions, in the right panel, desired to be displayed in the chart

Summary
This blog post covered the required concepts and steps to integrate SAP Data Warehouse Cloud with PowerBI using a Blank Query data source. Including how to manually authenticate yourself using the OAuth 3-lagged process, which is the same that should be done for any other 3rd-party application. Also how to start from the OData API catalog service, listing your spaces and assets and navigating all the way to consume entities data from SAP Data Warehouse Cloud.
I’d be happy to hear your thoughts, ideas and comments and discuss further on this topic. Let me know in the comments!
To keep updated about the latest information and blog post about SAP Data Warehouse Cloud follow the topic page, checkout the Q&A section and other related blog posts.
- SAP Managed Tags:
- SAP Datasphere,
- OData
Labels:
35 Comments
You must be a registered user to add a comment. If you've already registered, sign in. Otherwise, register and sign in.
Labels in this area
-
ABAP CDS Views - CDC (Change Data Capture)
2 -
AI
1 -
Analyze Workload Data
1 -
BTP
1 -
Business and IT Integration
2 -
Business application stu
1 -
Business Technology Platform
1 -
Business Trends
1,658 -
Business Trends
93 -
CAP
1 -
cf
1 -
Cloud Foundry
1 -
Confluent
1 -
Customer COE Basics and Fundamentals
1 -
Customer COE Latest and Greatest
3 -
Customer Data Browser app
1 -
Data Analysis Tool
1 -
data migration
1 -
data transfer
1 -
Datasphere
2 -
Event Information
1,400 -
Event Information
66 -
Expert
1 -
Expert Insights
177 -
Expert Insights
299 -
General
1 -
Google cloud
1 -
Google Next'24
1 -
Kafka
1 -
Life at SAP
780 -
Life at SAP
13 -
Migrate your Data App
1 -
MTA
1 -
Network Performance Analysis
1 -
NodeJS
1 -
PDF
1 -
POC
1 -
Product Updates
4,577 -
Product Updates
344 -
Replication Flow
1 -
RisewithSAP
1 -
SAP BTP
1 -
SAP BTP Cloud Foundry
1 -
SAP Cloud ALM
1 -
SAP Cloud Application Programming Model
1 -
SAP Datasphere
2 -
SAP S4HANA Cloud
1 -
SAP S4HANA Migration Cockpit
1 -
Technology Updates
6,873 -
Technology Updates
422 -
Workload Fluctuations
1
Related Content
- Possible Use Cases Of ECC & S/4HANA Connection With SAP Datasphere. in Technology Q&A
- SAP Datasphere - Space, Data Integration, and Data Modeling Best Practices in Technology Blogs by SAP
- Language Code for SAP Business Warehouse Application Server Power BI Connector in Technology Q&A
- SAP BW Bridge In SAP Datasphere : Connectivity Between S/4HANA System & BW Bridge in Technology Blogs by Members
- Exploring Datasphere & BW Bridge : Technical Insights in Technology Blogs by Members
Top kudoed authors
| User | Count |
|---|---|
| 39 | |
| 25 | |
| 17 | |
| 13 | |
| 7 | |
| 7 | |
| 7 | |
| 7 | |
| 6 | |
| 6 |