
- SAP Community
- Products and Technology
- Technology
- Technology Blogs by SAP
- @sap/datasphere-cli: Getting Rid of Passcodes Than...
Technology Blogs by SAP
Learn how to extend and personalize SAP applications. Follow the SAP technology blog for insights into SAP BTP, ABAP, SAP Analytics Cloud, SAP HANA, and more.
Turn on suggestions
Auto-suggest helps you quickly narrow down your search results by suggesting possible matches as you type.
Showing results for
Advisor
Options
- Subscribe to RSS Feed
- Mark as New
- Mark as Read
- Bookmark
- Subscribe
- Printer Friendly Page
- Report Inappropriate Content
09-21-2022
11:13 AM
This blog post is part of a series of blogs I published about @sap/datasphere-cli. Find all blog posts related to this topic in my overview blog post here.
The Node.js-based Command-Line Interface (CLI) for SAP Datasphere, @sap/datasphere-cli hosted on npmjs.com, allows you to interact with your SAP Datasphere tenant from the terminal or command line. With version 2022.20 of the CLI, you can now use OAuth client authentication instead of passcodes, allowing you to issue multiple commands without the need to re-authenticate for up to 720 hours!
Introduction
With previous versions of @sap/datasphere-cli, you had to provide a passcode for every command you executed. This is already cumbersome in a foreground scenario with you sitting in front of your PC and using the CLI manually on the command line. It gets even worse when trying to use the CLI in the background, for example in an automated script or a CI/CD pipeline.
Thanks to the latest developments in the area of @sap/datasphere-cli, you can now create an OAuth Client for Interactive Usage and authenticate using the provided Client ID and Client Secret. After you created an OAuth Client for Interactive Usage, you can log in once and run multiple commands without the need to authenticate again for the next 720 hours.
In this blog, I show you how to create an OAuth Client for Interactive Usage and different ways how you can use it to issue commands using the CLI.
Please note: This update includes a few additional essential changes I'd like to highlight here:
- Short flags of some options changed from lower case to upper case. Option -s, --space changed to -S, --space (capital -S), option -d, --definitions changed to -D, --definitions (capital -D).
- Commands with a hyphen, except for passcode-url, like cache-*, changed to cache *, eg cache-init changed to cache init.
Creating an OAuth Client
Following the official SAP Help page for creating an OAuth Client for Interactive Usage are the steps to take in a non-SAP data center.
Log in to your SAP Datasphere tenant and navigate to the App Integration page. Depending on whether your tenant is running in a Two Tenant Mode or One Tenant Mode setup, you need to take a different navigation route. In a One Tenant Mode system (that is, your SAP Datasphere and SAP Analytics Cloud system share the same URL, which only differs in the path in parts), you can configure a new OAuth Client in your connected SAP Analytics Cloud tenant. From the app switcher select Analytics (1), choose System > Administration (2), then click on App Integration (3), and finally hit Add a New OAuth Client (4).

Picture 1 - Adding a new OAuth Client
In a Two Tenant Mode system (the URL for both services is different), you can stay in the Data Warehouse app and choose System > Administration (2), then click on App Integration (3), and finally hit Add a New OAuth Client (4).
To create a new OAuth Client to use with the CLI, you only need to provide a meaningful name. As a purpose, choose Interactive Usage and hit Add. The Redirect URI should be put to http://localhost:8080 by default. In case you make use of the CLI_HTTP_PORT environment variable, change the port accordingly. When creating an OAuth Client for Interactive Usage only, you need to log in once with your business user account to retrieve the initial access token and refresh token you hand over to the CLI for executing commands.
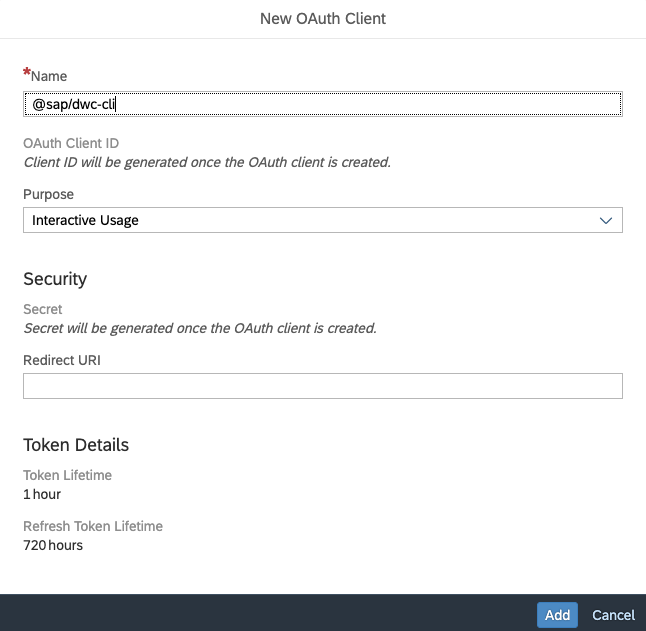
Picture 2 - Creating a new OAuth Client
After you created a new OAuth Client, you can see a new entry on the App Integration overview page. You need to remember/copy the Authorization URL and Token URL for later use (1). To copy the Client ID and Client Secret, hit the Edit OAuth Client button (2).

Picture 3 - New OAuth Client on App Integration Overview Page
You can find the Client ID (1) and the Client Secret (2) in the dialog. Hit the Show secret button (2) to reveal the Client Secret.

Picture 4 - OAuth Client Details
Using OAuth Clients with @sap/datasphere-cli
Now that you have the Authorization URL, Token URL, Client ID, and Client Secret, you can use these information to log in with your business user account using the CLI and then execute as many commands as you like up to 720 hours before you need to log in again and provide a new refresh token. You can provide the secrets in all different ways supported by the CLI, see the README. In addition, you can create a JSON file containing the secrets and pass it to the CLI using the -s, --secrets-file option. In the following section, I will demonstrate how to pass along the secrets using options and using a file.
To get to know the names of the different options for passing the secrets to the CLI, use option -h, --help (more options have been removed to improve readability):
$ datasphere login --help

Usage: datasphere login [options]


log in to your account using interactive OAuth authentication


Options:

  -c, --client-id <id>           client id for interactive oauth session authentication (optional)

  -C, --client-secret <secret>   client secret for interactive oauth session authentication (optional)

  -A, --authorization-url <url>  authorization url for interactive oauth session authentication (optional)

  -t, --token-url <url>          token url for interactive oauth session authentication (optional)

  -h, --help                     display help for command
Code Sample 1 - Overview of Options for Passing Secrets
Passing Secrets as Options
We can use the options shown above to log in with our business user account for the tenant we created the OAuth Client for. Currently, it is not possible to log in simultaneously with different accounts for the same tenant or multiple tenants.
When running the datasphere login command and specifying the options, a browser window opens requiring you to log in with your business account details. After successful login, a success message is shown and you can close the tab or window.
Picture 5 - Log In Passing Secrets as Options
After you logged in, you can display the locally stored secrets including the access token, refresh token, and expiry time, ... using the datasphere secrets show command:
$ datasphere secrets show

{

  "client_id": "...",

  "client_secret": "...",

  "authorization_url": ".../oauth/authorize",

  "token_url": ".../oauth/token",

  "access_token": "....",

  "refresh_token": "...",

  "expires_in": 3599,

  "token_type": "bearer",

  "id_token": "...",

  "scope": "...",

  "jti": "...",

  "expires_after": ...

}
Code Sample 2 - Displaying Locally Stored Secrets
Now that you are logged in, you can run as many commands as you like without the need to pass along a passcode or any other secrets again for the next 720 hours! Isn't this great?! 😊 The CLI uses the access token and refresh token it retrieved when running the datasphere login command to authenticate any further command. After 720 hours, you have to log out and log in again to refresh the locally stored refresh token before you can execute additional commands.
If you pass the secrets as separate options to the login command, make sure to URI encode the Client ID and Client secret and put them into double quotes.
Passing Secrets via File
To improve security and not reveal any secrets to someone browsing your terminal's history, you can also put the secrets into a file and point the CLI to the file's location when logging in or executing another command (to omit the login step, you can retrieve the access token yourself and pass it to the CLI directly to authenticate commands, see next section).
The file must contain either all information needed to retrieve the access token and refresh token like Client ID, Client Secret, Authorization URL, and Token URL, or you can only provide the access and refresh token instead. Whatever values you provide, you have to provide them in the form of a simple JSON file, with the property names being equal to the respective option names with leading -- being replaced with empty space, - being replaced by _, so for example --client-id becomes client_id. You can also run the datasphere secrets show command as shown in the above code sample to get an idea about the property names and which properties you can supply.
// my-secrets.json


{

  "client_id": "...",

  "client_secret": "...",

  "authorization_url": ".../oauth/authorize",

  "token_url": ".../oauth/token"

}
Code Sample 3 - Secrets JSON File
Then, run the datasphere login command and specify the path to the secrets file to log in:
$ datasphere login --secrets-file /path/to/my-secrets.json
Code Sample 4 - Logging In Using Secrets File
To remove any locally stored secrets, you can run the datasphere logout command. To verify that the secrets have been removed successfully, you can run the datasphere secrets show command and expect it to fail:
$ datasphere logout

$ datasphere secrets show

No secrets exist

Failed to display locally stored secrets for interactive OAuth authentication
Code Sample 5 - Logging Out
Directly Passing Access Tokens and Refresh Tokens
It might make sense in your scenario to directly pass the access token and refresh token you retrieved in another way than using the datasphere login command and pass both tokens to the CLI instead of Client ID, Client Secret, ... This way, the CLI uses the passed tokens to authenticate any command. Again, you can pass the tokens as options (use the -h, --help command to get to know the right option names) or use a JSON file as shown before.
$ datasphere cache init --host https://.. --access-token a%bak... --refresh-token ce$z2....
Code Sample 6 - Passing Access Token and Refresh Token as Options
Retrieving Access and Refresh Tokens Manually
Are you using Postman? If yes, check out this blog blogs.sap.com/how-to-setup-postman-for-consuming-sap-datasphere-apis/ which describes how to configure Postman to retrieve the access token using the interactive OAuth client.
If you are using the CLI in an automated setup, for example, a script or a CI/CD pipeline, you may want to retrieve the access token and refresh token manually, and provide the tokens together with the information about the Authorization URL, Token URL, Client ID, and Client Secret in a file to the CLI. This way, you don't need to log in first before executing commands, and you can update the refresh token shortly before it expires after 720 hours.
There are at least two different ways how to retrieve the tokens manually. Either you can use the datasphere login command and then run datasphere secrets show to display the tokens, or you can follow the login steps manually and use an HTTP client tool of your choice, for example, Postman or curl, to retrieve the tokens. Above you have already read about how to work with the two commands datasphere login and datasphere secrets show. In this section, I will show you how to follow the login steps manually and retrieve the tokens using Postman and curl.
First, you need to retrieve the temporary code which you later use to retrieve the actual tokens. To retrieve the code, you use the Authorization URL you retrieved from the App Integration page in your tenant. You construct the target URL following this syntax:
<authorization URL>?response_type=code&client_id=<client ID>


https://myhost.com/oauth/authorize??response_type=code&client_id=myclientid
Code Sample 7 - URL to Retrieve Temporary Code
Make sure to URI encode the Client ID. Open this URL in your browser. If not logged in already, you are forwarded to your IdP's login page.

Picture 6 - Login Page
After you logged in, you are forwarded to the Redirect URI you entered when creating the OAuth Client, or localhost:8080/?code=<code> if you did not enter any explicit Redirect URI. In any way, the temporary code is added as a query parameter to the URL.
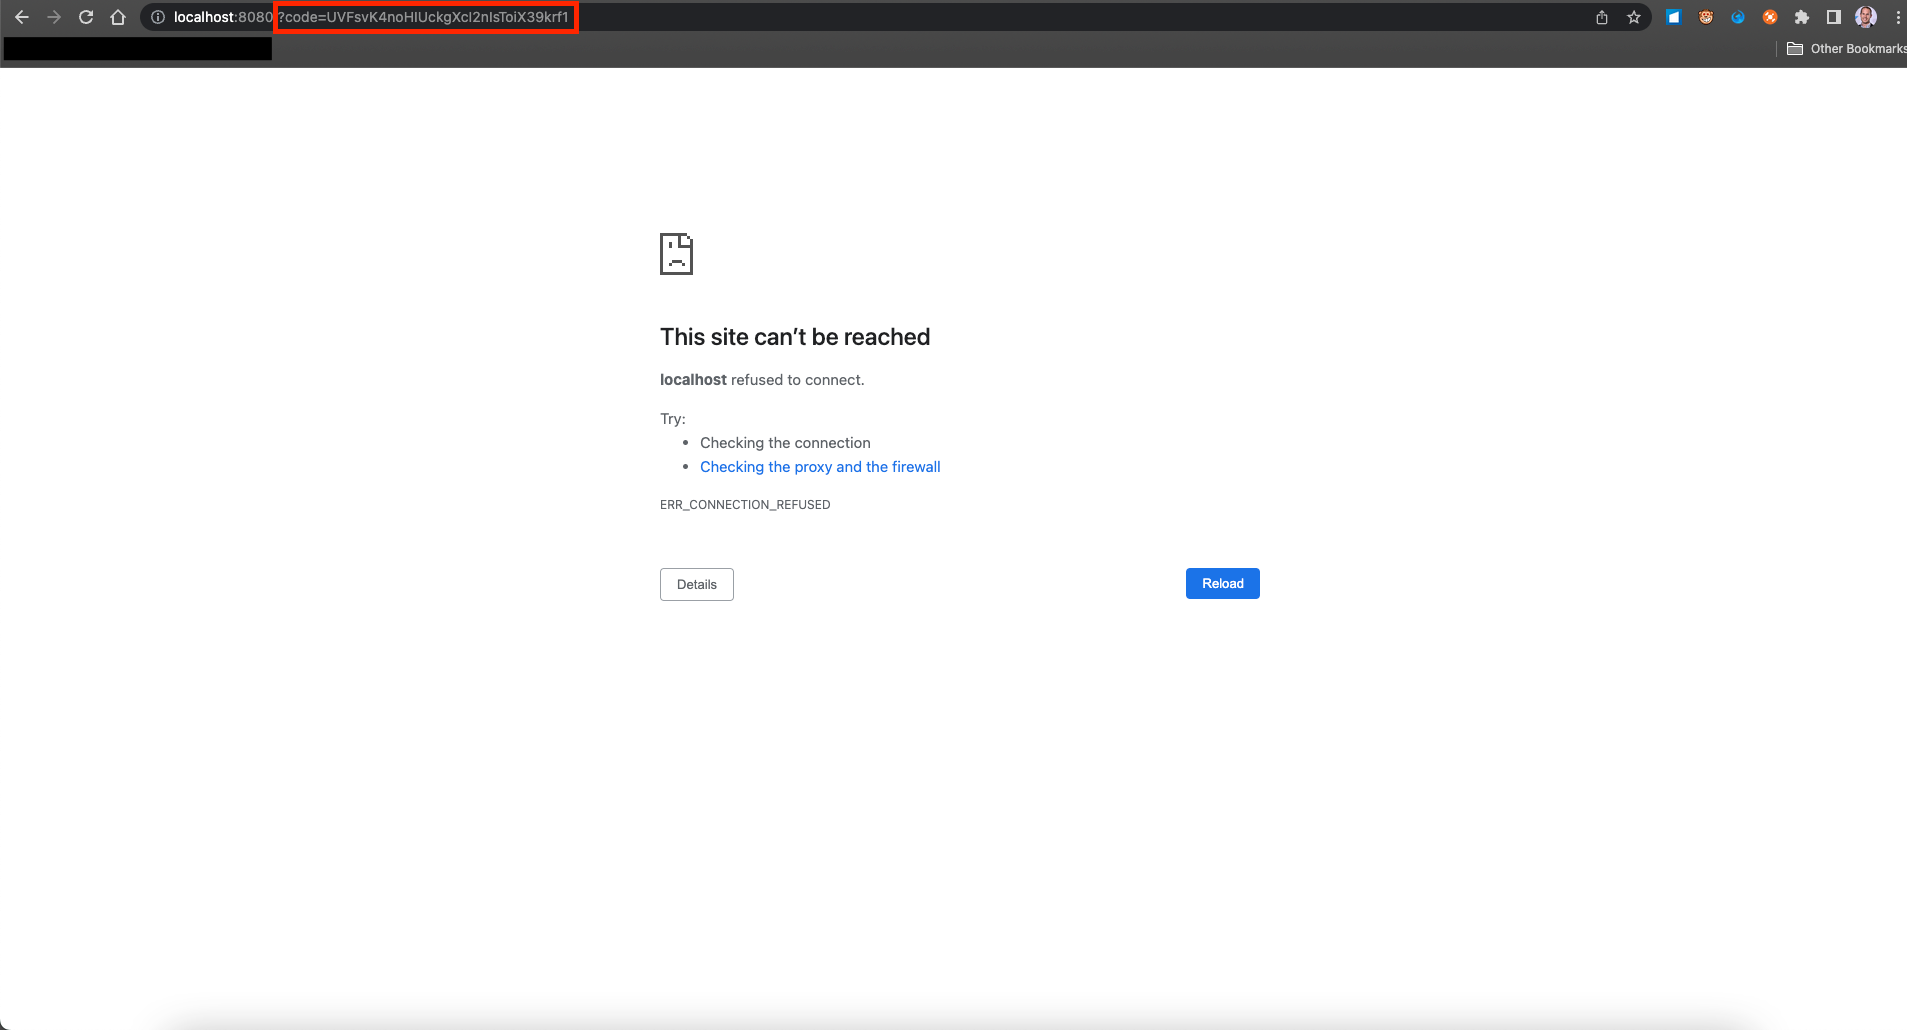
Picture 7 - Temporary Code as Query Parameter
Second, you need to send a POST request to the Token URL including the temporary code, Client ID, and Client Secret. The response contains the tokens, besides other things.

Picture 8 - Basic Auth with Client ID and Client Secret

Picture 9 - Custom Header x-sap-sac-custom-auth

Picture 10 - Temporary Code in Request Body
When the response returns with status 200 OK, you can find the tokens in the response body.

Picture 11 - Tokens in Response Body
Alternatively, you can use curl. To base64-encode the Client ID and Client Secret, you can, for example, use an online encoder (ideally you do this offline though, to ensure no secret information is shared with anyone).
$ curl -X POST <token URL> \

-H "Authorization: Basic <Base64 encoded <client ID>:<client Secret>>" \

-H "Content-Type: application/x-www-form-urlencoded" \

-H "x-sap-sac-custom-auth: true" \

-d "response_type=token&grant_type=authorization_code&code=<code>"
Code Sample 8 - Use curl to Retrieve Tokens
You can paste the tokens into a JSON file and pass it to the CLI using the -s, --secrets-file option or pass the tokens directly to the CLI, for example as options as seen in Code Sample 6 above.
Conclusion
I’d be happy to hear your thoughts, ideas, and comments on this tool and what you think would be a nice-to-have enhancement to the CLI, making your life and work with SAP Datasphere easier. Let me know in the comments!
Further Reading
Command-Line Interface for SAP Datasphere Cloud on npmjs.com
Command-Line Interface for SAP Datasphere on SAP Help
- SAP Managed Tags:
- SAP Datasphere
Labels:
29 Comments
You must be a registered user to add a comment. If you've already registered, sign in. Otherwise, register and sign in.
Labels in this area
-
ABAP CDS Views - CDC (Change Data Capture)
2 -
AI
1 -
Analyze Workload Data
1 -
BTP
1 -
Business and IT Integration
2 -
Business application stu
1 -
Business Technology Platform
1 -
Business Trends
1,658 -
Business Trends
93 -
CAP
1 -
cf
1 -
Cloud Foundry
1 -
Confluent
1 -
Customer COE Basics and Fundamentals
1 -
Customer COE Latest and Greatest
3 -
Customer Data Browser app
1 -
Data Analysis Tool
1 -
data migration
1 -
data transfer
1 -
Datasphere
2 -
Event Information
1,400 -
Event Information
66 -
Expert
1 -
Expert Insights
177 -
Expert Insights
299 -
General
1 -
Google cloud
1 -
Google Next'24
1 -
Kafka
1 -
Life at SAP
780 -
Life at SAP
13 -
Migrate your Data App
1 -
MTA
1 -
Network Performance Analysis
1 -
NodeJS
1 -
PDF
1 -
POC
1 -
Product Updates
4,577 -
Product Updates
345 -
Replication Flow
1 -
RisewithSAP
1 -
SAP BTP
1 -
SAP BTP Cloud Foundry
1 -
SAP Cloud ALM
1 -
SAP Cloud Application Programming Model
1 -
SAP Datasphere
2 -
SAP S4HANA Cloud
1 -
SAP S4HANA Migration Cockpit
1 -
Technology Updates
6,873 -
Technology Updates
427 -
Workload Fluctuations
1
Related Content
- Supporting Multiple API Gateways with SAP API Management – using Azure API Management as example in Technology Blogs by SAP
- How to configure alerts in Time and Material Journal in Technology Q&A
- SAP LICENSE RENEWAL FROM BASIS END #ATR in Technology Blogs by Members
- Question regarding enabling the Extended Integration Impact Analysis for SAP Readiness Check in Technology Q&A
- Usage Procedure Logging SAP Tables in Technology Q&A
Top kudoed authors
| User | Count |
|---|---|
| 41 | |
| 25 | |
| 17 | |
| 14 | |
| 9 | |
| 7 | |
| 6 | |
| 6 | |
| 6 | |
| 6 |