
- SAP Community
- Products and Technology
- Technology
- Technology Blogs by SAP
- SAP BTP Security: Troubleshooting 401 / 403 Errors...
Technology Blogs by SAP
Learn how to extend and personalize SAP applications. Follow the SAP technology blog for insights into SAP BTP, ABAP, SAP Analytics Cloud, SAP HANA, and more.
Turn on suggestions
Auto-suggest helps you quickly narrow down your search results by suggesting possible matches as you type.
Showing results for
Product and Topic Expert
Options
- Subscribe to RSS Feed
- Mark as New
- Mark as Read
- Bookmark
- Subscribe
- Printer Friendly Page
- Report Inappropriate Content
09-08-2022
10:44 AM
You have a java app.
It throws a 401 or 403 error.
It makes you crazy.
But: you’re not alone. Try this troubleshooting blog.
Here, you find debugging hints and friends.
Together, we're reproducing the error in a hands-on sample scenario, we add some configuration and create a debugger class to get an idea about what could cause the error.
Short description can be found in the Quick Guide at the end of this blog post.
Involved technologies:
SAP Business Technology Platform, Cloud Foundry Environment, XSUAA, Java Spring Boot.
1. Introduction
2. Sample Application
3. Run Error Scenarios
4. Run Troubleshooting Scenarios
5. Optional: More Info
6. Clean up
Appendix 1: Sample Code
Appendix 2: application.yml
We have a Java Spring Boot application, which exposes a REST endpoint.
It is protected using Spring Security, with OAuth 2 (via XSUAA binding) and it requires a certain scope to be present in the incoming JWT token.
We call the REST endpoint from anywhere and the request fails with HTTP status code 401 or 403.
We’re getting crazy because we don’t know the reason of the error.
To troubleshoot the error, we need more information.
Now we feel the pain of useful frameworks: they simplify our life, as long as everything works as expected. But if things start going wrong, it is hard to debug.
Fortunately, in the SAP Community, it is easy to find friends…and information.
One important information would be the JWT token itself, which could be invalid or incomplete.
However, since the request is already rejected by Spring Security, our endpoint implementation isn't invoked at all, so we cannot have a look at the JWT token.
In the sample code below, we’re demonstrating a way how to hock into the Spring framework, before the request is rejected, and thus get the opportunity to analyze the JWT token.
Second useful information would be to view the internal error messages and traces which are logged by Spring or SAP security libraries, but are not written to the Cloud Foundry log, for security reasons.
In the sample code below, we’re showing how to configure Spring to write the traces to the log.
As you’ve probably been browsing the internet in search for help (and friends), you must have reached this blog post with an existing error-throwing java app.
Nevertheless, to make the tutorial complete such that it can be executed by everybody, we start with creating a simple RESTful application and simple web app.
We simulate the errors and then fix it after analyzing the root cause.
To follow this tutorial, we need
To follow this tutorial, we create a root folder which will contain our 2 applications:
Java (created later) and web app (approuter).
In addition, we create the deployment descriptor (manifest.yml) and security descriptor (xs-security.json).
C:\trouble
approuter
package.json
xs-app.json
manifest.yml
xs-security.json
The final project structure can be found in appendix1.
The XSUAA instance is used to protect our application and to handle user login (together with approuter).
But also, it is responsible to create the authorization artifacts, as defined by below config parameters:
xs-security.json
The command for creating the instance of xsuaa:
cf cs xsuaa application backendXsuaa -c xs-security.json
After service creation we can check the cockpit for the newly created roles and role collection.
If you already have an application, you can of course skip this chapter.
To create a new Maven project, you can use any basic spring boot archetype and adapt it afterwards, or use the spring toolset in Eclipse.
Below description is based on an easy website starter, not the preferred way, but reproducible by anybody.
2.1.1. Generate Starter Project
Open: https://start.spring.io
Choose "Maven Project", "Java", "Spring Boot version 2.7.0".
Group: com.example
Artifact: backendapp
Name: backendapp
Description: backendapp
Package name: com.example.backendapp
Packaging: Jar
Java: 8
Choose "Add Dependencies" and then select "Spring Web".
Click "Generate".
A backendapp.zip file is generated and saved in the "Downloads" folder of our Windows system.
We extract it to c:\trouble, our root folder, which will contain the extracted project folder backendapp.
The final project structure can be found in appendix1.
2.1.2. Import Project
We import “trouble” into eclipse, via main menu -> File > Open Projects from File System, then browse to the extracted folder c:\trouble.
We need to do the following changes:
2.1.3. Adapt pom file
We add the dependency to the security libraries:
pom.xml
The <dependencies> section now looks as follows:
Yes, I’ve removed the "test" dependencies and deleted the "test" folder, to run little faster.
2.1.4. Spring Boot Application
The class BackendApplication.java is generated by the Spring Initializer and is marked with the annotation @SpringBootApplication
We find it in our project and are happy with it like it is.
2.1.5. REST Controller
Our application is required to expose a REST endpoint, to be called via HTTP.
Create Java Class
In our package com.example.backendapp we create a new Java Class with name "BackendController.java".
Define REST endpoint
We expose a simple REST endpoint with name “/endpoint” which does nothing than respond with a silly message when invoked.
Apologies, the focus of this tutorial is in the security configuration.
We need to mark the class as REST controller with an annotation, then define a method marked as endpoint for HTTP “GET” requests:
BackendController.java
2.1.6. Security Configuration
Authentication and authorization handling for requests to our endpoint is expressed in Java code.
Create Java Class
We create another java class in our package and we name it e.g. "BackendSecurity.java".
Here, we basically specify that the endpoint with name “/endpoint” requires that the calling user is authenticated and has the Role “BackendRole” (which contains the scope “scopeforbackend” as defined in our security descriptor).
That’s simple, but can sometimes make life difficult.
BackendSecurity.java
Why do we need an "AuthenticationConverter"?
We have to remember that in SAP BTP, XSUAA based, we define scopes with a prefix, to make them unique ($XSAPPNAME.scopeforbackend).
That prefix is generated during deployment, so we cannot simply write it in the code statically.
The "TokenAuthenticationConverter" retrieves the generated prefix in the binding and removes it, such that we can write just the scope name (scopeforbackend) in our filter code.
Summary
We've generated a Spring Boot app, we've defined a REST endpoint and we've configured authentication and authorization restriction, such that users accessing that endpoint are required to have a certain role.
Next we create a simple frontend app that calls the backend app.
The frontend app is so simple that it even doesn't contain any user interface.
We only create an approuter, to simulate a real web app.
We even don't create the approuter, we only start it and configure it.
The configuration is as follows:
We define a route.
Whenever an end-user invokes that route, he is faced with a login screen.
After successful logon, the XSUAA server issues a JWT token and the user is forwarded to our protected REST endpoint, as configured in the target destination.
Not only the user is forwarded: even the JWT token is forwarded (we configure it in the destination, see below).
This JWT token will reach our endpoint only if all security restrictions (as configured above) are met.
It feels (almost) like a real web app, doesn't it?
xs-app.json
The full app content can be found in appendix1.
Before we can deploy our 2 apps, we need to define the deployment descriptor:
manifest.yml
The full file content can be found in appendix1.
We can see, 2 apps are defined and both are bound to the same instance of XSUAA.
The destination for approuter is defined as environment variable, to make the tutorial shorter. In productive landscape, we would create real destination configuration in the cockpit.
Before deploy, we need to build the project, so we jump into c:\trouble\backendapp and run
mvn clean package
Then we can jump to c:\trouble and run cf push
After deploy, we don’t configure security settings for our user, as we want to simulate the error scenario.
Remember what we are doing:
We have an application scenario running in SAP BTP, which itself doesn't contain an error, but it throws an error when it is called.
We want to learn how to troubleshoot such scenario.
So first we need to troublemake the 2 typical error cases: HTTP Status 401 and 403.
As we know, HTTP status codes starting with a 4 indicate client errors.
Means, the endpoint has not been properly invoked.
Good about that: there doesn't seem to be a bug in our java code.
Bad about it: we need to find out why it fails.
The 401 text is specified as "Unauthorized", which we would interpret as "required role not available", but in fact, 401 means "Not authenticated". So the server refuses the access to the requested resource, which is our REST endpoint.
To simulate the 401-error-scenario, we simply invoke our REST endpoint directly, not via approuter, with a browser, hence without authentication.
In my example, the URL is:
https://backendapp.cfapps.sap.hana.ondemand.com/endpoint
In the browser we get error and the developer tools show 401.
To troubleshoot the error, we check the Cloud Foundry logs with
cf logs backendapp --recent
however, there’s no useful information there.
To simulate the 403-error-scenario, we invoke the approuter URL
E.g.:
https://backendrouter.cfapps.sap.hana.ondemand.com/tobackend/endpoint
This leads to display of a login page.
After entering our user credentials, we get an error message, as expected, and in the dev tools we can see status 403.
The error text is defined as "Forbidden" which means, the user is authenticated, the server accepts the user login, however, the application refuses the request because of missing authorization, the user is in fact "Unauthorized".
To troubleshoot the error, we check the Cloud Foundry logs, however, there’s no useful information there.
To finally simulate the scenario: we wonder why it is failing….
This is the interesting part (= less boring part) of the blog post:
How to find helpful error messages or traces in the Cloud Foundry log.
First attempt of troubleshooting is to view the logs, what we've already done.
so now we need to configure the frameworks, Spring and security libraries, such that detailed traces are written to the Cloud Foundry logs.
4.1.1. Logging level
There are several ways of changing the configuration: manifest, set-env, application.yml, application.properties.
In our example, we choose the file C:\trouble\backendapp\src\main\resources\application.properties which was generated by the Spring Initializer.
Suggested configuration:
We're interested in the traces written by Spring Security and SAP security library.
This will produce huge amount of text in the console, including tiny amount of helpful text.
Note:
Same settings for application.yml format can be found in the appendix2.
4.1.2. Spring Security Debug
One more nice logging option is to tell Spring Security to write debug info.
To do so, we open our security config class and add the following annotation:
4.1.3. Test
After build and deploy, we try both troublemaking URLs:
https://backendapp.cfapps.sap.hana.ondemand.com/endpoint
https://backendrouter.cfapps.sap.hana.ondemand.com/tobackend/endpoint
We can seethe overwhelming log output.
The second troubleshooting suggestion is my preferred one:
It is slower (I’m slow anyways) but more effective and flexible and powerful.
And more fun.
We create a little hook implementation and configure it to be called by the Spring framework prior to the Spring security code.
This gives us the chance to view and analyze the incoming request, before it is aborted.
Before we start with implementation, we need to find out where to place the hook.
So we have a look at the log output.
Quite at the beginning, we can find the debug information written by Spring Security Debug.
We need to view the Security filter chain.
View it...
We take a note of the first entry.
In my example, it is the DisableEncodeUrlFilter.
Here’s the link to the documentation where filters are listed. However, for the following mechanism to work, we need to point to a filter which is really used in our request, so better view the debugger, as it shows the reality.
Now we modify the security configuration of our app, in class BackendSecurity.java.
Here, what we’ve been doing was to add our authorization configuration to http requests, and return a Spring SecurityFilterChain.
The API allows us to specify an additional Filter, and add it in between other existing filters:
So now we only need to create our own filter and insert it into the chain before the Spring security filters.
Our own filter will then be invoked, before the Spring filter would reject eh erroneous request.
To make the tutorial a bit simpler, we create a new class as inner class of the BackendSecurity class.
It is a bean that extends org.springframework.web.filter.GenericFilterBean and overrides the doFilter() method:
After creating the class, we need to register it with the HttpSecurity builder:
That’s all.
We can build and deploy and test our new security filter.
Troublemaking 1: The HTTP 401 Error
After calling the direct URL:
https://backendapp.cfapps.sap.hana.ondemand.com/endpoint
we can easily see the reason of the error in the logs:
Our TroubleFilter has written that the auth header is missing, thus user is not authenticated, no JWT is sent.
Solution:
Use the approuter URL, or manually fetch a JWT token and send it to the endpoint, as it requires authentication via OAuth 2.0
Troublemaking 2: The HTTP 403 Error
After calling the approuter endpoint at
https://backendrouter.cfapps.sap.hana.ondemand.com/tobackend/endpoint
we get the 403 error.
This means, we're already one step further: user is authenticated, thus accepted by the server.
Now we only need to find out, why the user is not authorized.
In the log we can see helpful info around the JWT token, which is now being sent, but somehow doesn’t seem to be sufficient:
We can see that the clientid is contained in the aud claim.
We can see that the identity zone is ok
We can see the scopes: almost empty.
AHA !!
Almost empty!
Ahhhhhhhhhhh……
(we’re simulating our surprise and relief)
Now we understand: we’ve forgotten to assign the required role to our user...!
Therefore, the required scope (scopeforbackend) is not contained in the “scope” claim of the JWT token.
Solution:
We go to SAP BTP Cockpit->our subaccount->Role Collections->BackendRoles->Edit
Add our user.
Save.
Finally, we open the approuter again, but in different browser (incognito mode), to enforce new user login, such that the role assignment is realized.
As a result, the request is successful and in the log we can see that the required scope is present in the JWT.
If might be helpful in some cases to use the following snippet to print the full URL that was called:
Once we’ve found the problem, we should change back the log configurations and disable or delete the TroubleFilter.
Alternatively, delete the apps and services, subaccounts and clouds.
cf d -r -f backendrouter
cf d -r -f backendapp
cf ds -f backendXsuaa
We’ve learned about 2 options for troubleshooting Java Spring applications:
These 2 options don’t solve the problem itself, but enable us to see more logging messages and thus to understand the error.
More options are described in the SAP Help Portal here and here.
To set logging level for spring application, we can enter the following lines to the application.properties file:
logging.level.org.springframework.web=DEBUG
logging.level.org.springframework=DEBUG
logging.level.org.springframework.security=TRACE
logging.level.com.sap.cloud.security=TRACE
To enable Spring Security debug logs, we add the following annotation to our SecurityConfiguration class
@EnableWebSecurity(debug = true)
To implement a java class that is invoked before Spring Security would reject the request, we proceed as follows:
Find out the list of used Spring Security filters, by enabling Spring debug option and checking the log.
Implement a Filter Bean class that accesses the Authorization header and prints the relevant content of the JWT token.
Register this class in the filter chain before the Spring Security Filters.
See the code snippet in the appendix1
SAP Help Portal:
Authorization Entities documentation.
Reference for xs.security.json parameters.
Application Router main entry and npm.
Monitoring and Troubleshooting
Enable and Provide Application Logs
HTTP Status Codes:
MDN Web Docs (Mozilla Developer Network)
IANA (Internet Assigned Numbers Authority)
HTTP specification (RFC 2616)
OAuth 2.0
Understanding of OAuth for dummies like me.
For your convenience, see here the structure of the root project containing the 2 applications
xs-security.json
manifest.yml
backendapp
pom.xml
BackendappApplication.java
BackendController.java
BackendSecurity.java
application.properties
Approuter
package.json
xs-app.json
application.yml
It throws a 401 or 403 error.
It makes you crazy.
But: you’re not alone. Try this troubleshooting blog.
Here, you find debugging hints and friends.
Together, we're reproducing the error in a hands-on sample scenario, we add some configuration and create a debugger class to get an idea about what could cause the error.
Short description can be found in the Quick Guide at the end of this blog post.
Involved technologies:
SAP Business Technology Platform, Cloud Foundry Environment, XSUAA, Java Spring Boot.
Quicklinks:
Quick Guide
Sample Code
Content
1. Introduction
2. Sample Application
3. Run Error Scenarios
4. Run Troubleshooting Scenarios
5. Optional: More Info
6. Clean up
Appendix 1: Sample Code
Appendix 2: application.yml
1. Introduction
We have a Java Spring Boot application, which exposes a REST endpoint.
It is protected using Spring Security, with OAuth 2 (via XSUAA binding) and it requires a certain scope to be present in the incoming JWT token.
We call the REST endpoint from anywhere and the request fails with HTTP status code 401 or 403.
We’re getting crazy because we don’t know the reason of the error.
To troubleshoot the error, we need more information.
Now we feel the pain of useful frameworks: they simplify our life, as long as everything works as expected. But if things start going wrong, it is hard to debug.
Fortunately, in the SAP Community, it is easy to find friends…and information.
One important information would be the JWT token itself, which could be invalid or incomplete.
However, since the request is already rejected by Spring Security, our endpoint implementation isn't invoked at all, so we cannot have a look at the JWT token.
In the sample code below, we’re demonstrating a way how to hock into the Spring framework, before the request is rejected, and thus get the opportunity to analyze the JWT token.
Second useful information would be to view the internal error messages and traces which are logged by Spring or SAP security libraries, but are not written to the Cloud Foundry log, for security reasons.
In the sample code below, we’re showing how to configure Spring to write the traces to the log.
As you’ve probably been browsing the internet in search for help (and friends), you must have reached this blog post with an existing error-throwing java app.
Nevertheless, to make the tutorial complete such that it can be executed by everybody, we start with creating a simple RESTful application and simple web app.
We simulate the errors and then fix it after analyzing the root cause.
1.1. Prerequisites
To follow this tutorial, we need
- Access to SAP Business Technology Platform (SAP BTP) and permission to create instances and to deploy applications.
- Basic Java and Spring Boot skills, Eclipse IDE and Maven installed.
- Some basic understanding of OAuth and JWT token.
- The tutorial is using the Cloud Foundry command line client, but all tasks can be done in the cockpit as well.
1.2. Preparation
To follow this tutorial, we create a root folder which will contain our 2 applications:
Java (created later) and web app (approuter).
In addition, we create the deployment descriptor (manifest.yml) and security descriptor (xs-security.json).
C:\trouble
approuter
package.json
xs-app.json
manifest.yml
xs-security.json
The final project structure can be found in appendix1.
1.3. Create Instance of XSUAA Service
The XSUAA instance is used to protect our application and to handle user login (together with approuter).
But also, it is responsible to create the authorization artifacts, as defined by below config parameters:
xs-security.json
{

    "xsappname": "backendxsappname",

    "tenant-mode": "dedicated",

    "scopes": [{

            "name": "$XSAPPNAME.scopeforbackend"

        }

    ],

    "role-templates": [{

            "name": "BackendRole",

            "scope-references": ["$XSAPPNAME.scopeforbackend"]

        }

    ],

    "role-collections": [{

        "name": "BackendRoles",

        "role-template-references": [ "$XSAPPNAME.BackendRole" ]

      }

    ]

}
The command for creating the instance of xsuaa:
cf cs xsuaa application backendXsuaa -c xs-security.json
After service creation we can check the cockpit for the newly created roles and role collection.
2. Create Application
If you already have an application, you can of course skip this chapter.
2.1. Create Spring Boot Project
To create a new Maven project, you can use any basic spring boot archetype and adapt it afterwards, or use the spring toolset in Eclipse.
Below description is based on an easy website starter, not the preferred way, but reproducible by anybody.
2.1.1. Generate Starter Project
Open: https://start.spring.io
Choose "Maven Project", "Java", "Spring Boot version 2.7.0".
Group: com.example
Artifact: backendapp
Name: backendapp
Description: backendapp
Package name: com.example.backendapp
Packaging: Jar
Java: 8
Choose "Add Dependencies" and then select "Spring Web".
Click "Generate".
A backendapp.zip file is generated and saved in the "Downloads" folder of our Windows system.
We extract it to c:\trouble, our root folder, which will contain the extracted project folder backendapp.
The final project structure can be found in appendix1.
2.1.2. Import Project
We import “trouble” into eclipse, via main menu -> File > Open Projects from File System, then browse to the extracted folder c:\trouble.
We need to do the following changes:
2.1.3. Adapt pom file
We add the dependency to the security libraries:
pom.xml
    <dependency>

        <groupId>com.sap.cloud.security.xsuaa</groupId>

        <artifactId>xsuaa-spring-boot-starter</artifactId>

        <version>2.12.2</version>

    </dependency>
The <dependencies> section now looks as follows:
	<dependencies>

		<dependency>

			<groupId>org.springframework.boot</groupId>

			<artifactId>spring-boot-starter-web</artifactId>

		</dependency>


		<dependency>

			<groupId>com.sap.cloud.security.xsuaa</groupId>

			<artifactId>xsuaa-spring-boot-starter</artifactId>

			<version>2.12.2</version>

		</dependency>

	</dependencies>
Yes, I’ve removed the "test" dependencies and deleted the "test" folder, to run little faster.
2.1.4. Spring Boot Application
The class BackendApplication.java is generated by the Spring Initializer and is marked with the annotation @SpringBootApplication
We find it in our project and are happy with it like it is.
2.1.5. REST Controller
Our application is required to expose a REST endpoint, to be called via HTTP.
Create Java Class
In our package com.example.backendapp we create a new Java Class with name "BackendController.java".
Define REST endpoint
We expose a simple REST endpoint with name “/endpoint” which does nothing than respond with a silly message when invoked.
Apologies, the focus of this tutorial is in the security configuration.
We need to mark the class as REST controller with an annotation, then define a method marked as endpoint for HTTP “GET” requests:
BackendController.java
@RestController

public class BackendController {


   @GetMapping("/endpoint")

      public String getEndpoint(@AuthenticationPrincipal Token token) {

    	 return "Endpoint successfully invoked";
2.1.6. Security Configuration
Authentication and authorization handling for requests to our endpoint is expressed in Java code.
Create Java Class
We create another java class in our package and we name it e.g. "BackendSecurity.java".
Here, we basically specify that the endpoint with name “/endpoint” requires that the calling user is authenticated and has the Role “BackendRole” (which contains the scope “scopeforbackend” as defined in our security descriptor).
That’s simple, but can sometimes make life difficult.
BackendSecurity.java
@Configuration

public class BackendSecurity {


   @Autowired

   XsuaaServiceConfiguration xsuaaBinding;


   @Bean

   public SecurityFilterChain filterChain(HttpSecurity http) throws Exception {

      http

      .authorizeRequests().antMatchers("/endpoint").hasAuthority("scopeforbackend")

      .and()

      .oauth2ResourceServer().jwt().jwtAuthenticationConverter(getJwtAuthenticationConverter());

      return http.build();

   }


   Converter<Jwt, AbstractAuthenticationToken> getJwtAuthenticationConverter() {

      TokenAuthenticationConverter converter = new TokenAuthenticationConverter(xsuaaBinding);

      converter.setLocalScopeAsAuthorities(true);

      return converter;

   }

}
Why do we need an "AuthenticationConverter"?
We have to remember that in SAP BTP, XSUAA based, we define scopes with a prefix, to make them unique ($XSAPPNAME.scopeforbackend).
That prefix is generated during deployment, so we cannot simply write it in the code statically.
The "TokenAuthenticationConverter" retrieves the generated prefix in the binding and removes it, such that we can write just the scope name (scopeforbackend) in our filter code.
Summary
We've generated a Spring Boot app, we've defined a REST endpoint and we've configured authentication and authorization restriction, such that users accessing that endpoint are required to have a certain role.
2.2. Web App
Next we create a simple frontend app that calls the backend app.
The frontend app is so simple that it even doesn't contain any user interface.
We only create an approuter, to simulate a real web app.
We even don't create the approuter, we only start it and configure it.
The configuration is as follows:
We define a route.
Whenever an end-user invokes that route, he is faced with a login screen.
After successful logon, the XSUAA server issues a JWT token and the user is forwarded to our protected REST endpoint, as configured in the target destination.
Not only the user is forwarded: even the JWT token is forwarded (we configure it in the destination, see below).
This JWT token will reach our endpoint only if all security restrictions (as configured above) are met.
It feels (almost) like a real web app, doesn't it?
xs-app.json
{

   "authenticationMethod": "route",

   "routes": [

      {

        "source": "^/tobackend/(.*)$",

        "target": "$1",

        "destination": "destination_backend",

        "authenticationType": "xsuaa"

      }

   ]

}
The full app content can be found in appendix1.
2.3. Deploy
Before we can deploy our 2 apps, we need to define the deployment descriptor:
manifest.yml
applications:

- name: backendapp

  routes:

    - route: backendapp.cfapps.sap.hana.ondemand.com

  services:

    - backendXsuaa

- name: backendrouter

  routes:

  - route: backendrouter.cfapps.sap.hana.ondemand.com

  env:

    destinations: >

      [

        {

          "name":"destination_backend",

          "url":"https://backendapp.cfapps.sap.hana.ondemand.com",

          "forwardAuthToken": true

        }

      ]

  services:

    - backendXsuaa

. . .
The full file content can be found in appendix1.
We can see, 2 apps are defined and both are bound to the same instance of XSUAA.
The destination for approuter is defined as environment variable, to make the tutorial shorter. In productive landscape, we would create real destination configuration in the cockpit.
Before deploy, we need to build the project, so we jump into c:\trouble\backendapp and run
mvn clean package
Then we can jump to c:\trouble and run cf push
After deploy, we don’t configure security settings for our user, as we want to simulate the error scenario.
3. Run Error Scenarios
Remember what we are doing:
We have an application scenario running in SAP BTP, which itself doesn't contain an error, but it throws an error when it is called.
We want to learn how to troubleshoot such scenario.
So first we need to troublemake the 2 typical error cases: HTTP Status 401 and 403.
3.1. Troublemaking 1: 401
As we know, HTTP status codes starting with a 4 indicate client errors.
Means, the endpoint has not been properly invoked.
Good about that: there doesn't seem to be a bug in our java code.
Bad about it: we need to find out why it fails.
The 401 text is specified as "Unauthorized", which we would interpret as "required role not available", but in fact, 401 means "Not authenticated". So the server refuses the access to the requested resource, which is our REST endpoint.
To simulate the 401-error-scenario, we simply invoke our REST endpoint directly, not via approuter, with a browser, hence without authentication.
In my example, the URL is:
https://backendapp.cfapps.sap.hana.ondemand.com/endpoint
In the browser we get error and the developer tools show 401.
To troubleshoot the error, we check the Cloud Foundry logs with
cf logs backendapp --recent
however, there’s no useful information there.
3.2. Troublemaking 2: 403
To simulate the 403-error-scenario, we invoke the approuter URL
E.g.:
https://backendrouter.cfapps.sap.hana.ondemand.com/tobackend/endpoint
This leads to display of a login page.
After entering our user credentials, we get an error message, as expected, and in the dev tools we can see status 403.
The error text is defined as "Forbidden" which means, the user is authenticated, the server accepts the user login, however, the application refuses the request because of missing authorization, the user is in fact "Unauthorized".
To troubleshoot the error, we check the Cloud Foundry logs, however, there’s no useful information there.
To finally simulate the scenario: we wonder why it is failing….
4. Run Troubleshooting Scenarios
This is the interesting part (= less boring part) of the blog post:
How to find helpful error messages or traces in the Cloud Foundry log.
4.1. Troubleshooting 1: Configure Logging Level
First attempt of troubleshooting is to view the logs, what we've already done.
so now we need to configure the frameworks, Spring and security libraries, such that detailed traces are written to the Cloud Foundry logs.
4.1.1. Logging level
There are several ways of changing the configuration: manifest, set-env, application.yml, application.properties.
In our example, we choose the file C:\trouble\backendapp\src\main\resources\application.properties which was generated by the Spring Initializer.
Suggested configuration:
logging.level.org.springframework.web=DEBUG

logging.level.org.springframework=DEBUG

logging.level.org.springframework.security=TRACE

logging.level.com.sap.cloud.security=TRACE
We're interested in the traces written by Spring Security and SAP security library.
This will produce huge amount of text in the console, including tiny amount of helpful text.
Note:
Same settings for application.yml format can be found in the appendix2.
4.1.2. Spring Security Debug
One more nice logging option is to tell Spring Security to write debug info.
To do so, we open our security config class and add the following annotation:
@Configuration

@EnableWebSecurity(debug = true)

public class BackendSecurity {

. . .
4.1.3. Test
After build and deploy, we try both troublemaking URLs:
https://backendapp.cfapps.sap.hana.ondemand.com/endpoint
https://backendrouter.cfapps.sap.hana.ondemand.com/tobackend/endpoint
We can seethe overwhelming log output.
4.2. Troubleshooting 2: Create Filter Class
The second troubleshooting suggestion is my preferred one:
It is slower (I’m slow anyways) but more effective and flexible and powerful.
And more fun.
We create a little hook implementation and configure it to be called by the Spring framework prior to the Spring security code.
This gives us the chance to view and analyze the incoming request, before it is aborted.
Before we start with implementation, we need to find out where to place the hook.
So we have a look at the log output.
Quite at the beginning, we can find the debug information written by Spring Security Debug.
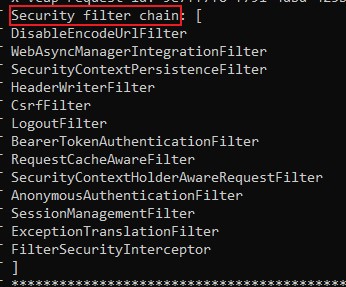
We need to view the Security filter chain.
View it...
We take a note of the first entry.
In my example, it is the DisableEncodeUrlFilter.
Here’s the link to the documentation where filters are listed. However, for the following mechanism to work, we need to point to a filter which is really used in our request, so better view the debugger, as it shows the reality.
Now we modify the security configuration of our app, in class BackendSecurity.java.
Here, what we’ve been doing was to add our authorization configuration to http requests, and return a Spring SecurityFilterChain.
The API allows us to specify an additional Filter, and add it in between other existing filters:
addFilterBefore(<myFilter>, <existingFilter>.class) So now we only need to create our own filter and insert it into the chain before the Spring security filters.
Our own filter will then be invoked, before the Spring filter would reject eh erroneous request.
To make the tutorial a bit simpler, we create a new class as inner class of the BackendSecurity class.
It is a bean that extends org.springframework.web.filter.GenericFilterBean and overrides the doFilter() method:
public class JwtTroubleFilter extends GenericFilterBean{


	@Override

	public void doFilter(ServletRequest request, ServletResponse response, FilterChain chain) throws IOException, ServletException {

		HttpServletRequest httpServletRequest = (HttpServletRequest) request;


		String authHeader = httpServletRequest.getHeader("Authorization");

		if(authHeader == null) {

			System.out.println("===> [TROUBLE] ERROR Authorization header not found");

			return;

		}


		JwtDecoder jwtDecoder = new XsuaaJwtDecoderBuilder(xsuaaBinding).withoutXsuaaAudienceValidator().build();

		String jwtEncoded = authHeader.substring(7);

		Jwt jwtDecoded = jwtDecoder.decode(jwtEncoded);


		System.out.println("===> [TROUBLE] This incoming JWT is sent to my app: " + jwtEncoded);

		System.out.println("===> [TROUBLE] The incoming JWT decoded: " + jwtDecoded.getClaims().toString());

		System.out.println("===> [TROUBLE] The incoming JWT is compared to the XSUAA binding of my app.");

		System.out.println("===> [TROUBLE] The incoming JWT must have my apps clientid in the aud.");


		System.out.println("===> [TROUBLE] JWT aud:     " + jwtDecoded.getAudience());

		System.out.println("===> [TROUBLE] XSUAA cliId: " + xsuaaBinding.getClientId());


		System.out.println("===> [TROUBLE] JWT sub:     " + jwtDecoded.getSubject());

		System.out.println("===> [TROUBLE] JWT iss:   " + jwtDecoded.getIssuer());

		System.out.println("===> [TROUBLE] XSUAA url: " + xsuaaBinding.getUaaUrl());

		System.out.println("===> [TROUBLE] JWT scopes: " + String.valueOf(jwtDecoded.getClaimAsStringList(TokenClaims.XSUAA.SCOPES)));


		chain.doFilter(request, response);

	}

}
After creating the class, we need to register it with the HttpSecurity builder:
@Bean

public SecurityFilterChain filterChain(HttpSecurity http) throws Exception {

	http

	.addFilterBefore(new JwtTroubleFilter(), DisableEncodeUrlFilter.class)

	.authorizeRequests().antMatchers("/endpoint").hasAuthority("scopeforbackend")
That’s all.
We can build and deploy and test our new security filter.
Troublemaking 1: The HTTP 401 Error
After calling the direct URL:
https://backendapp.cfapps.sap.hana.ondemand.com/endpoint
we can easily see the reason of the error in the logs:

Our TroubleFilter has written that the auth header is missing, thus user is not authenticated, no JWT is sent.
Solution:
Use the approuter URL, or manually fetch a JWT token and send it to the endpoint, as it requires authentication via OAuth 2.0
Troublemaking 2: The HTTP 403 Error
After calling the approuter endpoint at
https://backendrouter.cfapps.sap.hana.ondemand.com/tobackend/endpoint
we get the 403 error.
This means, we're already one step further: user is authenticated, thus accepted by the server.
Now we only need to find out, why the user is not authorized.
In the log we can see helpful info around the JWT token, which is now being sent, but somehow doesn’t seem to be sufficient:

We can see that the clientid is contained in the aud claim.
We can see that the identity zone is ok
We can see the scopes: almost empty.
AHA !!
Almost empty!
Ahhhhhhhhhhh……
(we’re simulating our surprise and relief)
Now we understand: we’ve forgotten to assign the required role to our user...!
Therefore, the required scope (scopeforbackend) is not contained in the “scope” claim of the JWT token.
Solution:
We go to SAP BTP Cockpit->our subaccount->Role Collections->BackendRoles->Edit
Add our user.
Save.
Finally, we open the approuter again, but in different browser (incognito mode), to enforce new user login, such that the role assignment is realized.
As a result, the request is successful and in the log we can see that the required scope is present in the JWT.
5. Optional: More Info
If might be helpful in some cases to use the following snippet to print the full URL that was called:
private void printRequestUrl(HttpServletRequest httpServletRequest) {

	StringBuilder requestURL = new StringBuilder(httpServletRequest.getRequestURL().toString());

	String queryString = httpServletRequest.getQueryString();

	String url;

	if (queryString == null) {

		url = requestURL.toString();

	} else {

		url = requestURL.append('?').append(queryString).toString();

	}


	System.out.println("===> [TROUBLE] Incoming request: " + httpServletRequest.getMethod() + " " + url);

	System.out.println("===> [TROUBLE] Incoming request user-agent: " + httpServletRequest.getHeader("user-agent"));

}
6. Cleanup
Once we’ve found the problem, we should change back the log configurations and disable or delete the TroubleFilter.
Alternatively, delete the apps and services, subaccounts and clouds.
cf d -r -f backendrouter
cf d -r -f backendapp
cf ds -f backendXsuaa
Summary
We’ve learned about 2 options for troubleshooting Java Spring applications:
- Configure logging levels for the involved components and enable Spring debug option
- Implement a hook class that is called before Spring Security would abort the request.
These 2 options don’t solve the problem itself, but enable us to see more logging messages and thus to understand the error.
More options are described in the SAP Help Portal here and here.
Quick Guide
To set logging level for spring application, we can enter the following lines to the application.properties file:
logging.level.org.springframework.web=DEBUG
logging.level.org.springframework=DEBUG
logging.level.org.springframework.security=TRACE
logging.level.com.sap.cloud.security=TRACE
To enable Spring Security debug logs, we add the following annotation to our SecurityConfiguration class
@EnableWebSecurity(debug = true)
To implement a java class that is invoked before Spring Security would reject the request, we proceed as follows:
Find out the list of used Spring Security filters, by enabling Spring debug option and checking the log.
Implement a Filter Bean class that accesses the Authorization header and prints the relevant content of the JWT token.
Register this class in the filter chain before the Spring Security Filters.
See the code snippet in the appendix1
Links
SAP Help Portal:
Authorization Entities documentation.
Reference for xs.security.json parameters.
Application Router main entry and npm.
Monitoring and Troubleshooting
Enable and Provide Application Logs
HTTP Status Codes:
MDN Web Docs (Mozilla Developer Network)
IANA (Internet Assigned Numbers Authority)
HTTP specification (RFC 2616)
OAuth 2.0
Understanding of OAuth for dummies like me.
Appendix 1: Sample Code
For your convenience, see here the structure of the root project containing the 2 applications

xs-security.json
{

    "xsappname": "backendxsappname",

    "tenant-mode": "dedicated",

    "scopes": [{

            "name": "$XSAPPNAME.scopeforbackend"

        }

    ],

    "role-templates": [{

            "name": "BackendRole",

            "scope-references": ["$XSAPPNAME.scopeforbackend"]

        }

    ],

    "role-collections": [{

        "name": "BackendRoles",

        "role-template-references": [ "$XSAPPNAME.BackendRole" ]

      }

    ]

}
manifest.yml
---

applications:

- name: backendapp

  memory: 1024M

  routes:

    - route: backendapp.cfapps.sap.hana.ondemand.com

  path: backendapp/target/backendapp-0.0.1-SNAPSHOT.jar

  services:

    - backendXsuaa

- name: backendrouter

  path: approuter

  memory: 128M

  routes:

  - route: backendrouter.cfapps.sap.hana.ondemand.com

  env:

    destinations: >

      [

        {

          "name":"destination_backend",

          "url":"https://backendapp.cfapps.sap.hana.ondemand.com",

          "forwardAuthToken": true

        }

      ]

  services:

    - backendXsuaa
backendapp
pom.xml
<?xml version="1.0" encoding="UTF-8"?>

<project xmlns="http://maven.apache.org/POM/4.0.0" xmlns:xsi="http://www.w3.org/2001/XMLSchema-instance" xsi:schemaLocation="http://maven.apache.org/POM/4.0.0 https://maven.apache.org/xsd/maven-4.0.0.xsd">

	<modelVersion>4.0.0</modelVersion>

	<parent>

		<groupId>org.springframework.boot</groupId>

		<artifactId>spring-boot-starter-parent</artifactId>

		<version>2.7.3</version>

		<relativePath /> <!-- lookup parent from repository -->

	</parent>

	<groupId>com.example</groupId>

	<artifactId>backendapp</artifactId>

	<version>0.0.1-SNAPSHOT</version>

	<name>backendapp</name>

	<description>Service App exposing REST endpoint</description>

	<properties>

		<java.version>1.8</java.version>

	</properties>

	<dependencies>

		<dependency>

			<groupId>org.springframework.boot</groupId>

			<artifactId>spring-boot-starter-web</artifactId>

		</dependency>


		<dependency>

			<groupId>com.sap.cloud.security.xsuaa</groupId>

			<artifactId>xsuaa-spring-boot-starter</artifactId>

			<version>2.12.2</version>

		</dependency>


	</dependencies>

	<build>

		<plugins>

			<plugin>

				<groupId>org.springframework.boot</groupId>

				<artifactId>spring-boot-maven-plugin</artifactId>

			</plugin>

		</plugins>

	</build>


</project>
BackendappApplication.java
package com.example.backendapp;


import org.springframework.boot.SpringApplication;

import org.springframework.boot.autoconfigure.SpringBootApplication;


@SpringBootApplication

public class BackendappApplication {


	public static void main(String[] args) {

		SpringApplication.run(BackendappApplication.class, args);

	}


}
BackendController.java
package com.example.backendapp;


import org.springframework.security.core.annotation.AuthenticationPrincipal;

import org.springframework.security.core.token.Token;

import org.springframework.web.bind.annotation.GetMapping;

import org.springframework.web.bind.annotation.RestController;


@RestController

public class BackendController {


	@GetMapping("/endpoint")

    public String getEndpoint(@AuthenticationPrincipal Token token) {

    	return "Endpoint successfully invoked";

    }

}
BackendSecurity.java
package com.example.backendapp;


import java.io.IOException;


import javax.servlet.FilterChain;

import javax.servlet.ServletException;

import javax.servlet.ServletRequest;

import javax.servlet.ServletResponse;

import javax.servlet.http.HttpServletRequest;


import org.springframework.beans.factory.annotation.Autowired;

import org.springframework.context.annotation.Bean;

import org.springframework.context.annotation.Configuration;

import org.springframework.core.convert.converter.Converter;

import org.springframework.security.authentication.AbstractAuthenticationToken;

import org.springframework.security.config.annotation.web.builders.HttpSecurity;

import org.springframework.security.config.annotation.web.configuration.EnableWebSecurity;

import org.springframework.security.oauth2.jwt.Jwt;

import org.springframework.security.oauth2.jwt.JwtDecoder;

import org.springframework.security.web.SecurityFilterChain;

import org.springframework.security.web.session.DisableEncodeUrlFilter;

import org.springframework.web.filter.GenericFilterBean;


import com.sap.cloud.security.token.TokenClaims;

import com.sap.cloud.security.xsuaa.XsuaaServiceConfiguration;

import com.sap.cloud.security.xsuaa.token.TokenAuthenticationConverter;

import com.sap.cloud.security.xsuaa.token.authentication.XsuaaJwtDecoderBuilder;


@Configuration

@EnableWebSecurity(debug = true)

public class BackendSecurity {


	@Autowired

	XsuaaServiceConfiguration xsuaaBinding;


	@Bean

	public SecurityFilterChain filterChain(HttpSecurity http) throws Exception {

		http

			.addFilterBefore(new JwtTroubleFilter(), DisableEncodeUrlFilter.class)

			.authorizeRequests().antMatchers("/endpoint").hasAuthority("scopeforbackend")

			.and()

			.oauth2ResourceServer().jwt().jwtAuthenticationConverter(getJwtAuthenticationConverter());


		return http.build();

	}


	Converter<Jwt, AbstractAuthenticationToken> getJwtAuthenticationConverter() {

		TokenAuthenticationConverter converter = new TokenAuthenticationConverter(xsuaaBinding);

		converter.setLocalScopeAsAuthorities(true);

		return converter;

	}


	public class JwtTroubleFilter extends GenericFilterBean{


		@Override

		public void doFilter(ServletRequest request, ServletResponse response, FilterChain chain) throws IOException, ServletException {

			HttpServletRequest httpServletRequest = (HttpServletRequest) request;


			String authHeader = httpServletRequest.getHeader("Authorization");

			if(authHeader == null) {

				System.out.println("===> [TROUBLE] ERROR Authorization header not found");

				return;

			}


			JwtDecoder jwtDecoder = new XsuaaJwtDecoderBuilder(xsuaaBinding).withoutXsuaaAudienceValidator().build();

			String jwtEncoded = authHeader.substring(7);

			Jwt jwtDecoded = jwtDecoder.decode(jwtEncoded);


			System.out.println("===> [TROUBLE] This incoming JWT is sent to my app: " + jwtEncoded);

			System.out.println("===> [TROUBLE] The incoming JWT decoded: " + jwtDecoded.getClaims().toString());

			System.out.println("===> [TROUBLE] The incoming JWT is compared to the XSUAA binding of my app.");

			System.out.println("===> [TROUBLE] The incoming JWT must have my apps clientid in the aud.");


			System.out.println("===> [TROUBLE] JWT aud:     " + jwtDecoded.getAudience());

			System.out.println("===> [TROUBLE] XSUAA cliId: " + xsuaaBinding.getClientId());


			System.out.println("===> [TROUBLE] JWT sub:     " + jwtDecoded.getSubject());

			System.out.println("===> [TROUBLE] JWT iss:   " + jwtDecoded.getIssuer());

			System.out.println("===> [TROUBLE] XSUAA url: " + xsuaaBinding.getUaaUrl());

			System.out.println("===> [TROUBLE] JWT scopes: " + String.valueOf(jwtDecoded.getClaimAsStringList(TokenClaims.XSUAA.SCOPES)));


			chain.doFilter(request, response);

		}

	}


}
application.properties
logging.level.org.springframework.web=DEBUG

logging.level.org.springframework.security=TRACE

logging.level.org.springframework=DEBUG

logging.level.com.sap.cloud.security=TRACE
Approuter
package.json
{

    "name": "approuter",

    "dependencies": {

        "@sap/approuter": "^10.4.3"

    },

    "scripts": {

        "start": "node node_modules/@sap/approuter/approuter.js"

    }

}
xs-app.json
{

   "authenticationMethod": "route",

   "routes": [

      {

        "source": "^/tobackend/(.*)$",

        "target": "$1",

        "destination": "destination_backend",

        "authenticationType": "xsuaa"

      }

   ]

}
Appendix 2: application.yml
application.yml
---

logging.level:

  com.sap: DEBUG

  org.springframework: ERROR

  org.springframework.security: DEBUG

  org.springframework.web: DEBUG
Labels:
1 Comment
You must be a registered user to add a comment. If you've already registered, sign in. Otherwise, register and sign in.
Labels in this area
-
ABAP CDS Views - CDC (Change Data Capture)
2 -
AI
1 -
Analyze Workload Data
1 -
BTP
1 -
Business and IT Integration
2 -
Business application stu
1 -
Business Technology Platform
1 -
Business Trends
1,658 -
Business Trends
93 -
CAP
1 -
cf
1 -
Cloud Foundry
1 -
Confluent
1 -
Customer COE Basics and Fundamentals
1 -
Customer COE Latest and Greatest
3 -
Customer Data Browser app
1 -
Data Analysis Tool
1 -
data migration
1 -
data transfer
1 -
Datasphere
2 -
Event Information
1,400 -
Event Information
66 -
Expert
1 -
Expert Insights
177 -
Expert Insights
299 -
General
1 -
Google cloud
1 -
Google Next'24
1 -
Kafka
1 -
Life at SAP
780 -
Life at SAP
13 -
Migrate your Data App
1 -
MTA
1 -
Network Performance Analysis
1 -
NodeJS
1 -
PDF
1 -
POC
1 -
Product Updates
4,577 -
Product Updates
345 -
Replication Flow
1 -
RisewithSAP
1 -
SAP BTP
1 -
SAP BTP Cloud Foundry
1 -
SAP Cloud ALM
1 -
SAP Cloud Application Programming Model
1 -
SAP Datasphere
2 -
SAP S4HANA Cloud
1 -
SAP S4HANA Migration Cockpit
1 -
Technology Updates
6,873 -
Technology Updates
427 -
Workload Fluctuations
1
Related Content
- Supporting Multiple API Gateways with SAP API Management – using Azure API Management as example in Technology Blogs by SAP
- SAP Cloud ALM and Identity Authentication Service (IAS) in Technology Blogs by SAP
- Configuring SAP CI/CD pipeline for Deploying ReactJS application in Cloud Foundry in Technology Q&A
- Consuming SAP with SAP Build Apps - Mobile Apps for iOS and Android in Technology Blogs by SAP
- SAP Application User provision based on Application Role via Entra ID in Technology Q&A
Top kudoed authors
| User | Count |
|---|---|
| 40 | |
| 25 | |
| 17 | |
| 14 | |
| 8 | |
| 7 | |
| 7 | |
| 7 | |
| 6 | |
| 6 |