
- SAP Community
- Products and Technology
- Technology
- Technology Blogs by SAP
- SAP BTP Security: How to handle Authorization and ...
Technology Blogs by SAP
Learn how to extend and personalize SAP applications. Follow the SAP technology blog for insights into SAP BTP, ABAP, SAP Analytics Cloud, SAP HANA, and more.
Turn on suggestions
Auto-suggest helps you quickly narrow down your search results by suggesting possible matches as you type.
Showing results for
Product and Topic Expert
Options
- Subscribe to RSS Feed
- Mark as New
- Mark as Read
- Bookmark
- Subscribe
- Printer Friendly Page
- Report Inappropriate Content
08-26-2022
7:59 PM
This blog post is based on the previous post where we did our first steps with authorization handling and attributes.
Today we’re going to connect a custom Identity Provider to our Subaccount. This allows us to showcase some more possibilities of fine-tuning authorization handling.
Used technologies: SAP Business Technology Platform (SAP BTP), Cloud Foundry Environment, SAP Cloud Identity Services – Identity Authentication (IAS), Authorization And Trust Management (XSUAA), Node.js.
0. Introduction
1. Preparation
2. Sample Application
3. IAS Configuration
4. BTP Configuration
5. Run
Appendix 1: Sample Code
Appendix 2: Sample Users
Same as in previous blog post, we have a user-centric application which uses XSUAA for protection.
In today’s blog post, we’re adding a custom Identity Provider (IdP) to store and maintain the users.
In our example, we're using Identity and Authentication Service (IAS)
To make it a bit more concrete:
First of all, there needs to be a trust relationship between the cloud and the IdP.
More concrete: the XSUAA server assigned to the subaccount needs to trust the IAS-tenant, and vice versa.
In our example, we establish the trust based on SAML.
When an end-user logs in to the application, the authentication is handled by approuter together with XSUAA.
XSUAA delegates the user-authentication to the connected IdP.
The IdP has the knowledge about all the users and their passwords (and the authentication mechanism defined by the admin, like multi-factor and all that stuff).
Above diagram shows how a user called "AssiDe" logs in to our application, where approuter handles login together with XSUAA, which delegates to IdP, which checks the identity.
The next diagram gives an overview about the components involved in our little scenario:
Above diagram shows the application which consists of 2 components: user interface and service app.
Both have binding to XSUAA which is used for protection.
The Identity Provider maintains the list of users and the assignment of users to user groups.
Scenario
With respect to the sample scenario, there’s no difference to what we introduced in the previous introduction.
In brief:
We’re creating a very simple application with extremely simple user interface which allows to view, create and manage employees.
This scenario allows us to distinguish what end-users are allowed to do (== authorization).
Our app is used by 3 types of end-users:
Users
Assistants
Managers
Authorization Model
These 3 types of end-users are allowed to do the following actions:
Users: view list of employees
Assistants: create employees and maybe manage
Managers: do everything
How do we distinguish the 3 types of end-users?
Users:
This is simple: normal users are added to the corresponding user group in IAS, by the admin.
Assistants:
Similarly, we have a user group for Assistants in IAS.
However, there are some assistants who have gone through special trainings.
These assistants will have a special attribute maintained in IAS.
Managers:
It was decided to not define a user group for Managers, because there are not too many managers in a company (just dreaming).
As such, to know if an end-user is a manager, we have to retrieve the “cost center”.
All this information is specific to users and as such, it is available only in the Identity Provider.
To make use of it in our application, we need:
some configuration in BTP
some configuration in IAS
some checks in application code
How does all come together?
Let's have a closer look at the security artifacts which are playing a role in the authorization-game:
Above diagram gives an overview about the security artifacts and their relation.
Identity Provider:
Users are created and maintained in the Identity Provider, so they can eventually use our application.
Their properties are maintained here, for instance user attributes like name, country, cost-center and also specific custom attributes.
And users are added to user groups, depending on their role, for instance Assistants or Managers, normal users.
App Designtime:
While developing our application, we define the scopes which are required.
As our app is used by users, we need to define role-templates, which serve as template for roles to be created in the cloud cockpit.
Roles can be assigned based on attribute values, so we also declare such attribute definitions.
Finally, even role collections can be modelled at designtime, if they are already known, and defined in the security descriptor (xs-security.json) of our app.
The application code itself knows about the scope names and performs checks before the end-user is allowed to perform the desired operation.
BTP:
After an instance of the XSUAA service is created based on the security descriptor, the defined role-templates and role-collections are available in the cockpit of BTP.
The (only) interesting part of the present tutorial is detailed out here:
When creating a role, it needs to be specified how the corresponding attributes are filled.
A fixed value (as done in the previous tutorial) is not suitable here, as the value is known by IAS only.
As such, we need to define a mapping: an attribute of the role is filled with the value of an attribute of IAS.
In the diagram, I've tried to show the relation by color of the user attribute cust_attr_1 which is mapped to the attribute SpecialTr of the role.
At runtime, when a user logs in to our application, his value true will be filled into the value of the attribute SpecialTr of the role, and will reach our app code where it can be checked.
But how does BTP know that an IAS-user should get which role?
Yes, it is interesting how a role collection is assigned to a user:
Instead of assigning a concrete user to the role collection, we assign it to a user group of IAS.
As a consequence, all users who belong to this group will be assigned to this role collection and get its roles.
This is shown as well in the diagram. The user is in AssistantsGroup which is mapped to AssistantsRC which contains the CreateRole.
Cool, but how does the IAS-user-information reach the mapping in BTP?
The answer is SAML.
SAML
Remember from the earlier diagrams where we painted the Trust relationship between the 2 different worlds of IAS and BTP? In today's tutorial the trust is based on SAML, because this is supported by Trial accounts. Alternatively, it can be based on OIDC (in that case, the IAS-user-information will reach the BTP as well, but in different format).
SAML is used to transfer user information between trusted systems. The user info is written in an xml document (assertion) which is issued by IAS and which is kept in a session in the browser.
Roughly speaking, the BTP-subaccount (with XSUAA) acts as Service Provider (in SAML speach) which contains our app, and on user-login, the Service Provider initiates the sign-in flow on the Identity Provider. The IdP responds with the assertion which is signed by a certificate. Since there's a trust relationship, the certificate can be validated by BTP (xsuaa).
Hope this superficial intro helps to understand the flow.
The last diagram tries to visualize the flow of information from end user to app code.
Hoping to ultimately clarify the confusion of similar terms in similar contexts with similar values and where to use what and why and so on…
The content is simplified, my apologies.
Let’s go through the flow by means of an example user.
The user with name AssiDe is a German assistant who has gone through a special training.
The user logs in to our app.
User is delegated to IAS for authentication.
IAS finds the user AssiDe in its list.
The user has an IAS-user-attribute called “Custom Attribute 1” and value "true".
This attribute stands for special training.
The user belongs to a user group called “AssistantsGroup”.
The IAS admin has defined a mapping of IAS-user-attributes to SAML-attributes.
For instance: "Cost Center" will be renamed to "cost_center" in the assertion.
So, the IAS issues a SAML assertion which contains (partly) the user login information.
This SAML assertion contains an attribute called “custom_attribute_1”, according to mapping, with value "true".
This assertion is sent to the BTP.
In the cockpit, the admin has defined a “role collection mapping” where it was stated that “AssistantsRC” will be assigned to users belonging to the IAS-user-group “AssistantsGroup”
As such, the user “AssiDe” is assigned to this role collection "AssistantsRC".
That role collection contains a role which was created by the admin, the “CreateRole”.
This role has an attribute called “SpecialTraining”.
The value of this attribute is mapped to the value of “custom_attribute_1”.
As such, the incoming SAML assertion is searched for the attribute with name "custom_attribute_1" and the value of this attribute (which is “true”) is filled into the attribute "SpecialTraining" of the role and the role is assigned to the user with value “true”.
The XSUAA server which controls security in the BTP subaccount, issues a JWT token and fills it with scopes and attributes as explained above.
The JWT token will contain the “createScope”, the “SpecialTraining” attribute, the “AssistantsRC” role collection and all the default user info like "name" and "email", etc
The JWT token is sent to our application which finally will extract the values of scope and attribute from it and use it for the necessary checks.
As such, the user AssiDe will be allowed to execute the "manage" action, for instance.
The End.
Summary
We want to support users from custom Identity Provider to use our application.
We need to establish trust between IdP and BTP.
We need to configure mappings between these 2 worlds, such that user data can reach our app and can be evaluated in checks.
Note:
The sample was created in Trial account, but works same way in productive account.
Disclaimer:
This is not an official reference application, I’m just sharing my personal experiences.
To follow this tutorial, we need
Before we start with the sample application, we need 2 preparation tasks:
Prepare test users in IAS
Establish trust between IAS and BTP
For testing our scenario, we need a few users with different properties, which are stored in IAS.
Import Users
They can be manually created, but I’ve prepared a small .csv file which is ready for import.
The file can be found in appendix 2, the content can be copied into a file in our file system.
My apologies for the silly user names, I just hope it makes things more clear.
To import the users, we go to IAS -> Users & Authorizations -> User Management.
In the bottom, we find the “Import Users” button, which opens a dialog for specifying our .csv file with sample user content.
After import, the users are added to the list of users in “User Management”, but they don’t have initial password.
So we need to do the following steps for each user:
Select user -> Authentication -> Password Details -> Set Initial -> enter password
The initial password will have to be changed upon first login of each user.
Note:
I’ve set the "email verification" attribute to "true", so at least the users won’t need to confirm an email.
However, I haven’t found a way to set initial password in the .csv file.
Create Groups & Assign Users
We need not only users, but we need user groups as well.
The reason is that the assignment of a user to a group in IAS will be one possibility to configure the assignment of a user to a role collection in BTP.
We go to “Users & Authorizations” -> User Groups
We create a new user group with name “AssistantsGroup” and same display name.
We select the new group and press “Add”.
We select the users "AssiDe" and "AssiUs" for adding to the group
We press "Save".
Then we create a second user group with name “UserGroup” and add the user with name “User”.
This one is meant for normal users.
Note:
We don’t define a “ManagersGroup” because there are not so many managers in the company (what a nice company).
We will have to think about a different way how to assign the roles to this user in BTP.
How can this be achieved???
Keep reading...
User Attributes
The properties of human users are called "user attributes" and have been imported with the .csv file. So just let’s have a quick look at an example.
We select the user "AssiDe", scroll down and expand “Custom Attributes”.
There we can see that the user has a value “true” for “Custom Attribute 1”
What is this?
Our sample application scenario supports handling of employees who – for any (silly) reason – require some special treatment.
Means that an assistant or manager who manage such employees, is required to complete some special (silly) training.
As such, we need to define a custom attribute to indicate if the respective user has acquired such special qualification.
As we cannot create custom attributes with a chosen name, we choose the CustomAttribute1 to store the special qualification.
To make things easier, we allow only values as "true" or "false".
Now we want that these users which we have imported in IAS, should be allowed to login to our app which is deployed to BTP.
Means that BTP should accept our IAS tenant as trusted Identity Provider.
To achieve that, we need to establish trust between IAS and our BTP subaccount.
We will establish the trust relationship manually, because the automated “Establish Trust” doesn’t work in Trial accounts.
Manually established trust will the based on SAML and is achieved by exchanging the metadata of both entities.
It is easy.
Note:
If you're working in non-trial-account, you may of course go ahead and use the "Establish Trust" button. Afterwards you will need to find the generated IAS-Application and continue with the configuration of chapter 3 based on OIDC instead of SAML. it is almost the same.
IAS: Download SAML Metadata
First we download the SAML metadata of our IAS.
We go to Applications & Resources -> Tenant Settings -> SAML 2.0 Configuration
We press “Download Metadata File” button on the bottom of the page.
BTP: Upload SAML Metadata of IAS
Now we go to BTP Cockpit: Trial subaccount -> Security -> Trust Configuration.
Press “New Trust Configuration” and upload our downloaded SAML-metadata file of IAS.
We can enter a Name and Description of our choice. This will be displayed on selection screen afterwards.
We just need to make sure that the “Available for User Logon” checkbox is enabled.
BTP: Download SAML Metadata
Now that we’re still in the “Trust Configuration” screen, we can go ahead and download the SAML metadata of the BTP subaccount from here.
To do so, we just press “SAML Metadata".
IAS: Upload SAML Metadata of BTP
Now we need to upload that file in IAS.
In IAS, we go to Applications & Resources -> Applications
We press “Create” and enter a name of our choice that allows us to recognize the BTP Trial account, e.g. "TRIAL_Attri".
Note that this "application" name has nothing to do with application that are deployed to a BTP subaccount. This is "IAS-language".
After "save", we make sure that the new entry is selected, then we select “SAML 2.0 Configuration”.
To upload the metadata file, we click the “Browse” button in the “Define from Metadata” section on top of the page.
After upload, we see the fields are filled with data which we recognize are pointing to our Trial account.
Save?
Yes, save.
Summary
To establish trust, we just need to exchange the SAML metadata.
We need some sample users with different attributes for testing our scenario.
Up to now, we’ve done some basic setup tasks that are independent from our application scenario.
We have users in our custom Identity Provider and we have connected it to our BTP subaccount.
Next tasks are specific to our application scenario:
The application itself, of course, and
The application-specific security artifacts, like roles etc
But first, we need to create the project on file system.
If you’ve followed the previous tutorial, you can just reuse the project, otherwise, please follow this guidance.
The file content can be copied from the appendix1.
The XSUAA instance is used to protect our application and to handle user login (together with approuter).
But also, it is responsible to create the authorization artifacts, as defined by below config parameters:
xs-security.json
For explanation of the settings, please refer to previous tutorial.
We specify a default role for the "UserRoleTemplate". As a consequence, a default role will be generated in BTP with this given name.
Default role can only be specified, if no dynamic attributes are contained in the template.
This is the reason why we cannot specify default roles for "Assistant" and "Manager".
We define only one role collection, because the other ones need to be created manually anyways.
Why we need to create role collections manually?
Because the role collections for assistants and managers will contain roles that have to be created manually anyways.
Why?
Because the role templates for assistant and manager have attributes that need to be mapped to an Identity Provider.
That can be done only in cockpit and is not known at designtime.
This is also the reason why we don’t define a static default value for the attribute in xs-security.json file.
The command for creating the instance of xsuaa:
cf cs xsuaa application attriXsuaa -c xs-security.json
After service creation we can check the cockpit for the newly created roles and role collection.
The service app exposes 2 protected REST endpoints and is explained in the previous blog post.
However, there’s a difference, because today we want to support a custom attribute.
So the user interface is a bit different: an employee is created with a name and with a checkbox that indicates if this employee requires special attention.
...Wh...
For whatever reason, don’t ask.
In the implementation of the “manage” endpoint, the authorization check logic is as follows:
If the logged-in user is a manager (has ”manage”-scope) then allow to manage the chosen employee.
If the logged-in user is an assistant (has ”create”-scope), then we need to look at the selected employee (from ui):
If the employee requires special attention, then we need to check if the assistant has received the required “special training”.
Only if "true", then allow.
If the employee does not require special attention, then we don’t check the qualification of the assistant.
Please forgive the many ifs. This allows for detailed error message which I hope helps in understanding.
Reading the custom attribute is same as reading any other attribute:
Note:
We can see that the attribute name is the name which we specified in the xs-security.json file
It has nothing to do with the name in SAML assertion or IAS.
Note:
Today we ignore any country-specific stuff, to make things a bit easier.
The full file content can be found in appendix1.
There's no difference, please refer to previous blog post approuter section.
Please refer to explanations in previous tutorial.
However, there’s a little difference: today we don’t make use of the country-attribute.
Instead, we place a checkbox in the page which is meant to indicate if the employee requires any special attention.
...
And no, I still don’t know why, so please don’t ask.
It is just a silly example.
Again, some useless explanation can be found, if desired, in the previous blog post.
Anyways, we don't open the app until we've gone through below configuration steps.
Remember what we are doing:
We have users in IAS who should access our app in BTP.
In our app code, we want to access attributes of the users.
As such, somehow we need to bring the IAS-user-info to BTP.
So let’s start configuring IAS.
Basically, what we need to configure is: the SAML assertion.
What is a SAML assertion?
It is just an xml snippet (token), carrying user and certificate info, thus identifying user across applications.
See here if you’re interested in trying it out.
3.1. Configure Default Name ID Format
First, we need a basic SAML configuration to make sure how a user is uniquely identified.
Typically, a unique user has a unique E-Mail.
We go to Applications & Resources -> Applications
We make sure that "TRIAL_Attri" is selected and the right pane shows the details.
We click on "Default Name ID Format", choose “E-Mail” and “Save”.
3.2. Configure Assertion Attributes
What does that mean?
When a user logs in to our application, XSUAA will handle the OAuth flow (Authorization Code grant).
However, XSUAA will delegate the user-authentication check to IAS, which is the entity that has the knowledge about users.
After successful user-verification, IAS will issue a SAML assertion which is stored in a session in the browser and serves as kind of certified security proof of the user.
It contains the relevant info about the user.
And what is the “relevant info” ?
First of all, it is up to us to decide, which user attributes should find their way into the assertion (apart from defaults).
And there’s also a second point:
How should these attributes be named?
Means, the attributes contained in the assertion, may have a different name than the user attributes that we can see in the IAS dashboard.
Example:
In the dashboard, the attributes have a human-readable name, like “First Name”
But this is not so technical, and in the assertion xml, we prefer something technical, like “first_name”.
So this mapping of names is the second point which we need to take care of.
How do we decide?
What we want to achieve:
Include those user attributes in the SAML assertion, that we want to evaluate in our app, because relevant for authorization check (e.g. training).
Others are anyways present as per default (name etc).
We proceed as follows:
We make sure that "TRIAL_Attri" is selected and the right pane shows the details.
We click on “Assertion Attributes”.
We press “+ Add” and in the popup, we scroll down to choose “Cost Center”.
On the right side, we leave the default: “cost_center”
One important step we should not forget: the “Groups”
This is relevant for the easy mapping of user groups to role collections in BTP.
What we want to achieve:
In IAS, certain type of users are bundled together in a group.
In our example, all users who work as assistant, are added to the group “AssistantsGroup”.
It is clear that these users will have the proper authorizations that are related to tasks of assistants.
In the language of BTP, we want to add all these users to a “Role Collection”.
In our example we will have an “AssistantRoleCollection”.
What we want to achieve: automatically assign all users of a “Group” to a “Role Collection”.
However, in SAML there’s no concept of “Groups” there are only “Attributes”.
As such, the mapping in BTP is based on a special attribute called “Groups”.
So we need to take care that this attribute is present in the SAML assertion.
We press “+ Add” and in the popup, we scroll down to choose “Groups”.
A new entry is added to the list. It has a default value (Assertion Attribute is “groups”).
We replace the default value ("groups") with “Groups”.
Make sure to spell correctly: “Groups” starting with upper case.
Press “Save”.
Double check: Groups should be spelled Groups and not groups and not grUPs.
Save?
Yes.
Done?
No.
3.3. Configure Default Attributes
At this point, a concentrated reader of this tutorial asks:
Hey, and what about the "special qualification??"
Yes, that’s a good question, thank you for asking.
We can add the “CustomAttribute1” to the list of “Assertion Attributes”, but it wouldn’t have the desired effect (include in SAML assertion), as it is not meant to be used there.
We have to move to different config screen.
I'm tired and not concentrated...
Anyways, we leave the “SAML Assertion Attributes” screen and choose “Default Attributes” (while making sure that “TRIAL_Attri” is selected in the application list).
What is that: “Default Attributes”?
It is similar like the previous screen: we can specify what attributes are contained in the SAML assertion that is issued after user login.
The difference:
The attributes specified here will always have a fixed default value.
An example could be:
Our sample app is deployed to an account located in Sahara, and all users who login to that app would get a default attribute like “location: Sahara”.
The application can evaluate it and display blue homepage.
Note that this configuration is done for selected “TRIAL_Attri”, which identifies the trusted specific subaccount.
Has anything to do with our “special qualification”?
Wait.
When specifying default attributes, it is possible to set a variable as value, which points to an existing user attribute, thus allowing not-fixed values.
In our example, we use this mechanism to assign a variable pointing to our CustomAttribute1.
As such, that default attribute won’t have a fixed value, but it will be filled with the value of current user.
OK.
Thanks.
We proceed as follows:
Press “+ Add”.
Enter Attribute as “default_attribute_custom_1”.
Enter Value as “${customAttribute1}” (without quotes).
Save.
That’s all about configuring IAS.
Summary
To make authorization via IAS possible, it is essential to do some configuration in IAS.
Default Name ID Format.
Assertion Attributes (Groups is required, others depend on scenario).
Default Attributes (only for custom attributes).
Time to visit our Trial subaccount in SAP BTP.
Here we’re dealing with security artifacts that are specific for XSUAA-based BTP applications.
I mean, we have role-templates and role collections (no user groups) and these are assigned to users.
What I want to say: this is a different world, and the configurations done in IAS have no effect here.
So why did we do it at all?
Hold on...
How's the situation in BTP:
The user has logged in with IAS.
A SAML assertion has been issued.
It contains user email and other user attributes.
It is sent to the XSUAA-server of this BTP subaccount.
Trust had been established based on SAML, so XSUAA accepts the assertion and starts reading it.
It finds attribute "Groups" which it will use to add corresponding role collection(s) to the user.
Example: in IAS, the user belongs to the user group “AssistantsGroup”. As a consequence, in BTP the user will get the corresponding role collection “AssistantsRC”.
But how does XSUAA know which is a “corresponding role collection” ?
Again a good question: this is exactly what we need to configure now.
Can we do that now?
->
Create Role Collections
BTP Subaccount -> Security -> Role Collections.
Create a Role Collection with name “AssistantsRC”.
Create a Role Collection with name “ManagersRC”.
Create a “UsersRC” ?
No, as it is already present.
Create Assistant Role
We go to Security -> Roles.
We find our “AssistantRoleTemplate”.
Note:
We can observe: for Assistant, we have a role template and a role name with same name.
This “AssistantRoleTemplate" is not a role, it is just the template.
That’s why it cannot be deleted.
Reason is: we didn’t define a default role in the xs-security.json.
We did that only for UserRoleTemplate, here we have a default role name and that’s why the “Create” is disabled for User.
In the line of “AssistantRoleTemplate”, we click on “Create Role”.
We enter a name like “AssistantRole” and press "Next".
In the “Configure Attributes” screen we now want to assign IAS-values to the XSUAA-attributes.
To do so, we choose “Identity Provider” as “Source” for the attribute.
The “Value” to be entered is in fact not a value (like “DE”), it is rather an attribute name.
It is a name of an IAS-attribute and it has to exactly match the name of the IAS configuration (previous chapter).
So we go ahead and enter:
If you don’t believe me, or if you’ve used different naming, you can go to your IAS and copy the name from the “Default Attributes” screen.
In the wizard, we can now press “Next” and tick the “AssistantsRC” collection.
Then finish the wizard.
Note:
Now we can see that the Role Name for Assistant has changed from template name to specific role name, as created by us.
Furthermore, this concrete role can be deleted, whereas the template cannot be deleted.
Create Manager Role
Similarly, we now create a Role with name "ManagerRole".
The Attribute has "Source: Identity Provider" and value “cost_center”.
We add it to the Role Collection "ManagersRC" and finish the wizard.
Configure Role Collection Mappings
We've created role collections and we've created roles and assigned them.
Next step is to configure the mappings.
What mappings?
We’ve already explained what we want to achieve with role collection mapping:
We want that (external) IAS-users who enter our application, can get the required scopes.
In BTP, this is done by assigning a user to a role collection.
However, we don’t want to enter each user manually.
We want to automatically assign the role collection to an IAS-User-Group.
E.g.
We want that all users who belong to the “AssistantsGroup” are assigned to the role collection “AssistantsRC”.
Can we stop talking and map map map?
There are 2 possibilities to map a BTP-Role-Collection to IAS-users:
Mapping can be based on an IAS-User-Group, or it can be based on an IAS-User-Attribute.
In our scenario, we have an example for each.
Map Role Collection to User Group
In BTP, we go to Security -> Role Collections and choose the newly created “AssistantsRC” entry.
In the details screen we can see that the Role “AssistantRole” is already configured, as done in previous step.
We click on “Edit” and go to section “User Groups”.
In the drop-down for “Identity Provider” we choose our custom IAS.
In the “Name” field, we enter the name of the IAS-User-Group: “AssistantsGroup”.
Note that you might need to adapt to your chosen names.
When copying from IAS, make sure to use the technical name of the user group, not the display name.
Save.
So now we’ve mapped the role collection to a user group.
Means, all group members will be assigned here as users.
Below diagram shows what we've just done:
Map Role Collection to User Attribute
Now we need to map the Role Collection for managers.
In this case, we didn’t create a user group in IAS.
As such, we cannot map the role collection to user group.
Remember, we decided that a user can be identified as manager by looking at his "Cost Center".
Instead, it is possible to map a role collection to a user attribute.
We go to Security -> Role Collections and choose the newly created “ManagersRC” entry.
We press on “Edit” and go to section “Attribute Mappings”.
In the drop-down for “Identity Provider” we choose our custom IAS.
In the “Attribute” Field, we enter the name of the attribute coming with the SAML assertion.
As mentioned, this is the "Cost Center", so we enter the SAML-name: “cost_center”.
Now we need a concrete value for the attribute.
In this case, we want to identify managers, so we enter the concrete cost center name. It is the value from the IAS-user with name “Manager”.
The value for cost center was imported from the .csv file and can be found in the “Employee Information” section in IAS:
As such, we enter “CoCeMa” in the Value field:
And don’t forget to “Save”
Again, please find below the diagram of what we've just done:
Map Role Collection to User Group – alternative
We have a third role collection, which still needs to be mapped: the “UsersRC”.
We defined this one in the security descriptor, because no attribute-stuff is required here.
We have a user group for "User" in IAS, so we can simply map the role collection to the IAS-User-Group.
Just like we did above with the "Assistant".
But instead of repeating the same steps as above, we go a different way.
We to to Security -> Trust Configuration.
Click on the custom IDP (in my example: “Custom IAS for Attri”)
Click on “Role Collection Mappings” in the left menu.
Create “New”.
In the dialog, we choose “UsersRC”.
The attribute must be “Groups” – remember, this is a default attribute in BTP, used for role collection mapping
Value: "UserGroup".
Note:
Make sure to copy this value from the user group name in IAS, in case you chose a different name.
After pressing Save, we can see the 3 role collections together in this screen:
Finally, we're done with all configurations.
Summary
To avoid confusion, let's add another summary:
In BTP, we configure the connection between the 2 worlds: IAS and BTP.
This means to copy over names of attributes and groups from IAS to BTP.
We need to create a role and map XSUAA-attribute name to IAS-attribute name.
We need to create a role collection and map it to IAS-User-Group.
Alternatively, a role collection can be mapped to an IAS-attribute with fix value.
Like in previous blog post, we test the 5 scenarios.
The difference is that today we have 5 users with different properties in our custom Identity Provider.
And they have been maintained and mapped in BTP (with one exception).
Note that the 5 users have initial password which needs to be changed after login.
After each test we need to start new incognito-browser with empty cache, otherwise the login screen is not displayed.
Optional:
Using IAs gives us one extraordinary opportunity: we can view the SAML assertion after user login.
This will be interesting, as we’ve been talking about it all the time.
To view the content of the assertion, it makes sense to install a plugin in the browser, e.g. Firefox SAML tracer or the SAML Chrome Panel.
The app entry point in my example:
https://attrirouter.cfapps.us10.hana.ondemand.com
To view the additional information which we write into the Cloud Foundry log, we start log streaming with command:
cf logs attriapp
Note:
Before displaying the user-login-screen, the BTP needs to know which identity provider we want to use. This is required, because after adding the trust, we have 2 IdPs (in my example).
So we need to choose the desired Identity Provider.
Luckily, we gave a helpful name:
1. No Role
To test the proper handling of a user without scopes, we use the user with name “Nothing”.
As a result, we get an error message, thrown by approuter: Forbidden
2. “User” Role
Next, we use a simple user with view-permission, it is the user with name “User”.
Result: we can view, but no action is allowed.
3. “Assistant” Role
Now we login with an assistant-user who does not have any special qualification: "AssiUs."
We’re allowed to create employees, so we create one employee with unchecked checkbox and another one with “Special” checked.
Then we try to “increase” for both.
Result:
First one succeeds, but the second one fails, because the current user does not have any special qualification maintained in IAS.
In the log we can see:
Scope for create is available
SAML group and role collection for assistants assigned
Special user attribute has value false, as we didn’t configure in IAS
4. “Assistant” Role with “special” Attribute
For the next test, we activate the SAML tracer browser plugin.
Now we login with an assistant who has received a special training, User “AssiDe”.
In the tracer tool, we can view the SAML assertion which has been issued for the user:
We can see the SAML attributes and their values.
We can see that it nicely behaves as we configured in IAS.
We can see that there’s an attribute called “Groups”.
We understand, in SAML it is just an attribute, while in BTP it will receive special treatment, because it is used to identify a user group which can be mapped to a role collection.
In fact, the value of this “Groups” attribute is the name of the user group.
Back to browser.
Again, we create 2 employees, one with and one without “special”.
And then try to “increase” both.
Result:
Everything is allowed.
In the log we can see:
Scope for create is available.
SAML group and role collection for assistants assigned.
Special user attribute has value true, as configured in IAS.
We can see that the SAML attribute “Groups” has found its way into the JWT claim “xs.system.attributes”
(this is SAP proprietary claim, not a default claim)
And we can see how the SAML (default) attribute “custom_attribute_1” has been mapped to the XSUAA attribute “SpecialTraining”.
5. “Manager” Role
Finally, we use the superuser “Manager” for login.
Result: as expected, this omnipotent user can do everything.
Optional: view subaccount shadow users
Just one click is required for this optional exercise:
Subaccount -> Security -> Users
We can see that the IAS users have been replicated here:
Remember that there was a checkbox for creating shadow users, when we created the trust configuration ?
It looked like this:
So, the user from IAS is replicated to BTP, but only after login, not all IAS-users.
As mentioned in the introduction, we have the choice to make the app more beautiful - or delete it.
To make the app more beautiful, we use these magic commands
cf d -r -f attrirouter
cf d -r -f attriapp
cf ds -f attriXsuaa
In this blog post we’ve learned how to configure user attributes in IAS and how to do attribute mapping and role collection mapping in SAP BTP.
When configuring the mappings in BTP, we need to use the attribute names that are contained in the SAML assertion. As such, we need to refer to the Assertion Attributes screen in IAS.
SAP Help Portal:
Authorization Entities documentation.
Reference for xs.security.json parameters.
Application Router main entry and npm.
IAS main docu page.
IAS default attributes config
Passport homepage and download.
Node.js package xssec.
OAuth 2.0
Understanding of OAuth for dummies like me.
BTW.... interested in client-credentials flow with IAS and identity service?
And what about a Security Glossary?
xs-security.json
manifest.yml
app
package.json
server.js
approuter
package.json
xs-app.json
homepage.html
users.csv
Today we’re going to connect a custom Identity Provider to our Subaccount. This allows us to showcase some more possibilities of fine-tuning authorization handling.
Used technologies: SAP Business Technology Platform (SAP BTP), Cloud Foundry Environment, SAP Cloud Identity Services – Identity Authentication (IAS), Authorization And Trust Management (XSUAA), Node.js.
Quicklinks:
Quick Guide
Sample Code
Content
0. Introduction
1. Preparation
2. Sample Application
3. IAS Configuration
4. BTP Configuration
5. Run
Appendix 1: Sample Code
Appendix 2: Sample Users
0.1. Introduction
Same as in previous blog post, we have a user-centric application which uses XSUAA for protection.
In today’s blog post, we’re adding a custom Identity Provider (IdP) to store and maintain the users.
In our example, we're using Identity and Authentication Service (IAS)

To make it a bit more concrete:
First of all, there needs to be a trust relationship between the cloud and the IdP.
More concrete: the XSUAA server assigned to the subaccount needs to trust the IAS-tenant, and vice versa.
In our example, we establish the trust based on SAML.
When an end-user logs in to the application, the authentication is handled by approuter together with XSUAA.
XSUAA delegates the user-authentication to the connected IdP.
The IdP has the knowledge about all the users and their passwords (and the authentication mechanism defined by the admin, like multi-factor and all that stuff).

Above diagram shows how a user called "AssiDe" logs in to our application, where approuter handles login together with XSUAA, which delegates to IdP, which checks the identity.
The next diagram gives an overview about the components involved in our little scenario:

Above diagram shows the application which consists of 2 components: user interface and service app.
Both have binding to XSUAA which is used for protection.
The Identity Provider maintains the list of users and the assignment of users to user groups.
Scenario
With respect to the sample scenario, there’s no difference to what we introduced in the previous introduction.
In brief:
We’re creating a very simple application with extremely simple user interface which allows to view, create and manage employees.
This scenario allows us to distinguish what end-users are allowed to do (== authorization).
Our app is used by 3 types of end-users:
Users
Assistants
Managers
Authorization Model
These 3 types of end-users are allowed to do the following actions:
Users: view list of employees
Assistants: create employees and maybe manage
Managers: do everything
How do we distinguish the 3 types of end-users?
Users:
This is simple: normal users are added to the corresponding user group in IAS, by the admin.
Assistants:
Similarly, we have a user group for Assistants in IAS.
However, there are some assistants who have gone through special trainings.
These assistants will have a special attribute maintained in IAS.
Managers:
It was decided to not define a user group for Managers, because there are not too many managers in a company (just dreaming).
As such, to know if an end-user is a manager, we have to retrieve the “cost center”.
All this information is specific to users and as such, it is available only in the Identity Provider.
To make use of it in our application, we need:
some configuration in BTP
some configuration in IAS
some checks in application code
How does all come together?
Let's have a closer look at the security artifacts which are playing a role in the authorization-game:

Above diagram gives an overview about the security artifacts and their relation.
Identity Provider:
Users are created and maintained in the Identity Provider, so they can eventually use our application.
Their properties are maintained here, for instance user attributes like name, country, cost-center and also specific custom attributes.
And users are added to user groups, depending on their role, for instance Assistants or Managers, normal users.
App Designtime:
While developing our application, we define the scopes which are required.
As our app is used by users, we need to define role-templates, which serve as template for roles to be created in the cloud cockpit.
Roles can be assigned based on attribute values, so we also declare such attribute definitions.
Finally, even role collections can be modelled at designtime, if they are already known, and defined in the security descriptor (xs-security.json) of our app.
The application code itself knows about the scope names and performs checks before the end-user is allowed to perform the desired operation.
BTP:
After an instance of the XSUAA service is created based on the security descriptor, the defined role-templates and role-collections are available in the cockpit of BTP.
The (only) interesting part of the present tutorial is detailed out here:
When creating a role, it needs to be specified how the corresponding attributes are filled.
A fixed value (as done in the previous tutorial) is not suitable here, as the value is known by IAS only.
As such, we need to define a mapping: an attribute of the role is filled with the value of an attribute of IAS.
In the diagram, I've tried to show the relation by color of the user attribute cust_attr_1 which is mapped to the attribute SpecialTr of the role.
At runtime, when a user logs in to our application, his value true will be filled into the value of the attribute SpecialTr of the role, and will reach our app code where it can be checked.
But how does BTP know that an IAS-user should get which role?
Yes, it is interesting how a role collection is assigned to a user:
Instead of assigning a concrete user to the role collection, we assign it to a user group of IAS.
As a consequence, all users who belong to this group will be assigned to this role collection and get its roles.
This is shown as well in the diagram. The user is in AssistantsGroup which is mapped to AssistantsRC which contains the CreateRole.
Cool, but how does the IAS-user-information reach the mapping in BTP?
The answer is SAML.
SAML
Remember from the earlier diagrams where we painted the Trust relationship between the 2 different worlds of IAS and BTP? In today's tutorial the trust is based on SAML, because this is supported by Trial accounts. Alternatively, it can be based on OIDC (in that case, the IAS-user-information will reach the BTP as well, but in different format).
SAML is used to transfer user information between trusted systems. The user info is written in an xml document (assertion) which is issued by IAS and which is kept in a session in the browser.
Roughly speaking, the BTP-subaccount (with XSUAA) acts as Service Provider (in SAML speach) which contains our app, and on user-login, the Service Provider initiates the sign-in flow on the Identity Provider. The IdP responds with the assertion which is signed by a certificate. Since there's a trust relationship, the certificate can be validated by BTP (xsuaa).
Hope this superficial intro helps to understand the flow.
The last diagram tries to visualize the flow of information from end user to app code.
Hoping to ultimately clarify the confusion of similar terms in similar contexts with similar values and where to use what and why and so on…
The content is simplified, my apologies.

Let’s go through the flow by means of an example user.
The user with name AssiDe is a German assistant who has gone through a special training.
The user logs in to our app.
User is delegated to IAS for authentication.
IAS finds the user AssiDe in its list.
The user has an IAS-user-attribute called “Custom Attribute 1” and value "true".
This attribute stands for special training.
The user belongs to a user group called “AssistantsGroup”.
The IAS admin has defined a mapping of IAS-user-attributes to SAML-attributes.
For instance: "Cost Center" will be renamed to "cost_center" in the assertion.
So, the IAS issues a SAML assertion which contains (partly) the user login information.
This SAML assertion contains an attribute called “custom_attribute_1”, according to mapping, with value "true".
This assertion is sent to the BTP.
In the cockpit, the admin has defined a “role collection mapping” where it was stated that “AssistantsRC” will be assigned to users belonging to the IAS-user-group “AssistantsGroup”
As such, the user “AssiDe” is assigned to this role collection "AssistantsRC".
That role collection contains a role which was created by the admin, the “CreateRole”.
This role has an attribute called “SpecialTraining”.
The value of this attribute is mapped to the value of “custom_attribute_1”.
As such, the incoming SAML assertion is searched for the attribute with name "custom_attribute_1" and the value of this attribute (which is “true”) is filled into the attribute "SpecialTraining" of the role and the role is assigned to the user with value “true”.
The XSUAA server which controls security in the BTP subaccount, issues a JWT token and fills it with scopes and attributes as explained above.
The JWT token will contain the “createScope”, the “SpecialTraining” attribute, the “AssistantsRC” role collection and all the default user info like "name" and "email", etc
The JWT token is sent to our application which finally will extract the values of scope and attribute from it and use it for the necessary checks.
As such, the user AssiDe will be allowed to execute the "manage" action, for instance.
The End.
Summary
We want to support users from custom Identity Provider to use our application.
We need to establish trust between IdP and BTP.
We need to configure mappings between these 2 worlds, such that user data can reach our app and can be evaluated in checks.
Note:
The sample was created in Trial account, but works same way in productive account.
Disclaimer:
This is not an official reference application, I’m just sharing my personal experiences.
0.2. Prerequisites
To follow this tutorial, we need
- Access to an IAS tenant and admin permission
- Access to SAP Business Technology Platform (SAP BTP) and permission to create instances and to deploy applications.
- Basic Node.js skills.
- Some basic understanding of OAuth and JWT token.
- The tutorial is using the Cloud Foundry command line client, but all tasks can be done in the cockpit as well
1. Preparation
Before we start with the sample application, we need 2 preparation tasks:
Prepare test users in IAS
Establish trust between IAS and BTP
1.1. Prepare IAS
For testing our scenario, we need a few users with different properties, which are stored in IAS.
Import Users
They can be manually created, but I’ve prepared a small .csv file which is ready for import.
The file can be found in appendix 2, the content can be copied into a file in our file system.
My apologies for the silly user names, I just hope it makes things more clear.
To import the users, we go to IAS -> Users & Authorizations -> User Management.
In the bottom, we find the “Import Users” button, which opens a dialog for specifying our .csv file with sample user content.
After import, the users are added to the list of users in “User Management”, but they don’t have initial password.
So we need to do the following steps for each user:
Select user -> Authentication -> Password Details -> Set Initial -> enter password
The initial password will have to be changed upon first login of each user.
Note:
I’ve set the "email verification" attribute to "true", so at least the users won’t need to confirm an email.
However, I haven’t found a way to set initial password in the .csv file.
Create Groups & Assign Users
We need not only users, but we need user groups as well.
The reason is that the assignment of a user to a group in IAS will be one possibility to configure the assignment of a user to a role collection in BTP.
We go to “Users & Authorizations” -> User Groups
We create a new user group with name “AssistantsGroup” and same display name.
We select the new group and press “Add”.
We select the users "AssiDe" and "AssiUs" for adding to the group
We press "Save".
Then we create a second user group with name “UserGroup” and add the user with name “User”.
This one is meant for normal users.

Note:
We don’t define a “ManagersGroup” because there are not so many managers in the company (what a nice company).
We will have to think about a different way how to assign the roles to this user in BTP.
How can this be achieved???
Keep reading...
User Attributes
The properties of human users are called "user attributes" and have been imported with the .csv file. So just let’s have a quick look at an example.
We select the user "AssiDe", scroll down and expand “Custom Attributes”.
There we can see that the user has a value “true” for “Custom Attribute 1”
What is this?
Our sample application scenario supports handling of employees who – for any (silly) reason – require some special treatment.
Means that an assistant or manager who manage such employees, is required to complete some special (silly) training.
As such, we need to define a custom attribute to indicate if the respective user has acquired such special qualification.
As we cannot create custom attributes with a chosen name, we choose the CustomAttribute1 to store the special qualification.
To make things easier, we allow only values as "true" or "false".
1.2. Establish Trust
Now we want that these users which we have imported in IAS, should be allowed to login to our app which is deployed to BTP.
Means that BTP should accept our IAS tenant as trusted Identity Provider.
To achieve that, we need to establish trust between IAS and our BTP subaccount.
We will establish the trust relationship manually, because the automated “Establish Trust” doesn’t work in Trial accounts.
Manually established trust will the based on SAML and is achieved by exchanging the metadata of both entities.
It is easy.
Note:
If you're working in non-trial-account, you may of course go ahead and use the "Establish Trust" button. Afterwards you will need to find the generated IAS-Application and continue with the configuration of chapter 3 based on OIDC instead of SAML. it is almost the same.
IAS: Download SAML Metadata
First we download the SAML metadata of our IAS.
We go to Applications & Resources -> Tenant Settings -> SAML 2.0 Configuration
We press “Download Metadata File” button on the bottom of the page.
BTP: Upload SAML Metadata of IAS
Now we go to BTP Cockpit: Trial subaccount -> Security -> Trust Configuration.
Press “New Trust Configuration” and upload our downloaded SAML-metadata file of IAS.
We can enter a Name and Description of our choice. This will be displayed on selection screen afterwards.
We just need to make sure that the “Available for User Logon” checkbox is enabled.

BTP: Download SAML Metadata
Now that we’re still in the “Trust Configuration” screen, we can go ahead and download the SAML metadata of the BTP subaccount from here.
To do so, we just press “SAML Metadata".
IAS: Upload SAML Metadata of BTP
Now we need to upload that file in IAS.
In IAS, we go to Applications & Resources -> Applications
We press “Create” and enter a name of our choice that allows us to recognize the BTP Trial account, e.g. "TRIAL_Attri".
Note that this "application" name has nothing to do with application that are deployed to a BTP subaccount. This is "IAS-language".
After "save", we make sure that the new entry is selected, then we select “SAML 2.0 Configuration”.
To upload the metadata file, we click the “Browse” button in the “Define from Metadata” section on top of the page.
After upload, we see the fields are filled with data which we recognize are pointing to our Trial account.
Save?
Yes, save.
Summary
To establish trust, we just need to exchange the SAML metadata.
We need some sample users with different attributes for testing our scenario.
2. Create Application
Up to now, we’ve done some basic setup tasks that are independent from our application scenario.
We have users in our custom Identity Provider and we have connected it to our BTP subaccount.
Next tasks are specific to our application scenario:
The application itself, of course, and
The application-specific security artifacts, like roles etc
2.0. Create Project Structure
But first, we need to create the project on file system.
If you’ve followed the previous tutorial, you can just reuse the project, otherwise, please follow this guidance.
The file content can be copied from the appendix1.
2.1. Create instance of XSUAA
The XSUAA instance is used to protect our application and to handle user login (together with approuter).
But also, it is responsible to create the authorization artifacts, as defined by below config parameters:
xs-security.json
{

    "xsappname": "attrixsappname",

    "tenant-mode": "dedicated",

    "scopes": [{

            "name": "$XSAPPNAME.scopeforview",

            "description": "Scope required for viewing employee list."

        },{

            "name": "$XSAPPNAME.scopeforcreate",

            "description": "Scope required for creating new employee"

        },{

            "name": "$XSAPPNAME.scopeformanage",

            "description": "Scope required for managing existing employee"

        }

    ],

    "attributes" : [ {

            "name" : "CostCenter",

            "description" : "This attribute contains the Cost Center of assigned user.",

            "valueType" : "string"

        },{

            "name" : "SpecialTraining",

            "description" : "Contains info if user received special training for special employees",

            "valueType" : "string",

            "valueRequired" : "false"

        }

    ],

    "role-templates": [{

            "name": "UserRoleTemplate",

            "default-role-name": "UserRole",

            "description": "Role for end users, allows to view list of employees",

            "scope-references": ["$XSAPPNAME.scopeforview"]

        },{

            "name": "AssistantRoleTemplate",

            "description": "Role for assistants, allows to view and create employees.",

            "scope-references": ["$XSAPPNAME.scopeforview", "$XSAPPNAME.scopeforcreate"],

            "attribute-references": [

                { "name" : "SpecialTraining"}

            ]

        },{

            "name": "ManagerRoleTemplate",

            "description": "Role for managers, allows to view, create and manage employees.",

            "scope-references": ["$XSAPPNAME.scopeforview", "$XSAPPNAME.scopeforcreate", "$XSAPPNAME.scopeformanage"],

            "attribute-references": [

                { "name" : "CostCenter" }

            ]

        }

    ],

    "role-collections": [{

            "name": "UsersRC",

            "role-template-references": [ "$XSAPPNAME.UserRoleTemplate" ]

        }

    ]

}
For explanation of the settings, please refer to previous tutorial.
We specify a default role for the "UserRoleTemplate". As a consequence, a default role will be generated in BTP with this given name.
Default role can only be specified, if no dynamic attributes are contained in the template.
This is the reason why we cannot specify default roles for "Assistant" and "Manager".
We define only one role collection, because the other ones need to be created manually anyways.
Why we need to create role collections manually?
Because the role collections for assistants and managers will contain roles that have to be created manually anyways.
Why?
Because the role templates for assistant and manager have attributes that need to be mapped to an Identity Provider.
That can be done only in cockpit and is not known at designtime.
This is also the reason why we don’t define a static default value for the attribute in xs-security.json file.
The command for creating the instance of xsuaa:
cf cs xsuaa application attriXsuaa -c xs-security.json
After service creation we can check the cockpit for the newly created roles and role collection.
2.2. Service Application
The service app exposes 2 protected REST endpoints and is explained in the previous blog post.
However, there’s a difference, because today we want to support a custom attribute.
So the user interface is a bit different: an employee is created with a name and with a checkbox that indicates if this employee requires special attention.
...Wh...
For whatever reason, don’t ask.
In the implementation of the “manage” endpoint, the authorization check logic is as follows:
If the logged-in user is a manager (has ”manage”-scope) then allow to manage the chosen employee.
If the logged-in user is an assistant (has ”create”-scope), then we need to look at the selected employee (from ui):
If the employee requires special attention, then we need to check if the assistant has received the required “special training”.
Only if "true", then allow.
If the employee does not require special attention, then we don’t check the qualification of the assistant.
   if (auth.checkScope(UAA_CREDENTIALS.xsappname + '.scopeformanage')) {

      res.send(`Salary increased for employee: '${employeeName}' by manager '${auth.getGivenName()}' .`)

   }else if(auth.checkScope(UAA_CREDENTIALS.xsappname + '.scopeforcreate')){

      if(employeeEntry.special == 'true'){

         if (hasSpecial(req)) {

            res.send(`Salary increased for employee: '${employeeName}' by assistant '${auth.getGivenName()}' .`)

         } else {

            res.status(403).end(`Assistant '${auth.getGivenName()}' not allowed to manage '${employeeName}' due to missing special qualification.`)

         }

      }else{

         res.send(`Salary increased for employee: '${employeeName}' by assistant '${auth.getGivenName()}' .`)

      }

   }else{

      res.status(403).end('Forbidden. Missing authorization for managing employee.')

   }
Please forgive the many ifs. This allows for detailed error message which I hope helps in understanding.
Reading the custom attribute is same as reading any other attribute:
const jwtDecoded = req.tokenInfo.getPayload()

const userAttrSpecial = jwtDecoded['xs.user.attributes'].SpecialTraining
Note:
We can see that the attribute name is the name which we specified in the xs-security.json file
It has nothing to do with the name in SAML assertion or IAS.
Note:
Today we ignore any country-specific stuff, to make things a bit easier.
The full file content can be found in appendix1.
2.3. Approuter
There's no difference, please refer to previous blog post approuter section.
2.4. Web Page
Please refer to explanations in previous tutorial.
However, there’s a little difference: today we don’t make use of the country-attribute.
Instead, we place a checkbox in the page which is meant to indicate if the employee requires any special attention.
...
And no, I still don’t know why, so please don’t ask.
It is just a silly example.
2.5. Deploy
Again, some useless explanation can be found, if desired, in the previous blog post.
Anyways, we don't open the app until we've gone through below configuration steps.
3. Configuration in IAS
Remember what we are doing:
We have users in IAS who should access our app in BTP.
In our app code, we want to access attributes of the users.
As such, somehow we need to bring the IAS-user-info to BTP.
So let’s start configuring IAS.
Basically, what we need to configure is: the SAML assertion.
What is a SAML assertion?
It is just an xml snippet (token), carrying user and certificate info, thus identifying user across applications.
See here if you’re interested in trying it out.
3.1. Configure Default Name ID Format
First, we need a basic SAML configuration to make sure how a user is uniquely identified.
Typically, a unique user has a unique E-Mail.
We go to Applications & Resources -> Applications
We make sure that "TRIAL_Attri" is selected and the right pane shows the details.
We click on "Default Name ID Format", choose “E-Mail” and “Save”.
3.2. Configure Assertion Attributes
What does that mean?
When a user logs in to our application, XSUAA will handle the OAuth flow (Authorization Code grant).
However, XSUAA will delegate the user-authentication check to IAS, which is the entity that has the knowledge about users.
After successful user-verification, IAS will issue a SAML assertion which is stored in a session in the browser and serves as kind of certified security proof of the user.
It contains the relevant info about the user.
And what is the “relevant info” ?
First of all, it is up to us to decide, which user attributes should find their way into the assertion (apart from defaults).
And there’s also a second point:
How should these attributes be named?
Means, the attributes contained in the assertion, may have a different name than the user attributes that we can see in the IAS dashboard.
Example:
In the dashboard, the attributes have a human-readable name, like “First Name”
But this is not so technical, and in the assertion xml, we prefer something technical, like “first_name”.
So this mapping of names is the second point which we need to take care of.
How do we decide?
What we want to achieve:
Include those user attributes in the SAML assertion, that we want to evaluate in our app, because relevant for authorization check (e.g. training).
Others are anyways present as per default (name etc).
We proceed as follows:
We make sure that "TRIAL_Attri" is selected and the right pane shows the details.
We click on “Assertion Attributes”.
We press “+ Add” and in the popup, we scroll down to choose “Cost Center”.
On the right side, we leave the default: “cost_center”
One important step we should not forget: the “Groups”
This is relevant for the easy mapping of user groups to role collections in BTP.
What we want to achieve:
In IAS, certain type of users are bundled together in a group.
In our example, all users who work as assistant, are added to the group “AssistantsGroup”.
It is clear that these users will have the proper authorizations that are related to tasks of assistants.
In the language of BTP, we want to add all these users to a “Role Collection”.
In our example we will have an “AssistantRoleCollection”.
What we want to achieve: automatically assign all users of a “Group” to a “Role Collection”.
However, in SAML there’s no concept of “Groups” there are only “Attributes”.
As such, the mapping in BTP is based on a special attribute called “Groups”.
So we need to take care that this attribute is present in the SAML assertion.
We press “+ Add” and in the popup, we scroll down to choose “Groups”.
A new entry is added to the list. It has a default value (Assertion Attribute is “groups”).
We replace the default value ("groups") with “Groups”.
Make sure to spell correctly: “Groups” starting with upper case.
Press “Save”.
Double check: Groups should be spelled Groups and not groups and not grUPs.

Save?
Yes.
Done?
No.
3.3. Configure Default Attributes
At this point, a concentrated reader of this tutorial asks:
Hey, and what about the "special qualification??"
Yes, that’s a good question, thank you for asking.
We can add the “CustomAttribute1” to the list of “Assertion Attributes”, but it wouldn’t have the desired effect (include in SAML assertion), as it is not meant to be used there.
We have to move to different config screen.
I'm tired and not concentrated...
Anyways, we leave the “SAML Assertion Attributes” screen and choose “Default Attributes” (while making sure that “TRIAL_Attri” is selected in the application list).
What is that: “Default Attributes”?
It is similar like the previous screen: we can specify what attributes are contained in the SAML assertion that is issued after user login.
The difference:
The attributes specified here will always have a fixed default value.
An example could be:
Our sample app is deployed to an account located in Sahara, and all users who login to that app would get a default attribute like “location: Sahara”.
The application can evaluate it and display blue homepage.
Note that this configuration is done for selected “TRIAL_Attri”, which identifies the trusted specific subaccount.
Has anything to do with our “special qualification”?
Wait.
When specifying default attributes, it is possible to set a variable as value, which points to an existing user attribute, thus allowing not-fixed values.
In our example, we use this mechanism to assign a variable pointing to our CustomAttribute1.
As such, that default attribute won’t have a fixed value, but it will be filled with the value of current user.
OK.
Thanks.
We proceed as follows:
Press “+ Add”.
Enter Attribute as “default_attribute_custom_1”.
Enter Value as “${customAttribute1}” (without quotes).
Save.

That’s all about configuring IAS.
Summary
To make authorization via IAS possible, it is essential to do some configuration in IAS.
Default Name ID Format.
Assertion Attributes (Groups is required, others depend on scenario).
Default Attributes (only for custom attributes).
4. Configuration in BTP Cockpit
Time to visit our Trial subaccount in SAP BTP.
Here we’re dealing with security artifacts that are specific for XSUAA-based BTP applications.
I mean, we have role-templates and role collections (no user groups) and these are assigned to users.
What I want to say: this is a different world, and the configurations done in IAS have no effect here.
So why did we do it at all?
Hold on...
How's the situation in BTP:
The user has logged in with IAS.
A SAML assertion has been issued.
It contains user email and other user attributes.
It is sent to the XSUAA-server of this BTP subaccount.
Trust had been established based on SAML, so XSUAA accepts the assertion and starts reading it.
It finds attribute "Groups" which it will use to add corresponding role collection(s) to the user.
Example: in IAS, the user belongs to the user group “AssistantsGroup”. As a consequence, in BTP the user will get the corresponding role collection “AssistantsRC”.
But how does XSUAA know which is a “corresponding role collection” ?
Again a good question: this is exactly what we need to configure now.
Can we do that now?
->
Create Role Collections
BTP Subaccount -> Security -> Role Collections.
Create a Role Collection with name “AssistantsRC”.
Create a Role Collection with name “ManagersRC”.
Create a “UsersRC” ?
No, as it is already present.
Create Assistant Role
We go to Security -> Roles.
We find our “AssistantRoleTemplate”.

Note:
We can observe: for Assistant, we have a role template and a role name with same name.
This “AssistantRoleTemplate" is not a role, it is just the template.
That’s why it cannot be deleted.
Reason is: we didn’t define a default role in the xs-security.json.
We did that only for UserRoleTemplate, here we have a default role name and that’s why the “Create” is disabled for User.
In the line of “AssistantRoleTemplate”, we click on “Create Role”.
We enter a name like “AssistantRole” and press "Next".
In the “Configure Attributes” screen we now want to assign IAS-values to the XSUAA-attributes.
To do so, we choose “Identity Provider” as “Source” for the attribute.
The “Value” to be entered is in fact not a value (like “DE”), it is rather an attribute name.
It is a name of an IAS-attribute and it has to exactly match the name of the IAS configuration (previous chapter).
So we go ahead and enter:
SpecialTraining -> Identity Provider -> default_attribute_custom_1If you don’t believe me, or if you’ve used different naming, you can go to your IAS and copy the name from the “Default Attributes” screen.
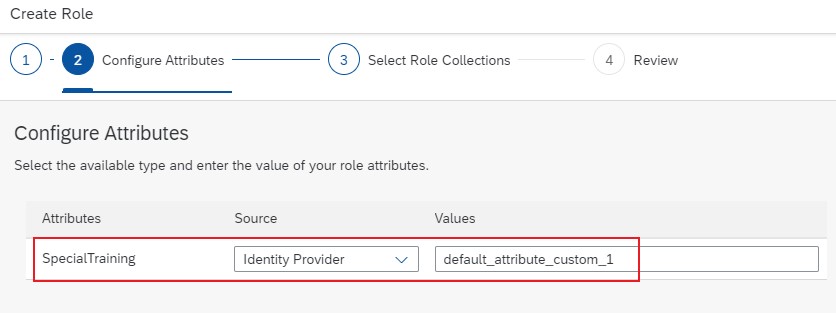
In the wizard, we can now press “Next” and tick the “AssistantsRC” collection.

Then finish the wizard.

Note:
Now we can see that the Role Name for Assistant has changed from template name to specific role name, as created by us.
Furthermore, this concrete role can be deleted, whereas the template cannot be deleted.
Create Manager Role
Similarly, we now create a Role with name "ManagerRole".
The Attribute has "Source: Identity Provider" and value “cost_center”.

We add it to the Role Collection "ManagersRC" and finish the wizard.
Configure Role Collection Mappings
We've created role collections and we've created roles and assigned them.
Next step is to configure the mappings.
What mappings?
We’ve already explained what we want to achieve with role collection mapping:
We want that (external) IAS-users who enter our application, can get the required scopes.
In BTP, this is done by assigning a user to a role collection.
However, we don’t want to enter each user manually.
We want to automatically assign the role collection to an IAS-User-Group.
E.g.
We want that all users who belong to the “AssistantsGroup” are assigned to the role collection “AssistantsRC”.
Can we stop talking and map map map?
There are 2 possibilities to map a BTP-Role-Collection to IAS-users:
Mapping can be based on an IAS-User-Group, or it can be based on an IAS-User-Attribute.
In our scenario, we have an example for each.
Map Role Collection to User Group
In BTP, we go to Security -> Role Collections and choose the newly created “AssistantsRC” entry.
In the details screen we can see that the Role “AssistantRole” is already configured, as done in previous step.
We click on “Edit” and go to section “User Groups”.
In the drop-down for “Identity Provider” we choose our custom IAS.
In the “Name” field, we enter the name of the IAS-User-Group: “AssistantsGroup”.
Note that you might need to adapt to your chosen names.
When copying from IAS, make sure to use the technical name of the user group, not the display name.
Save.

So now we’ve mapped the role collection to a user group.
Means, all group members will be assigned here as users.
Below diagram shows what we've just done:

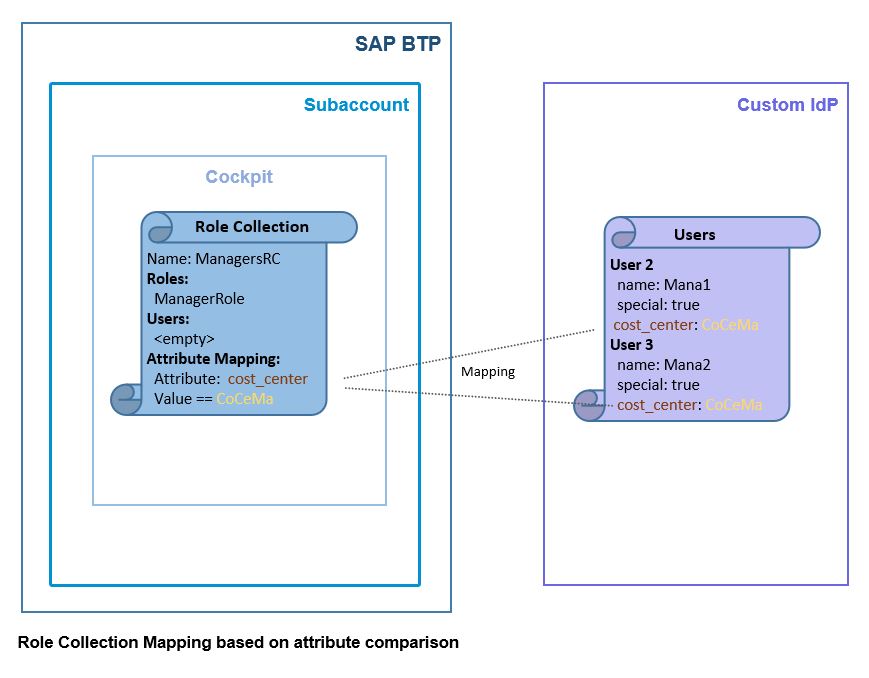
Map Role Collection to User Attribute
Now we need to map the Role Collection for managers.
In this case, we didn’t create a user group in IAS.
As such, we cannot map the role collection to user group.
Remember, we decided that a user can be identified as manager by looking at his "Cost Center".
Instead, it is possible to map a role collection to a user attribute.
We go to Security -> Role Collections and choose the newly created “ManagersRC” entry.
We press on “Edit” and go to section “Attribute Mappings”.
In the drop-down for “Identity Provider” we choose our custom IAS.
In the “Attribute” Field, we enter the name of the attribute coming with the SAML assertion.
As mentioned, this is the "Cost Center", so we enter the SAML-name: “cost_center”.
Now we need a concrete value for the attribute.
In this case, we want to identify managers, so we enter the concrete cost center name. It is the value from the IAS-user with name “Manager”.
The value for cost center was imported from the .csv file and can be found in the “Employee Information” section in IAS:

As such, we enter “CoCeMa” in the Value field:

And don’t forget to “Save”
Again, please find below the diagram of what we've just done:
Map Role Collection to User Group – alternative
We have a third role collection, which still needs to be mapped: the “UsersRC”.
We defined this one in the security descriptor, because no attribute-stuff is required here.
We have a user group for "User" in IAS, so we can simply map the role collection to the IAS-User-Group.
Just like we did above with the "Assistant".
But instead of repeating the same steps as above, we go a different way.
We to to Security -> Trust Configuration.
Click on the custom IDP (in my example: “Custom IAS for Attri”)
Click on “Role Collection Mappings” in the left menu.
Create “New”.
In the dialog, we choose “UsersRC”.
The attribute must be “Groups” – remember, this is a default attribute in BTP, used for role collection mapping
Value: "UserGroup".

Note:
Make sure to copy this value from the user group name in IAS, in case you chose a different name.
After pressing Save, we can see the 3 role collections together in this screen:

Finally, we're done with all configurations.
Summary
To avoid confusion, let's add another summary:
In BTP, we configure the connection between the 2 worlds: IAS and BTP.
This means to copy over names of attributes and groups from IAS to BTP.
We need to create a role and map XSUAA-attribute name to IAS-attribute name.
We need to create a role collection and map it to IAS-User-Group.
Alternatively, a role collection can be mapped to an IAS-attribute with fix value.
5. Run
Like in previous blog post, we test the 5 scenarios.
The difference is that today we have 5 users with different properties in our custom Identity Provider.
And they have been maintained and mapped in BTP (with one exception).
Note that the 5 users have initial password which needs to be changed after login.
After each test we need to start new incognito-browser with empty cache, otherwise the login screen is not displayed.
Optional:
Using IAs gives us one extraordinary opportunity: we can view the SAML assertion after user login.
This will be interesting, as we’ve been talking about it all the time.
To view the content of the assertion, it makes sense to install a plugin in the browser, e.g. Firefox SAML tracer or the SAML Chrome Panel.
The app entry point in my example:
https://attrirouter.cfapps.us10.hana.ondemand.com
To view the additional information which we write into the Cloud Foundry log, we start log streaming with command:
cf logs attriapp
Note:
Before displaying the user-login-screen, the BTP needs to know which identity provider we want to use. This is required, because after adding the trust, we have 2 IdPs (in my example).
So we need to choose the desired Identity Provider.
Luckily, we gave a helpful name:

1. No Role
To test the proper handling of a user without scopes, we use the user with name “Nothing”.
As a result, we get an error message, thrown by approuter: Forbidden
2. “User” Role
Next, we use a simple user with view-permission, it is the user with name “User”.
Result: we can view, but no action is allowed.
3. “Assistant” Role
Now we login with an assistant-user who does not have any special qualification: "AssiUs."
We’re allowed to create employees, so we create one employee with unchecked checkbox and another one with “Special” checked.
Then we try to “increase” for both.
Result:
First one succeeds, but the second one fails, because the current user does not have any special qualification maintained in IAS.

In the log we can see:
Scope for create is available
SAML group and role collection for assistants assigned
Special user attribute has value false, as we didn’t configure in IAS

4. “Assistant” Role with “special” Attribute
For the next test, we activate the SAML tracer browser plugin.
Now we login with an assistant who has received a special training, User “AssiDe”.
In the tracer tool, we can view the SAML assertion which has been issued for the user:

We can see the SAML attributes and their values.
We can see that it nicely behaves as we configured in IAS.
We can see that there’s an attribute called “Groups”.
We understand, in SAML it is just an attribute, while in BTP it will receive special treatment, because it is used to identify a user group which can be mapped to a role collection.
In fact, the value of this “Groups” attribute is the name of the user group.
Back to browser.
Again, we create 2 employees, one with and one without “special”.
And then try to “increase” both.
Result:
Everything is allowed.
In the log we can see:
Scope for create is available.
SAML group and role collection for assistants assigned.
Special user attribute has value true, as configured in IAS.
We can see that the SAML attribute “Groups” has found its way into the JWT claim “xs.system.attributes”
(this is SAP proprietary claim, not a default claim)
And we can see how the SAML (default) attribute “custom_attribute_1” has been mapped to the XSUAA attribute “SpecialTraining”.

5. “Manager” Role
Finally, we use the superuser “Manager” for login.
Result: as expected, this omnipotent user can do everything.

Optional: view subaccount shadow users
Just one click is required for this optional exercise:
Subaccount -> Security -> Users
We can see that the IAS users have been replicated here:

Remember that there was a checkbox for creating shadow users, when we created the trust configuration ?
It looked like this:
![]()
So, the user from IAS is replicated to BTP, but only after login, not all IAS-users.
6. Delete
As mentioned in the introduction, we have the choice to make the app more beautiful - or delete it.
To make the app more beautiful, we use these magic commands
cf d -r -f attrirouter
cf d -r -f attriapp
cf ds -f attriXsuaa
Summary
In this blog post we’ve learned how to configure user attributes in IAS and how to do attribute mapping and role collection mapping in SAP BTP.
Quick Guide
When configuring the mappings in BTP, we need to use the attribute names that are contained in the SAML assertion. As such, we need to refer to the Assertion Attributes screen in IAS.
Links
SAP Help Portal:
Authorization Entities documentation.
Reference for xs.security.json parameters.
Application Router main entry and npm.
IAS main docu page.
IAS default attributes config
Passport homepage and download.
Node.js package xssec.
OAuth 2.0
Understanding of OAuth for dummies like me.
BTW.... interested in client-credentials flow with IAS and identity service?
And what about a Security Glossary?
Appendix 1: Sample Code for Applications
xs-security.json
{

    "xsappname": "attrixsappname",

    "tenant-mode": "dedicated",

    "scopes": [{

            "name": "$XSAPPNAME.scopeforview",

            "description": "Scope required for viewing employee list."

        },{

            "name": "$XSAPPNAME.scopeforcreate",

            "description": "Scope required for creating new employee"

        },{

            "name": "$XSAPPNAME.scopeformanage",

            "description": "Scope required for managing existing employee"

        }

    ],

    "attributes" : [ {

            "name" : "CostCenter",

            "description" : "This attribute contains the Cost Center of assigned user.",

            "valueType" : "string"

        },{

            "name" : "SpecialTraining",

            "description" : "Contains info if user received special training for special employees",

            "valueType" : "string",

            "valueRequired" : "false"

        }

    ],

    "role-templates": [{

            "name": "UserRoleTemplate",

            "default-role-name": "UserRole",

            "description": "Role for end users, allows to view list of employees",

            "scope-references": ["$XSAPPNAME.scopeforview"]

        },{

            "name": "AssistantRoleTemplate",

            "description": "Role for assistants, allows to view and create employees.",

            "scope-references": ["$XSAPPNAME.scopeforview", "$XSAPPNAME.scopeforcreate"],

            "attribute-references": [

                { "name" : "SpecialTraining"}

            ]

        },{

            "name": "ManagerRoleTemplate",

            "description": "Role for managers, allows to view, create and manage employees.",

            "scope-references": ["$XSAPPNAME.scopeforview", "$XSAPPNAME.scopeforcreate", "$XSAPPNAME.scopeformanage"],

            "attribute-references": [

                { "name" : "CostCenter" }

            ]

        }

    ],

    "role-collections": [{

            "name": "UsersRC",

            "role-template-references": [ "$XSAPPNAME.UserRoleTemplate" ]

        }

    ]

}
manifest.yml
---

applications:

  - name: attriapp

    path: app

    memory: 64M

    routes:

    - route: attriapp.cfapps.us10.hana.ondemand.com

    services:

      - attriXsuaa

  - name: attrirouter

    path: approuter

    memory: 128M

    routes:

    - route: attrirouter.cfapps.us10.hana.ondemand.com

    env:

      destinations: >

        [

          {

            "name":"destination_attriapp",

            "url":"https://attriapp.cfapps.us10.hana.ondemand.com",

            "forwardAuthToken": true

          }

        ]

    services:

      - attriXsuaa
app
package.json
{

    "dependencies": {

        "@sap/xsenv": "latest",

        "@sap/xssec": "latest",

        "express": "^4.16.2",

        "passport": "^0.4.0"

    }

}
server.js
const xsenv = require('@sap/xsenv')

const serviceBindings = xsenv.getServices({

   myXsuaa: {tag: 'xsuaa'}

})

const UAA_CREDENTIALS = serviceBindings.myXsuaa

const DATABASE = new Array() // Global variable representing database


const express = require('express')

const app = express()

const xssec = require('@sap/xssec')

const passport = require('passport')

const JWTStrategy = xssec.JWTStrategy

passport.use('JWT', new JWTStrategy(UAA_CREDENTIALS))

app.use(passport.initialize())

app.use(passport.authenticate('JWT', {session: false}))

app.use(express.json())

app.use(logJwtMiddle)


/* App server */

app.listen(process.env.PORT)


/* App endpoints */

app.post('/create', (req, res) => {

   const auth = req.authInfo

   if (! auth.checkScope(UAA_CREDENTIALS.xsappname + '.scopeforcreate')) {

      res.status(403).end('Forbidden. Missing authorization for create.')

   }else{

      const body = req.body

      DATABASE.push({name: body.name, special: body.isSpecial})

      res.send(`Employee name: '${body.name}', Requires attention: '${body.isSpecial}'`)

   }

})


app.put('/manage', (req, res) => {

   const auth = req.authInfo

   const employeeName = req.body.name


   const employeeEntry = DATABASE.find(e => e.name == employeeName)

   if(employeeEntry == undefined){

      return res.status(404).end(`Employee '${employeeName}' not found.`)

   }


   if (auth.checkScope(UAA_CREDENTIALS.xsappname + '.scopeformanage')) {

      res.send(`Salary increased for employee: '${employeeName}' by manager '${auth.getGivenName()}' .`)

   }else if(auth.checkScope(UAA_CREDENTIALS.xsappname + '.scopeforcreate')){

      if(employeeEntry.special == 'true'){

         if (hasSpecial(req)) {

            res.send(`Salary increased for employee: '${employeeName}' by assistant '${auth.getGivenName()}' .`)

         } else {

            res.status(403).end(`Assistant '${auth.getGivenName()}' not allowed to manage '${employeeName}' due to missing special qualification.`)

         }

      }else{

         res.send(`Salary increased for employee: '${employeeName}' by assistant '${auth.getGivenName()}' .`)

      }

   }else{

      res.status(403).end('Forbidden. Missing authorization for managing employee.')

   }

})


/* Middleware */

function logJwtMiddle (req, res, next) {

   const tokenEncoded = req.headers["authorization"].substring(7)

   let jwtBase64Encoded = tokenEncoded.split('.')[1]

   let jwtDecodedAsString = Buffer.from(jwtBase64Encoded, 'base64').toString('ascii')

   let jwtDecoded = JSON.parse(jwtDecodedAsString)


   console.log(`===> The full JWT decoded: ${JSON.stringify(jwtDecoded)}`)

   console.log(`==> JWT scope: ${jwtDecoded.scope}`)

   console.log(`==> JWT role collections: ${JSON.stringify(jwtDecoded['xs.system.attributes'])}`)

   console.log(`==> JWT user attributes: ${JSON.stringify(jwtDecoded['xs.user.attributes'])}`)

   next()

}


/* HELPER */

function hasSpecial(req){

   const jwtDecoded = req.tokenInfo.getPayload()

   const userAttrSpecial = jwtDecoded['xs.user.attributes'].SpecialTraining

   return userAttrSpecial == 'true'

}
approuter
package.json
{

    "dependencies": {

        "@sap/approuter": "latest"

    },

    "scripts": {

        "start": "node node_modules/@sap/approuter/approuter.js"

    }

}
xs-app.json
{

  "welcomeFile": "homepage.html",

  "authenticationMethod": "route",

    "routes": [

      {

        "source": "^/route-me-to/(.*)$",

        "target": "$1",

        "destination": "destination_attriapp",

        "authenticationType": "xsuaa",

        "csrfProtection" : false

      },

      {

        "source": "^/(.*)$",

        "localDir": "resources",

        "authenticationType": "xsuaa",

        "scope": "$XSAPPNAME.scopeforview",

        "csrfProtection" : false

      }

    ]

  }
homepage.html
<html>

  <head>

    <script src = "https://code.jquery.com/jquery-3.6.0.min.js"></script>

    <script>

      function write(text, idOfP){

        const p = document.createElement("P")

        p.appendChild(document.createTextNode("-> " + text))

        document.getElementById(idOfP).appendChild(p)

      }


      function create(employeeName, isSpecial){

          $.post({

            url: `/route-me-to/create`,

            data: JSON.stringify({

              name: `${employeeName}`,

              isSpecial: `${isSpecial}`

            }),

            headers: {

              'Content-Type': 'application/json'

            },

            success: function(result, status, xhr){

              write(result, "createP")

            },

            error: function(xhr, status, error){

              write(xhr.responseText, "createP")

            }

          })

      }


      function manage(employeeName){

          $.ajax({

            type: "PUT",

            url: `/route-me-to/manage`,

            data: JSON.stringify({

              name: `${employeeName}`

            }),

            headers: {

              'Content-Type': 'application/json'

            },

            success: function(result, status, xhr){

              write(result, "manageP")

            },

            error: function(xhr, status, error){

              write(xhr.responseText, "manageP")

            }

          })

      }

    </script>

  </head>


  <body>

    <h1>Employee Management</h1>

    <h4>Create Employee</h4>

      <p id="createP">

        Name: <input id="empId" size="10"> Special: <input type="checkbox" id="chckId">

        <button type="button" onclick="create(empId.value, chckId.checked)">Submit</button></p>

    <h4>Manage Employee</h4>

    <p id="manageP">

      Increase Salary for: <input id="manaId" size="10">

      <button type="button" onclick="manage(manaId.value)">Submit</button></p>

  </body>

</html>
Appendix 2: Sample Users
users.csv
emails[0].value,name.familyName,name.givenName,userName,userType,active,urn:ietf:params:scim:schemas:extension:sap:2.0:User:mailVerified,urn:sap:cloud:scim:schemas:extension:custom:2.0:User:attributes[0].name,urn:sap:cloud:scim:schemas:extension:custom:2.0:User:attributes[0].value,urn:ietf:params:scim:schemas:extension:enterprise:2.0:User:costCenter

assius@from.us,Us,Assi,AssiUs,Employee,TRUE,true,customAttribute1,false,CoCeAs

asside@from.de,De,Assi,AssiDe,Employee,TRUE,true,customAttribute1,true,CoCeAs

manager@from.de,Ger,Mana,Manager,Employee,TRUE,true,customAttribute1,true,CoCeMa

user@from.es,Er,Us,User,Employee,TRUE,true,customAttribute1,false,none

nothing@from.fr,Ng,Nothi,Nothing,Employee,TRUE,true,customAttribute1,false,none
Labels:
8 Comments
You must be a registered user to add a comment. If you've already registered, sign in. Otherwise, register and sign in.
Labels in this area
-
ABAP CDS Views - CDC (Change Data Capture)
2 -
AI
1 -
Analyze Workload Data
1 -
BTP
1 -
Business and IT Integration
2 -
Business application stu
1 -
Business Technology Platform
1 -
Business Trends
1,661 -
Business Trends
87 -
CAP
1 -
cf
1 -
Cloud Foundry
1 -
Confluent
1 -
Customer COE Basics and Fundamentals
1 -
Customer COE Latest and Greatest
3 -
Customer Data Browser app
1 -
Data Analysis Tool
1 -
data migration
1 -
data transfer
1 -
Datasphere
2 -
Event Information
1,400 -
Event Information
64 -
Expert
1 -
Expert Insights
178 -
Expert Insights
273 -
General
1 -
Google cloud
1 -
Google Next'24
1 -
Kafka
1 -
Life at SAP
784 -
Life at SAP
11 -
Migrate your Data App
1 -
MTA
1 -
Network Performance Analysis
1 -
NodeJS
1 -
PDF
1 -
POC
1 -
Product Updates
4,577 -
Product Updates
326 -
Replication Flow
1 -
RisewithSAP
1 -
SAP BTP
1 -
SAP BTP Cloud Foundry
1 -
SAP Cloud ALM
1 -
SAP Cloud Application Programming Model
1 -
SAP Datasphere
2 -
SAP S4HANA Cloud
1 -
SAP S4HANA Migration Cockpit
1 -
Technology Updates
6,886 -
Technology Updates
403 -
Workload Fluctuations
1
Related Content
- SAP HANA Cloud Vector Engine: Quick FAQ Reference in Technology Blogs by SAP
- Consuming SAP with SAP Build Apps - Connectivity options for low-code development - part 2 in Technology Blogs by SAP
- Consuming CAPM Application's OData service into SAP Fiori Application in Business Application Studio in Technology Blogs by Members
- Consume Ariba APIs using Postman in Technology Blogs by SAP
- SAP Cloud Integration: Understanding the XML Digital Signature Standard in Technology Blogs by SAP
Top kudoed authors
| User | Count |
|---|---|
| 13 | |
| 10 | |
| 10 | |
| 7 | |
| 7 | |
| 6 | |
| 6 | |
| 5 | |
| 5 | |
| 4 |