
- SAP Community
- Products and Technology
- Enterprise Resource Planning
- ERP Blogs by Members
- Create a Fiori Application using RESTful Applicati...
Enterprise Resource Planning Blogs by Members
Gain new perspectives and knowledge about enterprise resource planning in blog posts from community members. Share your own comments and ERP insights today!
Turn on suggestions
Auto-suggest helps you quickly narrow down your search results by suggesting possible matches as you type.
Showing results for
former_member64
Explorer
Options
- Subscribe to RSS Feed
- Mark as New
- Mark as Read
- Bookmark
- Subscribe
- Printer Friendly Page
- Report Inappropriate Content
08-19-2022
8:15 PM
Introduction
In this post, We will go over a series of steps in creation of a Fiori application to perform CRUD operations using ABAP RESTful Application programming model(RAP) on S/4 HANA cloud platform and Business transaction platform(BTP).
Pre-requisites for this Application:
- S/4 HANA Cloud System
- Business transaction platform(BTP)
- Eclipse IDE
There are 2 type of scenarios in RAP.
- Managed Scenario
- Unmanaged Scenario
In this Blog, I am going to explain managed scenario.
Step 1: First, we need to create database table in S/4 HANA Cloud system to perform CRUD operations on this table.
Open Eclipse to create a database table.

Picture 1: Database table creation *Click to Enlarge.
Step 2: Create an Interface view on top of DB table.

Picture 2: Interface view.
Step 3: Create Consumption view on top of Interface view.

Picture 3: Consumption view.
Step 4: Create Metadata Extension file on top of Consumption view.
By using Metadata extension file, We can provide input selection and also arrange the order of fields in the Fiori application.
Right click on Core data services and select the Metadata Extension.

Picture 4: Metadata Extension file creation.
Once select the Metadata Extension, We should provide Name and Description.

Picture 5: Metadata extension file.
Step 5 : Create Behavior Definition on top of Interface view.
Right click on Interface view and select New behavior Definition.
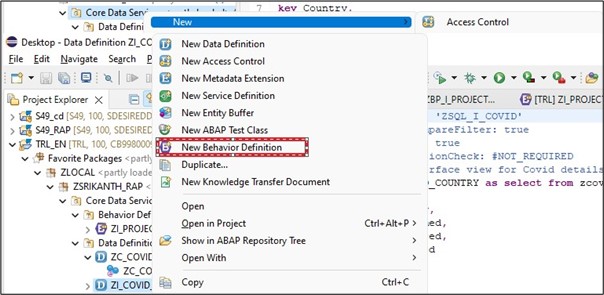
Picture 6: Behavior Definition path.
In the Next popup, We should select Implementation type as Managed as shown in Picture 7.

Picture 7: Behavior Definition creation.

Picture 8: Behavior Definition.
Next We should implement the behavior definition as shown in Picture 9.

Picture 9: Behavior Definition Implementation path.
Click behavior implementation class as shown in Picture 10.

Picture 10: Behavior Definition implementation.
Once create behavior implementation, We should activate the behavior definition.
Step 6 : Create Projection on top of Consumption view.
Right click on Consumption view and select New Behavior Definition as shown in Picture 11.

Picture 11: Projection path.

Picture 12: Projection creation.

Picture 13: Projection.
Step 7 : Create Service Definition on top of Consumption view.
Right click on Consumption view and select New Service definition on the popup screen.

Picture 14: Service Definition Path.
Once select the New Service Definition, We should provide service definition name and description as shown in Picture 15.

Picture 15: Service Definition.

Picture 16: Service Definition code.
Step 8 : Create Service binding on top of Service Definition.
Right click on Service definition and select New Service binding on the popup.
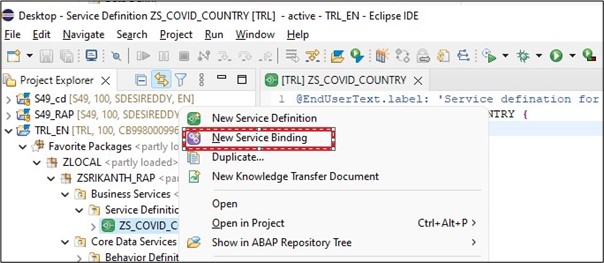
Picture 17: Service Binding path.
Once you select the New Service binding, We should provide Name, Description and Binding type as shown in Picture 18.
Binding type as OData V2 - UI

Picture 18: Binding type selection.
Next we should activate and Publish the Service Binding as shown in Picture 19.

Picture 19: Service Binding activation.
Step 9: Right click on Entity Set and select Open Fiori Elements App preview as shown in Picture 20.

Picture 20: Fiori Application Preview.
Once select Open Fiori Elements App Preview, Fiori Application will open in a Browser as shown in Picture 21.

Picture 21: Fiori Application initial screen.
Create Operation:
Click on create button on top of the screen as shown in below in Picture 22,

Picture 22: Create Button View.
Enter the required details and click on create button as shown in Picture 23.

Picture 23: Create Operation.
Once click on create button, Data will be saved successfully in Database table ZCOVID_COUNTRY.

Picture 24: Object Created.
Delete Operation:
We can delete the record also, Select the row and click on Delete button as shown in Picture 25.

Picture 25: Delete Operation.
Once click on delete button, the corresponding entry will be deleted from database table ZCOVID_COUNTRY.
Update Operation:
If we need to update the data, Select the row and click on entry as shown in Picture 26.

Picture 26: Update Operation.
Upon Click, it will navigate to another screen as shown in Picture 27.
Click on Edit button to update the record.

Picture 27: Edit Option.
Update the required fields and click on Save button as shown in Picture 28.

Picture 28: Save.
Once click on Save button, Data will updated directly in the Database table ZCOVID_COUNTRY.
Read operation:
If we need to view the existing data in the database table, We can view it in the initial screen of the application.

Picture 29: Read.
Hope you find this post helpful.
Please feel free to share your thoughts/feedback.
- SAP Managed Tags:
- SAP BTP, ABAP environment,
- SAP S/4HANA,
- ABAP RESTful Application Programming Model
1 Comment
You must be a registered user to add a comment. If you've already registered, sign in. Otherwise, register and sign in.
Labels in this area
-
"mm02"
1 -
A_PurchaseOrderItem additional fields
1 -
ABAP
1 -
ABAP Extensibility
1 -
ACCOSTRATE
1 -
ACDOCP
1 -
Adding your country in SPRO - Project Administration
1 -
Advance Return Management
1 -
AI and RPA in SAP Upgrades
1 -
Approval Workflows
1 -
ARM
1 -
ASN
1 -
Asset Management
1 -
Associations in CDS Views
1 -
auditlog
1 -
Authorization
1 -
Availability date
1 -
Azure Center for SAP Solutions
1 -
AzureSentinel
2 -
Bank
1 -
BAPI_SALESORDER_CREATEFROMDAT2
1 -
BRF+
1 -
BRFPLUS
1 -
Bundled Cloud Services
1 -
business participation
1 -
Business Processes
1 -
CAPM
1 -
Carbon
1 -
Cental Finance
1 -
CFIN
1 -
CFIN Document Splitting
1 -
Cloud ALM
1 -
Cloud Integration
1 -
condition contract management
1 -
Connection - The default connection string cannot be used.
1 -
Custom Table Creation
1 -
Customer Screen in Production Order
1 -
Data Quality Management
1 -
Date required
1 -
Decisions
1 -
desafios4hana
1 -
Developing with SAP Integration Suite
1 -
Direct Outbound Delivery
1 -
DMOVE2S4
1 -
EAM
1 -
EDI
2 -
EDI 850
1 -
EDI 856
1 -
EHS Product Structure
1 -
Emergency Access Management
1 -
Energy
1 -
EPC
1 -
Find
1 -
FINSSKF
1 -
Fiori
1 -
Flexible Workflow
1 -
Gas
1 -
Gen AI enabled SAP Upgrades
1 -
General
1 -
generate_xlsx_file
1 -
Getting Started
1 -
HomogeneousDMO
1 -
IDOC
2 -
Integration
1 -
Learning Content
2 -
LogicApps
2 -
low touchproject
1 -
Maintenance
1 -
management
1 -
Material creation
1 -
Material Management
1 -
MD04
1 -
MD61
1 -
methodology
1 -
Microsoft
2 -
MicrosoftSentinel
2 -
Migration
1 -
MRP
1 -
MS Teams
2 -
MT940
1 -
Newcomer
1 -
Notifications
1 -
Oil
1 -
open connectors
1 -
Order Change Log
1 -
ORDERS
2 -
OSS Note 390635
1 -
outbound delivery
1 -
outsourcing
1 -
PCE
1 -
Permit to Work
1 -
PIR Consumption Mode
1 -
PIR's
1 -
PIRs
1 -
PIRs Consumption
1 -
PIRs Reduction
1 -
Plan Independent Requirement
1 -
Premium Plus
1 -
pricing
1 -
Primavera P6
1 -
Process Excellence
1 -
Process Management
1 -
Process Order Change Log
1 -
Process purchase requisitions
1 -
Product Information
1 -
Production Order Change Log
1 -
Purchase requisition
1 -
Purchasing Lead Time
1 -
Redwood for SAP Job execution Setup
1 -
RISE with SAP
1 -
RisewithSAP
1 -
Rizing
1 -
S4 Cost Center Planning
1 -
S4 HANA
1 -
S4HANA
3 -
Sales and Distribution
1 -
Sales Commission
1 -
sales order
1 -
SAP
2 -
SAP Best Practices
1 -
SAP Build
1 -
SAP Build apps
1 -
SAP Cloud ALM
1 -
SAP Data Quality Management
1 -
SAP Maintenance resource scheduling
2 -
SAP Note 390635
1 -
SAP S4HANA
2 -
SAP S4HANA Cloud private edition
1 -
SAP Upgrade Automation
1 -
SAP WCM
1 -
SAP Work Clearance Management
1 -
Schedule Agreement
1 -
SDM
1 -
security
2 -
Settlement Management
1 -
soar
2 -
SSIS
1 -
SU01
1 -
SUM2.0SP17
1 -
SUMDMO
1 -
Teams
2 -
User Administration
1 -
User Participation
1 -
Utilities
1 -
va01
1 -
vendor
1 -
vl01n
1 -
vl02n
1 -
WCM
1 -
X12 850
1 -
xlsx_file_abap
1 -
YTD|MTD|QTD in CDs views using Date Function
1
- « Previous
- Next »
Related Content
- Building Low Code Extensions with Key User Extensibility in SAP S/4HANA and SAP Build in Enterprise Resource Planning Blogs by SAP
- Debugging transaction MD04 in SAP S/4HANA in Enterprise Resource Planning Blogs by SAP
- List of SAP-Default NACT Processing routines program in Enterprise Resource Planning Q&A
- Unable to print a billing document (AdobeForms) in VF02 in Enterprise Resource Planning Q&A
- Enter rate/ EUR rate type m for 11.04.2024 in the system settings. in Enterprise Resource Planning Q&A
Top kudoed authors
| User | Count |
|---|---|
| 2 | |
| 2 | |
| 2 | |
| 2 | |
| 2 | |
| 1 | |
| 1 | |
| 1 | |
| 1 | |
| 1 |