

- SAP Community
- Products and Technology
- Technology
- Technology Blogs by SAP
- Run Node.js Applications with Authentication Local...
Technology Blogs by SAP
Learn how to extend and personalize SAP applications. Follow the SAP technology blog for insights into SAP BTP, ABAP, SAP Analytics Cloud, SAP HANA, and more.
Turn on suggestions
Auto-suggest helps you quickly narrow down your search results by suggesting possible matches as you type.
Showing results for
Product and Topic Expert
Options
- Subscribe to RSS Feed
- Mark as New
- Mark as Read
- Bookmark
- Subscribe
- Printer Friendly Page
- Report Inappropriate Content
08-07-2022
10:15 AM
This blog series is mainly targeted for developers and administrators. If you are someone who has gone through the plethora of tutorials, documentation, and presentations on security topics in SAP BTP and still lacks the confidence to implement security for your application, you have come to the right place.
In this blog series, you will learn:
For ease of reading, I have split this in multiple blogs, which are:
Let's first get a high level picture. The approuter and application are usually bound to few service instances and have some environment variables. In this case, app router and application is bound to XSUAA service instance (nodeuaa) and has a destination environment variables (myapp) as mentioned in manifest.yml file.
manifest.yml is used during deployment and a destination is created in the Cloud Foundry. When we run app router locally, there is no destination created using manifest.yml file.
Similarly, there is no XSUAA instance locally.
The app router has a built-in support to run locally. App router can
We need to create following files:
Note that both app router and application is bound to XSUAA, hence we need default-services.json file at both places.
These file may contain confidential information. Hence include these files in the .gitignore. This will make sure that we don’t push this file to Git repository.
The files and folder structure is shown below.
Open Terminal and run below command to install the dependencies.
Next, run below command from myapp folder to run the application.
Obviously, this will fail. You will get an error message similar to below. It's because the app is looking for XSUAA service instance and it's not available locally.
To fix this, we need the XSUAA environment variable details and add that in default-services.json file.
Run the below command to get the environment variables and their values. Note that the last parameter in the command is app router name defined in manifest.yml file.
Copy the values in credentials JSON object.
Open myapp/default-services.json file and create a JSON entry as below:
Paste the value of credentials JSON object you copied in the <> placeholder.
Here is a snapshot of default-services.json file
Copy the same content to approuter/default-services.json file as well.
Instead of running cf env command, you may copy the values from BTP cockpit, as shown below.
Done! Run the command npm run start from myapp folder again.

Keep this application running. For next steps, open a new terminal.
Open file approuter/default-env.json file in the approuter folder and copy paste below content.
In this blog series, you will learn:
- How to protect an app in SAP BTP, Cloud Foundry environment from unauthorized access
- How to implement role-based features
- How SAP Identity Provider and Single-sign-on works
For ease of reading, I have split this in multiple blogs, which are:
- Fundamentals of Security in BTP: Introduction
- Fundamentals of Security in BTP: What is OAuth?
- Implement Authentication and Authorization in a Node.js App
- Run Node.js Applications with Authentication Locally [current blog]
What are we going to learn in this blog?
In the previous blogs, we learnt how to implement authentication and authorization to a Node.js app and deploy/run it to SAP BTP Cloud Foundry.
For we developer, the first question that comes to our mind probably is -
How to run your BTP application locally before deploying to cloud?
We developers love to debug and run things locally before deploying to server.

In this blog, we will learn how to run the Node.js application locally in SAP Business Application Studio. Even for a CAP application, the steps would be similar.
Prerequisite
In the previous blog, we implemented authentication and authorization in a Node.js App. We will use the same application for this hands-on.
A high level Overview of the scenario
Let's first get a high level picture. The approuter and application are usually bound to few service instances and have some environment variables. In this case, app router and application is bound to XSUAA service instance (nodeuaa) and has a destination environment variables (myapp) as mentioned in manifest.yml file.

What's the issue when we run the app locally?
manifest.yml is used during deployment and a destination is created in the Cloud Foundry. When we run app router locally, there is no destination created using manifest.yml file.
Similarly, there is no XSUAA instance locally.
So how do we fix it and run the app locally?
The app router has a built-in support to run locally. App router can
- Load required environment variables from a file name default-env.json
- Read the configuration from default-services.json file to find information about bound services such as XSUAA.
We need to create following files:
- default-env.json under approuter folder
- default-services.json under approuter folder
- default-services.json under service folder (myapp)
Note that both app router and application is bound to XSUAA, hence we need default-services.json file at both places.
These file may contain confidential information. Hence include these files in the .gitignore. This will make sure that we don’t push this file to Git repository.
The files and folder structure is shown below.

Step 1: Run Application (myapp) Locally
Open Terminal and run below command to install the dependencies.
npm installNext, run below command from myapp folder to run the application.
npm run startObviously, this will fail. You will get an error message similar to below. It's because the app is looking for XSUAA service instance and it's not available locally.
To fix this, we need the XSUAA environment variable details and add that in default-services.json file.
Let's fetch the XSUAA environment variable
Run the below command to get the environment variables and their values. Note that the last parameter in the command is app router name defined in manifest.yml file.
cf env approuter1Copy the values in credentials JSON object.
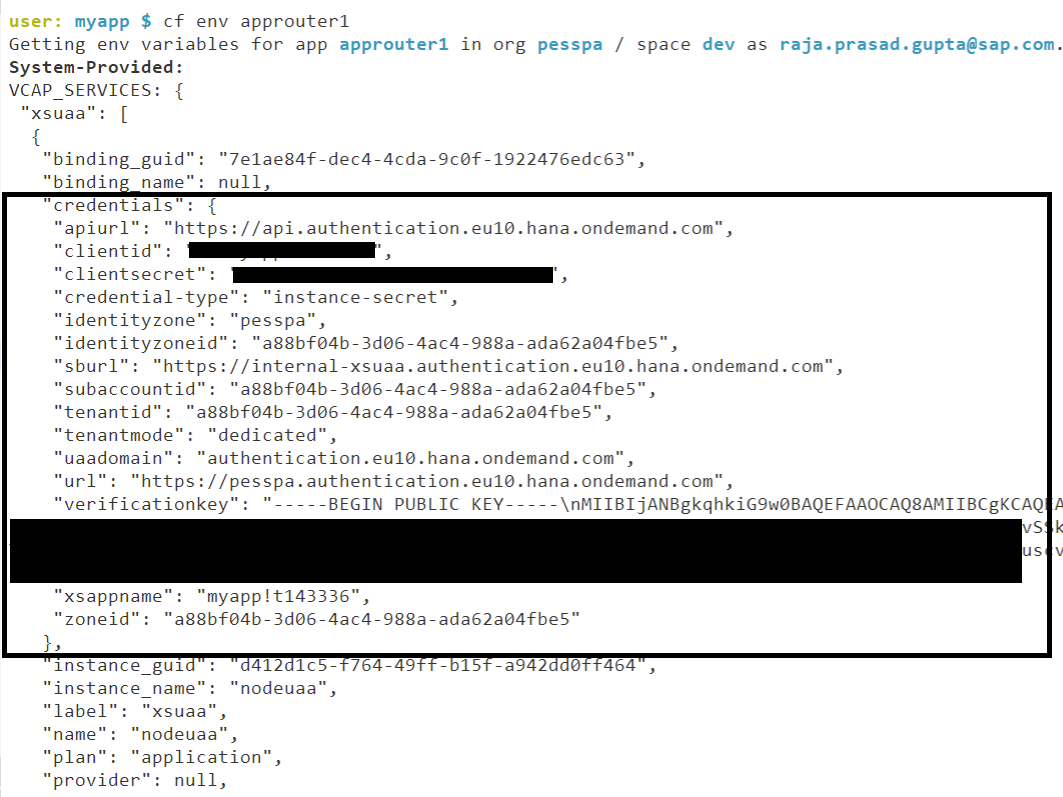
Open myapp/default-services.json file and create a JSON entry as below:
{

"uaa": {

          <value of credentials JSON Object>

       }

}
Paste the value of credentials JSON object you copied in the <> placeholder.
Here is a snapshot of default-services.json file

Copy the same content to approuter/default-services.json file as well.
Instead of running cf env command, you may copy the values from BTP cockpit, as shown below.

Done! Run the command npm run start from myapp folder again.
TADAA…it works. You will get the app running message as below.
You can check the myapp application running locally.
Of course it will give "Unauthorized" error message because that's how we have designed.
Remember, the application can only be accessed via App Router. In case of any doubt why this "Unauthorized" error message is coming, check the previous blog Implement Authentication and Authorization in a Node.js App
Keep this application running. For next steps, open a new terminal.
Step 2: Run App Router Locally
Open Terminal and run below command from approuter folder to install the dependencies.
npm installNext, run below command from approuter folder to start the app router.
npm run startObviously, this will fail. You will get similar error message as shown below. It's because the approuter is not able to find the destination called myapp.

Let's add the destination for local environment
Open file approuter/default-env.json file in the approuter folder and copy paste below content.
{

    "destinations": [

        {

            "name": "myapp",

            "url": "http://localhost:4000",

            "forwardAuthToken": true,

            "strictSSL": false

        }

    ]

}
This will create the destination for local testing. Not that the destination is pointing to http://localhost:4004, the same port where our application is running locally.
Run below command from app router folder to start the approuter again.
npm run startThis time, app router will start. But when you try to access the app, it will give another error message as below.

In the browser where app is running, you may get error message similar to - "The redirect_uri has an invalid domain."
Let's fix the error - "The redirect_uri has an invalid domain."
Open xs-security.json file and add an entry called oauth2-configuration as below.
You may have to adjust the region specific part (eu10) of the URL - https://*.eu10.applicationstudio.cloud.sap/**
{

    "oauth2-configuration": {

        "redirect-uris": [

            "https://*.eu10.applicationstudio.cloud.sap/**"

        ]

    },

    "xsappname": "myapp",

    "tenant-mode": "dedicated"

}
We need to update the XSUAA instance to get this change incorporated. Run below command from root folder to do the same.
cf update-service nodeuaa -c xs-security.jsonNote: This OAuth Configuration may create a problem when you run the app router from cloud. Don’t forget to remove this and update XSUAA service instance when you run the apps from cloud.
All Done! Run the app router again by running the command npm run start from app router folder.
Voila! It works now. You can see the application running locally.

Conclusion
Running an app locally is extremely helpful when we do development. It helps us save lot of time. If you observed closely, we achieved a hybrid approach. While the app router is running locally, XSUAA service instance is running in cloud. The target endpoint (the micro service) may run in local server or cloud.
Labels:
1 Comment
You must be a registered user to add a comment. If you've already registered, sign in. Otherwise, register and sign in.
Labels in this area
-
ABAP CDS Views - CDC (Change Data Capture)
2 -
AI
1 -
Analyze Workload Data
1 -
BTP
1 -
Business and IT Integration
2 -
Business application stu
1 -
Business Technology Platform
1 -
Business Trends
1,658 -
Business Trends
91 -
CAP
1 -
cf
1 -
Cloud Foundry
1 -
Confluent
1 -
Customer COE Basics and Fundamentals
1 -
Customer COE Latest and Greatest
3 -
Customer Data Browser app
1 -
Data Analysis Tool
1 -
data migration
1 -
data transfer
1 -
Datasphere
2 -
Event Information
1,400 -
Event Information
66 -
Expert
1 -
Expert Insights
177 -
Expert Insights
293 -
General
1 -
Google cloud
1 -
Google Next'24
1 -
Kafka
1 -
Life at SAP
780 -
Life at SAP
12 -
Migrate your Data App
1 -
MTA
1 -
Network Performance Analysis
1 -
NodeJS
1 -
PDF
1 -
POC
1 -
Product Updates
4,577 -
Product Updates
340 -
Replication Flow
1 -
RisewithSAP
1 -
SAP BTP
1 -
SAP BTP Cloud Foundry
1 -
SAP Cloud ALM
1 -
SAP Cloud Application Programming Model
1 -
SAP Datasphere
2 -
SAP S4HANA Cloud
1 -
SAP S4HANA Migration Cockpit
1 -
Technology Updates
6,873 -
Technology Updates
417 -
Workload Fluctuations
1
Related Content
- Data Privacy Embedding Model via Core AI in Technology Q&A
- SAP Application User provision based on Application Role via Entra ID in Technology Q&A
- Onboarding Users in SAP Quality Issue Resolution in Technology Blogs by SAP
- What’s new in Mobile development kit client 24.4 in Technology Blogs by SAP
- How to use AI services to translate Picklists in SAP SuccessFactors - An example in Technology Blogs by SAP
Top kudoed authors
| User | Count |
|---|---|
| 34 | |
| 25 | |
| 12 | |
| 7 | |
| 7 | |
| 6 | |
| 6 | |
| 6 | |
| 5 | |
| 4 |