
- SAP Community
- Products and Technology
- Technology
- Technology Blogs by SAP
- Trigger a Workflow Instance from a SAPUI5 Applicat...
Technology Blogs by SAP
Learn how to extend and personalize SAP applications. Follow the SAP technology blog for insights into SAP BTP, ABAP, SAP Analytics Cloud, SAP HANA, and more.
Turn on suggestions
Auto-suggest helps you quickly narrow down your search results by suggesting possible matches as you type.
Showing results for
Advisor
Options
- Subscribe to RSS Feed
- Mark as New
- Mark as Read
- Bookmark
- Subscribe
- Printer Friendly Page
- Report Inappropriate Content
08-02-2022
3:25 PM
Hello!
Are you interested in developing your own UI5 applications and starting a workflow instance from them? You can follow this quick exercise using your SAP Business Technology Platform trial account. Please bear in mind that now we have more capabilities for Low-Code/No-Code (LCNC) which you can use leveraging SAP Process Automation and its forms (if you're interested, check out these awesome and quick video tutorials) to quickly conduct a similar use case as I'm presenting to you here with SAPUI5 and Workflow Management. However, I wanted to quickly document how can you do it leveraging LCNC capabilities with SAP Business Application Studio as well.
Prerequisites:
An advantage of creating a MTA is that you can consume multiple application modules which shares the same lifecycle for development and deployment for a single application and its purpose.
The benefits can be summarized in 3 aspects (Abstraction, Automation and Assembly). For more information, check out this great blog post from simmaco.ferriero or the documentation here.
For this exercise you'll need to create a MTA with the following modules, I'll put it step by step:
Open your SAP Business Application Studio, and follow the template to create a Multitarget application.
Click on "Start from template" and select "Basic Multitarget Application"
Enter a name, I named mine "ui5workflowproject" and click finish.
A new workspace will open for you.
Now, inside your ui5workflowproject's mta project, let's add a Workflow module.
As we are going to create a Workflow Module, select this option.

I'll leave the name as the BAS suggests, if you want change the name.
Enter a workflow name and description, for the namespace I left if empty.
Open your .workflow file. Let's add 2 type of tasks for this simple exercise, User task and Mail Task (if you want to add just one to test it, it's fine as well).
For the User Tasks, let's leverage Workflow's form capabilities.
Create a new form file.
Add as many fields to your form as you want. For this exercise I'm simulating an Application for requesting IT equipment. I've added Employee, IT Equipment and Quantity as display-only (as these will come from the UI5 application) and comments for the approval manager to add comments whether he/she agrees to.
Let's add the decisions.
Now, go back to your workflow and add an exclusive gateway and a Mail task.
Copy this sample text body for the email notification:
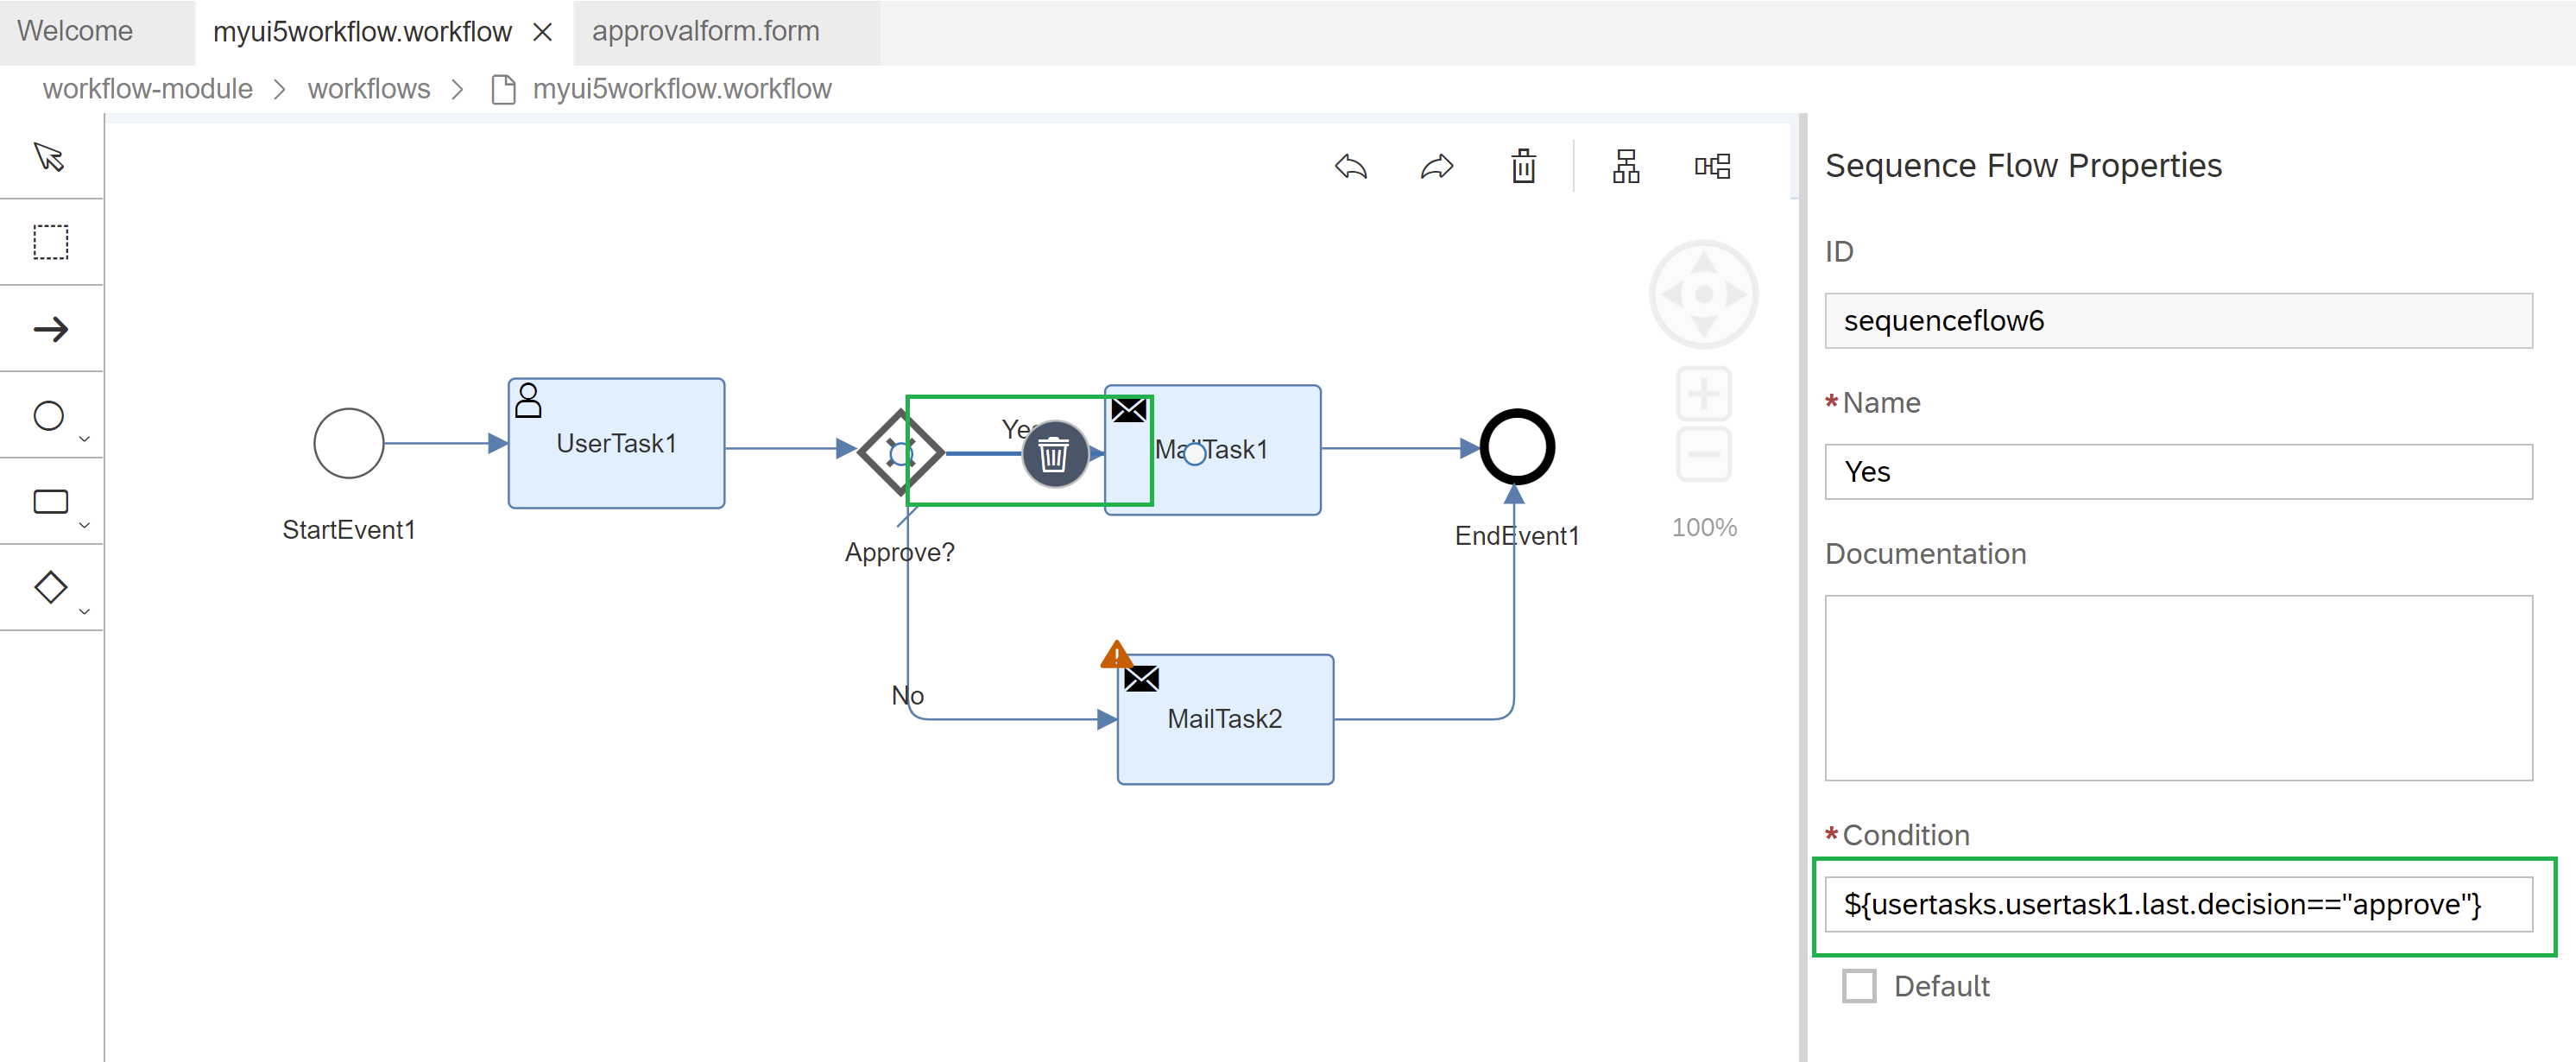
Add another mail task for the rejection email notification, and change the name of the exclusive gateway and sequency flow to add consistency. Set as the default sequenceflow the rejection one. For the approved sequence flow, add this condition as shown in the image below:
Add the configuration for the rejected mail task and change the name of the tasks to add consistency.
In the plain text mail body, I've added:
Let's test the workflow first.
Right click on the mta.yaml and let's build it.
[
If you haven't logged in yet to your Cloud Foundry Environment, you'll need to do it now to be able to deploy your application.
]
After the deployment is done. You'll see a similar message like this one:
Now let's test it.
Open your Fiori Launchpad portal (the one created with the Workflow Management Booster).
Copy this payload to run the test:
Go to your Workflow Definitions tile and start the instance in your Workflow:
Note: If you have configured your SMTP destination with a Gmail account, you will probably get an error if you haven't enabled an App password. Since May 30, 2022, google has disable the "less secure apps" access option, but you can still "enable" it following Google recommendations of setting up the 2-step verification and App Password. This video tutorial from YouTube helped me to do it quickly.
You'll see the task in your Inbox:
Approve it and go back to your Instance's log in the "Monitor Workflow" app tile:
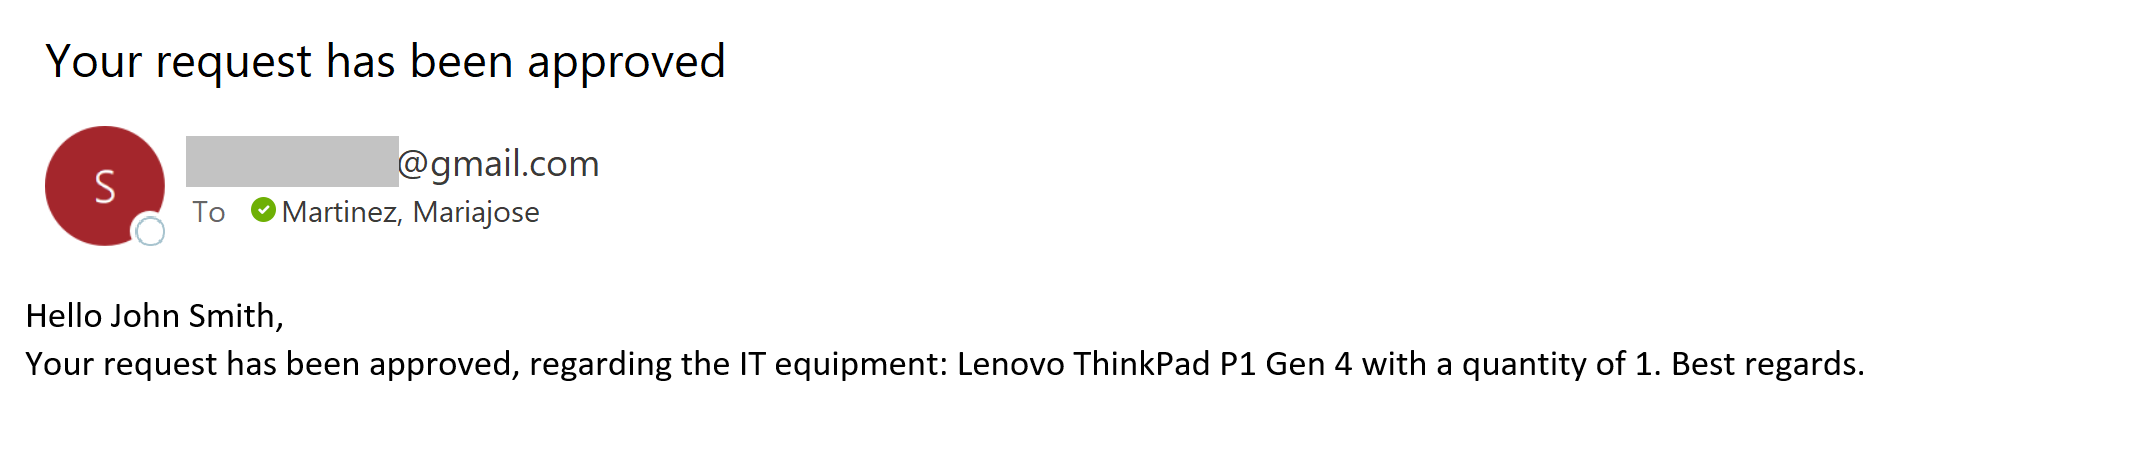
And the email sent:
Great! So it's now time to create the UI5 Fiori Module.
Right click the mta.yaml file and let's add the UI Fiori Application module.
Select SAPUI5 Freestyle and a blank one "SAP UI5 Application".
Select "None" for Data Source, as for this quick exercise we are not going get data from a data source.
Click next and give a name to your app main view and click next:
Give your UI5 module a name, a description and a namespace (if you want):
Let's use the new Fiori look and feel. Select Yes on "Configure Advanced options" and select "SAP Horizon" as the theme.
Click next and leave Cloud Foundry as the runtime to deploy the application and click Finish.
You will see in the mta.ymal file that the configuration from the UI5 application is already added.
First with the view, here we're going to see some of the LCNC capabilities SAP Business Application Studio offers.
Right click the main view and open it using the Layout Editor.
Insert a Vertical Box container (VBox) and align its content to the "Center":
Add three input values and change their Element IDs to:
And Placeholders to:
Now add a button and change its text to "Send your request":
And select the type "Emphasized", just to improve the look and feel of the application:
If you see the generated XML code (Code Editor), it will be like this:
Erase the "values" as these are going to be typed by the user (this can also be done in the Layout Editor):
Let's add a logic to the button before binding the input values and creating the press-button function in the Controller.
Add to the Button item - > press="pressButton" to indicate the action to call the function in the controller. Like this:
Now, let's go to the controller and add the full logic (later we're going to set up the authentication and app router), here:
We are going to create a function "pressButton" as we called it in the XML Button's action. And inside the function we are going to:
Get your Workflow ID. You can see it in the "Monitor Workflows, Definitions" tile. This is necessary to appoint the Workflow Instance call to the right Workflow ID.
Get your UI5 App Module ID from the manifest.json file, it’s the same as the name you put to your module. This is necessary to appoint the Workflow Instance call with the right UI5 application module.
Go back to the Controller and paste the following code of the pressButton function. Remember to change your UI5 module application IDs and Workflow IDs.
You should see your code, like this:
Remember to change your UI5 module application IDs and Workflow IDs (highlighted in green and blue).
Big thanks to Juan Pablo Meouchi that quickly helped me to correctly configure the scenario consumption.
Now, let's add the route for the Workflow API. This is done in the xs-app.json file. Add this object:
Like this:
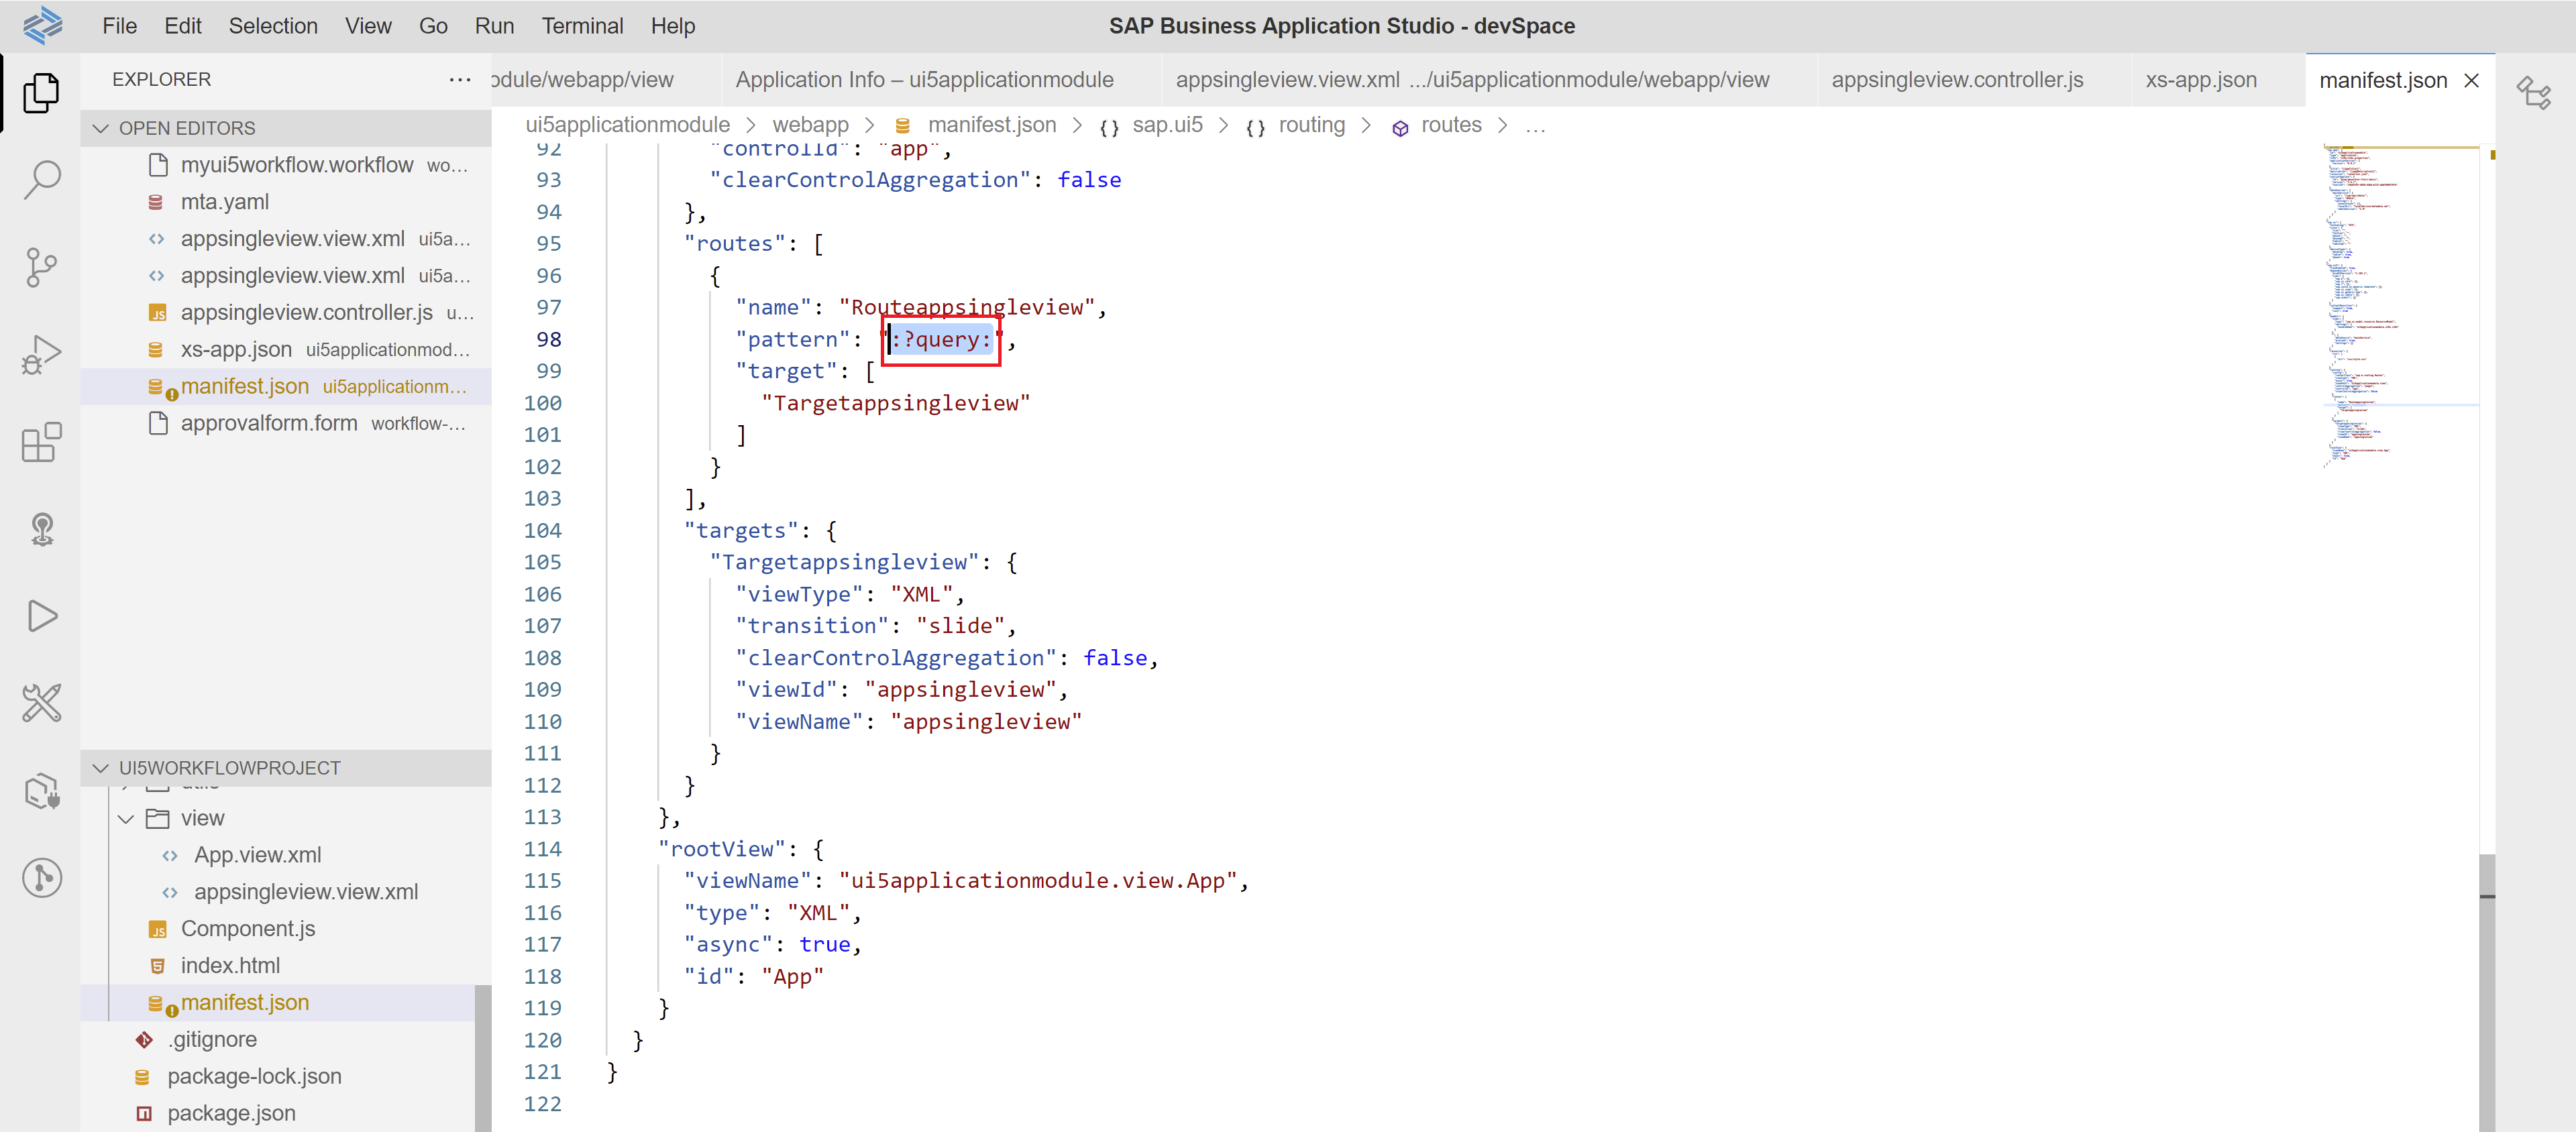
Now let's make sure in the manifest.json file, that the pattern inside the routes object is empty. If it appears :?query, erase it. It could cause issues when calling the Workflow Instance from the UI5 application. Why? Because the navigation is direct, it goes from the app controller to the view. If we do not remove the ":?query" it won't navigate directly from the app controller to the view.
It should look like this:
Now, let's add the AppRouter to the MTA project.
Right click again in the mta.yaml file of the project and click on "Create MTA Module from Template", then select "Approuter Configuration":
Select it as a Standalone Approuter as we are creating a standalone application, and leave the following answers as "Yes", as we're adding authentication and a UI5 application.
Note: we would select "Managed" if this application already exists to use in the Launchpad, for example. However, both Standalone and Managed applications can be added to the Launchpad Service.
Now we already have an updated version of our mta.yaml file.
However, I have tried building the MTA with this auto generated file and tried to deploy it, but it kept generating an BadRequest error when trying to upload the application content "app-host". Like this one:
If this happens to you, follow this next steps to fix the mta.yaml file.
What I needed to do in other to make this exercise to work, was to remove that app-content auto-generated module in the mta.yaml file.
Now in the "-approuter" module, you need to add as requirements the workflow service and the destination service.
Auto-generated is like this:
And now by adding the workflow service and destination service:
It should look like this:
This is important to let the Approuter know that we are also considering the workflow service in the entire application, to trigger Workflow instances.
Now inside the same Approuter module and its required destination service, we need the following:
It should look like this:
Now for the "ui_deployer" module, we need to add the build-parameters.
The auto.generated looks like this:
And by adding the required build-parameters configuration:
The .zip artifact is going to be the UI5 application module name you created.
It should look like this:
Now, its time to check the resources enlisted:
Erase the "service-name" in the repo_host resource and change the name from "ui5workflowproject-repo-host" to using underscore as it is declared in the original code as a module name "ui5workflowproject_html_repo_host":
Looking like this:
Your whole mta.yaml code should look like this:
Right click in the mta.yaml file to build it.
After the build is successful, right click the .mtar file to deploy it:
[
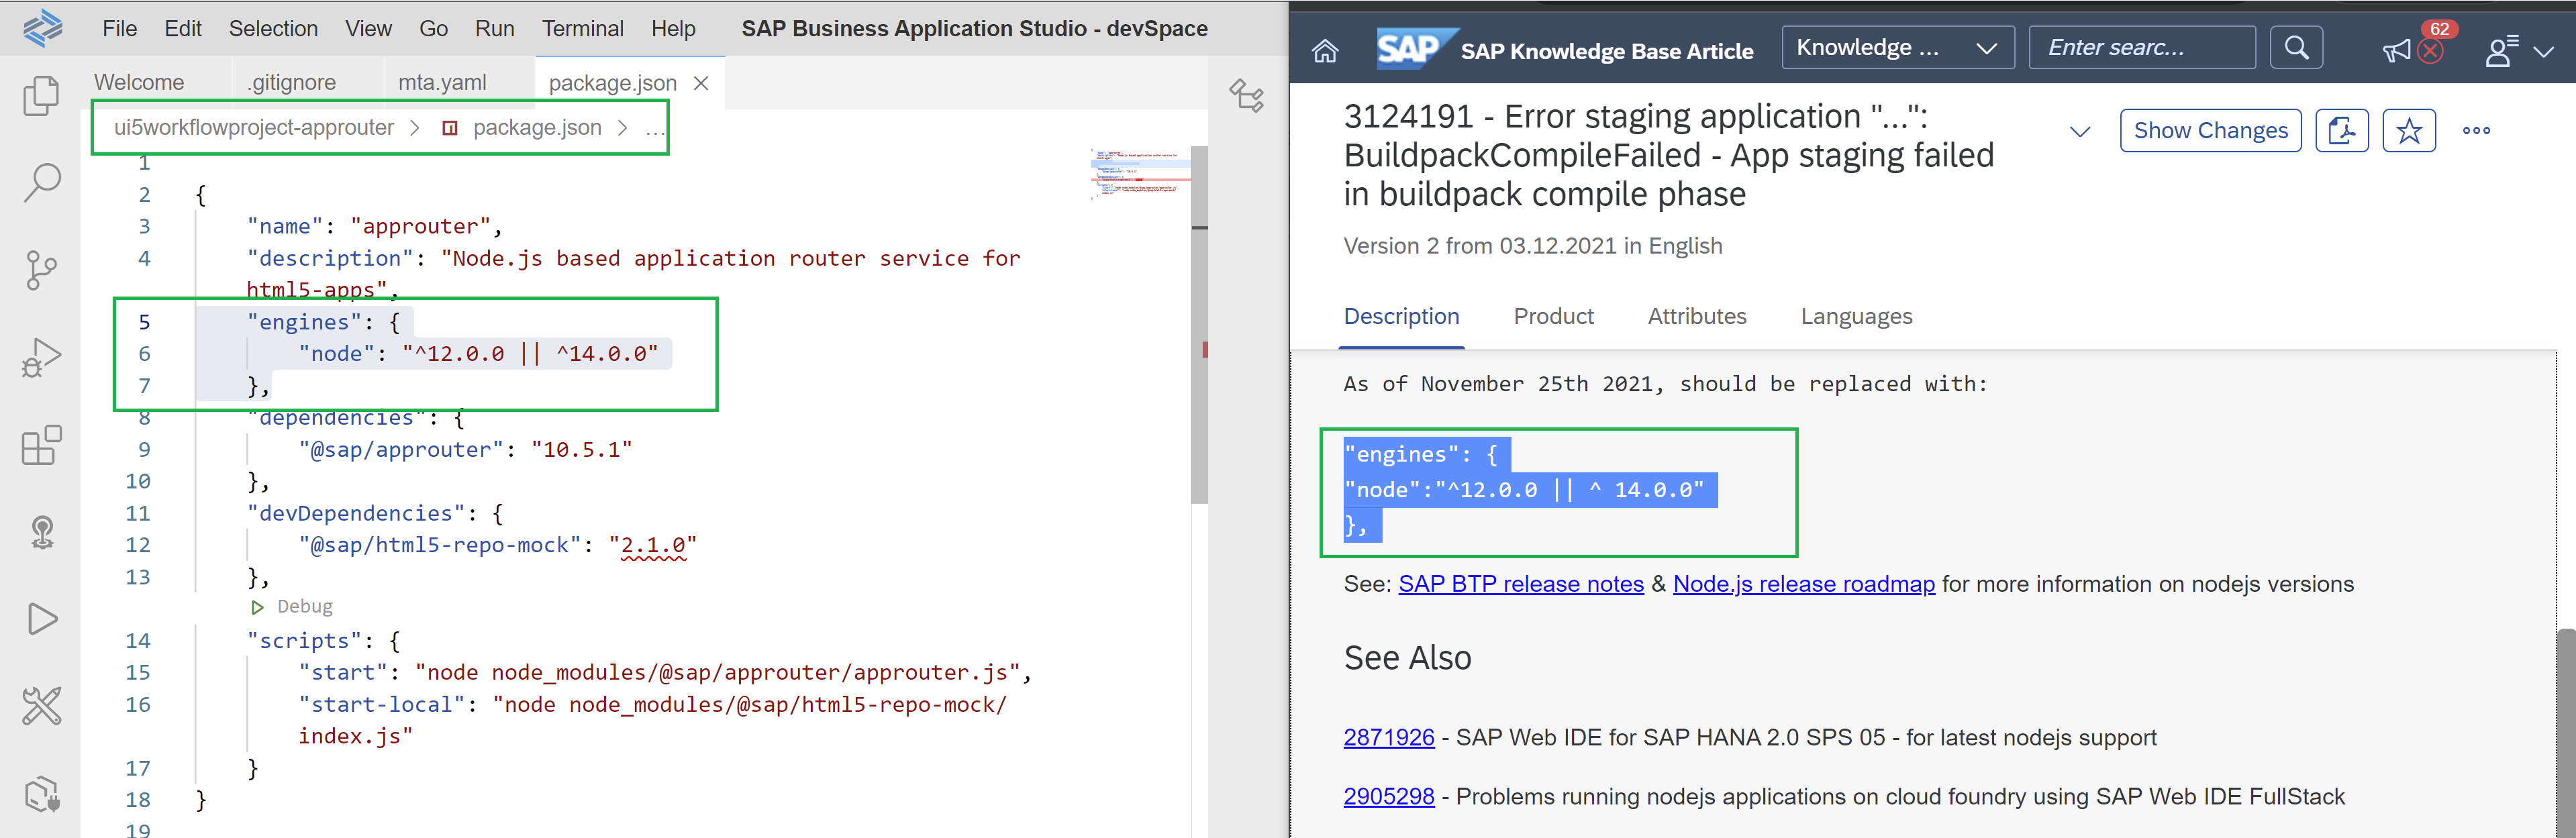
Note: If you get this error while deploying your MTA, check this SAP Note, is about the required engine Javascript versions.
The fix is simple, just update the engine's versions in the Approuter's Package.json file:
]
Build again the MTA project by right-clicking the mta.yaml file and deploy the .mtar file.
You should see the deployment successful message like this:
Copy the URL of the application router started and available, and add in the path:
As for this exercise I didn't add a namespace, this field inside the URL will be empty.
Testing it with some random values:
Check your Workflow Inbox and let's simulate a rejection and typing a comment:
And email sent with the rejection notification and reason:
Testing it again but now for approving the request:
Approving it:
And email generated:
You have successfully created and deployed a Multitarget application, including three software modules to consume a workflow service, for approving requests, from an UI5 custom application. Plus you have discovered a new Fiori look and feel theme "SAP Horizon" using advanced options while creating the application from a template, and leverage Low-Code/No-Code capabilities that SAP Business Application Studio offers.
Are you interested in getting to use more Low-Code/No-Code capabilities with SAP BTP?
To learn more about SAP BTP, see the learning journey Discover SAP Business Technology Platform, a great introduction to BTP and the Intelligent Enterprise strategy to see what it’s all about for free. Discover BTP, LCNC plus much more free learning at SAP Learning site.
Are you interested in developing your own UI5 applications and starting a workflow instance from them? You can follow this quick exercise using your SAP Business Technology Platform trial account. Please bear in mind that now we have more capabilities for Low-Code/No-Code (LCNC) which you can use leveraging SAP Process Automation and its forms (if you're interested, check out these awesome and quick video tutorials) to quickly conduct a similar use case as I'm presenting to you here with SAPUI5 and Workflow Management. However, I wanted to quickly document how can you do it leveraging LCNC capabilities with SAP Business Application Studio as well.
Prerequisites:
- You have a SAP BTP trial account (or productive one). If you don’t have an account, it is recommended to start using the several SAP BTP Free-Tier services available, this tutorial can help you. If you want to use the “regular” trial account, create one by registering here.
- You have initiated the Workflow Management booster. You can follow this great blog post from archana.shukla to complete this task.
Let's create the Multitarget Application (MTA)
An advantage of creating a MTA is that you can consume multiple application modules which shares the same lifecycle for development and deployment for a single application and its purpose.
The benefits can be summarized in 3 aspects (Abstraction, Automation and Assembly). For more information, check out this great blog post from simmaco.ferriero or the documentation here.
For this exercise you'll need to create a MTA with the following modules, I'll put it step by step:
- Workflow Module
- Fiori SAPUI5 Application
- AppRouter Configuration
Open your SAP Business Application Studio, and follow the template to create a Multitarget application.

Click on "Start from template" and select "Basic Multitarget Application"

Enter a name, I named mine "ui5workflowproject" and click finish.

A new workspace will open for you.
Now, inside your ui5workflowproject's mta project, let's add a Workflow module.
Add a Workflow Module into the MTA
As we are going to create a Workflow Module, select this option.

I'll leave the name as the BAS suggests, if you want change the name.

Enter a workflow name and description, for the namespace I left if empty.

Open your .workflow file. Let's add 2 type of tasks for this simple exercise, User task and Mail Task (if you want to add just one to test it, it's fine as well).

For the User Tasks, let's leverage Workflow's form capabilities.

Create a new form file.

Add as many fields to your form as you want. For this exercise I'm simulating an Application for requesting IT equipment. I've added Employee, IT Equipment and Quantity as display-only (as these will come from the UI5 application) and comments for the approval manager to add comments whether he/she agrees to.

Let's add the decisions.

Now, go back to your workflow and add an exclusive gateway and a Mail task.
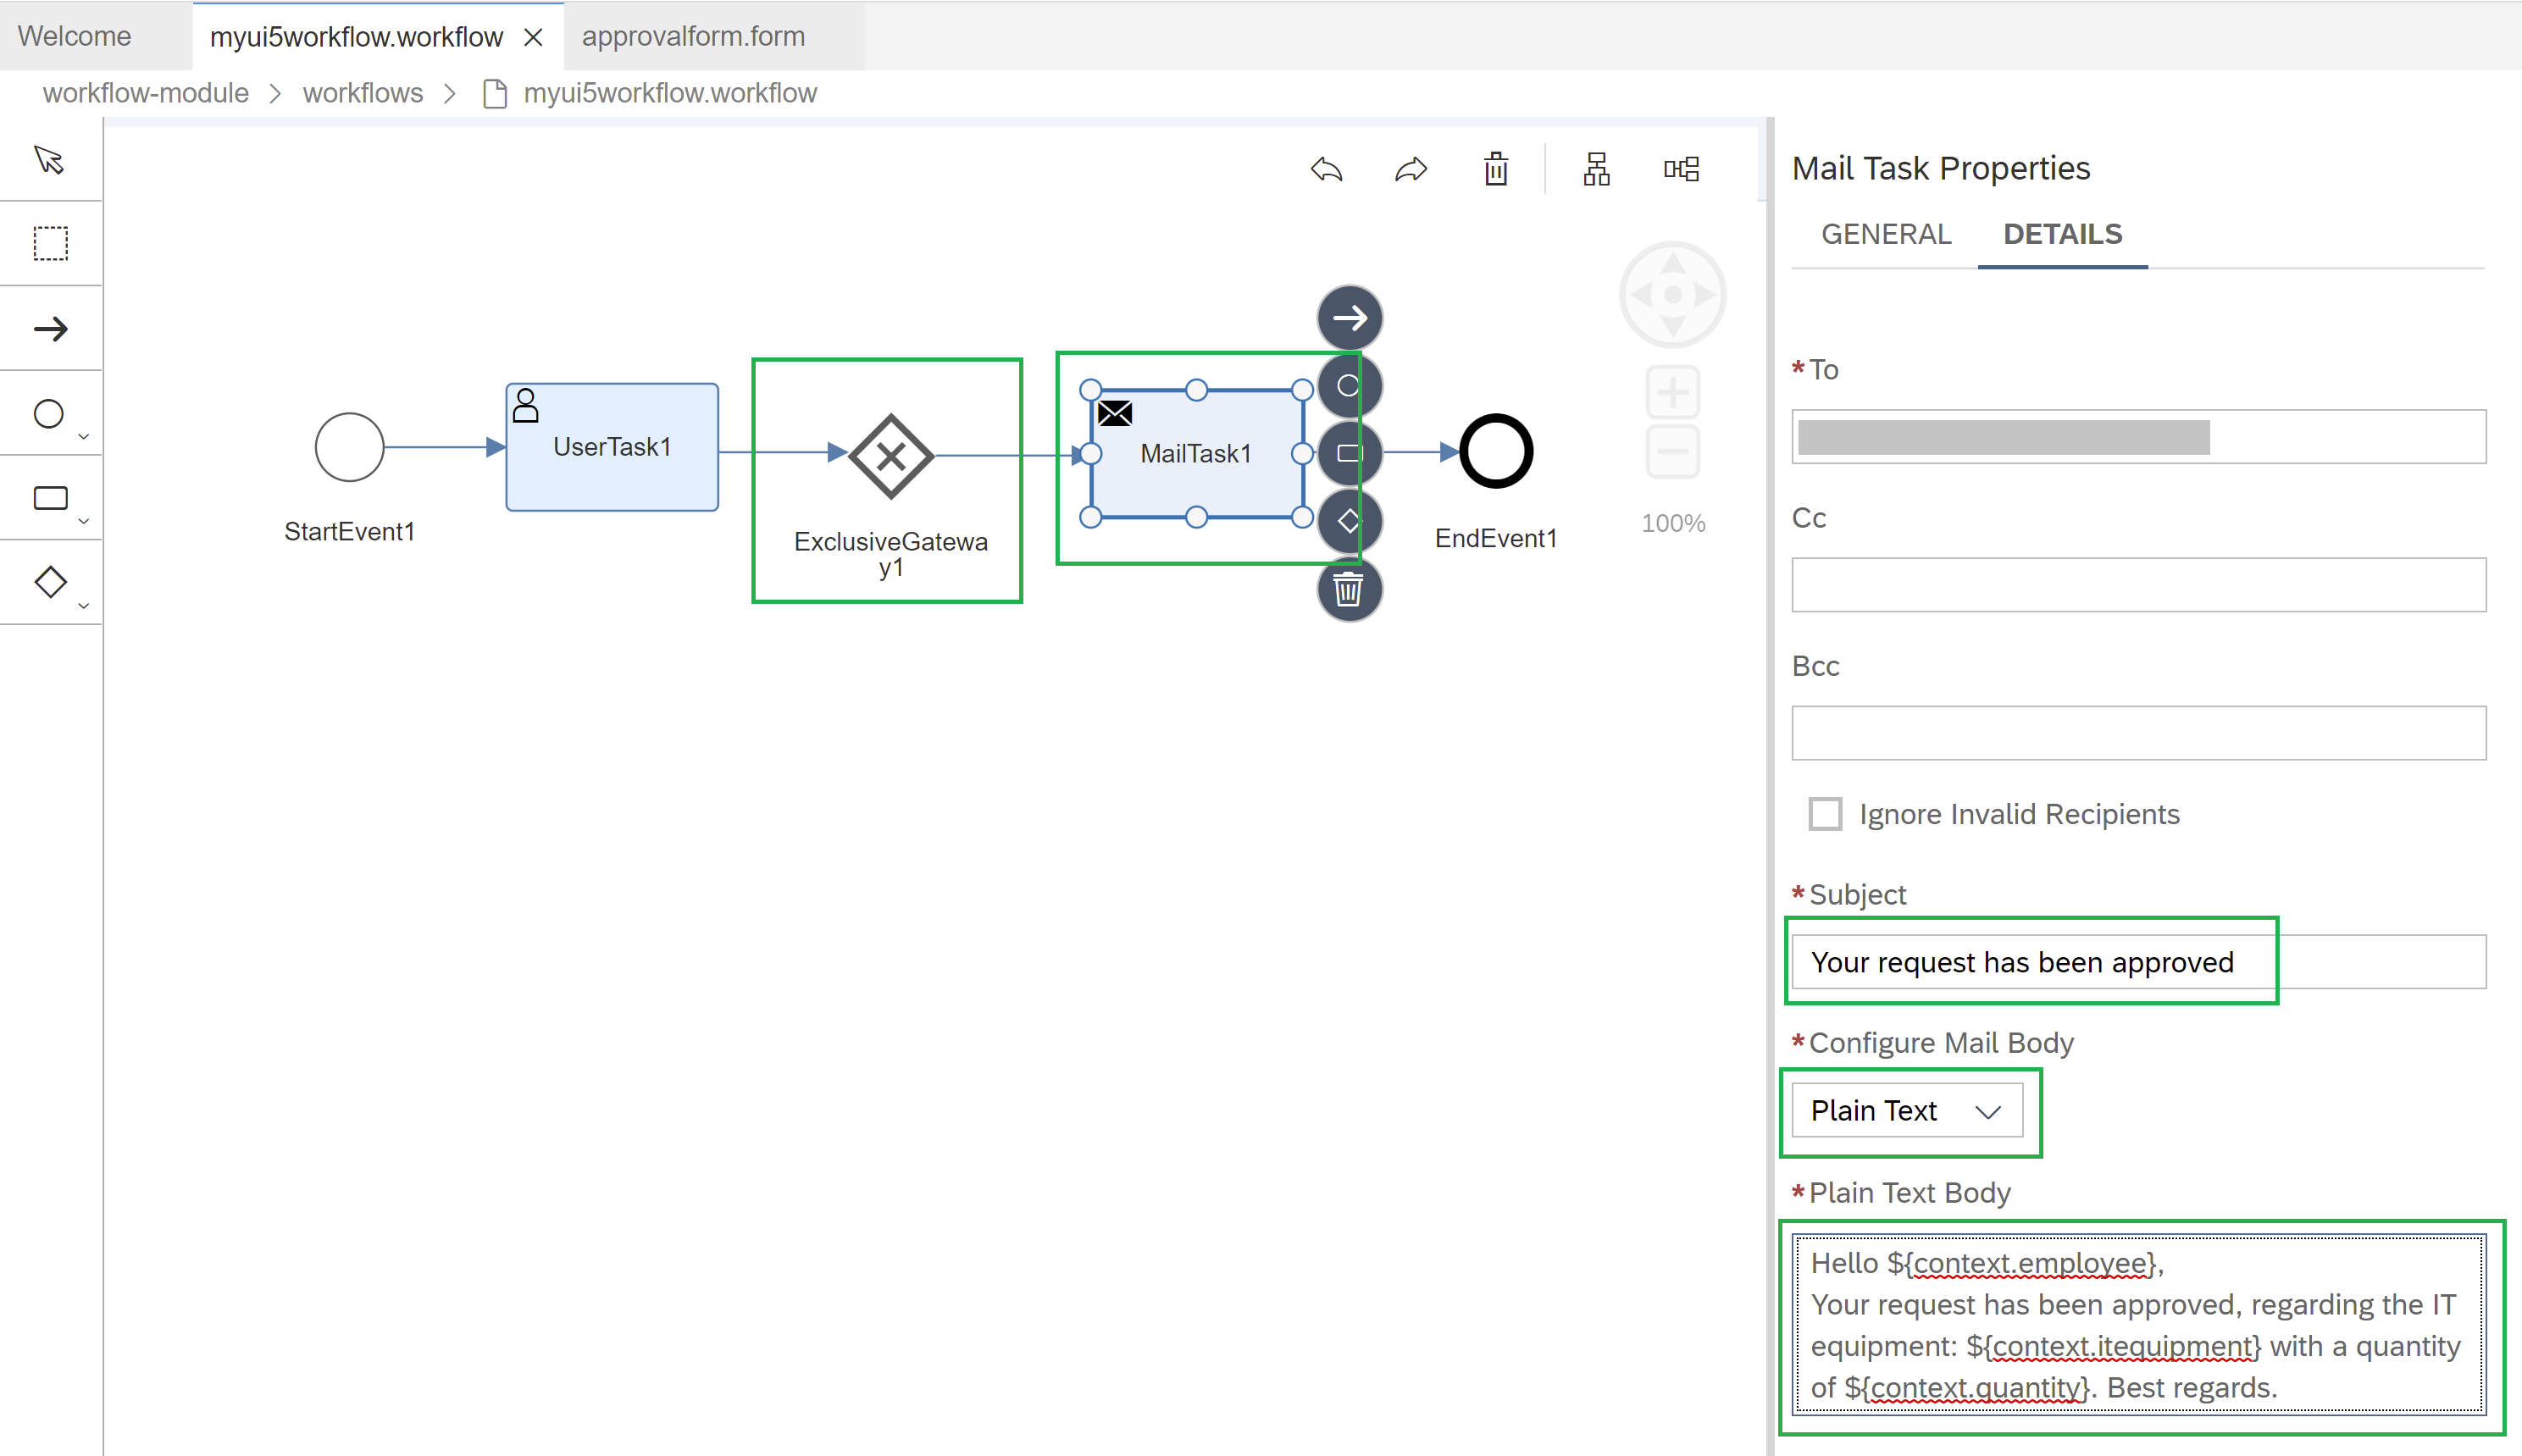
Copy this sample text body for the email notification:
Hello ${context.employee},

Your request has been approved, regarding the IT equipment: ${context.itequipment} with a quantity of ${context.quantity}. Best regards.
Add another mail task for the rejection email notification, and change the name of the exclusive gateway and sequency flow to add consistency. Set as the default sequenceflow the rejection one. For the approved sequence flow, add this condition as shown in the image below:
Add the configuration for the rejected mail task and change the name of the tasks to add consistency.
In the plain text mail body, I've added:
Hello ${context.employee},

Your request has been rejected, regarding the IT equipment: ${context.itequipment} with a quantity of ${context.quantity}. For this reason: ${context.comments}. Best regards.
Let's test the workflow first.
Right click on the mta.yaml and let's build it.

[
If you haven't logged in yet to your Cloud Foundry Environment, you'll need to do it now to be able to deploy your application.


]
After the deployment is done. You'll see a similar message like this one:

Now let's test it.
Open your Fiori Launchpad portal (the one created with the Workflow Management Booster).
Copy this payload to run the test:
{

  "employee": "John Smith",

  "itequipment": "Lenovo ThinkPad P1 Gen 4",

  "quantity": 1

}
Go to your Workflow Definitions tile and start the instance in your Workflow:

Note: If you have configured your SMTP destination with a Gmail account, you will probably get an error if you haven't enabled an App password. Since May 30, 2022, google has disable the "less secure apps" access option, but you can still "enable" it following Google recommendations of setting up the 2-step verification and App Password. This video tutorial from YouTube helped me to do it quickly.
You'll see the task in your Inbox:

Approve it and go back to your Instance's log in the "Monitor Workflow" app tile:

And the email sent:
Great! So it's now time to create the UI5 Fiori Module.
Add a Fiori Application Module into the MTA
Right click the mta.yaml file and let's add the UI Fiori Application module.

Select SAPUI5 Freestyle and a blank one "SAP UI5 Application".

Select "None" for Data Source, as for this quick exercise we are not going get data from a data source.
Click next and give a name to your app main view and click next:

Give your UI5 module a name, a description and a namespace (if you want):

Let's use the new Fiori look and feel. Select Yes on "Configure Advanced options" and select "SAP Horizon" as the theme.

Click next and leave Cloud Foundry as the runtime to deploy the application and click Finish.
You will see in the mta.ymal file that the configuration from the UI5 application is already added.
Let's configure the main view of the UI5 application.
First with the view, here we're going to see some of the LCNC capabilities SAP Business Application Studio offers.
Right click the main view and open it using the Layout Editor.

Insert a Vertical Box container (VBox) and align its content to the "Center":

Add three input values and change their Element IDs to:
- employeeInput
- itequipmentInput
- quantityInput
And Placeholders to:
- Type your name here
- Type your desired IT equipment
- Type your required quantity


Now add a button and change its text to "Send your request":

And select the type "Emphasized", just to improve the look and feel of the application:

If you see the generated XML code (Code Editor), it will be like this:

Erase the "values" as these are going to be typed by the user (this can also be done in the Layout Editor):

Let's add a logic to the button before binding the input values and creating the press-button function in the Controller.
Add to the Button item - > press="pressButton" to indicate the action to call the function in the controller. Like this:

Let's configure the main controller of the UI5 application.
Now, let's go to the controller and add the full logic (later we're going to set up the authentication and app router), here:

We are going to create a function "pressButton" as we called it in the XML Button's action. And inside the function we are going to:
- Create variables to get the input values we set up from the view.
- Create a variable object to pass the payload needed to trigger the Workflow Instance
- Set up the Workflow Instance triggering:
- First, getting the Authentication Token
- Second, requesting the POST call to start the Workflow Instance with its ID and payload.
Get your Workflow ID. You can see it in the "Monitor Workflows, Definitions" tile. This is necessary to appoint the Workflow Instance call to the right Workflow ID.

Get your UI5 App Module ID from the manifest.json file, it’s the same as the name you put to your module. This is necessary to appoint the Workflow Instance call with the right UI5 application module.

Go back to the Controller and paste the following code of the pressButton function. Remember to change your UI5 module application IDs and Workflow IDs.
            pressButton: function () {

                var sEmployee = this.getView().byId("employeeInput").getValue();

                var sITequipment = this.getView().byId("itequipmentInput").getValue();

                var sQuantity = parseInt(this.getView().byId("quantityInput").getValue());


                var startContext = {employee: sEmployee, itequipment: sITequipment, quantity: sQuantity};

                var workflowStartPayload = {definitionId: "myui5workflow", context: startContext}


                $.ajax({

                    url: "/ui5applicationmodule/bpmworkflowruntime/v1/xsrf-token",

                    method: "GET",

                    headers: {

                        "X-CSRF-Token": "Fetch"

                    },

                    success: function (result, xhr, data) {

                        var token = data.getResponseHeader("X-CSRF-Token");

                        if (token === null) return;


                        $.ajax({

                            url: "/ui5applicationmodule/bpmworkflowruntime/v1/workflow-instances",

                            type: "POST",

                            data: JSON.stringify(workflowStartPayload),

                            headers: {

                                "X-CSRF-Token": token,

                                "Content-Type": "application/json"

                            },

                            async: false,

                            success: function (data) {

                                MessageBox.information("The workflow has successfully started");

                            },

                            error: function (data) {


                            }

                        });

                    }

                });


            }
You should see your code, like this:
Remember to change your UI5 module application IDs and Workflow IDs (highlighted in green and blue).

Let's configure the route to consume the Workflow service with the UI5 application.
Big thanks to Juan Pablo Meouchi that quickly helped me to correctly configure the scenario consumption.
Now, let's add the route for the Workflow API. This is done in the xs-app.json file. Add this object:
    {

        "source": "^/bpmworkflowruntime/(.*)$",

        "target": "/$1",

        "service": "com.sap.bpm.workflow",

        "endpoint": "workflow_rest_url",

        "authenticationType": "xsuaa"

    },
Like this:

Now let's make sure in the manifest.json file, that the pattern inside the routes object is empty. If it appears :?query, erase it. It could cause issues when calling the Workflow Instance from the UI5 application. Why? Because the navigation is direct, it goes from the app controller to the view. If we do not remove the ":?query" it won't navigate directly from the app controller to the view.
It should look like this:

Now, let's add the AppRouter to the MTA project.
Add an Approuter Module into the MTA
Right click again in the mta.yaml file of the project and click on "Create MTA Module from Template", then select "Approuter Configuration":

Select it as a Standalone Approuter as we are creating a standalone application, and leave the following answers as "Yes", as we're adding authentication and a UI5 application.
Note: we would select "Managed" if this application already exists to use in the Launchpad, for example. However, both Standalone and Managed applications can be added to the Launchpad Service.

Now we already have an updated version of our mta.yaml file.
However, I have tried building the MTA with this auto generated file and tried to deploy it, but it kept generating an BadRequest error when trying to upload the application content "app-host". Like this one:

If this happens to you, follow this next steps to fix the mta.yaml file.
What I needed to do in other to make this exercise to work, was to remove that app-content auto-generated module in the mta.yaml file.

Now in the "-approuter" module, you need to add as requirements the workflow service and the destination service.
Auto-generated is like this:

And now by adding the workflow service and destination service:
- name: workflow

- name: <your MTA's project name>-destination-service
It should look like this:

This is important to let the Approuter know that we are also considering the workflow service in the entire application, to trigger Workflow instances.
Now inside the same Approuter module and its required destination service, we need the following:
    group: destinations

    properties:

      forwardAuthToken: false

      name: ui5

      url: https://ui5.sap.com
It should look like this:

Now for the "ui_deployer" module, we need to add the build-parameters.
The auto.generated looks like this:

And by adding the required build-parameters configuration:
  build-parameters:

    build-result: resources

    requires:

    - artifacts:

      - ui5applicationmodule.zip

      name: ui5applicationmodule

      target-path: resources/
The .zip artifact is going to be the UI5 application module name you created.
It should look like this:

Now, its time to check the resources enlisted:
Erase the "service-name" in the repo_host resource and change the name from "ui5workflowproject-repo-host" to using underscore as it is declared in the original code as a module name "ui5workflowproject_html_repo_host":

Looking like this:

Your whole mta.yaml code should look like this:
_schema-version: "3.2"

ID: ui5workflowproject

version: 0.0.1

modules:

- name: workflow-module

  type: com.sap.application.content

  path: workflow-module

  requires:

  - name: workflow

    parameters:

      content-target: true

- name: ui5applicationmodule

  type: html5

  path: ui5applicationmodule

  build-parameters:

    build-result: dist

    builder: custom

    commands:

    - npm install

    - npm run build:cf

    supported-platforms: []

- name: ui5workflowproject-approuter

  type: approuter.nodejs

  path: ui5workflowproject-approuter

  requires:

  - name: ui5workflowproject_html_repo_runtime

  - name: uaa_ui5workflowproject

  - name: workflow

  - name: ui5workflowproject-destination-service

    group: destinations

    properties:

      forwardAuthToken: false

      name: ui5

      url: https://ui5.sap.com

  parameters:

    disk-quota: 256M

    memory: 256M

- name: ui5workflowproject_ui_deployer

  type: com.sap.application.content

  path: .

  requires:

  - name: ui5workflowproject_html_repo_host

    parameters:

      content-target: true

  build-parameters:

    build-result: resources

    requires:

    - artifacts:

      - ui5applicationmodule.zip

      name: ui5applicationmodule

      target-path: resources/

resources:

- name: workflow

  type: org.cloudfoundry.managed-service

  parameters:

    service: workflow

    service-plan: lite

- name: ui5workflowproject_html_repo_host

  type: org.cloudfoundry.managed-service

  parameters:

    service: html5-apps-repo

    service-plan: app-host

- name: ui5workflowproject-destination-service

  type: org.cloudfoundry.managed-service

  parameters:

    config:

      HTML5Runtime_enabled: false

      init_data:

        instance:

          destinations:

          - Authentication: NoAuthentication

            Name: ui5

            ProxyType: Internet

            Type: HTTP

            URL: https://ui5.sap.com

          existing_destinations_policy: update

      version: 1.0.0

    service: destination

    service-name: ui5workflowproject-destination-service

    service-plan: lite

- name: ui5workflowproject_html_repo_runtime

  type: org.cloudfoundry.managed-service

  parameters:

    service: html5-apps-repo

    service-plan: app-runtime

- name: uaa_ui5workflowproject

  type: org.cloudfoundry.managed-service

  parameters:

    path: ./xs-security.json

    service: xsuaa

    service-name: ui5workflowproject-xsuaa-service

    service-plan: application

parameters:

  deploy_mode: html5-repo
Now it's time to build the MTA and deploy it
Right click in the mta.yaml file to build it.

After the build is successful, right click the .mtar file to deploy it:

[
Note: If you get this error while deploying your MTA, check this SAP Note, is about the required engine Javascript versions.
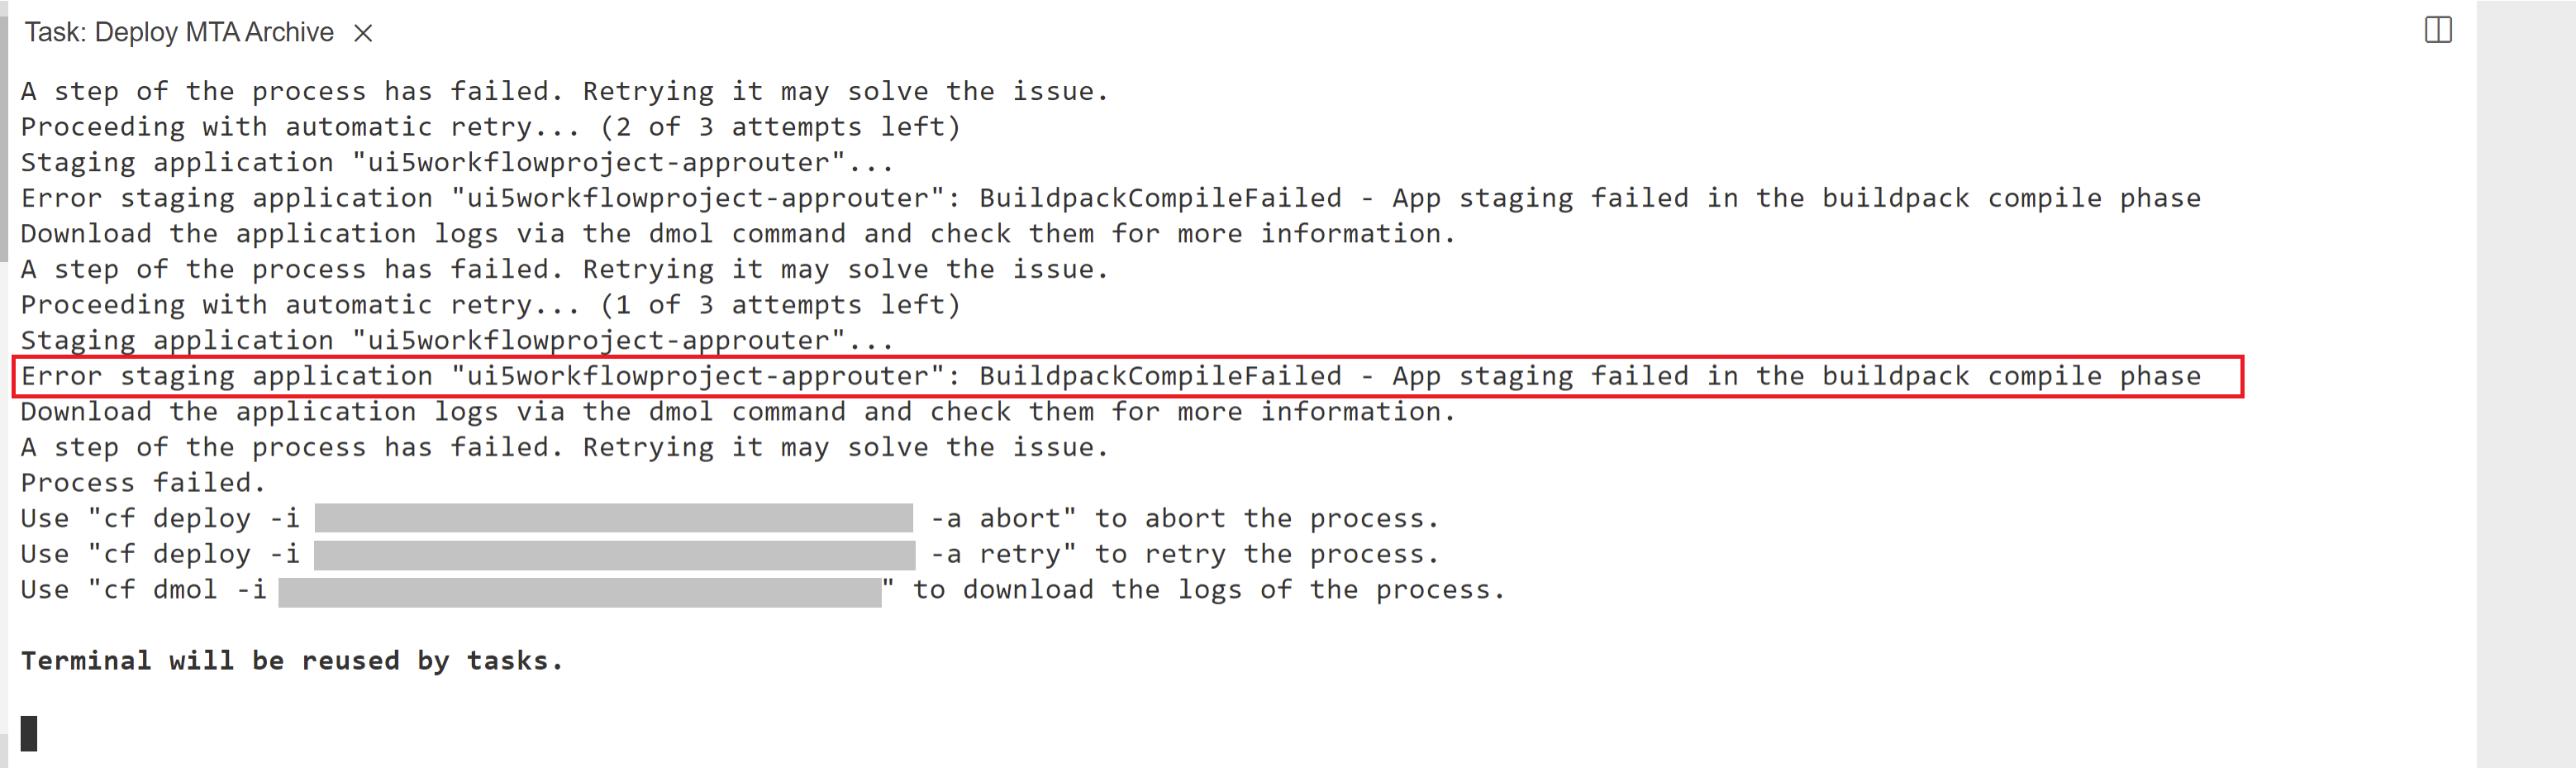
The fix is simple, just update the engine's versions in the Approuter's Package.json file:
]
Build again the MTA project by right-clicking the mta.yaml file and deploy the .mtar file.
You should see the deployment successful message like this:

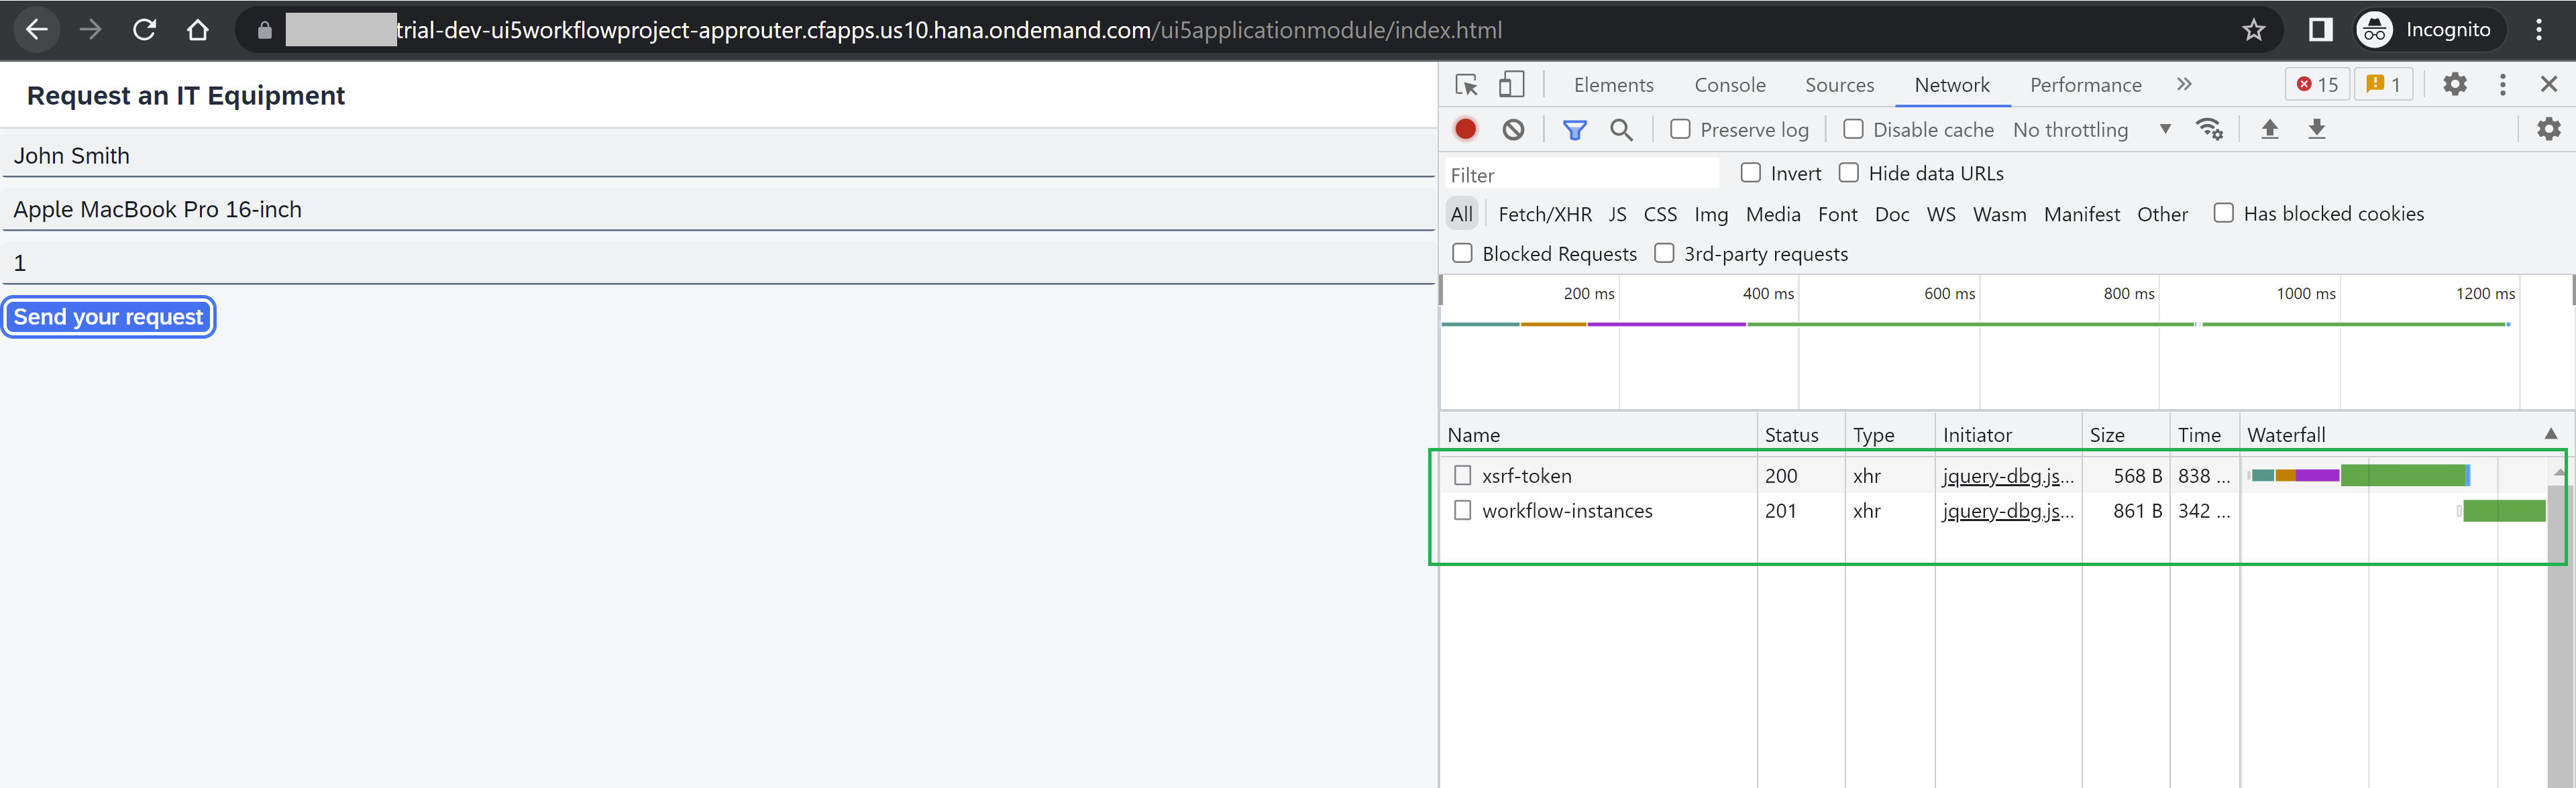
Copy the URL of the application router started and available, and add in the path:
/<your namespace><your UI5 Fiori Application Module name>/index.htmlAs for this exercise I didn't add a namespace, this field inside the URL will be empty.

Let's test the whole MTA project
Testing it with some random values:
Check your Workflow Inbox and let's simulate a rejection and typing a comment:

And email sent with the rejection notification and reason:

Testing it again but now for approving the request:

Approving it:

And email generated:

Conclusions
You have successfully created and deployed a Multitarget application, including three software modules to consume a workflow service, for approving requests, from an UI5 custom application. Plus you have discovered a new Fiori look and feel theme "SAP Horizon" using advanced options while creating the application from a template, and leverage Low-Code/No-Code capabilities that SAP Business Application Studio offers.
Are you interested in getting to use more Low-Code/No-Code capabilities with SAP BTP?
To learn more about SAP BTP, see the learning journey Discover SAP Business Technology Platform, a great introduction to BTP and the Intelligent Enterprise strategy to see what it’s all about for free. Discover BTP, LCNC plus much more free learning at SAP Learning site.
- SAP Managed Tags:
- SAP Business Application Studio,
- SAP Workflow Management,
- SAPUI5
Labels:
15 Comments
You must be a registered user to add a comment. If you've already registered, sign in. Otherwise, register and sign in.
Labels in this area
-
ABAP CDS Views - CDC (Change Data Capture)
2 -
AI
1 -
Analyze Workload Data
1 -
BTP
1 -
Business and IT Integration
2 -
Business application stu
1 -
Business Technology Platform
1 -
Business Trends
1,661 -
Business Trends
91 -
CAP
1 -
cf
1 -
Cloud Foundry
1 -
Confluent
1 -
Customer COE Basics and Fundamentals
1 -
Customer COE Latest and Greatest
3 -
Customer Data Browser app
1 -
Data Analysis Tool
1 -
data migration
1 -
data transfer
1 -
Datasphere
2 -
Event Information
1,400 -
Event Information
66 -
Expert
1 -
Expert Insights
178 -
Expert Insights
293 -
General
1 -
Google cloud
1 -
Google Next'24
1 -
Kafka
1 -
Life at SAP
784 -
Life at SAP
12 -
Migrate your Data App
1 -
MTA
1 -
Network Performance Analysis
1 -
NodeJS
1 -
PDF
1 -
POC
1 -
Product Updates
4,577 -
Product Updates
340 -
Replication Flow
1 -
RisewithSAP
1 -
SAP BTP
1 -
SAP BTP Cloud Foundry
1 -
SAP Cloud ALM
1 -
SAP Cloud Application Programming Model
1 -
SAP Datasphere
2 -
SAP S4HANA Cloud
1 -
SAP S4HANA Migration Cockpit
1 -
Technology Updates
6,886 -
Technology Updates
416 -
Workload Fluctuations
1
Related Content
- What’s new in Mobile development kit client 24.4 in Technology Blogs by SAP
- Validations on 'Apply' in restful ABAP in Technology Q&A
- Lowest SAP ECC version that can be integrated with SAP BTP through Cloud Connector in Technology Q&A
- CAP authentication in Technology Q&A
- NCO 2.0 and UNICODE compatibility in Technology Q&A
Top kudoed authors
| User | Count |
|---|---|
| 30 | |
| 23 | |
| 10 | |
| 7 | |
| 6 | |
| 6 | |
| 5 | |
| 5 | |
| 5 | |
| 4 |