
- SAP Community
- Products and Technology
- Enterprise Resource Planning
- ERP Blogs by Members
- End to End : Step by Step CFL enablement of Custom...
Enterprise Resource Planning Blogs by Members
Gain new perspectives and knowledge about enterprise resource planning in blog posts from community members. Share your own comments and ERP insights today!
Turn on suggestions
Auto-suggest helps you quickly narrow down your search results by suggesting possible matches as you type.
Showing results for
sakshi_sawhney
Participant
Options
- Subscribe to RSS Feed
- Mark as New
- Mark as Read
- Bookmark
- Subscribe
- Printer Friendly Page
- Report Inappropriate Content
08-01-2022
10:22 AM
In the last blog we covered “Introduction - Custom Fields and Logic App capability”.
Here in our case, we have custom fields in EBAN and EKPO.
Let's start with Table: EBAN.
Below are the custom fields we see EBAN Table.
Now as these were created in backend, we have 2 options:
Option 1. Prepare them from the backend (GUI) - Transaction code: SFCD_EUI. This transaction shows the fields that could be enabled to be used in CFL app from the backend.
This transaction also gives additional flexibility to add a custom F4 help if needed on the field when displayed on Fiori App. Fields created from this transaction can only be deleted from the backend transaction SCFD_EUI and not from CFL Fiori App.
Below picture shows the transaction:
Option 2. Create fields directly on Custom Fields and Logic App- These fields are comparatively easy to create and manage but then we won't be able to have a custom F4. These can only be deleted from this App.
For this option you can refer many blogs as well as its readily available there.
To Prepare the custom fields in EBAN - follow below steps :
Step 1. Execute Transaction SCFD_EUI and provide the table name EBAN and run. Next screens show Field status -'Preparation Required' against the custom fields. This means we will have to prepare this field first. You may notice these fields are part of CI_EBANDB structure.

Step 2. Select any one field and click ‘Prepare’ button to get the list of steps to performed. Follow the steps in sequence to avoid any issue while activation. Below is the pop up of steps to be performed in sequence.
Step 3. After following the steps listed in the pop up the structure would look as below image. Within include structure: EBAN_INCL_EEW_PS, create the the append structure and add all the custom fields.
Please note always place custom fields within append structure.


Step 4. Now again go to transaction SCFD_EUI, provide table name as EBAN. We now see Field status as 'Can Be Enabled'. Now click the fields which you would like to enable.
Step 5. Below shows pop up details to be filled at time of Enablement of fields.
a. Text Field Enablement – Provide Semantic Type as ‘Text Field’ for a text field.
b. Field with custom F4 Enablement – Provide Semantic Type as ‘Code List’ and Value Help View as CDS Value Help view created. By click red generate icon seen on pop-up you will get the sample code of the 2 views that need to be created at the background. There are many articles on this topic available. But if further details are needed, please feel free to reach out. In my case this F4 field was for source id , that it is contained the partner systems from which the PR / PO is created.
Step 6. After all custom fields are enabled from backend. Open CFL App from the Fiori Launchpad. You will see these fields are available as below and in ‘Published’ status (green color):
Now 60% of our Task is done 😊
Pending step are custom fields in EKPO and making all these fields visible on the CFL screens. From this step onwards we will work on CFL App on Fiori Launchpad
Step 7. Now we want same fields in Table EKPO as well, for this do not manually create fresh fields again only delete the old custom fields in CI_EKPODB and CI_EKPODBX and activate structures.
Step 8. Now for creation of fields, we just need to do an additional step on CFL app. Activate Business Scenario, so that same fields are available in EKPO Table.
Step 9. After Step 8, we will start seeing 2 fields one for PR and other for PO, all the PO custom fields will be visible under Business Context – ‘Procurement: Purchasing Document Item’
Step 10. For all the PR custom fields, go to UI and Reports Tab and ‘Enable Usage’ of Purchase Requisition GUI and click on Publish
PR Fields

Below screenshot shows how custom fields appear on Standard Transactions Purchase Requisition after enabling:

Step 11. For all the PO custom fields, go to UI and Reports Tab and ‘Enable Usage’ of Purchase Order GUI and click on Publish
Below Screenshot shows, how fields appear in PO screen.
How the F4 looks when the fields are enabled for the GUI: For F4 functionality multiple blogs are already available and can be referred, so not touching that topic here. However, if requested can create a new post detailing the same.
Limitations of CFL fields:
So now we know about how to enable existing custom fields in standard table as custom fields and publish them to the GUI. We also have identified the limitations we see so far. However we do hope to get features added in upcoming releases as its still evolving.
Hope , it was helpful. Suggestions and questions are welcome !! 😊
Next Blog: How to publish the custom fields on Standard Fiori App.
Here we will see - "How to prepare and enable your existing custom fields in tables EBAN and EKPO and show on GUI ? "
Here in our case, we have custom fields in EBAN and EKPO.
Let's start with Table: EBAN.
Below are the custom fields we see EBAN Table.

CI_EBANDB - Custom Fields
Now as these were created in backend, we have 2 options:
Option 1. Prepare them from the backend (GUI) - Transaction code: SFCD_EUI. This transaction shows the fields that could be enabled to be used in CFL app from the backend.
This transaction also gives additional flexibility to add a custom F4 help if needed on the field when displayed on Fiori App. Fields created from this transaction can only be deleted from the backend transaction SCFD_EUI and not from CFL Fiori App.
Below picture shows the transaction:
Option 2. Create fields directly on Custom Fields and Logic App- These fields are comparatively easy to create and manage but then we won't be able to have a custom F4. These can only be deleted from this App.
For this option you can refer many blogs as well as its readily available there.
We will go with Option 1 for 2 reasons listed below:
- We do not want custom field names to be changed, as when we create via CFL app it also adds Suffix based on Business Context maintained in standard settings.
- We have custom F4 fields in our scenario.
To Prepare the custom fields in EBAN - follow below steps :
Step 1. Execute Transaction SCFD_EUI and provide the table name EBAN and run. Next screens show Field status -'Preparation Required' against the custom fields. This means we will have to prepare this field first. You may notice these fields are part of CI_EBANDB structure.
Step 2. Select any one field and click ‘Prepare’ button to get the list of steps to performed. Follow the steps in sequence to avoid any issue while activation. Below is the pop up of steps to be performed in sequence.

Step 3. After following the steps listed in the pop up the structure would look as below image. Within include structure: EBAN_INCL_EEW_PS, create the the append structure and add all the custom fields.
Please note always place custom fields within append structure.
Step 4. Now again go to transaction SCFD_EUI, provide table name as EBAN. We now see Field status as 'Can Be Enabled'. Now click the fields which you would like to enable.

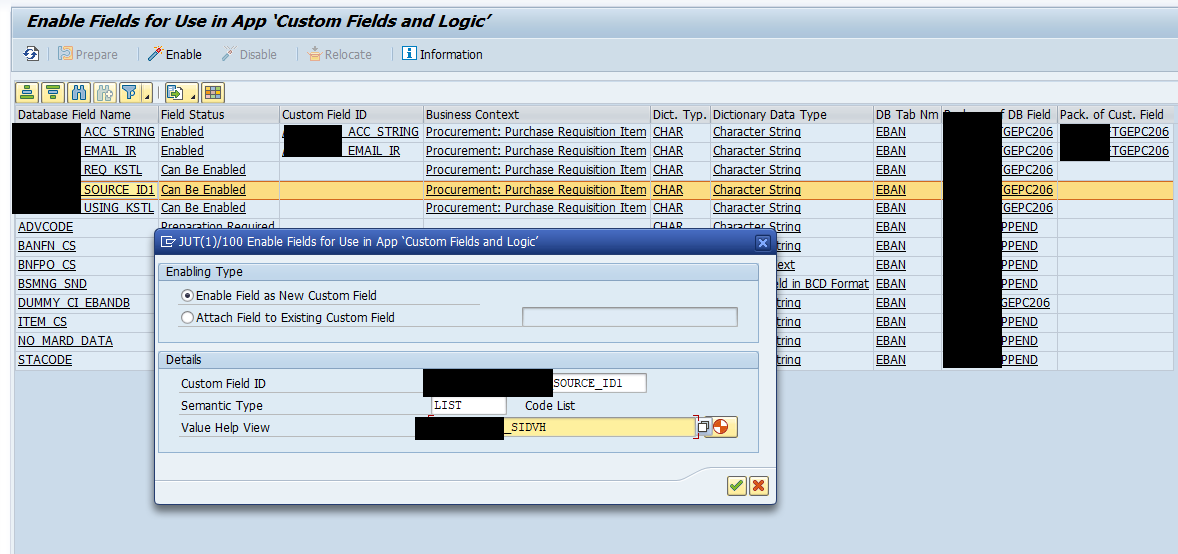
Step 5. Below shows pop up details to be filled at time of Enablement of fields.
a. Text Field Enablement – Provide Semantic Type as ‘Text Field’ for a text field.

b. Field with custom F4 Enablement – Provide Semantic Type as ‘Code List’ and Value Help View as CDS Value Help view created. By click red generate icon seen on pop-up you will get the sample code of the 2 views that need to be created at the background. There are many articles on this topic available. But if further details are needed, please feel free to reach out. In my case this F4 field was for source id , that it is contained the partner systems from which the PR / PO is created.
Step 6. After all custom fields are enabled from backend. Open CFL App from the Fiori Launchpad. You will see these fields are available as below and in ‘Published’ status (green color):

Custom Fields Enabled from SCFD_EUI
Now 60% of our Task is done 😊
Pending step are custom fields in EKPO and making all these fields visible on the CFL screens. From this step onwards we will work on CFL App on Fiori Launchpad
Step 7. Now we want same fields in Table EKPO as well, for this do not manually create fresh fields again only delete the old custom fields in CI_EKPODB and CI_EKPODBX and activate structures.
Step 8. Now for creation of fields, we just need to do an additional step on CFL app. Activate Business Scenario, so that same fields are available in EKPO Table.
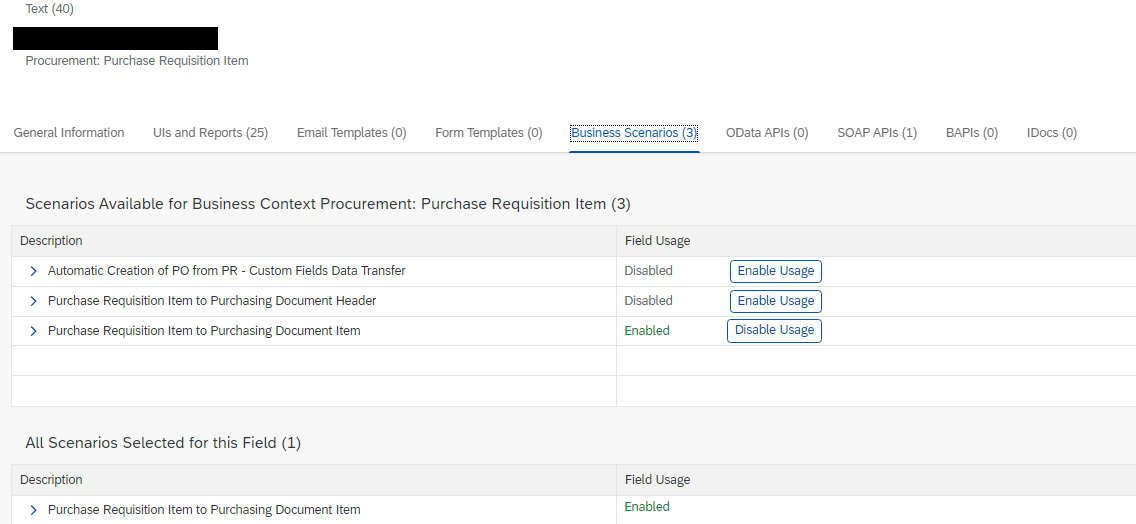
Step 9. After Step 8, we will start seeing 2 fields one for PR and other for PO, all the PO custom fields will be visible under Business Context – ‘Procurement: Purchasing Document Item’

Step 10. For all the PR custom fields, go to UI and Reports Tab and ‘Enable Usage’ of Purchase Requisition GUI and click on Publish
PR Fields
Available under UI and Reports Tab
Below screenshot shows how custom fields appear on Standard Transactions Purchase Requisition after enabling:
Transaction - ME53N Item Details
Step 11. For all the PO custom fields, go to UI and Reports Tab and ‘Enable Usage’ of Purchase Order GUI and click on Publish

Available under UI and Reports Tab
Below Screenshot shows, how fields appear in PO screen.

Transaction - ME23N Item Details
How the F4 looks when the fields are enabled for the GUI: For F4 functionality multiple blogs are already available and can be referred, so not touching that topic here. However, if requested can create a new post detailing the same.

F4 on the custom field
Limitations of CFL fields:
- No control of the Screen layout or screen visibility where Custom Fields are displayed on GUI like we had for custom field displayed on custom screen.
- The tab where custom fields are displayed is displayed as ‘Custom Fields’, this can’t be renamed.
- The fields get displayed in sequence we publish them on the GUI.
So now we know about how to enable existing custom fields in standard table as custom fields and publish them to the GUI. We also have identified the limitations we see so far. However we do hope to get features added in upcoming releases as its still evolving.
Hope , it was helpful. Suggestions and questions are welcome !! 😊
Next Blog: How to publish the custom fields on Standard Fiori App.
- SAP Managed Tags:
- ABAP Development,
- ABAP Extensibility,
- SAP Fiori for SAP S/4HANA,
- SAP S/4HANA
You must be a registered user to add a comment. If you've already registered, sign in. Otherwise, register and sign in.
Labels in this area
-
"mm02"
1 -
A_PurchaseOrderItem additional fields
1 -
ABAP
1 -
ABAP Extensibility
1 -
ACCOSTRATE
1 -
ACDOCP
1 -
Adding your country in SPRO - Project Administration
1 -
Advance Return Management
1 -
AI and RPA in SAP Upgrades
1 -
Approval Workflows
1 -
ARM
1 -
ASN
1 -
Asset Management
1 -
Associations in CDS Views
1 -
auditlog
1 -
Authorization
1 -
Availability date
1 -
Azure Center for SAP Solutions
1 -
AzureSentinel
2 -
Bank
1 -
BAPI_SALESORDER_CREATEFROMDAT2
1 -
BRF+
1 -
BRFPLUS
1 -
Bundled Cloud Services
1 -
business participation
1 -
Business Processes
1 -
CAPM
1 -
Carbon
1 -
Cental Finance
1 -
CFIN
1 -
CFIN Document Splitting
1 -
Cloud ALM
1 -
Cloud Integration
1 -
condition contract management
1 -
Connection - The default connection string cannot be used.
1 -
Custom Table Creation
1 -
Customer Screen in Production Order
1 -
Data Quality Management
1 -
Date required
1 -
Decisions
1 -
desafios4hana
1 -
Developing with SAP Integration Suite
1 -
Direct Outbound Delivery
1 -
DMOVE2S4
1 -
EAM
1 -
EDI
2 -
EDI 850
1 -
EDI 856
1 -
edocument
1 -
EHS Product Structure
1 -
Emergency Access Management
1 -
Energy
1 -
EPC
1 -
Financial Operations
1 -
Find
1 -
FINSSKF
1 -
Fiori
1 -
Flexible Workflow
1 -
Gas
1 -
Gen AI enabled SAP Upgrades
1 -
General
1 -
generate_xlsx_file
1 -
Getting Started
1 -
HomogeneousDMO
1 -
IDOC
2 -
Integration
1 -
Learning Content
2 -
LogicApps
2 -
low touchproject
1 -
Maintenance
1 -
management
1 -
Material creation
1 -
Material Management
1 -
MD04
1 -
MD61
1 -
methodology
1 -
Microsoft
2 -
MicrosoftSentinel
2 -
Migration
1 -
MRP
1 -
MS Teams
2 -
MT940
1 -
Newcomer
1 -
Notifications
1 -
Oil
1 -
open connectors
1 -
Order Change Log
1 -
ORDERS
2 -
OSS Note 390635
1 -
outbound delivery
1 -
outsourcing
1 -
PCE
1 -
Permit to Work
1 -
PIR Consumption Mode
1 -
PIR's
1 -
PIRs
1 -
PIRs Consumption
1 -
PIRs Reduction
1 -
Plan Independent Requirement
1 -
Premium Plus
1 -
pricing
1 -
Primavera P6
1 -
Process Excellence
1 -
Process Management
1 -
Process Order Change Log
1 -
Process purchase requisitions
1 -
Product Information
1 -
Production Order Change Log
1 -
Purchase requisition
1 -
Purchasing Lead Time
1 -
Redwood for SAP Job execution Setup
1 -
RISE with SAP
1 -
RisewithSAP
1 -
Rizing
1 -
S4 Cost Center Planning
1 -
S4 HANA
1 -
S4HANA
3 -
Sales and Distribution
1 -
Sales Commission
1 -
sales order
1 -
SAP
2 -
SAP Best Practices
1 -
SAP Build
1 -
SAP Build apps
1 -
SAP Cloud ALM
1 -
SAP Data Quality Management
1 -
SAP Maintenance resource scheduling
2 -
SAP Note 390635
1 -
SAP S4HANA
2 -
SAP S4HANA Cloud private edition
1 -
SAP Upgrade Automation
1 -
SAP WCM
1 -
SAP Work Clearance Management
1 -
Schedule Agreement
1 -
SDM
1 -
security
2 -
Settlement Management
1 -
soar
2 -
SSIS
1 -
SU01
1 -
SUM2.0SP17
1 -
SUMDMO
1 -
Teams
2 -
User Administration
1 -
User Participation
1 -
Utilities
1 -
va01
1 -
vendor
1 -
vl01n
1 -
vl02n
1 -
WCM
1 -
X12 850
1 -
xlsx_file_abap
1 -
YTD|MTD|QTD in CDs views using Date Function
1
- « Previous
- Next »
Related Content
- Advance Return Management complete configuration(SAP ARM) in Enterprise Resource Planning Blogs by Members
- How to add custom field to production order output in Enterprise Resource Planning Q&A
- Screen selection field of a Query program went missing upon modification of Infoset. in Enterprise Resource Planning Q&A
- Add "Start Date" & "End Date" fields in Customer Statement Form in Enterprise Resource Planning Q&A
- Building Low Code Extensions with Key User Extensibility in SAP S/4HANA and SAP Build in Enterprise Resource Planning Blogs by SAP
Top kudoed authors
| User | Count |
|---|---|
| 6 | |
| 2 | |
| 2 | |
| 2 | |
| 2 | |
| 2 | |
| 2 | |
| 1 | |
| 1 | |
| 1 |