
- SAP Community
- Products and Technology
- Enterprise Resource Planning
- ERP Blogs by SAP
- Instant Payments in Brazil (PIX) in SAP S/4HANA Cl...
Enterprise Resource Planning Blogs by SAP
Get insights and updates about cloud ERP and RISE with SAP, SAP S/4HANA and SAP S/4HANA Cloud, and more enterprise management capabilities with SAP blog posts.
Turn on suggestions
Auto-suggest helps you quickly narrow down your search results by suggesting possible matches as you type.
Showing results for
Advisor
Options
- Subscribe to RSS Feed
- Mark as New
- Mark as Read
- Bookmark
- Subscribe
- Printer Friendly Page
- Report Inappropriate Content
07-22-2022
10:33 AM
Instant payments represent a new arrangement within the Brazilian financial system that allows 24/7 transactions in real-time between different institutions without the need for intermediaries such as card schemes, acquirers, or issuers. This blog post helps you understand the individual functionalities and solutions regarding Brazilian Instant Payments in SAP S/4 HANA Cloud.
This blog is divided into 2 parts:
After you purchased any goods or services, the supplier sends you the invoice that contains a QR code information with the PIX link and the transaction ID which you need during the payment process.
The following process explains to you the steps of configuring the system and the PIX data transfer from the master data through document posting and payment run to the payment media. When you create the payment media, the system fills out segments J and J52 PIX or segments A and B with the PIX key in the payment file, depending on how you enter the PIX keys for document posting.
Create a technical bank in the Manage Banks app. To maintain multiple aliases, each entry needs the complete key filled out in database tables Customer Master (Bank Details) (KNBK table) and Vendor Master (Bank Details) (LFBK table).

Examples of regular expression used for validation:
Define the alias type and the payment system in the business partner master data in the Manage Business Partner Master Data app.
You can also assign the alias type, payment system, and the alias itself to the business partner in the Maintain Business Partner app.
There are two types of payment that can be performed via posting of supplier invoices:
When the company receives the PIX invoice with QR code, the payment is done via CNAB 240 with segments J and J52PIX. The information from the QR Code must be stored in the Supplier Invoice and then read during payment media creation.
To enter QR Code information, select the button Pix Info.
In the pop-up window, you can enter either:
The payment method for outgoing payments must have the following parameters:
After the bank executes the payment according to the information in the payment file, it sends back a return file. The return file contains payment confirmation or rejection data. To clear the relevant data, you need to import the received return file into your system.
When the system processes the Confirmation Return File, it clears the Bill of Exchange Payment Request and the invoice.
Rejection Return File contains up to five rejection error codes that explain the reason of the rejection. To upload the file, open the Manage Incoming Payment Files app and choose Import. In the File Type field, choose Bank Statement, and in the Format field, select the CNAB240 Payment Format (BRAZIL). Upload the file you received from the bank and choose Process.
When you sell any goods or services, you execute a payment run and send the payment data in a payment file (in format CNAB750) to the bank or payment system to request a dynamic or use a static QR code. The payment system generates a QR code and sends the data back to you. You print the invoice containing the QR code and send it to your customer.
Unique transaction IDs are generated automatically containing the company code, document number, and year. The transaction ID is inserted in the incoming payment file (BR_FEBRABAN_750) that you send to the bank. The transaction ID is mandatory in the case of dynamic QR codes. As soon as the payment is completed, you receive the payment status information from the bank.
The following process explains how to configure the system.
Assign the relevant ISPB code to Company Code and House Bank in the view Assign ISPB Codes to Bank Codes configuration activity in settings for Payment Formats.
To display or print the received QR code in the invoice, you must first set up correspondence by assigning a correspondence program and variant to your company code.
In Display Correspondence History app, you can display the PDF Form with QR Code.
No special handling is needed. When you post customer invoices, use the payment method you created with the payment medium format BR_FEBRABAN_750.
The payment method for incoming payment must have the following parameters:
You can do the changes to the payment method in the configuration activity Set Up Payment Methods for Each Country/Reg.
Execute the payment run for customer invoice with incoming payment method for format BR_FEBRABAN_750 in the App Manage Automatic Payments.
After you have executed payment run, Bill-of-Exchange (BoE) payment request is created and updated in the customer invoice.
After the bank executes the payment according to the information in the payment file, it sends back a return file. The return file contains payment confirmation or rejection data. To clear the relevant data, you need to import the received return file into your system.
When the system processes the Confirmation Return File, it clears the Bill of Exchange Payment Request and the invoice.
Rejection Return File contains up to five rejection error codes that explain the reason of the rejection. To upload the file, open the Manage Incoming Payment Files app and choose Import. In the File Type field, choose Bank Statement, and in the Format field, select the FEBRABAN CNAB 750 (BRAZIL) format. Upload the file you received from the bank and choose Process.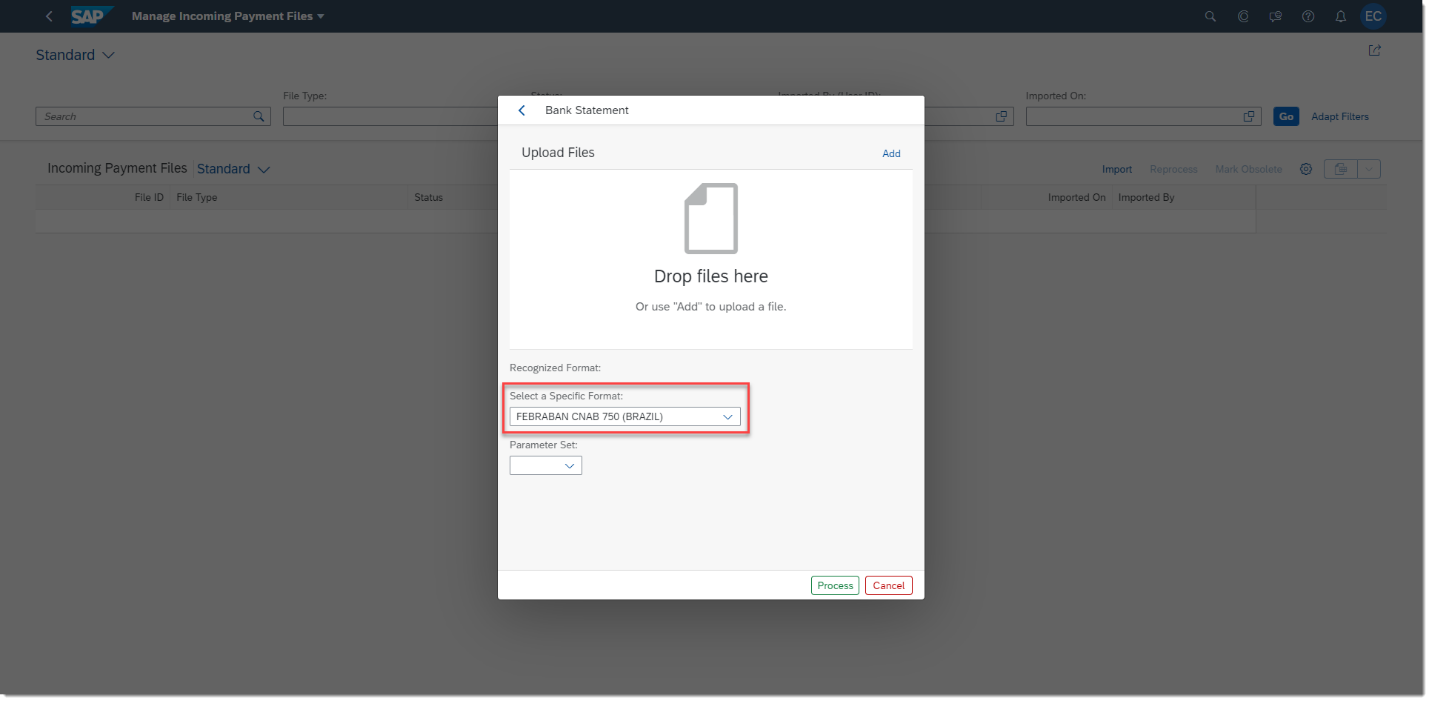
The error codes are displayed in the Memo Line of the Bank Statement Item.
Do you have any further comments regarding this topic? Do not hesitate to share them in the comment section below. You are also welcome to ask any questions about SAP S4/HANA Finance in the Community Q&A section.
This blog is divided into 2 parts:
Accounts Payable
After you purchased any goods or services, the supplier sends you the invoice that contains a QR code information with the PIX link and the transaction ID which you need during the payment process.
The following process explains to you the steps of configuring the system and the PIX data transfer from the master data through document posting and payment run to the payment media. When you create the payment media, the system fills out segments J and J52 PIX or segments A and B with the PIX key in the payment file, depending on how you enter the PIX keys for document posting.
Bank Master Data
Create a technical bank in the Manage Banks app. To maintain multiple aliases, each entry needs the complete key filled out in database tables Customer Master (Bank Details) (KNBK table) and Vendor Master (Bank Details) (LFBK table).
- Enter the bank country/region, which is the same as the payment system country.
- Choose a bank key, the bank number, and a bank name.
- Choose Payment System as the bank category.

Define Alias Types
To define Alias types, go to Configure your solution in Manage Your Solution App. Look for the configuration activity Define Alias Types for Bank Accounts in the settings related to Bank Account Alias.
This configuration activity allows you to define possible Alias types, description, and validation routine as regular expression.
It is required to have the Alias Types named in this way to work with PMW format BR_FEBRABAN_A.
Examples of regular expression used for validation:
- Email with limited length to 77: ^(?=.{6,77}$)\w+(\.\w+)*@(\w+\.)+(\w{2,4})
- Any string of length 32 characters: ^[0-9a-fA-F]{8}-?[0-9a-fA-F]{4}-?[0-9a-fA-F]{4}-?[0-9a-fA-F]{4}-?[0-9a-fA-F]{12}
- Phone: ([0,+]{0,1}\s*[0-9]{2,3})?\s*\(?[0-9]{2}\)?\s*[0-9]{4,5}[- ]*[0-9]{4}
Define Payment System
To define payment system, go to configuration activity Define Payment Systems in the settings related to Bank Account Alias.
- Define payment system
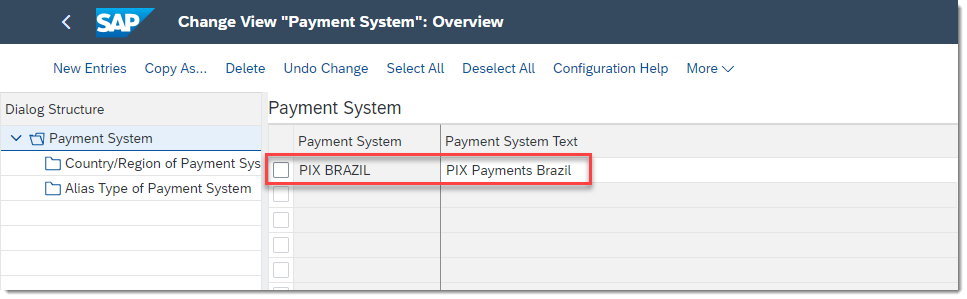
- Define country in which the payment system is valid

- Assign Alias types to payment system

Business Partner Master Data
Define the alias type and the payment system in the business partner master data in the Manage Business Partner Master Data app.
On the Bank Accounts tab, click on Create.
Click on the Details arrow and on the Bank Information tab, enter the payment system, the alias type, and the alias itself, which can be, for example, the e-mail address of the business partner. Save your entries.
You can also assign the alias type, payment system, and the alias itself to the business partner in the Maintain Business Partner app.
Open the relevant business partner data and on the Payment Transactions tab, choose the Alias button. In the popup window, enter the payment system, the alias type, and the alias itself, which can be, for example, the e-mail address of the business partner.
Posting Supplier Invoice
There are two types of payment that can be performed via posting of supplier invoices:
1. PIX Transfer (PIX key defined by Partner Bank Type)
In this scenario, the proper PIX key used for the payment is defined by the Partner Bank Type (BSEG-BVTYP).
In the Part. bank type popup window, you choose the relevant partner bank type that already contains the PIX key.
2. QR code information received via incoming invoice
When the company receives the PIX invoice with QR code, the payment is done via CNAB 240 with segments J and J52PIX. The information from the QR Code must be stored in the Supplier Invoice and then read during payment media creation.
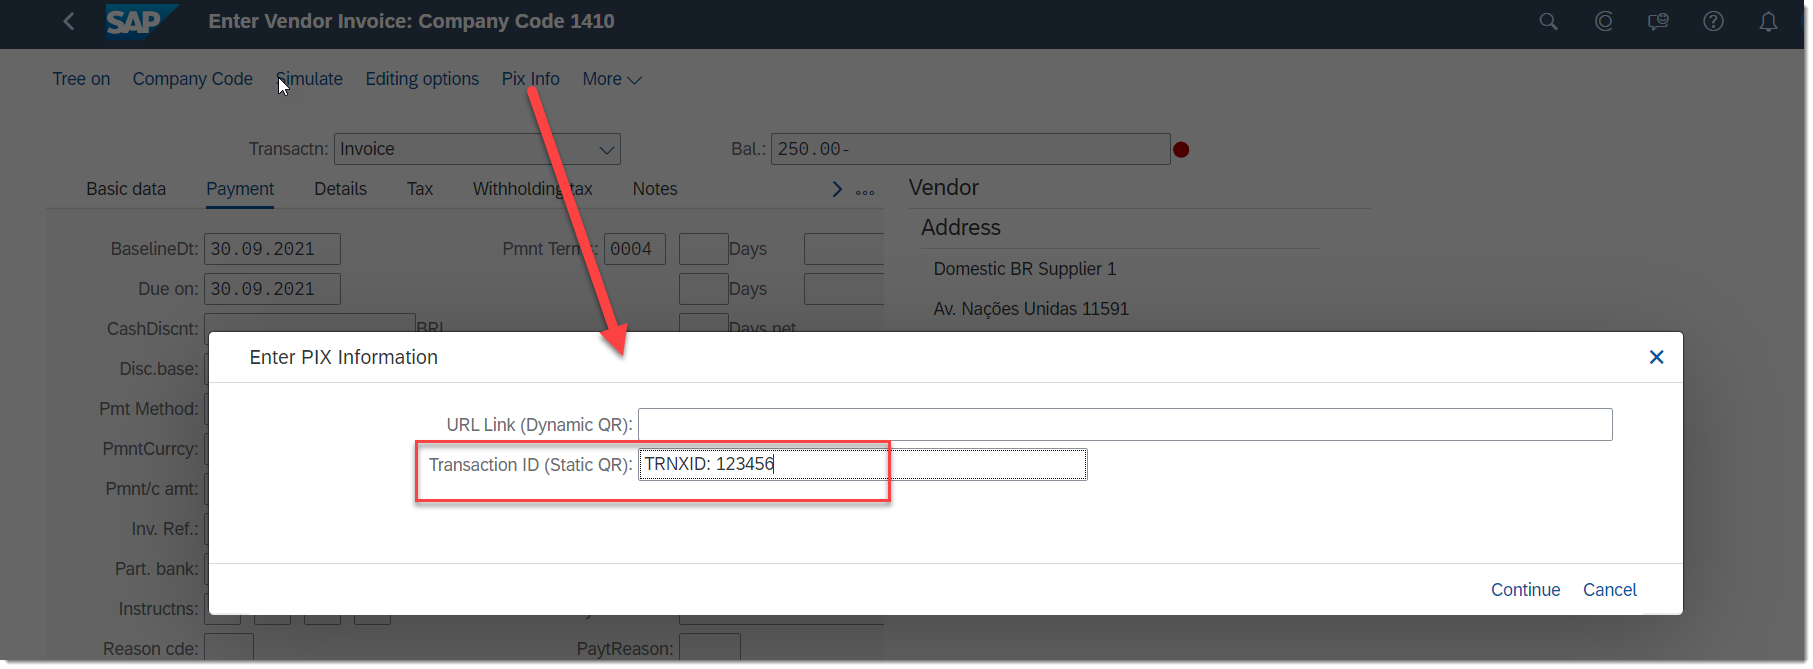
To enter QR Code information, select the button Pix Info.
In the pop-up window, you can enter either:
- the URL Link (Dynamic QR) – 77-character long string
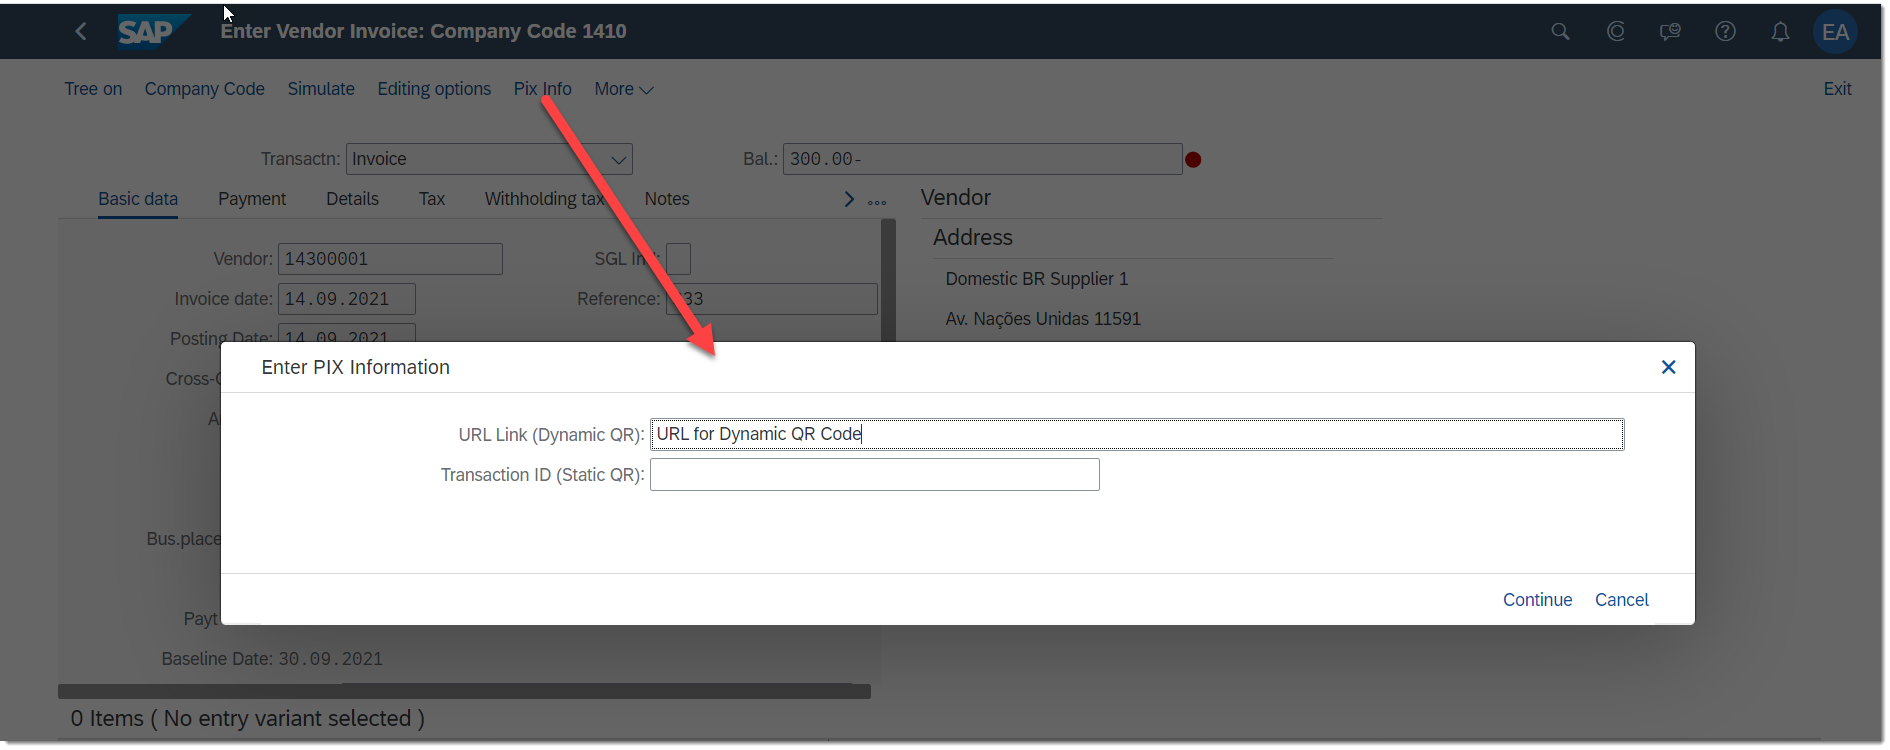
- or the Transaction ID (Static QR) – up to 35-character long string, and select PIX key via Partner Bank Type Field

Adding QR Code to an Existing Invoice
It is also possible to add PIX URL or Transaction ID to an existing invoice. You can do so in Manage Journal Entries App by clicking on the invoice and selecting Manage Additional Payment Attributes where you can enter the relevant value.

Payment Method for Outgoing Payments
The payment method for outgoing payments must have the following parameters:
| Payment method for | Outgoing Payments |
| Payment method classification | Bank transfer |
| Required master record specifications | Bank details (Alias Required) |
| Payment medium | Format: BR_FEBRABAN_A |
| Format Supplement: PIX |
You can do the changes to the payment method in the configuration activity Set Up Payment Methods for Each Country/Reg.
It is also necessary to assign the permitted payment system for Payment Method.
CNAB240 Return File Processing
After the bank executes the payment according to the information in the payment file, it sends back a return file. The return file contains payment confirmation or rejection data. To clear the relevant data, you need to import the received return file into your system.
Confirmation Return File
Confirmation Return File contains payment confirmation. To upload the file, open the Manage Incoming Payment Files app and choose Import. In the File Type field, choose Bank Statement, and in the Format field, select the CNAB240 Payment Format (BRAZIL). Upload the file you received from the bank and choose Process.
When the system processes the Confirmation Return File, it clears the Bill of Exchange Payment Request and the invoice.
Rejection Return File
Rejection Return File contains up to five rejection error codes that explain the reason of the rejection. To upload the file, open the Manage Incoming Payment Files app and choose Import. In the File Type field, choose Bank Statement, and in the Format field, select the CNAB240 Payment Format (BRAZIL). Upload the file you received from the bank and choose Process.
The error codes are displayed in the Memo Line of the Bank Statement Item.
Error codes are maintained in the configuration activity Error Codes in settings for Electronic Bank Statement.

Accounts Receivable
When you sell any goods or services, you execute a payment run and send the payment data in a payment file (in format CNAB750) to the bank or payment system to request a dynamic or use a static QR code. The payment system generates a QR code and sends the data back to you. You print the invoice containing the QR code and send it to your customer.
Unique transaction IDs are generated automatically containing the company code, document number, and year. The transaction ID is inserted in the incoming payment file (BR_FEBRABAN_750) that you send to the bank. The transaction ID is mandatory in the case of dynamic QR codes. As soon as the payment is completed, you receive the payment status information from the bank.
The following process explains how to configure the system.
House Bank Master Data
Assign your PIX key as an alternative bank account in your house bank master data using the Manage Bank Accounts app. The PIX Key for the relevant House Bank Account can be maintained in the field Alternative Bank Account Number on the House Bank Account Data screen.

Assign ISPB Code for House Bank
Assign the relevant ISPB code to Company Code and House Bank in the view Assign ISPB Codes to Bank Codes configuration activity in settings for Payment Formats.


Correspondence Setup
To display or print the received QR code in the invoice, you must first set up correspondence by assigning a correspondence program and variant to your company code.
- Add Correspondence SAPBR in the configuration activity Define Variants for Correspondence Types.

- Add Identifier SAPBR in the configuration activity Assign Labels and Company Codes to Correspondence Type Variants

- Assign form template FIN_FO_CORR_INTDOC_PIX_BR to application object FFO_CORR_INTDOC in the Assign Form Templates configuration activity.


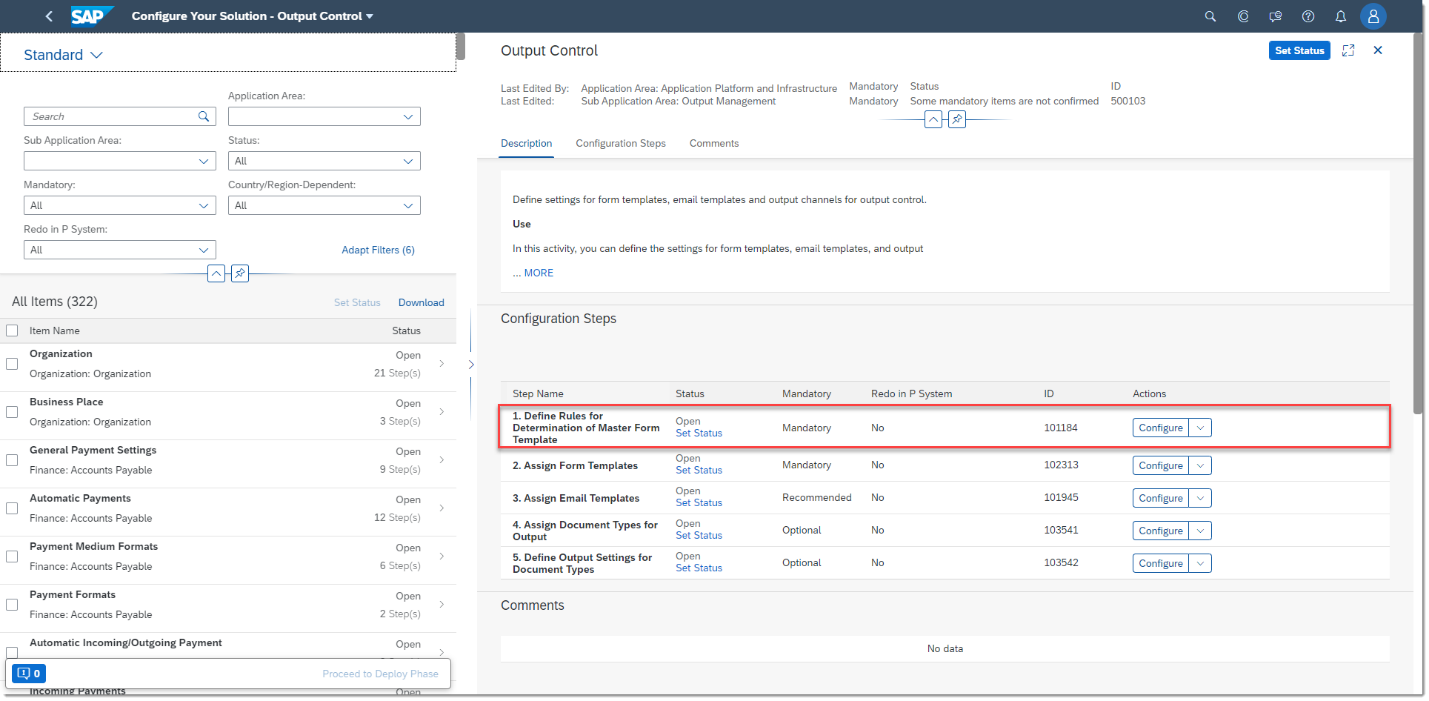
- Maintain Form Derivation Rule ID FORM_MASTER_BR_PIX in configuration activity Define Rules for Determination of Master Form Template

QR Code Form Output
In Display Correspondence History app, you can display the PDF Form with QR Code.

Posting Customer Invoice
No special handling is needed. When you post customer invoices, use the payment method you created with the payment medium format BR_FEBRABAN_750.
Payment Method for Incoming Payments
The payment method for incoming payment must have the following parameters:
| Payment method for | Incoming Payments |
| Payment method classification | Bill/exch.pyt.req |
| Posting details | Value 'R' in the Sp. G/L Ind. B/Ex. B/Ex.Pmt.Req field |
| Payment medium | Format: BR_FEBRABAN_750 |
You can do the changes to the payment method in the configuration activity Set Up Payment Methods for Each Country/Reg.

Payment Media Creation for DMEE Payment Format CNAB750
Execute the payment run for customer invoice with incoming payment method for format BR_FEBRABAN_750 in the App Manage Automatic Payments.
After you have executed payment run, Bill-of-Exchange (BoE) payment request is created and updated in the customer invoice.
CNAB750 Return File Processing
After the bank executes the payment according to the information in the payment file, it sends back a return file. The return file contains payment confirmation or rejection data. To clear the relevant data, you need to import the received return file into your system.
Confirmation Return File
Confirmation Return File contains payment confirmation. To upload the file, open the Manage Incoming Payment Files app and choose Import. In the File Type field, choose Bank Statement, and in the Format field, select the CNAB750 Payment Format (BRAZIL). Upload the file you received from the bank and choose Process.
When the system processes the Confirmation Return File, it clears the Bill of Exchange Payment Request and the invoice.
Rejection Return File
Rejection Return File contains up to five rejection error codes that explain the reason of the rejection. To upload the file, open the Manage Incoming Payment Files app and choose Import. In the File Type field, choose Bank Statement, and in the Format field, select the FEBRABAN CNAB 750 (BRAZIL) format. Upload the file you received from the bank and choose Process.
The error codes are displayed in the Memo Line of the Bank Statement Item.

Error codes are maintained in the configuration activity Error Codes in settings for Electronic Bank Statement.

Do you have any further comments regarding this topic? Do not hesitate to share them in the comment section below. You are also welcome to ask any questions about SAP S4/HANA Finance in the Community Q&A section.
- SAP Managed Tags:
- SAP S/4HANA Finance,
- FIN (Finance),
- FIN Globalization Services,
- SAP S/4HANA Public Cloud
Labels:
2 Comments
You must be a registered user to add a comment. If you've already registered, sign in. Otherwise, register and sign in.
Labels in this area
-
Artificial Intelligence (AI)
1 -
Business Trends
363 -
Business Trends
21 -
Customer COE Basics and Fundamentals
1 -
Digital Transformation with Cloud ERP (DT)
1 -
Event Information
461 -
Event Information
23 -
Expert Insights
114 -
Expert Insights
151 -
General
1 -
Governance and Organization
1 -
Introduction
1 -
Life at SAP
415 -
Life at SAP
2 -
Product Updates
4,686 -
Product Updates
205 -
Roadmap and Strategy
1 -
Technology Updates
1,502 -
Technology Updates
85
Related Content
- What is the API to read Payment media data for bank in S4Hana public cloud? in Enterprise Resource Planning Q&A
- Continuous Influence Session SAP S/4HANA Cloud, private edition: Results Review Cycle for Q4 2023 in Enterprise Resource Planning Blogs by SAP
- SAP S/4HANA Cloud Private Edition | 2023 FPS01 Release – Part 2 in Enterprise Resource Planning Blogs by SAP
- SAP S/4HANA Cloud Private Edition | 2023 FPS01 Release – Part 1 in Enterprise Resource Planning Blogs by SAP
- Localization in SAP S/4HANA Cloud Public Edition 2402 in Enterprise Resource Planning Blogs by SAP
Top kudoed authors
| User | Count |
|---|---|
| 5 | |
| 5 | |
| 4 | |
| 3 | |
| 3 | |
| 3 | |
| 2 | |
| 2 | |
| 2 | |
| 2 |