
- SAP Community
- Products and Technology
- Technology
- Technology Blogs by SAP
- NFT Smart Contract Development - Road to OpenSea (...
Technology Blogs by SAP
Learn how to extend and personalize SAP applications. Follow the SAP technology blog for insights into SAP BTP, ABAP, SAP Analytics Cloud, SAP HANA, and more.
Turn on suggestions
Auto-suggest helps you quickly narrow down your search results by suggesting possible matches as you type.
Showing results for
Advisor
Options
- Subscribe to RSS Feed
- Mark as New
- Mark as Read
- Bookmark
- Subscribe
- Printer Friendly Page
- Report Inappropriate Content
07-18-2022
12:38 PM
In first part of the NFT smart contract development series, I already showed you how to develop a ERC1155 NFT smart contract, how to customize and how to test it. But the most important thing is still missing, the image. That's what this part 2 blogpost is about.
Lets directly jump in.
Currently we are hosting a Customer Engagement Initiative regarding this topic.
Descriptions and especially images are an important aspect of an NFT. It's something you typically want to show. So where is the metadata? Because you have to pay a lot of ether for the memory, it is not embedded in the smart contract. Instead, for metadata concerning the contract as well as for metadata concerning tokens, only uri's are stored in the contract (see figure 1).
As mentioned in the last blogpost the ERC1155 offers the possibility to store a string directly in the constructor. This is useful for us to store the contract level metadata as this is only one value. Then a method called contractURI() has to return this stored string. It is important that this method is called exactly this way, because this is required by the marketplaces.
For the token level metadata we extend our struct and our add function with a parameter, such that each token contains a different link. We also define a method called uri(...) that returns the stored token url. This time, however, the method takes a token id so that we can return a different url for each token.
Another marketplace specific feature is a public string variable called name that stores the name of the contract. This does not require a method to retrieve it, the marketplaces address the variable directly.
With the update of the code it is also recommended to update the tests. These must now also check whether the contract url and the token urls are returned correctly. Since the add method now takes a third parameter, we also need to update the old tests.
As figure 1 has already revealed, the urls stored in the contract initially refer to json documents. These in turn point to images or in the case of animated NFTs to html files. The html files can even contain javascript, since they are executed by OpenSea in a sandboxed iframe. To make the post a bit more exciting we will take care of the html NFTs directly.
So let's create an animated html file that we call token1.html which generates an animated glitching effect on an text. To quickly find cool animations, it is always good visit codepen.
In addition to the token image, you also need an image for the contract, which in the case of OpenSea will later be called a collection. We will just use the same effect but with the word collection (see Figure 3):
Now we come to the json files which describe the properties of a token or a contract. Let's start with the contract level metadata (Files: collection.json). These consist of many properties like a collection name, a description, the link to the collection image, an external website for further token info and royalty information like the cost and the recipient (see OpenSea Wiki).
The token level metadata (token1.json) is similar in structure, but can also have user-defined attributes (see OpenSea Wiki). :
As you can see the json files point to the images/html files. Accordingly, it is necessary to observe an order when uploading, so that the images urls are available. Alternatively you can also work with relative paths and directories. But we will concentrate on the former.
The metadata can be published on any web server, but since the contract itself is stored in a decentralized, immutable manner, it is good practice to store the data on the ipfs file system, which is also distributed.
Although you can host an ipfs node yourself and distribute your data for free, this requires the installation of components and ipfs requires that this file is also pinned by several IPFS nodes. Accordingly, it has become established to use a service for this. An example for this is nft.storage which we will also use in the next step.
After you have registered you can click on Files and upload the images and html files via the gui. After that you can copy the IPFS url and substitute the url in the json files. After that you can upload them as well (see Figure 4).
After we have uploaded all the files and linked them together, we can take care of the contract deployment. For this we first use metamask, a browser plugin that can connect us to an ethereum network (chrome, firefox). If you don't already have metamask follow the metamask wizard which pop ups if you click on the fox icon to create an account. Next you can switch to the test network by selecting the rinkeby test network in the drop-down menu at the top (see Figure 5):
To deploy the contract within the testnet, you need ether. While you typically buy them on the mainnet, there are faucets for the rinkeby testnet that simply send you some ether. To name two well-known sites: ChainLink Faucet and rinkebyfaucet. Open one of the Faucets pages, copy your wallet address from metamask and click send to have the ether credited to your account (see Figure 6). This may take some time. Finally you will see an incoming transaction in your metamask window.
Now we can finally switch back to our Remix IDE, select the deployment tab and work with the Injected Web3 Provider. You should then see metamask pop up as the IDE has connected to the plugin. If everything worked as expected the Account field shows your metmask account address.
As in the VM, we can now publish the contract by clicking on "deploy". Since we now have constructor parameters, these must of course be filled in. On the one hand with the name of the contract and on the other hand with the url that points to the contract.json file (see figure 7).
Note that OpenSea has problems to process ipfs:// uris on contract level. Use the http link provided by nft.storage i.e., https://bafkr....c6a.ipfs.nftstorage.link/ here.
Since the transaction costs ether, you will again see a metamask window where you can confirm the transaction.
In the next step, we use our Add method to add a new toke. Here we have to configure the parameters again, among others the IPFS (not http) link that points to our token1.json (see Figure 8). Finally we hit deploy and confirm the metamask transaction. In the example, I set the allowed number of tokens to 1, so it is an NFT:
... And finally we mint this token:
In the last step we can now go to OpenSea Rinkeby to look at our collection and our NFT. Just like with Remix, you can also link OpenSea to your Metamask account so you can see all your NFTs directly. If you are connected you can navigate to your collections (see Figure 10 top right) and select the NFT such that you see all details (see Figure 10). If you click on the collection name above the token name, you will see the collection including the collection image and the description (see Figure 11). As you scroll through the pages you will discover all your defined properties.
Today I showed you how the final steps of the NFT smart contract development look like. For this we gave our contract metadata support, so that the contract itself and each token can reference metadata. Then we looked at an animated NFT based on HTML, assembled the metadata documents and published them on IPFS so that we achieved our final goal of displaying them properly on OpenSea.
I hope I could bring the world of smart contracts and NFTs a bit closer to you! You can download all files here.
Leave a comment if you have any questions or suggestions. To make sure you don’t miss anything on blockchain topics, feel free to follow me.
Lets directly jump in.
Currently we are hosting a Customer Engagement Initiative regarding this topic.
If you are interested read the business perspective blog from my colleagues or to join us directly, please register here.
Add Metadata Support
Descriptions and especially images are an important aspect of an NFT. It's something you typically want to show. So where is the metadata? Because you have to pay a lot of ether for the memory, it is not embedded in the smart contract. Instead, for metadata concerning the contract as well as for metadata concerning tokens, only uri's are stored in the contract (see figure 1).

Figure 1: Overview of Metadata
As mentioned in the last blogpost the ERC1155 offers the possibility to store a string directly in the constructor. This is useful for us to store the contract level metadata as this is only one value. Then a method called contractURI() has to return this stored string. It is important that this method is called exactly this way, because this is required by the marketplaces.
For the token level metadata we extend our struct and our add function with a parameter, such that each token contains a different link. We also define a method called uri(...) that returns the stored token url. This time, however, the method takes a token id so that we can return a different url for each token.
Another marketplace specific feature is a public string variable called name that stores the name of the contract. This does not require a method to retrieve it, the marketplaces address the variable directly.
//SPDX-License-Identifier: UNLICENSED

pragma solidity ^0.8.15;


import "@openzeppelin/contracts/token/ERC1155/ERC1155.sol";

import "@openzeppelin/contracts/access/Ownable.sol";

import "@openzeppelin/contracts/token/ERC1155/extensions/ERC1155Supply.sol";


contract BlogNft is ERC1155, Ownable, ERC1155Supply {

    struct TokenInfo {

        bool exists; // A solidity mapping holds a value for any key. Thus an empty struct is returned if a key actually does not exist. With the flag we make sure that a token really exists.

        uint256 maxAmountAllowed; // Max amount of mintable tokens

        string metadataUrl; // Token specific url

    }


    mapping(uint256 => TokenInfo) tokenInfos; // Mapping from token id to token info

    string public name; // Required by marketplace


    constructor(string memory contractName, string memory contractMetadataUrl) ERC1155(contractMetadataUrl) {

        name = contractName;

    }


    function add(uint256 tokenId, uint256 maxAmountAllowed, string memory metadataUrl) public onlyOwner {

        require(!tokenInfos[tokenId].exists, "Token with given id already exists"); // Ensure we can only add and not override

        tokenInfos[tokenId] = TokenInfo(true, maxAmountAllowed, metadataUrl); // Add token informations for token id

    }


    function mint(uint256 tokenId, uint256 amount) public onlyOwner {

        TokenInfo memory tokenInfo = tokenInfos[tokenId]; // Get token information for token id

        require(tokenInfo.exists, "Token with given id does not exists"); // Ensure token id is allowed to be minted

        uint256 minted = super.totalSupply(tokenId); // Get amount of already minted tokens

        require((minted + amount) <= tokenInfo.maxAmountAllowed, "To many tokens"); // Prevent minting more than allowed

        _mint(msg.sender, tokenId, amount, ""); // Mint token

    }


    function _beforeTokenTransfer(

        address operator,

        address from,

        address to,

        uint256[] memory ids,

        uint256[] memory amounts,

        bytes memory data

    ) internal override(ERC1155, ERC1155Supply) {

        super._beforeTokenTransfer(operator, from, to, ids, amounts, data);

    }


    // Token level metadata

    function uri(uint256 tokenId) public view override returns (string memory) {

        return tokenInfos[tokenId].metadataUrl;

    }


    // Contract level metadata

    function contractURI() public view returns (string memory) {

        return super.uri(0);

    }

}
Updating Tests
With the update of the code it is also recommended to update the tests. These must now also check whether the contract url and the token urls are returned correctly. Since the add method now takes a third parameter, we also need to update the old tests.
const { expect } = require("chai");

const { ethers } = require("hardhat");


describe("BlogNft", function () {

  let contract = null;  // Contract

  let ownerUser = null; // Owner of the contract

  let otherUser = null; // Some other user


  beforeEach(async function() {

    // Get interacting ether account

    [ownerUser, otherUser] = await ethers.getSigners();

    // Load factory for our contract

    const contractFactory = await ethers.getContractFactory("BlogNft");

    // Deploy the contract using the

    const contractName = "MyContract";

    const contractLevelMetadataUrl = "https://myUrl.sap"

    contract = await contractFactory.deploy(contractName, contractLevelMetadataUrl);

    // Ensure it is deployed

    await contract.deployed();

  });


  it("Prevent add token twice", async function () {

    // Add a token that is allowed to be minted

    await contract.connect(ownerUser).add(1, 10, "https://myToken.sap");

    // Ensure the same request would be reverted

    await expect(contract.connect(ownerUser).add(1, 10, "https://myToken.sap")).to.be.revertedWith('Token with given id already exists');

  });


  it("Add and mint multiple tokens", async function () {

    await contract.connect(ownerUser).add(1, 10, "https://myToken.sap"); // Allow 10 tokens of id 1

    await contract.connect(ownerUser).mint(1, 5); // Mint 5 of id 1

    await contract.connect(ownerUser).add(2, 1, "https://myToken.sap");  // Allow 1 token of id 2

    await contract.connect(ownerUser).mint(2, 1); // Mint 1 of id 2

  });


  it("Ensure mintablity", async function () {

    const tokenId = 1;

    await contract.connect(ownerUser).add(tokenId, 10, "https://myToken.sap");

    await contract.connect(ownerUser).mint(tokenId, 5); // Mint 5

    await expect(await contract.connect(ownerUser).balanceOf(ownerUser.address, tokenId)).to.equal(5);

    await contract.connect(ownerUser).mint(tokenId, 5); // Mint 5 more

    await expect(await contract.connect(ownerUser).balanceOf(ownerUser.address, tokenId)).to.equal(10);

  });


  it("Prevent minting of non existing token", async function () {

    const tokenId = 1;

    await expect(contract.connect(ownerUser).mint(tokenId, 5)).to.be.revertedWith('Token with given id does not exists');

  });


  it("Prevent minting more than allowed", async function () {

    const tokenId = 1;

    await contract.connect(ownerUser).add(tokenId, 10, "https://myToken.sap");

    await expect(contract.connect(ownerUser).mint(tokenId, 10 + 1)).to.be.revertedWith('To many tokens');

  });


  it("Ensure only owner can mint", async function () {

    const tokenId = 1;

    await contract.connect(ownerUser).add(tokenId, 10, "https://myToken.sap");

    await expect(contract.connect(otherUser).mint(tokenId, 10)).to.be.revertedWith('caller is not the owner');

  });


  it("Ensure only owner can add", async function () {

    const tokenId = 1;

    await expect(contract.connect(otherUser).add(tokenId, 10, "https://myToken.sap")).to.be.revertedWith('caller is not the owner');

  });


  it("Ensure contract level metadata url matches", async function () {

    await expect(await contract.connect(ownerUser).contractURI()).to.be.equal('https://myUrl.sap');

  });


  it("Ensure token level metadata url matches", async function () {

    await contract.connect(ownerUser).add(1, 10, "https://myToken1.sap");

    await expect(await contract.connect(ownerUser).uri(1)).to.be.equal('https://myToken1.sap');

    await contract.connect(ownerUser).add(2, 10, "https://myToken2.sap");

    await expect(await contract.connect(ownerUser).uri(2)).to.be.equal('https://myToken2.sap');

  });

});
Building the Metadata - Images
As figure 1 has already revealed, the urls stored in the contract initially refer to json documents. These in turn point to images or in the case of animated NFTs to html files. The html files can even contain javascript, since they are executed by OpenSea in a sandboxed iframe. To make the post a bit more exciting we will take care of the html NFTs directly.
So let's create an animated html file that we call token1.html which generates an animated glitching effect on an text. To quickly find cool animations, it is always good visit codepen.

Figure 2: Glitching Animation (Files: token1.png)
<html lang="en">

<head>

    <title>NFT</title>

    <style>

		body {

		  background: black;

		  color: white;

		  display: flex;

		  justify-content: center;

		  align-items: center;

		  font-family: Arial, Helvetica, sans-serif;

		}


		.container {

		  text-align: center;

		}


		.glitch {

		  font-size: 5rem;

		  font-weight: bold;

		  text-transform: uppercase;

		  position: relative;

		  text-shadow: 0.05em 0 0 #00fffc, -0.03em -0.04em 0 #fc00ff,

			0.025em 0.04em 0 #fffc00;

		  animation: glitch 725ms infinite;

		}


		.glitch span {

		  position: absolute;

		  top: 0;

		  left: 0;

		}


		.glitch span:first-child {

		  animation: glitch 500ms infinite;

		  clip-path: polygon(0 0, 100% 0, 100% 35%, 0 35%);

		  transform: translate(-0.04em, -0.03em);

		  opacity: 0.75;

		}


		.glitch span:last-child {

		  animation: glitch 375ms infinite;

		  clip-path: polygon(0 65%, 100% 65%, 100% 100%, 0 100%);

		  transform: translate(0.04em, 0.03em);

		  opacity: 0.75;

		}


		@keyframes glitch {

		  0% {

			text-shadow: 0.05em 0 0 #00fffc, -0.03em -0.04em 0 #fc00ff,

			  0.025em 0.04em 0 #fffc00;

		  }

		  15% {

			text-shadow: 0.05em 0 0 #00fffc, -0.03em -0.04em 0 #fc00ff,

			  0.025em 0.04em 0 #fffc00;

		  }

		  16% {

			text-shadow: -0.05em -0.025em 0 #00fffc, 0.025em 0.035em 0 #fc00ff,

			  -0.05em -0.05em 0 #fffc00;

		  }

		  49% {

			text-shadow: -0.05em -0.025em 0 #00fffc, 0.025em 0.035em 0 #fc00ff,

			  -0.05em -0.05em 0 #fffc00;

		  }

		  50% {

			text-shadow: 0.05em 0.035em 0 #00fffc, 0.03em 0 0 #fc00ff,

			  0 -0.04em 0 #fffc00;

		  }

		  99% {

			text-shadow: 0.05em 0.035em 0 #00fffc, 0.03em 0 0 #fc00ff,

			  0 -0.04em 0 #fffc00;

		  }

		  100% {

			text-shadow: -0.05em 0 0 #00fffc, -0.025em -0.04em 0 #fc00ff,

			  -0.04em -0.025em 0 #fffc00;

		  }

		}

    </style>

</head>

<body>

  <div class="container">

  <p class="glitch">

    <span aria-hidden="true">SAP</span>

    SAP

    <span aria-hidden="true">SAP</span>

  </p>

</div>

</body>

</html>
In addition to the token image, you also need an image for the contract, which in the case of OpenSea will later be called a collection. We will just use the same effect but with the word collection (see Figure 3):

Figure 3: Collection (Files: collection.png)
Building the Metadata - JSON
Now we come to the json files which describe the properties of a token or a contract. Let's start with the contract level metadata (Files: collection.json). These consist of many properties like a collection name, a description, the link to the collection image, an external website for further token info and royalty information like the cost and the recipient (see OpenSea Wiki).
{

	"name": "Blog Collection",

	"description": "This collection belongs to a tutorial blog",

	"image": "ipfs://bafkreifbpdqq3tv5imylrbvpjdnwypnsnpgmwahhxauxs5om25yirsyouq"

}
The token level metadata (token1.json) is similar in structure, but can also have user-defined attributes (see OpenSea Wiki). :
{

   "image":"ipfs://bafkreidmpvevxecjjysiaay2h6kn2f43bupyixtxki4kccs32yt7dbrwme",

   "animation_url":"ipfs://bafkreiazww7dwdobtahy72w446hde6buqjuukg4tbibpnmj7sxin2yokeu",

   "background_color":"000000",

   "description":"SAP Token tutorial",

   "name":"SAP Token 1",

   "attributes":[

      {

         "value":"black",

         "trait_type":"color"

      },

      {

         "value":"glitch",

         "trait_type":"type"

      }

   ]

}
As you can see the json files point to the images/html files. Accordingly, it is necessary to observe an order when uploading, so that the images urls are available. Alternatively you can also work with relative paths and directories. But we will concentrate on the former.
Publishing the Metadata
The metadata can be published on any web server, but since the contract itself is stored in a decentralized, immutable manner, it is good practice to store the data on the ipfs file system, which is also distributed.
Although you can host an ipfs node yourself and distribute your data for free, this requires the installation of components and ipfs requires that this file is also pinned by several IPFS nodes. Accordingly, it has become established to use a service for this. An example for this is nft.storage which we will also use in the next step.
After you have registered you can click on Files and upload the images and html files via the gui. After that you can copy the IPFS url and substitute the url in the json files. After that you can upload them as well (see Figure 4).

Figure 4: Nft Storage Upload and Copy IPFS Url
Publishing the Contract
After we have uploaded all the files and linked them together, we can take care of the contract deployment. For this we first use metamask, a browser plugin that can connect us to an ethereum network (chrome, firefox). If you don't already have metamask follow the metamask wizard which pop ups if you click on the fox icon to create an account. Next you can switch to the test network by selecting the rinkeby test network in the drop-down menu at the top (see Figure 5):

Figure 5: Metamask
To deploy the contract within the testnet, you need ether. While you typically buy them on the mainnet, there are faucets for the rinkeby testnet that simply send you some ether. To name two well-known sites: ChainLink Faucet and rinkebyfaucet. Open one of the Faucets pages, copy your wallet address from metamask and click send to have the ether credited to your account (see Figure 6). This may take some time. Finally you will see an incoming transaction in your metamask window.

Figure 6: Ether ChainLink Faucet
Now we can finally switch back to our Remix IDE, select the deployment tab and work with the Injected Web3 Provider. You should then see metamask pop up as the IDE has connected to the plugin. If everything worked as expected the Account field shows your metmask account address.
As in the VM, we can now publish the contract by clicking on "deploy". Since we now have constructor parameters, these must of course be filled in. On the one hand with the name of the contract and on the other hand with the url that points to the contract.json file (see figure 7).
Note that OpenSea has problems to process ipfs:// uris on contract level. Use the http link provided by nft.storage i.e., https://bafkr....c6a.ipfs.nftstorage.link/ here.
Since the transaction costs ether, you will again see a metamask window where you can confirm the transaction.

Figure 7: Rinkeby Deployment
In the next step, we use our Add method to add a new toke. Here we have to configure the parameters again, among others the IPFS (not http) link that points to our token1.json (see Figure 8). Finally we hit deploy and confirm the metamask transaction. In the example, I set the allowed number of tokens to 1, so it is an NFT:

Figure 8: Rinkeby Add Token
... And finally we mint this token:
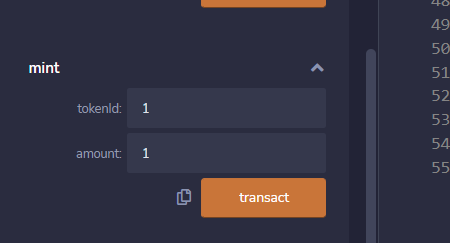
Figure 9: Mint Rinkeby
OpenSea
In the last step we can now go to OpenSea Rinkeby to look at our collection and our NFT. Just like with Remix, you can also link OpenSea to your Metamask account so you can see all your NFTs directly. If you are connected you can navigate to your collections (see Figure 10 top right) and select the NFT such that you see all details (see Figure 10). If you click on the collection name above the token name, you will see the collection including the collection image and the description (see Figure 11). As you scroll through the pages you will discover all your defined properties.

Figure 10: The deployed NFT

Figure 11: The deployed NFT collection
Summary
Today I showed you how the final steps of the NFT smart contract development look like. For this we gave our contract metadata support, so that the contract itself and each token can reference metadata. Then we looked at an animated NFT based on HTML, assembled the metadata documents and published them on IPFS so that we achieved our final goal of displaying them properly on OpenSea.
I hope I could bring the world of smart contracts and NFTs a bit closer to you! You can download all files here.
Leave a comment if you have any questions or suggestions. To make sure you don’t miss anything on blockchain topics, feel free to follow me.
- SAP Managed Tags:
- Digital Technologies,
- Blockchain
Labels:
You must be a registered user to add a comment. If you've already registered, sign in. Otherwise, register and sign in.
Labels in this area
-
ABAP CDS Views - CDC (Change Data Capture)
2 -
AI
1 -
Analyze Workload Data
1 -
BTP
1 -
Business and IT Integration
2 -
Business application stu
1 -
Business Technology Platform
1 -
Business Trends
1,658 -
Business Trends
93 -
CAP
1 -
cf
1 -
Cloud Foundry
1 -
Confluent
1 -
Customer COE Basics and Fundamentals
1 -
Customer COE Latest and Greatest
3 -
Customer Data Browser app
1 -
Data Analysis Tool
1 -
data migration
1 -
data transfer
1 -
Datasphere
2 -
Event Information
1,400 -
Event Information
66 -
Expert
1 -
Expert Insights
177 -
Expert Insights
300 -
General
1 -
Google cloud
1 -
Google Next'24
1 -
Kafka
1 -
Life at SAP
780 -
Life at SAP
13 -
Migrate your Data App
1 -
MTA
1 -
Network Performance Analysis
1 -
NodeJS
1 -
PDF
1 -
POC
1 -
Product Updates
4,577 -
Product Updates
346 -
Replication Flow
1 -
RisewithSAP
1 -
SAP BTP
1 -
SAP BTP Cloud Foundry
1 -
SAP Cloud ALM
1 -
SAP Cloud Application Programming Model
1 -
SAP Datasphere
2 -
SAP S4HANA Cloud
1 -
SAP S4HANA Migration Cockpit
1 -
Technology Updates
6,873 -
Technology Updates
429 -
Workload Fluctuations
1
Related Content
- ABAP Cloud Developer Trial 2022 Available Now in Technology Blogs by SAP
- Top Picks: Innovations Highlights from SAP Business Technology Platform (Q1/2024) in Technology Blogs by SAP
- Generative AI-based SAP Fiori App development with Joule directly from the business requirement in Technology Blogs by SAP
- Platform agnostic ABAP Add-On Development and use of standard objects in Cloud Development in Technology Blogs by Members
- Solution for Rubik’s Cube of E-Invoicing in SAP Document and Reporting Compliance in Technology Blogs by Members
Top kudoed authors
| User | Count |
|---|---|
| 43 | |
| 25 | |
| 17 | |
| 15 | |
| 10 | |
| 7 | |
| 7 | |
| 6 | |
| 6 | |
| 6 |