
- SAP Community
- Products and Technology
- Enterprise Resource Planning
- ERP Blogs by SAP
- SAP S/4HANA Bank Master Data Cockpit
Enterprise Resource Planning Blogs by SAP
Get insights and updates about cloud ERP and RISE with SAP, SAP S/4HANA and SAP S/4HANA Cloud, and more enterprise management capabilities with SAP blog posts.
Turn on suggestions
Auto-suggest helps you quickly narrow down your search results by suggesting possible matches as you type.
Showing results for
former_member80
Explorer
Options
- Subscribe to RSS Feed
- Mark as New
- Mark as Read
- Bookmark
- Subscribe
- Printer Friendly Page
- Report Inappropriate Content
06-23-2022
9:23 AM
Until recently, maintaining bank master has been a somewhat manual process, requiring users to load the bank master data in multiple iterations where the settings for the countries vary. The analysis of the country specific bank settings configuration and the impact of the bank master data changes has always been a manual process. SAP has resolved many of these issues with the introduction of the Bank Master Data Cockpit. With this functionality, users have one SAP program from which all tasks related to the bank master data can be performed.
Overview
The Bank Master Data Cockpit is a new program available in SAP S/4HANA OP 2020 release. It is available in the SAP S/4HANA Cloud as well. This is a great tool for managing bank master data on SAP.
Bank master data is foundational data that represents a bank in a country. This data is required in the SAP system to load business partner (customer, vendor, counterparty, etc.) bank account information and for any payment and bank statement processing. Having accurate bank master data is essential when sending payment files from SAP.
Bank master data is typically maintained from a third-party source file upload. This data can be obtained from different sources and formats. Two of the prominent providers of global bank master data are SWIFT and LexisNexis/Accuity, however, the Bank Master Data Cockpit supports most used formats worldwide. As a side note, Accuity is part of the LexisNexis Risk Solutions group of companies, the LexisNexis Risk Solutions Group. The bank master data file is typically known as the Accuity file.
As bank master data is required to load business partner bank details, it is loaded initially in a project and also needs to be loaded periodically, e.g., monthly or quarterly, as banks change through time. For example, if new banks are formed, their data is needed on SAP. When banks merge, there are changes to the local bank numbers and SWIFT/BIC codes, these would then become obsolete and should no longer be used.
In this blog, I highlight the key aspects of the Bank Master Data Cockpit and how it can be utilized by SAP customers. This program is an example of new, well-designed functionality on SAP S/4HANA.
Below are some key features of the program.
After selecting the tile, press the Bank Master Data Cockpit button, to be taken to the Bank Master Data Cockpit.
The screenshot below from an SAP S/4HANA Cloud system shows the layout of the program and the various formats supported.
As mentioned in the highlights on the program, with the Bank Master Data Cockpit, it is not necessary to import the file from the application server.
The screenshot below shows the various areas of the Bank Master Data Cockpit screen when using the SAP GUI. The user will notice that the screen layout is the same as on the Cloud, shown above.
There are seven boxes on the screen each highlighting specific data:
Bank Master Data: This box shows statistics on the bank master data currently loaded in the system.
Country/Region Specific Settings: This box shows the number of countries configured in the country specific bank settings configuration (transaction code OY17). By pressing the Display Settings button, the configuration settings for each country can be reviewed, as shown below.
Load Bank Directory File: This box contains the input parameters. These will be described further below.
Data in File: High-level statistics on the data in the input file are displayed. By pressing the Display Records button, the user can view the bank master data read from the file but not yet saved to the SAP tables.
Changes to Bank Master: The program shows the changes that will be made to the bank master data once saving the data to the database.
Impact on Existing Bank Details: Here the user can view the impact to the existing bank related data in the system. In other words, what updates will be made to the bank master data currently used in business partner bank details and house banks. This is outlined further below.
Update Bank Master Data: By pressing the Save Changes button, the data is saved to SAP. Before pressing this button, the data is just in memory and has not been saved to the SAP tables.
Load Global Bank Master Data with Two Different Sets of Parameters
In this section, I outline how to specify the input parameters of the Bank Master Data Cockpit.
In the Load Bank Directory File box, the user specifies the input parameters.
In this example, the entire global file will be imported but the countries will be split into two groups:
This setting will be for countries where the company does not have bank accounts and therefore will not be making domestic payments. Because of this local routing numbers are not created. In this case, the bank key will be set to the SWIFT code and the bank number will be blank.
This other setting will be used for countries where the company expects to or may make domestic payments using the local routing numbers. The records with the bank key of a local routing number will have the SWIFT code populated in the SWIFT/BIC field. Records with the SWIFT codes as bank keys will also be created.
From the screen shown above, the user enters the first three input parameters:
Press the Edit Parameters button. A popup window will be displayed where the user will specify the import settings by country.
Make the settings for the smaller group, which is the group of countries with the 4 – Create bank keys with SWIFT code setting, in our example.
Note: The parameter options on the screenshot below may be different based on the File Format selected.
It is important to understand that with the Edit Parameters functionality, the user is specifying the import parameters across all 249 countries on SAP. It is possible that the same settings are not the same across all countries. In our example, in key countries where an SAP customer has bank accounts, both the local routing numbers as well as all BICs/SWIFT codes should be created, whereas in other countries, only the BIC/SWIFT code bank master data records should be created.
Press the Copy Parameters button.
You will see the popup below.
Press the Deselect all icon to deselect the indicator to the left of each country.
At this point, only Andorra (country AD) has been selected. Next, select the indicator to the left of all the other countries that should fall into the 4 - BIC (SWIFT Code, International ID), as shown below.
When done, press the Enter key. At this point, the countries with the 4 - BIC (SWIFT Code, International ID) import setting have been made.
Next select a country that should have the 8 – All BICs + all Bank Numbers setting, which in our case is US (United States), as shown in the screenshot below and press the Copy Parameters button.
At the popup, either 1) press the Deselect All icon and then select all the countries that should have the 8 – All BICs + all Bank Numbers setting or 2) deselect the individual indicators for all the countries with the 4 – BIC (SWIFT Code, International ID) setting.
In this step, you are specifying the countries that should have the 8 – All BICs + all Bank Numbers import setting.
Press the Enter key when done.
Press the Save as Variant button to save the parameters to a variant.
Enter the name of the variant and press the Enter key.
See the section on Importing and Exporting the Input Parameters section below, which outlines how to export and import the parameter settings across systems. Using this functionality, SAP customers can ensure the input parameters are consistent across systems.
Press the Load File button to load the import file based on the settings specified.
While the program is working, it lets the user know where it is in the process with informational messages at the bottom of the screen, such as the ones below.
After the file is imported, the Bank Master Data Cockpit will display information about the data and how it will be imported in the middle portion of the screen, as shown in the screenshot below.
Press the Display Records button to view the data to be imported and to be omitted, as shown below.
By double clicking on a number, the system shows you the underlying data. The screenshot below shows the U.S. records that will be omitted.
When you are happy with the data uploaded and want to save it to SAP, press the Save Changes button. This will import the data into SAP.
While the data is being saved to SAP, there are updates on the status, as shown below.
After the data has been saved to SAP, the screen will look like below.
Importing and Exporting the Input Parameters
A great feature of the program is the ability to download and upload the parameter settings across systems. This can be used to ensure the input parameters are consistent across all systems, e.g., Quality Assurance and Production. It also greatly facilitates making the input settings across the 200+ countries.
From the Edit Upload Parameters popup window, there are Export Parameters to Local File and Import Parameters from Local File icons, shown below, that can be used to export and import the input parameters between systems.
When exporting the parameters, a file with the parameter settings is created. Below is a sample file. This file can be opened and edited using Excel.
When importing the parameters, press the Import Parameters from Local File icon and select the text file to import, as shown below. The settings are then specified from the file.
When importing a parameters file, the following steps indicate how to load the parameters file and then save the parameters as a variant.
Impact on Existing Bank Details
With the functionality in the Impact on Existing Bank Details box, the user can view the impact to the house banks and existing business partners’ bank details in the system. In other words, showing the impact of updates that will be made to the bank master data currently used in house banks and business partner bank details.
Press the Check Impact button to have the system execute the analysis across the countries loaded. The system then determines all uses of the banks to be changed (minor impact) and to be marked for deletion (critical impact).
The impacted records are listed when pressing the Display Impact button from the screenshot above, as shown in the screenshot below. As shown below, the system outlines by country the impact, if the bank master data file is saved to SAP. All uses of the banks to be changed (minor impact) and to be marked for deletion (critical impact) are listed.
The user can double click on any numbers displayed, in the screenshot above, to view what makes up the minor or critical impacts listed. From the screen above, if the user double clicks on the “29”, which are the minor changes for Canada, the program shows in what way each of the bank keys that will be changed are currently used on the system.
When double clicking on any of the above records, the system shows the old and new values for each field for the bank key displayed. With the view, the user is able to see exactly what is changing for the impacted bank records.
Keep in mind, this analysis is done before the data is saved to the SAP tables. At this point, the program is holding all changes in memory while the analysis is done.
Validating the Data Imported
After the bank data has been imported into SAP, use the Manage Banks app or transaction code FI03 to display the bank master data created or updated.
The screenshot below a bank record displayed using the Manage Banks app.
Summary
The Bank Master Data Cockpit is a very useful, well-designed program new with SAP S/4HANA that resolves many of the issues around bank master data maintenance on earlier releases.
I sincerely hope you have found this blog to be useful. Please share your thoughts or feedback to me directly or add a comment to the blog.
Overview
The Bank Master Data Cockpit is a new program available in SAP S/4HANA OP 2020 release. It is available in the SAP S/4HANA Cloud as well. This is a great tool for managing bank master data on SAP.
Bank master data is foundational data that represents a bank in a country. This data is required in the SAP system to load business partner (customer, vendor, counterparty, etc.) bank account information and for any payment and bank statement processing. Having accurate bank master data is essential when sending payment files from SAP.
Bank master data is typically maintained from a third-party source file upload. This data can be obtained from different sources and formats. Two of the prominent providers of global bank master data are SWIFT and LexisNexis/Accuity, however, the Bank Master Data Cockpit supports most used formats worldwide. As a side note, Accuity is part of the LexisNexis Risk Solutions group of companies, the LexisNexis Risk Solutions Group. The bank master data file is typically known as the Accuity file.
As bank master data is required to load business partner bank details, it is loaded initially in a project and also needs to be loaded periodically, e.g., monthly or quarterly, as banks change through time. For example, if new banks are formed, their data is needed on SAP. When banks merge, there are changes to the local bank numbers and SWIFT/BIC codes, these would then become obsolete and should no longer be used.
In this blog, I highlight the key aspects of the Bank Master Data Cockpit and how it can be utilized by SAP customers. This program is an example of new, well-designed functionality on SAP S/4HANA.
Below are some key features of the program.
- A key aspect of the Bank Master Data Cockpit is the ability to import all data for all countries with their country specific setup. In other words, not all countries need to have the same input parameters. Separate uploads when importing countries with different settings are not necessary.
- Once the initial input parameters are set, loading the bank master data both initially and on an ongoing basis is very easy and fast.
- The Bank Master Data Cockpit has features to easily analyze the data before the actual update to SAP. Keep in mind, when importing a global bank master data file, there are approximately one million records in the file being imported.
- From the Bank Master Data Cockpit, the user can see and analyze all aspects of bank master data maintenance along with the back-end configuration. The user can check the country specific bank settings configuration from the program, upload the bank master data after having specified the input parameters, analyze the data before making the updates to SAP, etc.
- A global file with a million records takes approximately five minutes to load into memory. The time to update the bank master data to the SAP tables varies based on the number of records being updated. One thousand to two thousand records are updated to the SAP tables per second. These are very fast processing times.
- A key aspect of the Bank Master Data Cockpit is that it will import a zipped global bank master data file (across 200+ countries) from the user’s desktop. The bank master data files are very large files (1 gigabytes). Being able to load a zipped file is helpful because the smaller sized file is easier to work with.
- Because of the above point, it is no longer required to have an AL11 directory from which to import the data file. To load files from the desktop, there is a size limit on the file. Because the global files tend to be very large files, the fact that the Bank Master Data Cockpit imports a zipped file is key.
- The functionality included with the Bank Master Data Cockpit is the same in the Cloud and in SAP S/4HANA On-Premise.
Getting Started
The Bank Master Data Cockpit can be executed using the Transfer BIC Data Fiori tile if on the SAP S/4HANA Cloud.
![]()
Bank Master Data Cockpit App
After selecting the tile, press the Bank Master Data Cockpit button, to be taken to the Bank Master Data Cockpit.

Bank Master Data Cockpit Button
The screenshot below from an SAP S/4HANA Cloud system shows the layout of the program and the various formats supported.

Bank Master Data Cockpit App
As mentioned in the highlights on the program, with the Bank Master Data Cockpit, it is not necessary to import the file from the application server.
The screenshot below shows the various areas of the Bank Master Data Cockpit screen when using the SAP GUI. The user will notice that the screen layout is the same as on the Cloud, shown above.

Areas of the Bank Master Data Cockpit
There are seven boxes on the screen each highlighting specific data:
Bank Master Data: This box shows statistics on the bank master data currently loaded in the system.
Country/Region Specific Settings: This box shows the number of countries configured in the country specific bank settings configuration (transaction code OY17). By pressing the Display Settings button, the configuration settings for each country can be reviewed, as shown below.

Bank Country Specific Settings Configuration
Load Bank Directory File: This box contains the input parameters. These will be described further below.
Data in File: High-level statistics on the data in the input file are displayed. By pressing the Display Records button, the user can view the bank master data read from the file but not yet saved to the SAP tables.
Changes to Bank Master: The program shows the changes that will be made to the bank master data once saving the data to the database.
Impact on Existing Bank Details: Here the user can view the impact to the existing bank related data in the system. In other words, what updates will be made to the bank master data currently used in business partner bank details and house banks. This is outlined further below.
Update Bank Master Data: By pressing the Save Changes button, the data is saved to SAP. Before pressing this button, the data is just in memory and has not been saved to the SAP tables.
Load Global Bank Master Data with Two Different Sets of Parameters
In this section, I outline how to specify the input parameters of the Bank Master Data Cockpit.
In the Load Bank Directory File box, the user specifies the input parameters.
In this example, the entire global file will be imported but the countries will be split into two groups:
- 4 – Create bank keys with SWIFT code
This setting will be for countries where the company does not have bank accounts and therefore will not be making domestic payments. Because of this local routing numbers are not created. In this case, the bank key will be set to the SWIFT code and the bank number will be blank.
- 8 – Create bank key for both local routing numbers and all SWIFT/BIC codes
This other setting will be used for countries where the company expects to or may make domestic payments using the local routing numbers. The records with the bank key of a local routing number will have the SWIFT code populated in the SWIFT/BIC field. Records with the SWIFT codes as bank keys will also be created.

Enter Input Parameters
From the screen shown above, the user enters the first three input parameters:
- Select the bank master data input file at the Path and Filename field.
- Select file format using the File Format field.
- Select the Default variant in the Parameters field.
Press the Edit Parameters button. A popup window will be displayed where the user will specify the import settings by country.
Make the settings for the smaller group, which is the group of countries with the 4 – Create bank keys with SWIFT code setting, in our example.
- Specify Country/Region as AD (Andorra)
- Select Import Data (If not selected, SAP will not upload the specified data from the input file. It is possible that not all the bank master data in the input file is desired on SAP.)
- Select Add Missing Branch Code XXX for HQ
- Select Mark Obsolete Records for Deletion
- Specify the Bank Key Type as 4 - BIC (SWIFT Code, International ID
- Select Exclude Records with Invalid Bank IDs (If selected, SAP will omit any records not following the bank number settings in the country specific bank settings configuration (transaction code OY17). This is very helpful if the input file contains bank data that the SAP customer does not want created in SAP.)
- Select Convert to Uppercase (If selected, SAP will convert all bank data to uppercase.)
Note: The parameter options on the screenshot below may be different based on the File Format selected.

Parameters Options Screen
It is important to understand that with the Edit Parameters functionality, the user is specifying the import parameters across all 249 countries on SAP. It is possible that the same settings are not the same across all countries. In our example, in key countries where an SAP customer has bank accounts, both the local routing numbers as well as all BICs/SWIFT codes should be created, whereas in other countries, only the BIC/SWIFT code bank master data records should be created.

Copy Parameters Button on Parameters Options Screen
Press the Copy Parameters button.
You will see the popup below.

Country Parameters Settings
Press the Deselect all icon to deselect the indicator to the left of each country.
At this point, only Andorra (country AD) has been selected. Next, select the indicator to the left of all the other countries that should fall into the 4 - BIC (SWIFT Code, International ID), as shown below.

Specify First Group of Countries
When done, press the Enter key. At this point, the countries with the 4 - BIC (SWIFT Code, International ID) import setting have been made.
Next select a country that should have the 8 – All BICs + all Bank Numbers setting, which in our case is US (United States), as shown in the screenshot below and press the Copy Parameters button.

First Country of Second Group
At the popup, either 1) press the Deselect All icon and then select all the countries that should have the 8 – All BICs + all Bank Numbers setting or 2) deselect the individual indicators for all the countries with the 4 – BIC (SWIFT Code, International ID) setting.
In this step, you are specifying the countries that should have the 8 – All BICs + all Bank Numbers import setting.

Specify Countries in Second Group
Press the Enter key when done.
Press the Save as Variant button to save the parameters to a variant.

Save the Input Parameters in a Variant
Enter the name of the variant and press the Enter key.

Enter Name of Variant
See the section on Importing and Exporting the Input Parameters section below, which outlines how to export and import the parameter settings across systems. Using this functionality, SAP customers can ensure the input parameters are consistent across systems.
Press the Load File button to load the import file based on the settings specified.

Load File into SAP Memory
While the program is working, it lets the user know where it is in the process with informational messages at the bottom of the screen, such as the ones below.

Progress Messages
After the file is imported, the Bank Master Data Cockpit will display information about the data and how it will be imported in the middle portion of the screen, as shown in the screenshot below.

Validate Bank Master Data Loaded
Press the Display Records button to view the data to be imported and to be omitted, as shown below.

Validate Data Loaded by Country
By double clicking on a number, the system shows you the underlying data. The screenshot below shows the U.S. records that will be omitted.

Display Omitted Data for the U.S.
When you are happy with the data uploaded and want to save it to SAP, press the Save Changes button. This will import the data into SAP.

Save Data to SAP Tables
While the data is being saved to SAP, there are updates on the status, as shown below.

Data Being Saved to SAP Tables
After the data has been saved to SAP, the screen will look like below.

Bank Master Data Save Complete
Importing and Exporting the Input Parameters
A great feature of the program is the ability to download and upload the parameter settings across systems. This can be used to ensure the input parameters are consistent across all systems, e.g., Quality Assurance and Production. It also greatly facilitates making the input settings across the 200+ countries.
From the Edit Upload Parameters popup window, there are Export Parameters to Local File and Import Parameters from Local File icons, shown below, that can be used to export and import the input parameters between systems.

Import and Export Parameters Icons
When exporting the parameters, a file with the parameter settings is created. Below is a sample file. This file can be opened and edited using Excel.

Sample Parameters File
When importing the parameters, press the Import Parameters from Local File icon and select the text file to import, as shown below. The settings are then specified from the file.
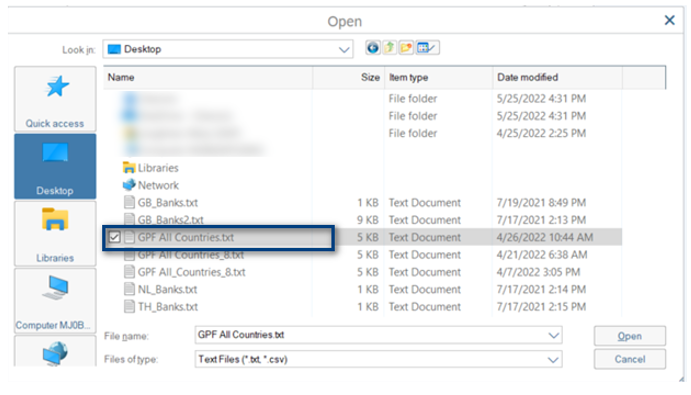
Select Parameters File
When importing a parameters file, the following steps indicate how to load the parameters file and then save the parameters as a variant.
- Have the parameters input file on your laptop. This is the parameters file that was exported from the first system and will be imported into the second system.
- Go to the Bank Master Data Cockpit.
- Enter the three initial fields (filename, file format, parameters), based on your example.
- Press the Edit Parameters button.
- Press the Import Parameters from a Local File icon at the bottom right of the popup.
- Select the GPF All Countries.txt file at the open file popup window.
- Select the Convert to Uppercase indicator.
- Press the Save as Variant button.
Impact on Existing Bank Details
With the functionality in the Impact on Existing Bank Details box, the user can view the impact to the house banks and existing business partners’ bank details in the system. In other words, showing the impact of updates that will be made to the bank master data currently used in house banks and business partner bank details.
Press the Check Impact button to have the system execute the analysis across the countries loaded. The system then determines all uses of the banks to be changed (minor impact) and to be marked for deletion (critical impact).

Impact on Existing Bank Details
The impacted records are listed when pressing the Display Impact button from the screenshot above, as shown in the screenshot below. As shown below, the system outlines by country the impact, if the bank master data file is saved to SAP. All uses of the banks to be changed (minor impact) and to be marked for deletion (critical impact) are listed.
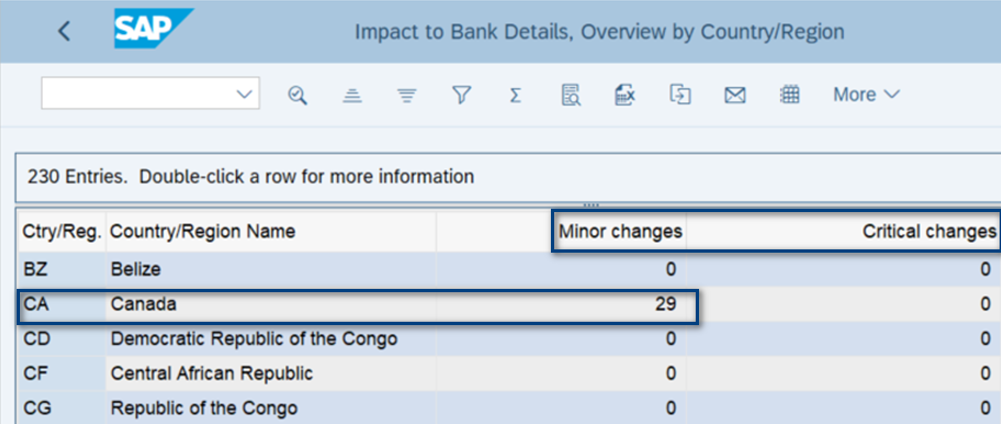
Display Impacts to Bank Details by Country
The user can double click on any numbers displayed, in the screenshot above, to view what makes up the minor or critical impacts listed. From the screen above, if the user double clicks on the “29”, which are the minor changes for Canada, the program shows in what way each of the bank keys that will be changed are currently used on the system.

Display Impacts for a Country
When double clicking on any of the above records, the system shows the old and new values for each field for the bank key displayed. With the view, the user is able to see exactly what is changing for the impacted bank records.

Detailed Changes Made
Keep in mind, this analysis is done before the data is saved to the SAP tables. At this point, the program is holding all changes in memory while the analysis is done.
Validating the Data Imported
After the bank data has been imported into SAP, use the Manage Banks app or transaction code FI03 to display the bank master data created or updated.

Manage Banks App
The screenshot below a bank record displayed using the Manage Banks app.

Manage Banks Screen
Summary
The Bank Master Data Cockpit is a very useful, well-designed program new with SAP S/4HANA that resolves many of the issues around bank master data maintenance on earlier releases.
I sincerely hope you have found this blog to be useful. Please share your thoughts or feedback to me directly or add a comment to the blog.
- SAP Managed Tags:
- Banking,
- banking services from SAP,
- FIN Cash Management
Labels:
5 Comments
You must be a registered user to add a comment. If you've already registered, sign in. Otherwise, register and sign in.
Labels in this area
-
Artificial Intelligence (AI)
1 -
Business Trends
363 -
Business Trends
21 -
Customer COE Basics and Fundamentals
1 -
Digital Transformation with Cloud ERP (DT)
1 -
Event Information
461 -
Event Information
24 -
Expert Insights
114 -
Expert Insights
154 -
General
1 -
Governance and Organization
1 -
Introduction
1 -
Life at SAP
415 -
Life at SAP
2 -
Product Updates
4,685 -
Product Updates
215 -
Roadmap and Strategy
1 -
Technology Updates
1,502 -
Technology Updates
89
Related Content
- Migrating data from SAP ECC to SAP S4/HANA with the migration cockpit in Enterprise Resource Planning Blogs by Members
- Manage Supply Shortage and Excess Supply with MRP Material Coverage Apps in Enterprise Resource Planning Blogs by SAP
- Business Rule Framework Plus(BRF+) in Enterprise Resource Planning Blogs by Members
- SAP ERP Functionality for EDI Processing: UoMs Determination for Inbound Orders in Enterprise Resource Planning Blogs by Members
- What is the complete list of function restrictions during software update? in Enterprise Resource Planning Q&A
Top kudoed authors
| User | Count |
|---|---|
| 12 | |
| 11 | |
| 7 | |
| 6 | |
| 6 | |
| 4 | |
| 4 | |
| 4 | |
| 4 | |
| 3 |