
- SAP Community
- Products and Technology
- Technology
- Technology Blogs by SAP
- Creating your first Personalized Recommendation Pr...
Technology Blogs by SAP
Learn how to extend and personalize SAP applications. Follow the SAP technology blog for insights into SAP BTP, ABAP, SAP Analytics Cloud, SAP HANA, and more.
Turn on suggestions
Auto-suggest helps you quickly narrow down your search results by suggesting possible matches as you type.
Showing results for
Advisor
Options
- Subscribe to RSS Feed
- Mark as New
- Mark as Read
- Bookmark
- Subscribe
- Printer Friendly Page
- Report Inappropriate Content
06-23-2022
7:39 PM
The free tier option for Personalized Recommendation is now available as part of the Cloud Platform Enterprise Agreement (CPEA) and the Pay-As-You-Go for SAP BTP model. If you don’t have access to either of these, you can get started with Pay-As-You-Go for SAP BTP. To set up an SAP BTP global account and access the free tier model, check out this blog post by Riley Rainey.
You can find more information about Personalized Recommendation in SAP Discovery Center and SAP Help Portal.
This blog series is all about trying out the Personalized Recommendation service. In it, I’ll show you how to get started and then walk you through the whole process – from training the model right up to calling a real-time inference. So, if you’re a business or an IT expert and are looking for ways to elevate your users’ experience and engagement while enhancing item discovery and conversion, follow this blog and see how Personalized Recommendation can enhance your use case.
If you’ve not yet created an SAP BTP global account, check out this blog post, which explains how to do so.
In this step of the process, we’ll be using a booster to help assign entitlements to an existing or new subaccount, create a service instance, and generate the service key for Personalized Recommendation.
Here’s a short video that shows how to do this:
Once you’ve created your free tier account, you’ll be directed to the SAP BTP cockpit, where you can find and manage all your subaccounts, including their instances and services. This is the initial view of the SAP BTP Cockpit user interface.
To accelerate the setup process, we’ll use the booster, which you can easily access by clicking the Booster button on the left of the screen. If the button isn’t visible, click the hamburger icon in the top-left corner of the screen.
In the Booster section, you can see all the boosters available for different services. Click the search bar, search for Personalized Recommendation, and then click the Set up an account for Personalized Recommendation booster.
When you enter the booster, you see the overview of the booster and some additional resources relevant to Personalized Recommendation. To continue, click the Start button located in the upper right corner of the screen.
A new window opens, showing the four-step account setup process. This process is as follows:
Lastly, to use the Personalized Recommendation API, you need a Bearer Token to authorize yourself before calling any API.
In the address bar of a new browser tab, paste the url value, followed by the swagger value and hit Enter.
Next, click Authorize to use the APIs.
When you’ve successfully created the token and authorized yourself on the Swagger API page, click the following link to continue to the next step of this guide – Model Training and Serving.
At this point, we have completed the service account setup and generated a token. If you have encountered any issues, feel free to leave a comment below. My team will definitely help you out. Alternatively, check out the Q&A area in the community or visit our community page to browse our use cases and learning materials.
In the next step, we will be using the APIs to trigger training and view the training status. Feel free to follow my profile and stay tuned for the next steps. See you in the next blog!
You can find more information about Personalized Recommendation in SAP Discovery Center and SAP Help Portal.
This blog series is all about trying out the Personalized Recommendation service. In it, I’ll show you how to get started and then walk you through the whole process – from training the model right up to calling a real-time inference. So, if you’re a business or an IT expert and are looking for ways to elevate your users’ experience and engagement while enhancing item discovery and conversion, follow this blog and see how Personalized Recommendation can enhance your use case.
| Getting Started with Personalized Recommendation |
Step 1: Setup Step 2: Model Training and Serving Step 3: Real-Time Inference Step 4: Use Your Own Data |
Step 1: Setup
If you’ve not yet created an SAP BTP global account, check out this blog post, which explains how to do so.
In this step of the process, we’ll be using a booster to help assign entitlements to an existing or new subaccount, create a service instance, and generate the service key for Personalized Recommendation.
Here’s a short video that shows how to do this:
Video Walk-Through of Step 1
Instance Creation and Service Key Generation with Booster
Once you’ve created your free tier account, you’ll be directed to the SAP BTP cockpit, where you can find and manage all your subaccounts, including their instances and services. This is the initial view of the SAP BTP Cockpit user interface.
 SAP BTP Cockpit User Interface
To accelerate the setup process, we’ll use the booster, which you can easily access by clicking the Booster button on the left of the screen. If the button isn’t visible, click the hamburger icon in the top-left corner of the screen.

Booster Button on the SAP BTP Cockpit User Interface
In the Booster section, you can see all the boosters available for different services. Click the search bar, search for Personalized Recommendation, and then click the Set up an account for Personalized Recommendation booster.
 Set up an Account for Personalized Recommendation
When you enter the booster, you see the overview of the booster and some additional resources relevant to Personalized Recommendation. To continue, click the Start button located in the upper right corner of the screen.
 Service Overview of Personalized Recommendation
A new window opens, showing the four-step account setup process. This process is as follows:
- Check Prerequisites
This step checks whether the new user meets all the prerequisites for the booster to complete successfully. Once the check is complete, two green DONE messages are displayed, as shown in the following screen capture.

Check Prerequisites Stage of the Account Setup Process
- Select Scenario
In this part of the process, you can choose from two options:
- Create Subaccount: This option enables you to set up a new Cloud Foundry subaccount and execute the booster steps in this new account.
- Select Subaccount: This option enables you to set up an existing Cloud Foundry subaccount and execute the booster steps in that account.
 Select Scenario Stage of the Account Setup Process
- Configure Subaccount
- If you select the Create Subaccount option, refer to the details below:
- Entitlements: Choose the free plan for development and try-out purposes or the standard plan intended for productive usage.
- Subaccount Name: Give your Subaccount a name.
- Provider: Choose Amazon Web Services (AWS).
- Region: Choose Europe (Frankfurt) - Canary - AWS.Subdomain: Give your Subdomain a name.
- Org Name: Give your Org Name a name (customizable/auto-generated according to the name of your subdomain and global account).
- Space Name: Give your Space a name.See the following screen capture for reference.
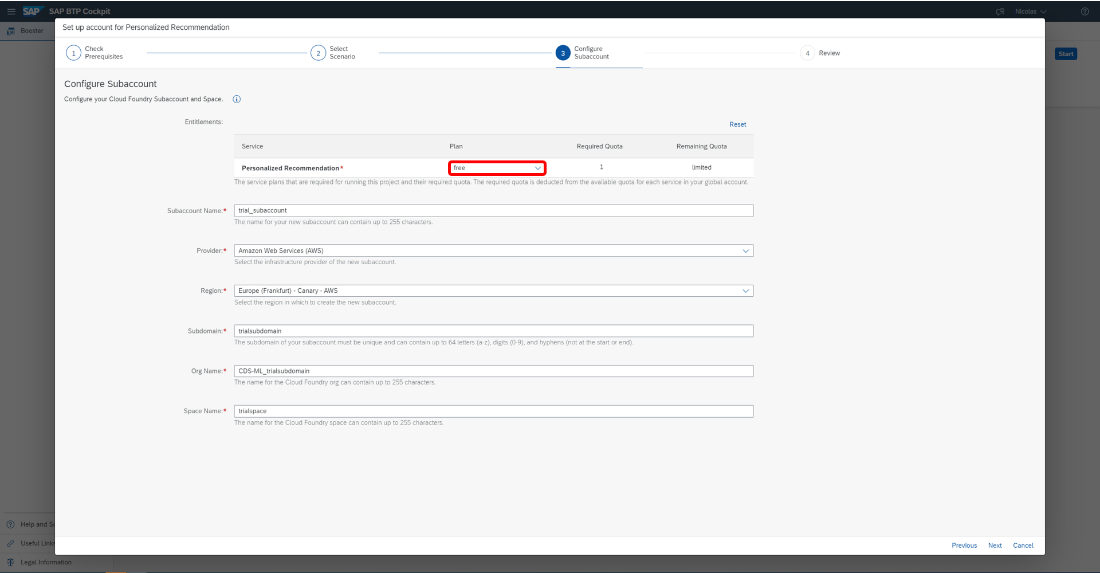 Configure Subaccount Stage of the Account Setup Process (Create Subaccount)
- If you choose the Select Subaccount option, refer to the details below:
- Entitlements: Choose the free plan for free-tier users or the standard plan for non-free tier users.
- Subaccount: Click the dropdown to see all available subaccounts. Click the designated subaccount; the form is then filled automatically based on the subaccount. See the following screen capture for reference.
 Configure Subaccount Stage of the Account Setup Process (Select Subaccount)
- If you select the Create Subaccount option, refer to the details below:
- Review
The last step allows you to review the entire configuration and make sure that all the information you’ve provided is correct. If it is, click the Finish button in the bottom-right corner to finish subaccount creation.
 Review Stage of the Account Setup Process
Once the booster process for setting up your Personalized Recommendation account has finished, download the service key that has been created.
 Completion of the Account Setup Process
When you download the new service key, a window appears giving the credentials and details of the Service Key. Here, you can obtain the Service URL, ClientID, ClientSecret, and UAA URL, which you’ll need to generate the bearer token and access the Swagger API page. Below is an example of the credentials that you’re likely to encounter.
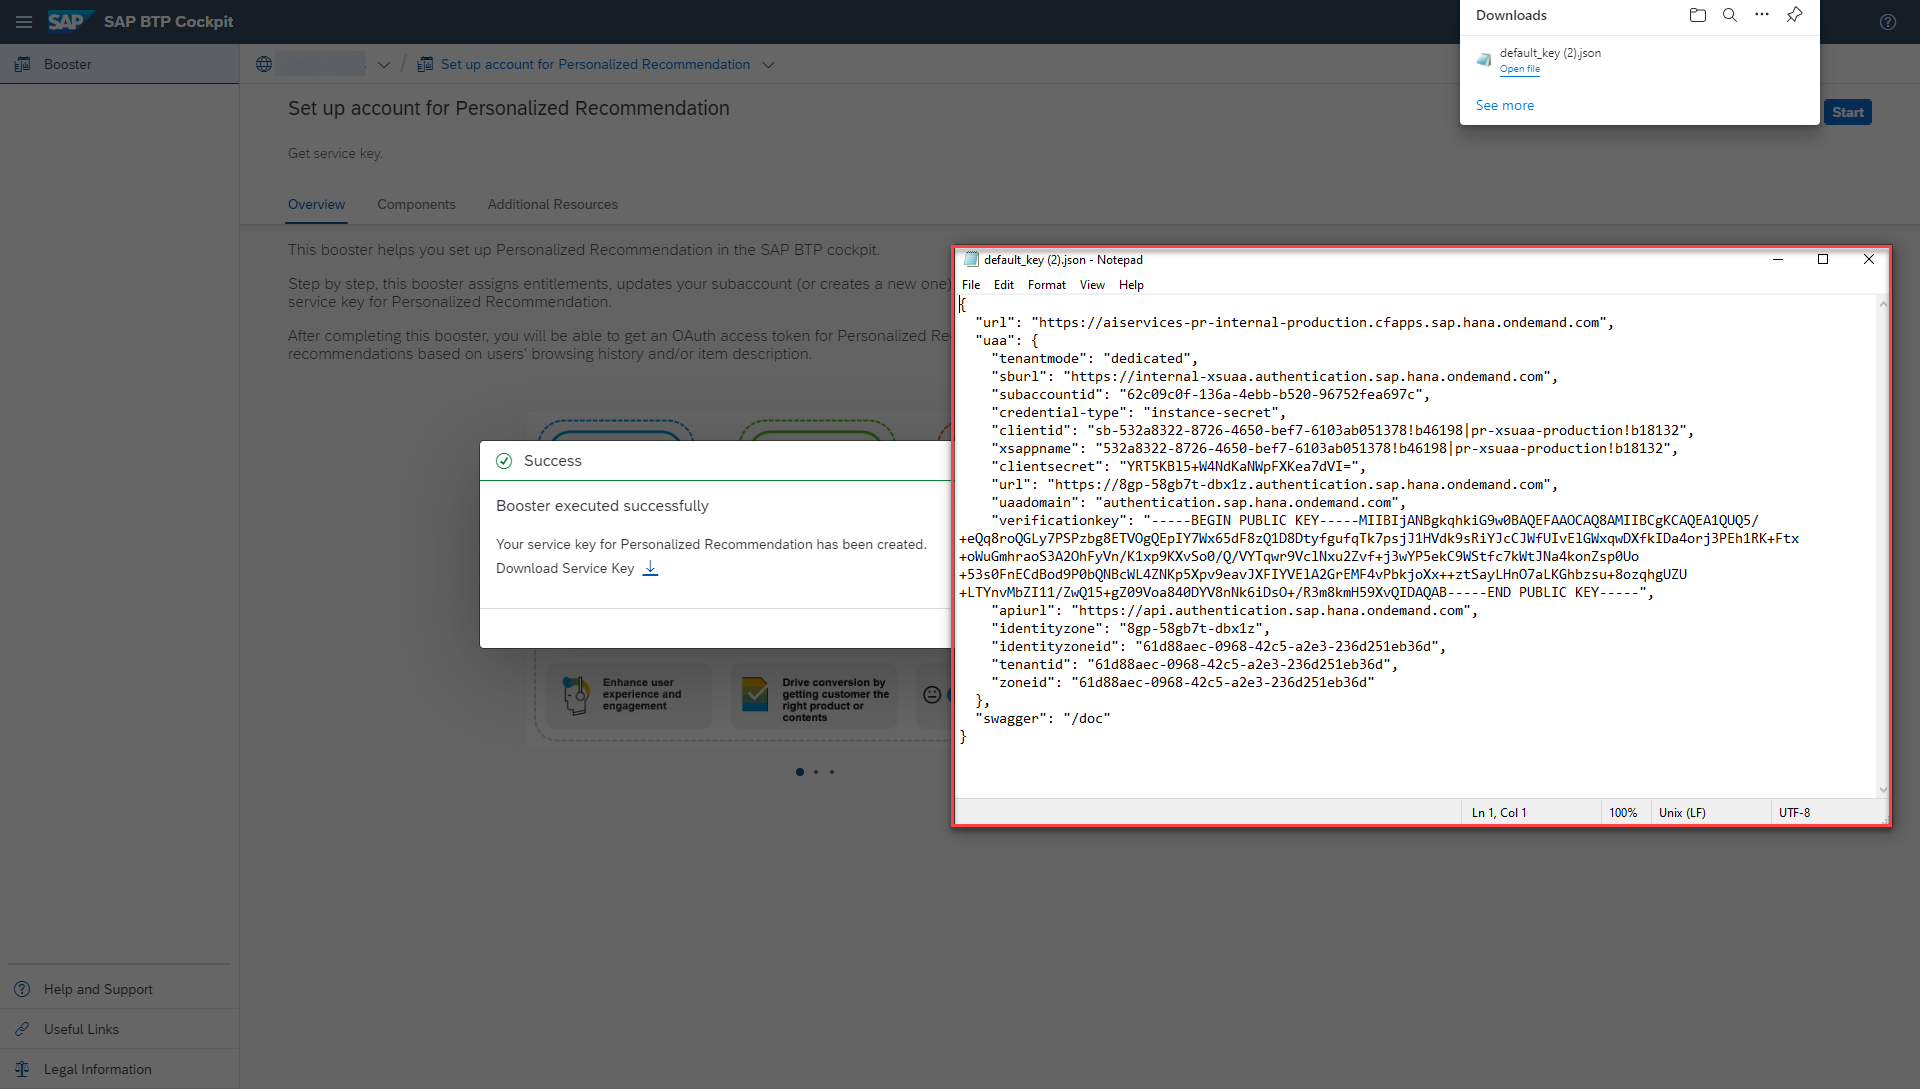 View Service Key
Getting the Bearer Token
Lastly, to use the Personalized Recommendation API, you need a Bearer Token to authorize yourself before calling any API.
- In the uaa section of the service key, copy the url value and paste it into the address bar of a new browser tab. Add /oauth/token?grant_type=client_credentials after the url and choose Enter.
 View uaa Section of Service Key
- Enter the clientid value from your service key as Username.
- Enter the clientsecret value from your service key as Password.
- Click Sign in or OK (depending on the web browser you work with).

A browser tab at <uaa url> + /oauth/token?grant_type=client_credentials
You should receive a response like the following:
 Access Token Sample
Once the token has been generated, make sure to copy and save it for easy access. The token is valid for the next 12 hours following generation, so you’ll need to generate a new token after 12 hours have passed.
Accessing the Swagger API Page
To access the Swagger API page, you need the url (not from the uaa section) and swagger values from the service key generated earlier.
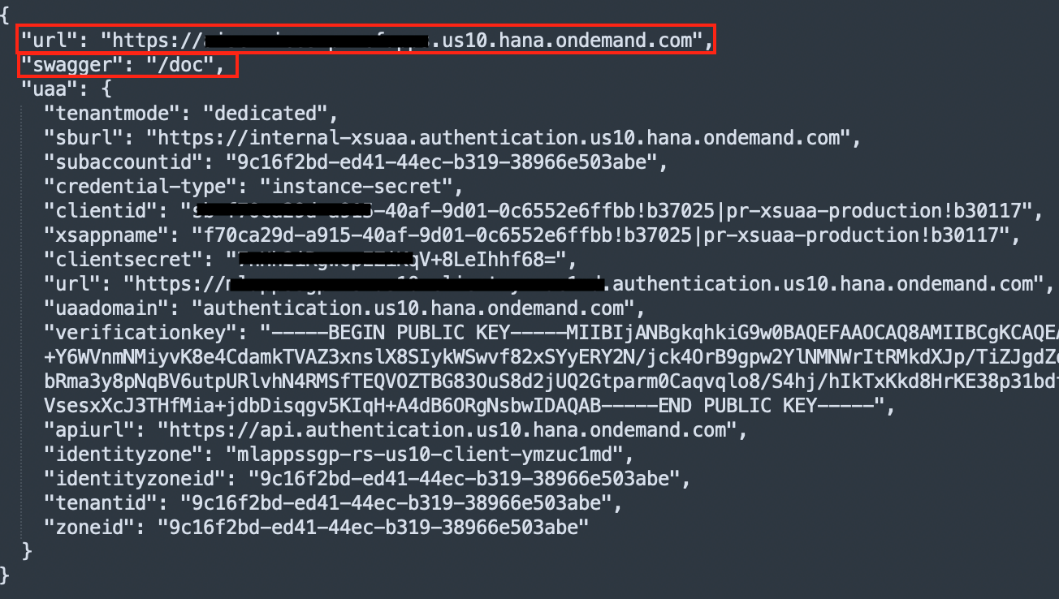
Swagger API Section of the Service Key
In the address bar of a new browser tab, paste the url value, followed by the swagger value and hit Enter.
Authorization on the Swagger API Page
Before using the APIs, you must authorize yourself using the Authorize button in the upper-right corner of the screen.
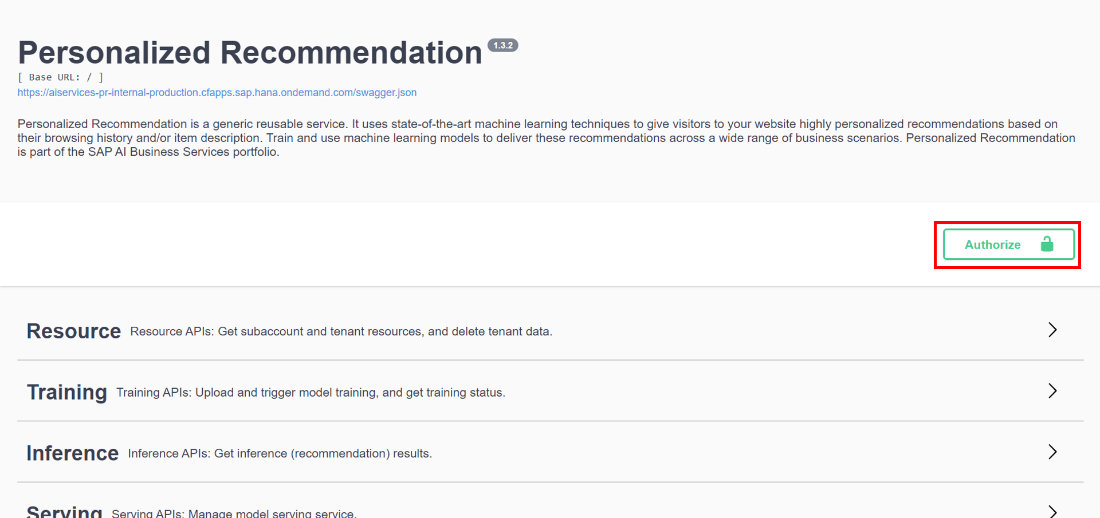
Authorize button on the Swagger API Page
When you click the button, a popup appears, asking you to input your Bearer Token. In the input box, make an entry with the format Bearer <your_token>, where your_token is the “access_token” value from the response received earlier.
 Enter Bearer Token on the Authorize screen
Next, click Authorize to use the APIs.
When you’ve successfully created the token and authorized yourself on the Swagger API page, click the following link to continue to the next step of this guide – Model Training and Serving.
Cheers
At this point, we have completed the service account setup and generated a token. If you have encountered any issues, feel free to leave a comment below. My team will definitely help you out. Alternatively, check out the Q&A area in the community or visit our community page to browse our use cases and learning materials.
In the next step, we will be using the APIs to trigger training and view the training status. Feel free to follow my profile and stay tuned for the next steps. See you in the next blog!
Labels:
You must be a registered user to add a comment. If you've already registered, sign in. Otherwise, register and sign in.
Labels in this area
-
ABAP CDS Views - CDC (Change Data Capture)
2 -
AI
1 -
Analyze Workload Data
1 -
BTP
1 -
Business and IT Integration
2 -
Business application stu
1 -
Business Technology Platform
1 -
Business Trends
1,661 -
Business Trends
87 -
CAP
1 -
cf
1 -
Cloud Foundry
1 -
Confluent
1 -
Customer COE Basics and Fundamentals
1 -
Customer COE Latest and Greatest
3 -
Customer Data Browser app
1 -
Data Analysis Tool
1 -
data migration
1 -
data transfer
1 -
Datasphere
2 -
Event Information
1,400 -
Event Information
64 -
Expert
1 -
Expert Insights
178 -
Expert Insights
273 -
General
1 -
Google cloud
1 -
Google Next'24
1 -
Kafka
1 -
Life at SAP
784 -
Life at SAP
11 -
Migrate your Data App
1 -
MTA
1 -
Network Performance Analysis
1 -
NodeJS
1 -
PDF
1 -
POC
1 -
Product Updates
4,577 -
Product Updates
324 -
Replication Flow
1 -
RisewithSAP
1 -
SAP BTP
1 -
SAP BTP Cloud Foundry
1 -
SAP Cloud ALM
1 -
SAP Cloud Application Programming Model
1 -
SAP Datasphere
2 -
SAP S4HANA Cloud
1 -
SAP S4HANA Migration Cockpit
1 -
Technology Updates
6,886 -
Technology Updates
401 -
Workload Fluctuations
1
Related Content
- Cloud Integration: Manually Sign / Verify XML payload based on XML Signature Standard in Technology Blogs by SAP
- SAP Cloud Integration: Understanding the XML Digital Signature Standard in Technology Blogs by SAP
- Setup of Synthetic User Monitoring in SAP Cloud ALM in Technology Blogs by Members
- Native HANA Information Views on Source system S4/HANA. in Technology Q&A
- plug and gain 101: #4 What is a Process Flow Variant? in Technology Blogs by SAP
Top kudoed authors
| User | Count |
|---|---|
| 11 | |
| 10 | |
| 9 | |
| 9 | |
| 7 | |
| 7 | |
| 7 | |
| 6 | |
| 6 | |
| 5 |