

- SAP Community
- Products and Technology
- Enterprise Resource Planning
- ERP Blogs by SAP
- Introduction of Bad Debt Relief solution
Enterprise Resource Planning Blogs by SAP
Get insights and updates about cloud ERP and RISE with SAP, SAP S/4HANA and SAP S/4HANA Cloud, and more enterprise management capabilities with SAP blog posts.
Turn on suggestions
Auto-suggest helps you quickly narrow down your search results by suggesting possible matches as you type.
Showing results for
Product and Topic Expert
Options
- Subscribe to RSS Feed
- Mark as New
- Mark as Read
- Bookmark
- Subscribe
- Printer Friendly Page
- Report Inappropriate Content
06-17-2022
8:32 AM
What is Bad Debt Relief (BDR)?
The taxpayer, who is liable to pay tax on supplied goods and services, is authorized to reduce the tax base after the tax becomes chargeable if the customer does not fully or partly pay for the goods or services and the receivable result becomes uncollectible. Bad Debt is the uncollectible payment; Bad debt relief is the reduced part calculated by tax rules from the payment.
After identifying the Bad Debt, the process of correction documents can be initiated. The Bad Debt Relief correction documents are reported in the VAT ledger.
Description of business process

Please note that this blog post only covers details of the Finance Contract Accounting (FI-CA) component.
Basic Business Process
Basic prerequisite for Correction documents creation is customizing configuration described in the chapter Prerequisites.
- Posting invoices: The service/product provider first posts the invoice and pays the VAT amount to the tax authority.
After the invoice is identified as a bad debt and fulfill all required conditions, it is possible to initiate the correction processing to create correction tax document
- Managing correction – mark receivables: This process is the first step in the Tax Correction Framework for creating correction documents. This step is indicated in yellow in the flow chart.
To mark receivables is possible to accomplish with transaction code FKKID_TC in dialog or in the background (also in simulation mode) and marked receivables are then saved in DB table DFKKIDTCT.- Choose “Items for Processing” in section Scope. “Add/Change/Del. Mark of Items” in section Action. “In dialog” in section Control.
- Choose „Correction category as "1 - VAT correction" in the Input parameters and enter, for example, document numbers in Corrected Document Number“ in Corrected Document Data and execute.

- Choose items in the provided list and click “Set marks” and your customized value in the Correction reason and eventually "External package reference number ID" in the pop-up window populated
- You can also unmark the already marked items by clicking on button “Delete marks”.

- After the successful executing the items marking, you will find your assigned value in the “Correction reason” column and in the “External package reference number ID” and it indicates the items are ready for correction documents creation.

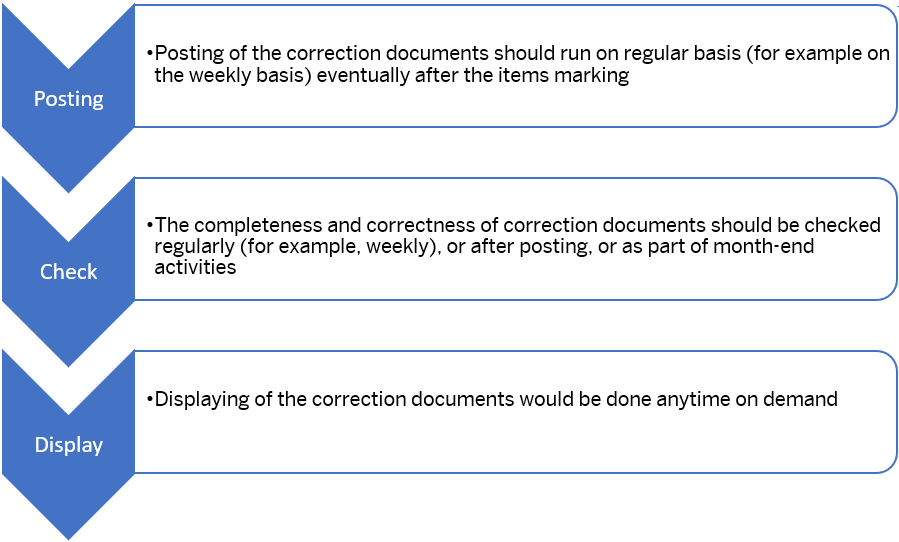
- Correction evaluation and posting: The second step within the Tax Correction Framework is to evaluate the feasibility to create and post the Correction document. The result of the successful executing is created Correction document. This step is indicated in yellow in the flow chart.
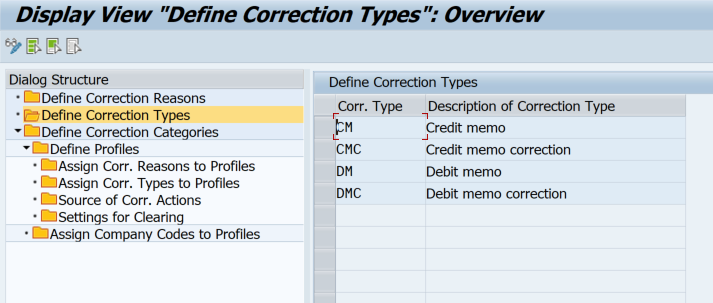
If Correction Documents are posted then the correction information for Corrected Document items is stored in DB Table DFKKIDTC, such as corrected amounts and others of every Corrected Document item. There are four types of correction document:
- Credit Memo (decrease of tax base amount): It happens most frequently compared to other correction documents. If an invoice is not fully paid, a Credit Memo will be created to return the VAT amount from the Tax authority. This Correction document can be printed and sent to the customer via FICA correspondence.
- Debit Memo (increase of tax base amount): It happens when the arrival of full/partial payment of invoice items, after the Credit Memo was issued and Tax authority already returned the VAT amount. This Correction document can be printed and sent to the customer via FICA correspondence.
- Credit Memo Correction (increase of tax base amount): It is used for correcting mistakes in Credit Memo, or as a correction document for Credit Memo (always 1:1). This Correction document can be printed and sent to the customer via FICA correspondence.
- Debit Memo Correction (decrease of tax base amount): It is used for a correction document of Debit Memo, when the invoice clearing with payment was reset. This Correction document can be printed and sent to the customer via FICA correspondence.
Automated creation of the Correction documents: Credit memo, Debit memo and Debit memo correction is possible to realize via transaction code FKKID_TC in dialog or in the background (also in simulation mode) and depends on the situation for each item:
- Choose “Posting of Marked items” in section Scope, “Update postings” in section Action, “In dialog” in section Control, and “Real run” in section Mode.
- Choose „Correction category as "1 - VAT correction" in the Input parameters and enter “Reconciliation key”, “Posting date” and "Document date”.
- Choose "Display results" and List corrected documents by number in Display Control and enter, for example, document numbers in "Corrected Document Number" in Corrected Document Data and execute.


- In Real mode run you have confirmed the required processing by clicking on button "Continue".
- Result of the processing is documented in the application log. After the successful processing the correction documents are created and displayed for the selected items of the corrected documents.


Automated creation of the Correction document Credit memo correction is possible to realize manually via transaction code FKKID_TC1 in dialog mode:
- Choose “Display correction documents” in section Action.
- Enter “Reconciliation key”, “Posting date” and “Document date.”
- Enter for example document numbers in "Corrected document number" in section Corrected document data and execute.

- Select required Correction documents Credit memo, for which is required to create Correction document and click on the button „Correct correction “
- Result of the processing is documented in the application log. After the successful processing, the correction documents are created for selected items of the corrected documents.
- Correction documents check and display: It is possible to list and display correction documents via transaction code FKKID_TC in dialog or in the background (list), where are listed all correction documents based on the selection criteria entered. You can display correction documents via transaction code FKKID_TC1 in dialog or in the background (list), where are listed all correction documents based on the selection criteria entered with status indication and correction necessity.
Transaction code FKKID_TC:
- Choose “Posting of Marked items” in section Scope, “Display existing postings” in section Action, “In dialog” in section Control, and “Real run” in section Mode.
- Choose „Display reversed corrections “, “Display corrected corrections”, “List corrected documents by number” in section Display control based on your requirements.
- Enter for example document numbers in „Corrected document number“in section Corrected document data and execute.“

- There are listed and displayed the information about corrected documents/items and also information about related Correction documents/items

Transaction code FKKID_TC1:
- Choose “Display correction documents” in section Action.
- Enter “Display Item details” in section Control.
- Enter for example document numbers in „Corrected document number“in section Corrected document data and execute.

- There are listed and displayed the information about corrected documents/items and also information about related Correction documents/items.

Transaction code FKKID_TC1 correction documents check:
- Choose “Display corrected documents” in section Action.
- Enter “Display Item details” in section Control.
- Choose Analysis Flag as “ “ (all = information, warning, error)
- Enter for example document numbers in "Corrected Document Number" in section Corrected document data and execute.

- Each marked document item are listed and displayed with detail information, including “Relevant Correction Amount in Local Currency”, “Correction Amount in Local Currency”, “Difference”, “Analysis flag”, suggested “Correction type”, “Posting type of correction”, “Description of the correction type” etc. Types of correction depends on the situations of items.

4. Mark items with File Upload: When there are multiple documents to mark, you can use the file uploading function from the local file *.txt (with FICA document numbers) to mark items in transaction FKKID_TC1 via mass processing in simulation mode.
- Choose “Mark Items with File Upload” in section Action.
- Enter “File name and path”, “Correction reason” and “External package reference ID” and execute
 Result of the processing is documented in the application log.
- After the successful execution, you can find your assigned value in the “Correction reason” column and in the “External package reference number ID”, which indicates the items are ready for correction documents creation.
Prerequisites
- Basic Customizing: You can enter the View Cluster FKKID_TC_VC in transaction SM34.
- Define Correction Reasons: You can define your own correction reasons with code and description.

- Define Correction Types: You can define your own correction types with code and description.
- Define Correction Categories: A Correction Category stands for a Tax Correction implementation, if there is a correspondent output relevant to the Correction Category then the Correspondence Type must be stated.

- Define Correction Profile: Since different Company Codes can have different settings. The basic idea is to customize the Correction Profile and assign them to Company Codes. If there are multiple Company Codes with a same setting, one Correction Profile prepared is enough to assign to multiple Company Codes.

- Define Correction Types: You can define your own correction types with code and description.
Within Define profile definition you can assign:
- Correction reasons to Profiles: You can assign the customized value.

- Correction types to Profiles: The profile depends on the Correction Types and its settings. Document Type, main transaction and sub transaction are for correction postings

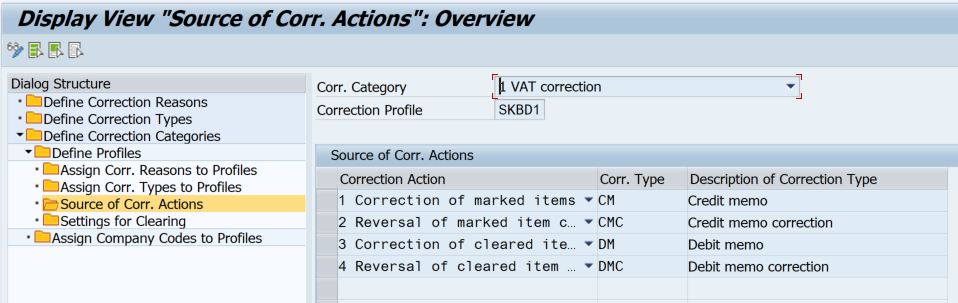
- Source of Corr. Actions: It defines which Correction Action are to be used in different situations.
- Correction of marked items: First posting after the receivable was marked for processing.
- Reversal of marked item corrections: It is used for taking the correction of marked items back.
- Correction of cleared items: It is an action to receivable clearing.
- Reversal of cleared item corrections: It is used for clearing reversal.
 Settings for Clearing: The tax correction processing depends on the receivable clearing type.
- Assign Company Codes to Profiles: In the Dialog Structure you can assign the Company codes to defined profiles.

- Assign Company Codes to Profiles: In the Dialog Structure you can assign the Company codes to defined profiles.
- Correction reasons to Profiles: You can assign the customized value.
- Basic Customizing for posting:
- In transaction FQC0, enter 3200 in the Posting Area.
- You can choose the appointed Chart of Accounts.
- You can click create to add new entries and define posting attributes of the correction documents to be created based on the attributes of the corrected documents.

How to use BDR solution
(Note: Blocks with blue color are in scope of BDR solution.)

How to display correction information in FPE3/FPE2
By implementing the customizing procedure below, you can display the correction data in the FICA Document Display/Change (FPE3/FPE2)
- Go to tr. SPRO FICA customizing
- Navigate to Financial Accounting –> Contract Accounts receivable and payable –> Basic Functions –>Posting and Documents –> Document –> Screen preparation –> Include own fields and detail screens (You can also refer to the blog post Adding custom screen to FPE1, FPE2 and FPE3 transactions and prepare own business partner item detail screen)
- To add the correction fields into your new screen, You can:
- Add some individual fields or
- Use table controls if there are more records related to one business partner’s document item.
- Fields which can be added and referred from the screen, are in DB tables DFKKIDTCT (Tax Corrections – Items for processing) or DFKKIDTC (Tax Corrections - Correction Records). The relation to the business partner item is saved in the fields TCRPD, TCRPR and TCRPI (Corrected Document item key fields) or they can be referred by the RPKEY_S group name.
- Please note that the relation to the correction data is at the document item (OPUPK) level instead of subitem level; that is the correction data is one for all subitems of a particular item.

- Correction data can be either read directly from DFKKIDTCT and DFKKIDTC tables or by methods READ_TCT_FOR_TCRPI or READ_TC_FOR_TCRPI from the class FKKID_CL_TC_DB.
- Correction data can only be read and displayed but cannot be changed directly from the screen in tr. FPE2). Any changes to the correction data can only be accomplished by transactions FKKID_TC or FKKID_TC1, which can be executed from the screen after implementing a button.
- Please note that the relation to the correction data is at the document item (OPUPK) level instead of subitem level; that is the correction data is one for all subitems of a particular item.
SAP Notes
The general functions in this blog post can also be used for country/region-specific solutions, such as deliverables described in the SAP Notes for Slovakia
SAP Help Portal
The updated documentation will be available on the SAP Help Portal as soon as the Support Packages listed in the SAP Notes are available.
Is this blog post useful? Do you have any further comments regarding this topic? Please don’t hesitate to share your thoughts in the comment section below.
- SAP Managed Tags:
- SAP Contract Accounts Receivable and Payable,
- SAP S/4HANA Finance
Labels:
3 Comments
You must be a registered user to add a comment. If you've already registered, sign in. Otherwise, register and sign in.
Labels in this area
-
Artificial Intelligence (AI)
1 -
Business Trends
363 -
Business Trends
22 -
Customer COE Basics and Fundamentals
1 -
Digital Transformation with Cloud ERP (DT)
1 -
Event Information
461 -
Event Information
24 -
Expert Insights
114 -
Expert Insights
156 -
General
1 -
Governance and Organization
1 -
Introduction
1 -
Life at SAP
415 -
Life at SAP
2 -
Product Updates
4,685 -
Product Updates
217 -
Roadmap and Strategy
1 -
Technology Updates
1,502 -
Technology Updates
89
Related Content
- ISAE 3000 for SAP S/4HANA Cloud Public Edition - Evaluation of the Authorization Role Concept in Enterprise Resource Planning Blogs by SAP
- Quick Start guide for PLM system integration 3.0 Implementation/Installation in Enterprise Resource Planning Blogs by SAP
- Introducing the market standard of electronic invoicing for the United States in Enterprise Resource Planning Blogs by SAP
- FAQ on Upgrading SAP S/4HANA Cloud Public Edition in Enterprise Resource Planning Blogs by SAP
- An introduction into Service Management in S/4HANA Cloud Private Edition in Enterprise Resource Planning Blogs by SAP
Top kudoed authors
| User | Count |
|---|---|
| 12 | |
| 11 | |
| 10 | |
| 8 | |
| 7 | |
| 6 | |
| 4 | |
| 4 | |
| 4 | |
| 3 |