
- SAP Community
- Groups
- Interest Groups
- Application Development
- Blog Posts
- Getting started with ABAP: How to Create Table Par...
Application Development Blog Posts
Learn and share on deeper, cross technology development topics such as integration and connectivity, automation, cloud extensibility, developing at scale, and security.
Turn on suggestions
Auto-suggest helps you quickly narrow down your search results by suggesting possible matches as you type.
Showing results for
anujawani2426
Active Participant
Options
- Subscribe to RSS Feed
- Mark as New
- Mark as Read
- Bookmark
- Subscribe
- Printer Friendly Page
- Report Inappropriate Content
06-16-2022
6:26 PM
This is the fourth blog post in this series. Here is the previous blog post Getting Started with ABAP: Data Dictionary Introduction
In the previous blog post, we learn what is Data Dictionary.
In this blog post you will learn how to create table, data elements and domain
Step 1: Enter transaction code SE11 from where we can create a table and press Enter.
Step 2: You will get below window. Enter the table name which you want to create.
Note: Table name should start with Y or Z only.
Step 3: Click on Create button. You will get below window.
Step 4: Enter Short Description. Enter Delivery Class as A. Select Display/Maintenance Allowed from the dropdown Data Browser/Table View Editing.
Delivery class is how database table is going to be transported during installation, upgrade, and copies within landscapes, clients and customer systems.
There is a total of 7 Delivery Classes in SAP ABAP.
If we select this delivery class type that means we are creating application table which contain master data or transaction data. Application Tables are transported to the customer as empty.
Master data means the data which rarely gets changed. For example, Customer data, Address data.
Transaction Data means the data which change frequently. For example, Sales Data.
These are client specific customer table used for customize application. Here data is only entered by the customer.
These tables used to store temporary data. Tables are delivered to customer as empty.
Customer table where SAP can add data but can not modify or delete it.
System table in which customers can make entries. System tables are delivered with some data.
These tables are System table delivered by SAP with predefined data as part of system.
System table for system administration data. A system table in the delivery class W usually delivered with predefined data by SAP.
Data browser/table view editing allows you to edit the contents of the table, create entries into the table, delete entries from the table using table maintenance tools.
Table maintenance tools are data browser (Transaction SE16), table/view maintenance (Transaction SM30/SM31) and Generate Table maintenance Dialog (Transaction SE54).
There are four options in data browser/table view editing
If we select this option in dropdown, using data browser (Transaction SE16) display of the table contents is possible but no maintenance is allowed.
Using table/view maintenance (Transaction SM30/SM31) display and maintenance of the table/view is not allowed.
Using Generate Table Maintenance Dialog (Transaction SE54) tool only display of the table contents is allowed no maintenance.
If we select this option in dropdown, using data browser (Transaction SE16) display of the table contents as well as maintenance of table/view is allowed.
Using table/view maintenance (Transaction SM30/SM31) display and maintenance of the table/view is allowed.
Using Generate Table Maintenance Dialog (Transaction SE54) tool display of the table contents and maintenance is allowed.
If we select this option in dropdown, using data browser (Transaction SE16) display of the table contents as well as maintenance is not allowed.
Using table/view maintenance (Transaction SM30/SM31) display and maintenance of the table/view is not allowed.
Using Generate Table Maintenance Dialog (Transaction SE54) tool display of the table contents as well as maintenance is not allowed.
If we select this option in dropdown, using data browser (Transaction SE16) display of the table contents is possible but no maintenance is allowed.
Using table/view maintenance (Transaction SM30/SM31) display is allowed and maintenance of the table/view is not allowed.
Using Generate Table Maintenance Dialog (Transaction SE54) tool only display of the table contents is allowed no maintenance.
Step 5: Press Save button and save it in your existing package. Click on Fields Tab. You will get below window.
Step 6: Add fields into the table. First add MANDT field and make it key also add the MANDT as a data element. Press Enter.
MANDT is a client field. Here client means area. If we have MANDT field in our table that means table is client dependent and if we don’t have that field that means table is client independent.
Client dependent means if we create table in one client it will be accessible only in that client and it is not accessible in other clients.
Client independent means if we create table in one client it will be accessible in that client and other client also.
MANDT is a standard data element which is already created by SAP. Hence, we are reusing it here.
Step 7: Double click on MANDT element. Below window will get open. Here we can see MANDT is a data element and it is already created.
Here we can see that MANDT domain is already created by SAP.
Note: To add field into table first we require to create Data Element first.
Two ways we can create Data Element
Step 1: Add Field name as Employee_id and Data element name as ZAK_Employee_id.
Step 2: Double click on ZAK_employee_id data element. It will show you below window. Click on yes and save it in your package.
Step 3: Then it will ask you to create data element. Click on yes.
Step 4: Give Short Description.
Step 5: Here to create data element we need to specify the data type. That means which type of it is.
In Elementary Type, we can specify type by creating domain or using built-in type.
First, we will see built-in type.
Click on built-in type and then click on data type field. Just beside the data type field there is input help means there is a list of data type that we can use it.
Below you can see the list of data type.
Step 6: I want employee_id field of type CHAR hence I selected CHAR.
Step 7: Specify length of the value which we want to store in employee_id field.
Give length 20 if you select numeric data type then you can also specify decimal places.
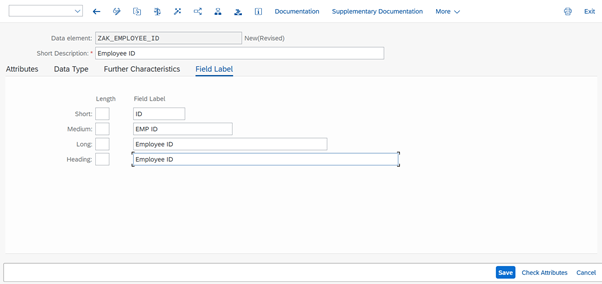
Step 8: Click on Field Label tab. It is compulsory to give field label. It is used to display heading for that particular field in the report.
Step 9: Save it in your package and activate it.
Step 10: Click on back. Here your data element is created.
I am going to continue this blog post in next blog post.
Here you can check next blog post Getting started with ABAP: How to Create Table Part 2
Follow my profile to be notified of the next blog post. Please feel free to ask any questions you have in the comments section below.
In the previous blog post, we learn what is Data Dictionary.
In this blog post you will learn how to create table, data elements and domain
How to a Create Table
Step 1: Enter transaction code SE11 from where we can create a table and press Enter.

Step 2: You will get below window. Enter the table name which you want to create.
Note: Table name should start with Y or Z only.

Step 3: Click on Create button. You will get below window.

Step 4: Enter Short Description. Enter Delivery Class as A. Select Display/Maintenance Allowed from the dropdown Data Browser/Table View Editing.
What is Delivery Class?
Delivery class is how database table is going to be transported during installation, upgrade, and copies within landscapes, clients and customer systems.
Types of Delivery Class
There is a total of 7 Delivery Classes in SAP ABAP.
- A
If we select this delivery class type that means we are creating application table which contain master data or transaction data. Application Tables are transported to the customer as empty.
Master data means the data which rarely gets changed. For example, Customer data, Address data.
Transaction Data means the data which change frequently. For example, Sales Data.
- C
These are client specific customer table used for customize application. Here data is only entered by the customer.
- L
These tables used to store temporary data. Tables are delivered to customer as empty.
- G
Customer table where SAP can add data but can not modify or delete it.
- E
System table in which customers can make entries. System tables are delivered with some data.
- S
These tables are System table delivered by SAP with predefined data as part of system.
- W
System table for system administration data. A system table in the delivery class W usually delivered with predefined data by SAP.
Data Browser/Table View Editing
Data browser/table view editing allows you to edit the contents of the table, create entries into the table, delete entries from the table using table maintenance tools.
Table maintenance tools are data browser (Transaction SE16), table/view maintenance (Transaction SM30/SM31) and Generate Table maintenance Dialog (Transaction SE54).
There are four options in data browser/table view editing
- Display/Maintenance allowed with restrictions
If we select this option in dropdown, using data browser (Transaction SE16) display of the table contents is possible but no maintenance is allowed.
Using table/view maintenance (Transaction SM30/SM31) display and maintenance of the table/view is not allowed.
Using Generate Table Maintenance Dialog (Transaction SE54) tool only display of the table contents is allowed no maintenance.
- Display/Maintenance Allowed
If we select this option in dropdown, using data browser (Transaction SE16) display of the table contents as well as maintenance of table/view is allowed.
Using table/view maintenance (Transaction SM30/SM31) display and maintenance of the table/view is allowed.
Using Generate Table Maintenance Dialog (Transaction SE54) tool display of the table contents and maintenance is allowed.
- Display/Maintenance Not Allowed
If we select this option in dropdown, using data browser (Transaction SE16) display of the table contents as well as maintenance is not allowed.
Using table/view maintenance (Transaction SM30/SM31) display and maintenance of the table/view is not allowed.
Using Generate Table Maintenance Dialog (Transaction SE54) tool display of the table contents as well as maintenance is not allowed.
- Only Display Allowed
If we select this option in dropdown, using data browser (Transaction SE16) display of the table contents is possible but no maintenance is allowed.
Using table/view maintenance (Transaction SM30/SM31) display is allowed and maintenance of the table/view is not allowed.
Using Generate Table Maintenance Dialog (Transaction SE54) tool only display of the table contents is allowed no maintenance.

Step 5: Press Save button and save it in your existing package. Click on Fields Tab. You will get below window.

Step 6: Add fields into the table. First add MANDT field and make it key also add the MANDT as a data element. Press Enter.

What is MANDT?
MANDT is a client field. Here client means area. If we have MANDT field in our table that means table is client dependent and if we don’t have that field that means table is client independent.
Client dependent means if we create table in one client it will be accessible only in that client and it is not accessible in other clients.
Client independent means if we create table in one client it will be accessible in that client and other client also.
MANDT is a standard data element which is already created by SAP. Hence, we are reusing it here.
Step 7: Double click on MANDT element. Below window will get open. Here we can see MANDT is a data element and it is already created.
Here we can see that MANDT domain is already created by SAP.

Note: To add field into table first we require to create Data Element first.
How to Create Data Element
Two ways we can create Data Element
First Method
Step 1: Add Field name as Employee_id and Data element name as ZAK_Employee_id.

Step 2: Double click on ZAK_employee_id data element. It will show you below window. Click on yes and save it in your package.

Step 3: Then it will ask you to create data element. Click on yes.

Step 4: Give Short Description.

Step 5: Here to create data element we need to specify the data type. That means which type of it is.
In Elementary Type, we can specify type by creating domain or using built-in type.
First, we will see built-in type.
Click on built-in type and then click on data type field. Just beside the data type field there is input help means there is a list of data type that we can use it.
Below you can see the list of data type.

Step 6: I want employee_id field of type CHAR hence I selected CHAR.

Step 7: Specify length of the value which we want to store in employee_id field.
Give length 20 if you select numeric data type then you can also specify decimal places.

Step 8: Click on Field Label tab. It is compulsory to give field label. It is used to display heading for that particular field in the report.
Step 9: Save it in your package and activate it.

Step 10: Click on back. Here your data element is created.

I am going to continue this blog post in next blog post.
Here you can check next blog post Getting started with ABAP: How to Create Table Part 2
Follow my profile to be notified of the next blog post. Please feel free to ask any questions you have in the comments section below.
- SAP Managed Tags:
- ABAP Development
1 Comment
You must be a registered user to add a comment. If you've already registered, sign in. Otherwise, register and sign in.
Labels in this area
-
A Dynamic Memory Allocation Tool
1 -
ABAP
8 -
abap cds
1 -
ABAP CDS Views
14 -
ABAP class
1 -
ABAP Cloud
1 -
ABAP Development
4 -
ABAP in Eclipse
1 -
ABAP Keyword Documentation
2 -
ABAP OOABAP
2 -
ABAP Programming
1 -
abap technical
1 -
ABAP test cockpit
7 -
ABAP test cokpit
1 -
ADT
1 -
Advanced Event Mesh
1 -
AEM
1 -
AI
1 -
API and Integration
1 -
APIs
8 -
APIs ABAP
1 -
App Dev and Integration
1 -
Application Development
2 -
application job
1 -
archivelinks
1 -
Automation
4 -
BTP
1 -
CAP
1 -
CAPM
1 -
Career Development
3 -
CL_GUI_FRONTEND_SERVICES
1 -
CL_SALV_TABLE
1 -
Cloud Extensibility
8 -
Cloud Native
7 -
Cloud Platform Integration
1 -
CloudEvents
2 -
CMIS
1 -
Connection
1 -
container
1 -
Debugging
2 -
Developer extensibility
1 -
Developing at Scale
4 -
DMS
1 -
dynamic logpoints
1 -
Eclipse ADT ABAP Development Tools
1 -
EDA
1 -
Event Mesh
1 -
Expert
1 -
Field Symbols in ABAP
1 -
Fiori
1 -
Fiori App Extension
1 -
Forms & Templates
1 -
IBM watsonx
1 -
Integration & Connectivity
10 -
JavaScripts used by Adobe Forms
1 -
joule
1 -
NodeJS
1 -
ODATA
3 -
OOABAP
3 -
Outbound queue
1 -
Product Updates
1 -
Programming Models
13 -
Restful webservices Using POST MAN
1 -
RFC
1 -
RFFOEDI1
1 -
SAP BAS
1 -
SAP BTP
1 -
SAP Build
1 -
SAP Build apps
1 -
SAP Build CodeJam
1 -
SAP CodeTalk
1 -
SAP Odata
1 -
SAP UI5
1 -
SAP UI5 Custom Library
1 -
SAPEnhancements
1 -
SapMachine
1 -
security
3 -
text editor
1 -
Tools
17 -
User Experience
5
Top kudoed authors
| User | Count |
|---|---|
| 4 | |
| 2 | |
| 2 | |
| 2 | |
| 2 | |
| 1 | |
| 1 | |
| 1 | |
| 1 | |
| 1 |