
- SAP Community
- Products and Technology
- Technology
- Technology Blogs by SAP
- SAP BTP: How to call protected app across regions ...
Technology Blogs by SAP
Learn how to extend and personalize SAP applications. Follow the SAP technology blog for insights into SAP BTP, ABAP, SAP Analytics Cloud, SAP HANA, and more.
Turn on suggestions
Auto-suggest helps you quickly narrow down your search results by suggesting possible matches as you type.
Showing results for
Product and Topic Expert
Options
- Subscribe to RSS Feed
- Mark as New
- Mark as Read
- Bookmark
- Subscribe
- Printer Friendly Page
- Report Inappropriate Content
06-15-2022
3:02 PM
This blog post shows how to support authorization (scope, role) in a user-centric scenario where a REST endpoint is called from an application in a different subaccount (in different region).
Used technologies: SAP BTP, Cloud Foundry, XSUAA, SAML2, OAuth2, Destination, OAuth2SAMLBearerAsertion, Node.js,
This blog post builds completely on top of the scenario described in detail in the previous postings: intro and tutorial.
This blog is based on default setup in trial accounts. If you have own custom Identity Provider, you might prefer the next blog post.
0. Introduction
1. Backend Application
2. Frontend Application
3. Trust Configuration
4. Destination
5. Run
6. Cleanup
Appendix 1: Sample Code for Backend Application
Appendix 2: Sample Code for Frontend Application
Appendix 3: Sample Code for Destination Configuration
The detailed description of our setup is described in the intro blog.
In our example scenario, we have a kind of service-providing application, which we call “Backend App” and which is deployed in a Trial account in region Singapore (ap21).
We want to call it from a “Frontend Application” which is deployed in a different Trial account in a different region (us10).
The challenge of our scenario was authenticating a user across boundaries of different subaccounts and regions.
The solution was to define Trust (based on SAML) and to use a destination of type "OAuth2SAMLBearerAssertion".
In the previous tutorial, we’ve focused on describing how to configure trust and destination, to realize authentication for the backend app which is protected with OAuth.
However, we ignored the authorization aspect.
So this is todays challenge:
In addition to protecting our backend app with OAuth, we require a scope. And we expect that the frontend app sends a JWT token which contains that scope.
How to solve this challenge?
The solution is much more simple than expected:
We proceed as usual, in the backend subaccount, we assign the role collection to the “frontend” user.
This is possible thanks to the configured trust.
Below diagram shows the scenario and the relevant components:
In the diagram we can see that a user accesses the frontend application.
This user is known to the identity provider, so the logon (via approuter and xsuaa) is successful.
The frontend app calls the backend app which is protected via xsuaa and defines a scope.
This scope is contained in a role collection.
The clou is:
The second subaccount defines trust to the frontend subaccount.
As such, the users of frontend IDP are available in backend via trust.
So the frontend user can be configured in the role collection.
Like that, when a JWT token is fetched for the frontend user, it will contain the backend scope.
Basically, this is already all the knowledge which is aimed to be transferred in this tutorial.
Curious readers however, might wish to go through the step-by-step description given below.
Most explanations are given in the previous blogs, so todays tutorial will be much faster.
You can re-use previous deployment, if not already deleted.
New readers can safely create everything from scratch and turn to the previous posts for explanations.
The previous tutorial and this prerequisites section are prerequisites.
We use the project as created here.
We’re using the same backend application as in the previous tutorial, with 2 differences:
We login to the Trial account which represents the backend.
In my example:
cf login -a https://api.cf.ap21.hana.ondemand.com -o backendorg
Today we want to secure our backend app not only with OAuth protection, but also with a scope.
This ensures that only users who have been assigned authorization (by admin) are able to call our endpoint.
We enhance the security descriptor to define a scope which is wrapped in a role-template.
For more convenience, we also define a role collection that can be assigned to a user (by admin).
The command to create the instance from scratch:
cf cs xsuaa application backendXsuaa -c backend-security.json
The command to update existing instance:
cf update-service backendXsuaa -c backend-security.json
After running the command, we can check that the role and role collection are available in the backend subaccount dashboard.
In our application code, we can now check if the required scope is available in the incoming JWT token.
For the very first test, I use to comment the hard check and instead, send the info in the response.
The complete sample code can be found in the appendix 1.
After deploy, we can take a note of the service-endpoint URL.
In my example:
https://backend.cfapps.ap21.hana.ondemand.com/endpoint
The frontend app is explained in previous post and contains no difference.
So we go through the creation process without further comments
We log on to the Trial account used for the frontend.
In my example:
cf login -a https://api.cf.us10.hana.ondemand.com -o frontendorg
The creation command:
cf cs xsuaa application frontendXsuaa -c frontend-security.json
The creation command:
cf cs destination lite frontendDestination
The complete sample code can be found in the appendix 2.
The complete sample code can be found in the appendix 2.
After deploy, we get the application entry URL, but we don’t use it until all configuration has been finished.
The trust configuration does not differ from the description in previous tutorial.
Short description:
Download IdP Metadata from frontend subaccount -> Connectivity -> Destinations
Configure Trust at subaccount -> Security -> Trust Configuration -> New
Name: "Frontend_IDP"
Available for User Logon: disabled
Creating the destination is described in detail in previous blog post.
So today we can just import the destination configuration at
frontend_subaccount -> Connectivity -> Destinations -> Import Destination
The destination configuration can be copied (and adapted) from the appendix 3.
After import, anyways, we need to manually enter the sensitive info: clientid/secret.
To get the required info, we need to view the environment variables of our deployed backend app.
E.g. via these commands:
cf login -a https://api.cf.ap21.hana.ondemand.com -o backendorg
cf env backend
Then find the section of XSUAA binding and copy the properties into the destination configuration.
In my example:
"clientid": "sb-backendxsuaa!t7722"
"clientsecret": "msWms8tylSHWi4HJ7pTPhHNwaiM="
Remember:
"Client Key" <- clientid
"Token Service User" <- clientid
"Token Service Password" <- clientsecret
After finishing with the 2 required configurations, we (still) cannot call our application.
We first need to assign the roles, which we defined in our security config files, to our user.
Today, we need an additional step, we need to assign roles on both sides, frontend and backend.
5.1.1. Assign Frontend Role
Our frontend app requires a role with the uaa.user scope, as described in previous tutorial.
To assign this role, we login to our frontend Trial account
5.1.2. Assign Backend Role
This step is new.
The challenge:
We have a (frontend) user who accesses our (frontend) application which is running in (frontend) account in some foreign region (like e.g. us10).
This user is only available in that account, not in backend account.
So we cannot use a “grant” statement on XSUAA level to assign the backend role to the frontend user (as described here).
Nevertheless, the solution is different and more simple:
After we defined the trust to the IDP of Frontend_Subaccount, we can access the users of this Identity Provider.
As such, we can just go ahead, login to the backend subaccount and assign the (frontend) user to the (backend) role which we require in our (backend) application.
To start the flow, we enter our frontend application via the approuter URL.
In my example:
https://frontendrouter.cfapps.us10.hana.ondemand.com/tofrontend/homepage
As a result, our browser should show the 4 JWT sections successfully.
5.2.1. Scope
The JWT information was explained in detail in previous blog post.
For today, we have one additional happiness factor: the scope information.
We can see that the backendscope, which was defined and validated by the backend app, has found its way into the JWT token, which is sent by the frontend app.
This makes us happy.
At least, it made my day, when I saw it for the first time.
Frontend Subaccount:
Manually delete destination configuration.
Delete artifacts:
cf login -a https://api.cf.us10.hana.ondemand.com -o frontendorg
cf d frontend -r -f
cf d frontendrouter -r -f
cf ds frontendXsuaa -f
cf ds frontendDestination -f
Backend Subaccount:
Manually delete trust configuration.
Delete artifacts:
cf login -a https://api.cf.ap21.hana.ondemand.com -o backendorg
cf d backend -r -f
cf ds backendXsuaa -f
In todays tutorial, we’ve learned how to configure authorization (scope) in a cross-subaccount scenario.
The previous tutorial already showed that authentication is possible after configuring trust between subaccounts
Today we’ve seen that we can build on this trust, in order to assign a role to a user from foreign identity provider.
As such, when a frontend user logs into the frontend app, he will receive the backend role, when calling the backend app via destination.
In the next blog post, we're using an external custom Identity Provider and connect it to both our subaccounts. This allows us to use user-group and role collection mapping, to enable authorization.
See links section of previous blog post.
backend-security.json
manifest.yml
package.json
server.js
frontend-security.json
manifest.yml
app
package.json
server.js
package.json
xs-app.json
destination_to_backend
Used technologies: SAP BTP, Cloud Foundry, XSUAA, SAML2, OAuth2, Destination, OAuth2SAMLBearerAsertion, Node.js,
This blog post builds completely on top of the scenario described in detail in the previous postings: intro and tutorial.
This blog is based on default setup in trial accounts. If you have own custom Identity Provider, you might prefer the next blog post.
Quicklinks:
Quick Guide
Sample Code
Content
0. Introduction
1. Backend Application
2. Frontend Application
3. Trust Configuration
4. Destination
5. Run
6. Cleanup
Appendix 1: Sample Code for Backend Application
Appendix 2: Sample Code for Frontend Application
Appendix 3: Sample Code for Destination Configuration
0. Introduction
The detailed description of our setup is described in the intro blog.
In our example scenario, we have a kind of service-providing application, which we call “Backend App” and which is deployed in a Trial account in region Singapore (ap21).
We want to call it from a “Frontend Application” which is deployed in a different Trial account in a different region (us10).
The challenge of our scenario was authenticating a user across boundaries of different subaccounts and regions.
The solution was to define Trust (based on SAML) and to use a destination of type "OAuth2SAMLBearerAssertion".
In the previous tutorial, we’ve focused on describing how to configure trust and destination, to realize authentication for the backend app which is protected with OAuth.
However, we ignored the authorization aspect.
So this is todays challenge:
In addition to protecting our backend app with OAuth, we require a scope. And we expect that the frontend app sends a JWT token which contains that scope.
How to solve this challenge?
The solution is much more simple than expected:
We proceed as usual, in the backend subaccount, we assign the role collection to the “frontend” user.
This is possible thanks to the configured trust.
Below diagram shows the scenario and the relevant components:

In the diagram we can see that a user accesses the frontend application.
This user is known to the identity provider, so the logon (via approuter and xsuaa) is successful.
The frontend app calls the backend app which is protected via xsuaa and defines a scope.
This scope is contained in a role collection.
The clou is:
The second subaccount defines trust to the frontend subaccount.
As such, the users of frontend IDP are available in backend via trust.
So the frontend user can be configured in the role collection.
Like that, when a JWT token is fetched for the frontend user, it will contain the backend scope.
Basically, this is already all the knowledge which is aimed to be transferred in this tutorial.
Curious readers however, might wish to go through the step-by-step description given below.
Most explanations are given in the previous blogs, so todays tutorial will be much faster.
You can re-use previous deployment, if not already deleted.
New readers can safely create everything from scratch and turn to the previous posts for explanations.
Prerequisites
The previous tutorial and this prerequisites section are prerequisites.
Preparation
We use the project as created here.
1. Create Backend Application
We’re using the same backend application as in the previous tutorial, with 2 differences:
- We define a scope in our security config.
- We enforce that scope in our application code.
1.0. Preparation
We login to the Trial account which represents the backend.
In my example:
cf login -a https://api.cf.ap21.hana.ondemand.com -o backendorg
1.1. Create XSUAA Service Instance
Today we want to secure our backend app not only with OAuth protection, but also with a scope.
This ensures that only users who have been assigned authorization (by admin) are able to call our endpoint.
We enhance the security descriptor to define a scope which is wrapped in a role-template.
For more convenience, we also define a role collection that can be assigned to a user (by admin).
"scopes": [{

    "name": "$XSAPPNAME.backendscope"

}],

"role-templates": [{

    "name": "BackendRole",

    "scope-references": ["$XSAPPNAME.backendscope"]

}],

"role-collections": [{

      "name": "Backend_Roles",

      "role-template-references": ["$XSAPPNAME.BackendRole"]
The command to create the instance from scratch:
cf cs xsuaa application backendXsuaa -c backend-security.json
The command to update existing instance:
cf update-service backendXsuaa -c backend-security.json
After running the command, we can check that the role and role collection are available in the backend subaccount dashboard.
1.2. Create Backend Application
In our application code, we can now check if the required scope is available in the incoming JWT token.
app.get('/endpoint', passport.authenticate('JWT', {session: false}), (req, res) => {

    const authInfo = req.authInfo

    console.log(`===> [AUDIT] backendapp accessed by user '${authInfo.getGivenName()}' from subdomain '${authInfo.getSubdomain()}' with oauth client: '${authInfo.getClientId()}'`)

    const isScopeAvailable = authInfo.checkScope(UAA_CREDENTIALS.xsappname + '.backendscope')

    if (! isScopeAvailable) {

        // res.status(403).end('Forbidden. Missing authorization.') // Don't fail during prototyping

    }


    res.json({

        'message': `Backend app successfully called. Scope available: ${isScopeAvailable}`,

        'jwtToken': authInfo.getAppToken()})

})
For the very first test, I use to comment the hard check and instead, send the info in the response.
The complete sample code can be found in the appendix 1.
1.3. Deploy
After deploy, we can take a note of the service-endpoint URL.
In my example:
https://backend.cfapps.ap21.hana.ondemand.com/endpoint
2. Create Frontend Application
The frontend app is explained in previous post and contains no difference.
So we go through the creation process without further comments
2.0. Preparation
We log on to the Trial account used for the frontend.
In my example:
cf login -a https://api.cf.us10.hana.ondemand.com -o frontendorg
2.1. Create XSUAA Service Instance
The creation command:
cf cs xsuaa application frontendXsuaa -c frontend-security.json
2.2. Create Destination Service Instance
The creation command:
cf cs destination lite frontendDestination
2.3. Create Core Application
The complete sample code can be found in the appendix 2.
2.4. Create Approuter
The complete sample code can be found in the appendix 2.
2.5. Deploy
After deploy, we get the application entry URL, but we don’t use it until all configuration has been finished.
3. Configure Trust
The trust configuration does not differ from the description in previous tutorial.
Short description:
3.1. Frontend Subaccount
Download IdP Metadata from frontend subaccount -> Connectivity -> Destinations
3.2. Backend Subaccount
Configure Trust at subaccount -> Security -> Trust Configuration -> New
Name: "Frontend_IDP"
Available for User Logon: disabled
4. Create Destination
Creating the destination is described in detail in previous blog post.
So today we can just import the destination configuration at
frontend_subaccount -> Connectivity -> Destinations -> Import Destination
The destination configuration can be copied (and adapted) from the appendix 3.
#clientKey=<< Existing password/certificate removed on export >>

#tokenServicePassword=<< Existing password/certificate removed on export >>

Description=Destination pointing to backend app endpoint in backend account

Type=HTTP

authnContextClassRef=urn\:oasis\:names\:tc\:SAML\:2.0\:ac\:classes\:PreviousSession

audience=https\://backendsubdomain.authentication.ap21.hana.ondemand.com

Authentication=OAuth2SAMLBearerAssertion

Name=destination_to_backend

tokenServiceURL=https\://backendsubdomain.authentication.ap21.hana.ondemand.com/oauth/token/alias/backendsubdomain.azure-ap21

ProxyType=Internet

URL=https\://backend.cfapps.ap21.hana.ondemand.com/endpoint

nameIdFormat=urn\:oasis\:names\:tc\:SAML\:1.1\:nameid-format\:emailAddress

tokenServiceURLType=Dedicated

tokenServiceUser=sb-backendxsuaa\!t7722
After import, anyways, we need to manually enter the sensitive info: clientid/secret.
To get the required info, we need to view the environment variables of our deployed backend app.
E.g. via these commands:
cf login -a https://api.cf.ap21.hana.ondemand.com -o backendorg
cf env backend
Then find the section of XSUAA binding and copy the properties into the destination configuration.
In my example:
"clientid": "sb-backendxsuaa!t7722"
"clientsecret": "msWms8tylSHWi4HJ7pTPhHNwaiM="
Remember:
"Client Key" <- clientid
"Token Service User" <- clientid
"Token Service Password" <- clientsecret
5. Run Scenario
After finishing with the 2 required configurations, we (still) cannot call our application.
5.1. Assign Roles
We first need to assign the roles, which we defined in our security config files, to our user.
Today, we need an additional step, we need to assign roles on both sides, frontend and backend.
5.1.1. Assign Frontend Role
Our frontend app requires a role with the uaa.user scope, as described in previous tutorial.
To assign this role, we login to our frontend Trial account
5.1.2. Assign Backend Role
This step is new.
The challenge:
We have a (frontend) user who accesses our (frontend) application which is running in (frontend) account in some foreign region (like e.g. us10).
This user is only available in that account, not in backend account.
So we cannot use a “grant” statement on XSUAA level to assign the backend role to the frontend user (as described here).
Nevertheless, the solution is different and more simple:
After we defined the trust to the IDP of Frontend_Subaccount, we can access the users of this Identity Provider.
As such, we can just go ahead, login to the backend subaccount and assign the (frontend) user to the (backend) role which we require in our (backend) application.
- Login to our backend Trial account
- Go to Security -> Role Collections
The role collection “Backend_Roles” is already existing and the BackendRole is already configured. - Switch to “Edit” mode
- Go to “Users” section
- Choose the trusted “Frontend_IDP”.
- Type the (frontend) user email into the "ID" field and "E-Mail" field.
- Save.

5.2. Run
To start the flow, we enter our frontend application via the approuter URL.
In my example:
https://frontendrouter.cfapps.us10.hana.ondemand.com/tofrontend/homepage
As a result, our browser should show the 4 JWT sections successfully.
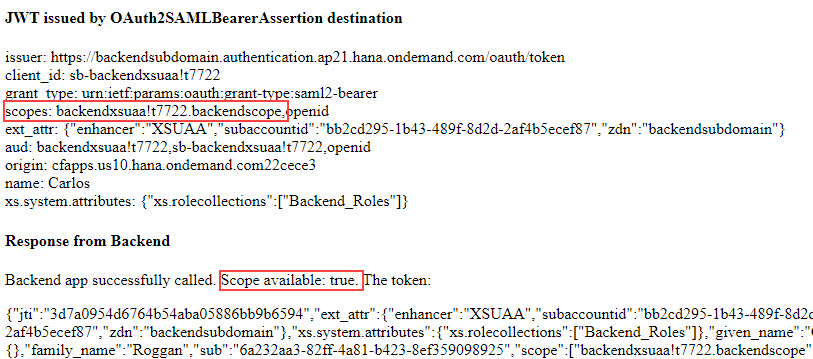
5.2.1. Scope
The JWT information was explained in detail in previous blog post.
For today, we have one additional happiness factor: the scope information.
We can see that the backendscope, which was defined and validated by the backend app, has found its way into the JWT token, which is sent by the frontend app.
This makes us happy.
At least, it made my day, when I saw it for the first time.
6. Cleanup
Frontend Subaccount:
Manually delete destination configuration.
Delete artifacts:
cf login -a https://api.cf.us10.hana.ondemand.com -o frontendorg
cf d frontend -r -f
cf d frontendrouter -r -f
cf ds frontendXsuaa -f
cf ds frontendDestination -f
Backend Subaccount:
Manually delete trust configuration.
Delete artifacts:
cf login -a https://api.cf.ap21.hana.ondemand.com -o backendorg
cf d backend -r -f
cf ds backendXsuaa -f
Summary
In todays tutorial, we’ve learned how to configure authorization (scope) in a cross-subaccount scenario.
The previous tutorial already showed that authentication is possible after configuring trust between subaccounts
Today we’ve seen that we can build on this trust, in order to assign a role to a user from foreign identity provider.
As such, when a frontend user logs into the frontend app, he will receive the backend role, when calling the backend app via destination.
Quick Guide
- In backend application, we define a scope and a role-template.
- In backend subaccount, we create a new trust configuration with the IDP metadata (connectivity) of frontend subaccount.
- In backend subaccount, we can now assign users of frontend IDP to the backend role collection.
Next Step
In the next blog post, we're using an external custom Identity Provider and connect it to both our subaccounts. This allows us to use user-group and role collection mapping, to enable authorization.
Links
See links section of previous blog post.
Appendix 1: Sample Code for Backend Application
backend-security.json
{

    "xsappname": "backendxsuaa",

    "tenant-mode": "dedicated",

    "scopes": [{

        "name": "$XSAPPNAME.backendscope"

    }],

    "role-templates": [{

        "name": "BackendRole",

        "description": "Role required for Backend Application",

        "scope-references": ["$XSAPPNAME.backendscope"]

    }],

    "role-collections": [{

          "name": "Backend_Roles",

          "role-template-references": ["$XSAPPNAME.BackendRole"]

        }

    ]

}
manifest.yml
---

applications:

  - name: backend

    path: app

    memory: 64M

    routes:

    - route: backend.cfapps.ap21.hana.ondemand.com

    services:

      - backendXsuaa
app
package.json
{

  "dependencies": {

    "@sap/xsenv": "latest",

    "@sap/xssec": "latest",

    "express": "^4.17.1",

    "passport": "^0.4.0"

  }

}
server.js
const xsenv = require('@sap/xsenv')

const UAA_CREDENTIALS = xsenv.getServices({myXsuaa: {tag: 'xsuaa'}}).myXsuaa


const express = require('express')

const app = express();

const xssec = require('@sap/xssec')

const passport = require('passport')

const JWTStrategy = xssec.JWTStrategy

passport.use('JWT', new JWTStrategy(UAA_CREDENTIALS))

app.use(passport.initialize())

app.use(express.json())


// start server

app.listen(process.env.PORT)


app.get('/endpoint', passport.authenticate('JWT', {session: false}), (req, res) => {

    const authInfo = req.authInfo

    console.log(`===> [AUDIT] backendapp accessed by user '${authInfo.getGivenName()}' from subdomain '${authInfo.getSubdomain()}' with oauth client: '${authInfo.getClientId()}'`)

    const isScopeAvailable = authInfo.checkScope(UAA_CREDENTIALS.xsappname + '.backendscope')

    if (! isScopeAvailable) {

        //res.status(403).end('Forbidden. Missing authorization.') // Don't fail during prototyping

    }


    res.json({

        'message': `Backend app successfully called. Scope available: ${isScopeAvailable}`,

        'jwtToken': authInfo.getAppToken()})

})
Appendix 2: Sample Code for Frontend Application
frontend-security.json
{

    "xsappname": "frontendxsuaa",

    "tenant-mode": "dedicated",

    "role-templates": [{

        "name": "uaaUserDefaultRole",

        "description": "Default role uaa.user required for user centric scenarios",

        "scope-references": ["uaa.user"]

    }],

    "role-collections": [{

          "name": "Frontend_Roles",

          "role-template-references": [ "$XSAPPNAME.uaaUserDefaultRole" ]

        }

    ]

}
manifest.yml
---

applications:

  - name: frontend

    path: app

    memory: 64M

    routes:

    - route: frontend.cfapps.us10.hana.ondemand.com

    services:

      - frontendXsuaa

      - frontendDestination

  - name: frontendrouter

    routes:

    - route: frontendrouter.cfapps.us10.hana.ondemand.com

    path: approuter

    memory: 128M

    env:

      destinations: >

        [

          {

            "name":"destination_frontend",

            "url":"https://frontend.cfapps.us10.hana.ondemand.com",

            "forwardAuthToken": true

          }

        ]

    services:

      - frontendXsuaa
app
package.json
{

  "dependencies": {

    "@sap/destinations": "latest",

    "@sap/xsenv": "latest",

    "@sap/xssec": "^3.2.13",

    "express": "^4.17.1",

    "node-fetch": "2.6.2",

    "passport": "^0.4.0"

  }

}
server.js
const xsenv = require('@sap/xsenv')


const INSTANCES = xsenv.getServices({

    myXsuaa: {tag: 'xsuaa'},

    myDestination: {tag: 'destination'}

})

const XSUAA_CREDENTIALS = INSTANCES.myXsuaa

const DESTINATION_CREDENTIALS = INSTANCES.myDestination


const fetch = require('node-fetch')

const xssec = require('@sap/xssec')

const passport = require('passport')

const JWTStrategy = xssec.JWTStrategy

passport.use('JWT', new JWTStrategy(XSUAA_CREDENTIALS))

const express = require('express')

const app = express();

app.use(passport.initialize())

app.use(express.json())


// start server

app.listen(process.env.PORT)


// calling destination service with user token and token exchange

app.get('/homepage', passport.authenticate('JWT', {session: false}), async (req, res) => {


    const userJwtToken = req.authInfo.getAppToken()


    // instead of fetching token for destination service with client creds, we HAVE to use token exchange, must be user for princip propag

    const destJwtToken = await _doTokenExchange(userJwtToken)


    // read destination

    const destination = await _readDestination('destination_to_backend', destJwtToken)

    const samlbearerJwtToken = destination.authTokens[0].value


    // call backend app endpoint

    const response = await _callBackend(destination)

    const responseJson = JSON.parse(response)

    const responseJwtTokenDecoded = decodeJwt(responseJson.jwtToken)


    // print token info to browser

    const htmlUser = _formatClaims(userJwtToken)

    const htmlDest = _formatClaims(destJwtToken)

    const htmlBearer = _formatClaims(samlbearerJwtToken)


    res.send(`  <h4>JWT after user login</h4>${htmlUser}

                <h4>JWT after token exchange</h4>${htmlDest}

                <h4>JWT issued by OAuth2SAMLBearerAssertion destination</h4>${htmlBearer}

                <h4>Response from Backend</h4>${responseJson.message}. The token: <p>${JSON.stringify(responseJwtTokenDecoded)}</p>`)


})


/* HELPER */


async function _readDestination(destinationName, jwtToken, userToken){

    const destServiceUrl = `${DESTINATION_CREDENTIALS.uri}/destination-configuration/v1/destinations/${destinationName}`

    const options = {

       headers: { Authorization: 'Bearer ' + jwtToken}

    }

    const response = await fetch(destServiceUrl, options)

    const responseJson = await response.json()

    return responseJson

}


async function _doTokenExchange (bearerToken){

    return new Promise ((resolve, reject) => {

       xssec.requests.requestUserToken(bearerToken, DESTINATION_CREDENTIALS, null, null, null, null, (error, token)=>{

          resolve(token)

       })

    })

}


async function _callBackend (destination){

    const backendUrl = destination.destinationConfiguration.URL

    const options = {

       headers: {

          Authorization : destination.authTokens[0].http_header.value  // contains the "Bearer" plus space

       }

    }

    const response = await fetch(backendUrl, options)

    const responseText = await response.text()

    return responseText

}


function decodeJwt(jwtEncoded){

    return new xssec.TokenInfo(jwtEncoded).getPayload()

}


function _formatClaims(jwtEncoded){

    // const jwtDecodedJson = new xssec.TokenInfo(jwtEncoded).getPayload()

    const jwtDecodedJson = decodeJwt(jwtEncoded)

    console.log(`===> The full JWT: ${JSON.stringify(jwtDecodedJson)}`)


     const claims = new Array()

     claims.push(`issuer: ${jwtDecodedJson.iss}`)

     claims.push(`<br>client_id: ${jwtDecodedJson.client_id}</br>`)

     claims.push(`grant_type: ${jwtDecodedJson.grant_type}`)

     claims.push(`<br>scopes: ${jwtDecodedJson.scope}</br>`)

     claims.push(`ext_attr: ${JSON.stringify(jwtDecodedJson.ext_attr)}`)

     claims.push(`<br>aud: ${jwtDecodedJson.aud}</br>`)

     claims.push(`origin: ${jwtDecodedJson.origin}`)

     claims.push(`<br>name: ${jwtDecodedJson.given_name}</br>`)

     claims.push(`xs.system.attributes: ${JSON.stringify(jwtDecodedJson['xs.system.attributes'])}`)

     return claims.join('')

}
approuter
package.json
{

    "dependencies": {

        "@sap/approuter": "latest"

    },

    "scripts": {

        "start": "node node_modules/@sap/approuter/approuter.js"

    }

}
xs-app.json
{

  "authenticationMethod": "route",

  "routes": [

    {

      "source": "^/tofrontend/(.*)$",

      "target": "$1",

      "destination": "destination_frontend",

      "authenticationType": "xsuaa"

    }

  ]

}
Appendix 3: Sample Code for Destination Configuration
destination_to_backend
#clientKey=<< Existing password/certificate removed on export >>

#tokenServicePassword=<< Existing password/certificate removed on export >>

#

#Fri Jun 10 07:09:11 UTC 2022

Description=Destination pointing to backend app endpoint in backend account

Type=HTTP

authnContextClassRef=urn\:oasis\:names\:tc\:SAML\:2.0\:ac\:classes\:PreviousSession

audience=https\://backendsubdomain.authentication.ap21.hana.ondemand.com

Authentication=OAuth2SAMLBearerAssertion

Name=destination_to_backend

tokenServiceURL=https\://backendsubdomain.authentication.ap21.hana.ondemand.com/oauth/token/alias/backendsubdomain.azure-ap21

ProxyType=Internet

URL=https\://backend.cfapps.ap21.hana.ondemand.com/endpoint

nameIdFormat=urn\:oasis\:names\:tc\:SAML\:1.1\:nameid-format\:emailAddress

tokenServiceURLType=Dedicated

tokenServiceUser=sb-backendxsuaa\!t7722
Labels:
4 Comments
You must be a registered user to add a comment. If you've already registered, sign in. Otherwise, register and sign in.
Labels in this area
-
ABAP CDS Views - CDC (Change Data Capture)
2 -
AI
1 -
Analyze Workload Data
1 -
BTP
1 -
Business and IT Integration
2 -
Business application stu
1 -
Business Technology Platform
1 -
Business Trends
1,658 -
Business Trends
91 -
CAP
1 -
cf
1 -
Cloud Foundry
1 -
Confluent
1 -
Customer COE Basics and Fundamentals
1 -
Customer COE Latest and Greatest
3 -
Customer Data Browser app
1 -
Data Analysis Tool
1 -
data migration
1 -
data transfer
1 -
Datasphere
2 -
Event Information
1,400 -
Event Information
66 -
Expert
1 -
Expert Insights
177 -
Expert Insights
298 -
General
1 -
Google cloud
1 -
Google Next'24
1 -
Kafka
1 -
Life at SAP
780 -
Life at SAP
13 -
Migrate your Data App
1 -
MTA
1 -
Network Performance Analysis
1 -
NodeJS
1 -
PDF
1 -
POC
1 -
Product Updates
4,577 -
Product Updates
343 -
Replication Flow
1 -
RisewithSAP
1 -
SAP BTP
1 -
SAP BTP Cloud Foundry
1 -
SAP Cloud ALM
1 -
SAP Cloud Application Programming Model
1 -
SAP Datasphere
2 -
SAP S4HANA Cloud
1 -
SAP S4HANA Migration Cockpit
1 -
Technology Updates
6,873 -
Technology Updates
420 -
Workload Fluctuations
1
Related Content
- Adversarial Machine Learning: is your AI-based component robust? in Technology Blogs by SAP
- Adversarial Machine Learning: is your AI-based component robust? in Technology Blogs by SAP
- Cloud Integration: AMQP Adapter, Client Certificate, Solace PubSub+ [2]: Certificate Chain in Technology Blogs by SAP
- SAP BTP ABAP Environment on Google Cloud in Technology Blogs by SAP
- SAP Recognized as a Leader in 2024 Gartner® Magic Quadrant™ for iPaaS in Technology Blogs by SAP
Top kudoed authors
| User | Count |
|---|---|
| 37 | |
| 25 | |
| 17 | |
| 13 | |
| 7 | |
| 7 | |
| 7 | |
| 6 | |
| 6 | |
| 6 |