
- SAP Community
- Groups
- Interest Groups
- DevOps and System Administration
- Blogs
- Wireshark with SAP Dissectors for Ubuntu and macOS
DevOps and System Administration Blogs
Explore DevOps and system administration blog posts. Stay current with best practices, tools, and insights into efficient IT management strategies.
Turn on suggestions
Auto-suggest helps you quickly narrow down your search results by suggesting possible matches as you type.
Showing results for
dylan-drummond
Contributor
Options
- Subscribe to RSS Feed
- Mark as New
- Mark as Read
- Bookmark
- Subscribe
- Printer Friendly Page
- Report Inappropriate Content
06-12-2022
9:25 AM
Intro
Wireshark is a popular and free open-source toolset for analysing network traffic:
https://wireshark.org

Wireshark can also be used to analyse SAP-specific network traffic - such as for example SAPGUI traffic and RFC traffic - using a most excellent Wireshark plugin for SAP Dissectors, the code for which is provided by SecureAuth on GitHub:
https://github.com/SecureAuthCorp/SAP-Dissection-plug-in-for-Wireshark
We show some effective ways to get a Wireshark+SAP-Dissectors instance up and running on Ubuntu Desktop 22.04 LTS for amd64 (x86_64) and arm64 (aarch64) architectures, as well as on an Intel-based (amd64) MacBook and on an M1 (arm64) MacBook.
[Update January 2023: the maintainer of the github repo donated the repo to WIreshark in late 2022. So it might be that in future, the SAP Dissectors will be included as part of the main Wireshark product instead of as a plugin you need to integrate/build yourself. So I ran 4 smoketests - 2 on macOS (arm64 and amd64), and 2 on Ubuntu Desktop 22.04 (arm64 and amd64) installing the latest version at the time, which was Wireshark 4.0.2. For all 4 smoketests, result was that the Wireshark 4.0.2 instances did not yet include the SAP Dissectors, so for now this below blog's integrate/build advice for SAP Dissectors is still relevant].
We also show how to make sure that remote capture (via the sshdump tool) is available in all the Wireshark instances you install, and how you can remotely capture SAPGUI traffic. And we look briefly into how to retrieve SAP data using the SAPDIAG protocol Dissector of the Wireshark plugin.
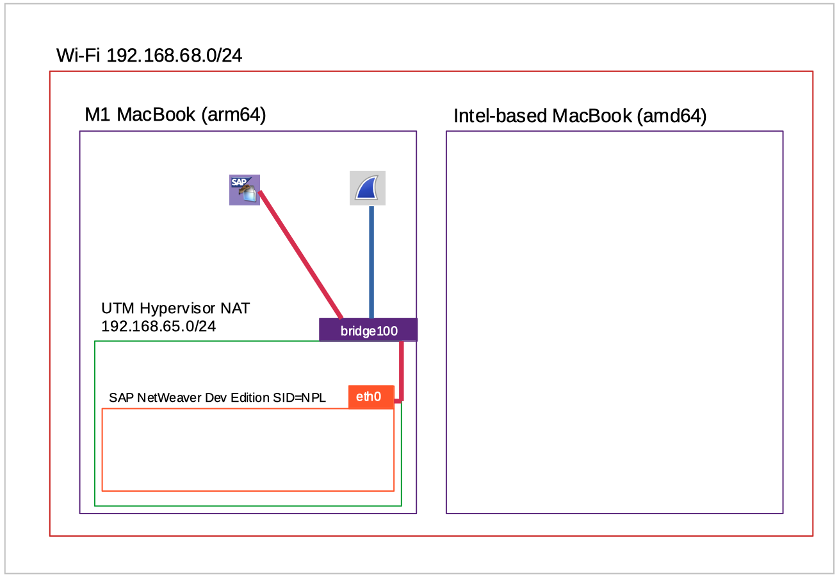
The system landscape for the various demos consists of...
- An M1 MacBook, on which there is a Hypervisor-Emulator called UTM: the SAP system VM is an (emulated amd64) SAP NetWeaver 7.52 SP04 Developer Edition, installed using the advice in a blog I wrote in 2022; then there are one or more Ubuntu VMs (arm64).
- An Intel-based MacBook, on which there is a Hypervisor called VMware Fusion, on which we run one or more Ubuntu VMs (amd64).

The two physical machines are on the same (home Wi-Fi) network 192.168.68.0/24. If the clients (SAPGUI, Wireshark) are all on the M1 MacBook, the SAP VM and the clients operate as nodes on a UTM NAT network (usually 192.168.65.0/24 but some screenshots were taken before doing a Hypervisor upgrade, when the NAT network was 192.168.64.0/24); if any client is on the Intel-based MacBook, the SAP VM and all the clients operate as nodes on the Wi-Fi network. (We don’t cover IP-switching for SAP systems in this blog, but it’s easy enough, just remember to adjust /etc/hosts before starting up).
Let’s get started…
Table of Contents
1 - Installing on Ubuntu Desktop 22.04 LTS (amd64 architecture)
1.1 - Install via Package Manager and Build Standalone Plugin
1.2 - Testing SAPDIAG Dissector on local Ubuntu amd64 VM interface
2 - Installing on Ubuntu Desktop 22.04 LTS (arm64 architecture)
2.1 - Testing SAPDIAG Dissector on local Ubuntu arm64 VM interface
3 - Alternative Ubuntu Install Method - Integrated Build (amd64 and arm64)
4 - Installing on Intel-based MacBook (amd64 architecture)
4.1 - Testing SAPDIAG Dissector on local Intel-based MacBook interface
5 - Installing on M1-based MacBook (arm64 architecture)
5.1 - Testing SAPDIAG Dissector on local M1-based MacBook interface
6 - Using tcpdump to enable remote capture of network traffic
6.1 - Wireshark on Ubuntu, tcpdump on MacBook-with-SAPGUI-client
6.2 - Wireshark on Ubuntu (arm64), tcpdump on SAP server, SAPGUI-client on MacBook
7 - Finding SAP user ID and password from SAPDIAG captured items
8 - Discover other data and tcodes viewed and entered by a SAPGUI user
Appendix - capturing SAPGUI for HTML (HTTP) traffic
--
[Disclaimer stuff: this blog is not an evolving Git-like-repo, instead it’s in effect a snapshot detailing how in June 2022 the author was able to get Wireshark-with-SAP-Dissectors working in various OS and architecture scenarios. As Wireshark, the plugin, Ubuntu, macOS, packages in Homebrew etcetera evolve over time, the blog will tend to become outdated. Also, the list of ‘brew install’ packages that worked for me, might not be the right list for your MacBook, as the different machines have different histories of Homebrew usage. Note that I don’t operate any Helpdesk, so you will just need to BYODS (Bring Your Own Debug Skills) in case you are spinning up Wireshark instances yourself.
You should be aware, that all powerful tools like Wireshark and tcpdump that are used to capture network traffic, can be used by malicious actors with unethical goals - so if you intend to use Wireshark etc on a computer that connects to a company-network or organisation-network, you need to get permission for network-capture tool use before you use such tools, as otherwise you could be breaching company/organisation policy, or even the law... Stay wise, stay ethical].
[Formatting note: SAP Wordpress forces two dashes to appear as a single dash for its standard text font, so a couple of commands below are presented in "source code" boxes, to preserve the two dashes where appropriate].
1- Installing on Ubuntu Desktop 22.04 LTS (amd64 architecture)
1.1 - Install via Package Manager and Build Standalone Plugin
This is the main method that we are going to use for Ubuntu: first install Wireshark using Ubuntu’s package manager, and then separately install the SAP-Dissectors plugin as a standalone plugin. The main benefit of this approach is that the package manager will work out all dependencies such as libraries needed by Wireshark, so that we don’t need to find/guess those ourselves.
A good idea is to make sure your packages are up to date:
sudo apt update
sudo apt upgrade
In the SAP-Dissection GitHub repo, the instructions for this “Wireshark plus standalone plugin” method are as follows (retrieved June 2022):
sudo add-apt-repository ppa:wireshark-dev/stable -y
sudo apt-get update
sudo apt-get install wireshark wireshark-dev
git clone https://github.com/SecureAuthCorp/SAP-Dissection-plug-in-for-Wireshark/
cd SAP-Dissection-plug-in-for-Wireshark/
mkdir build
cd build
cmake ..
make
make install
Let’s run through the first three of those commands... when we get to the ‘apt-get install’ step, a pop-up asks us if we want to configure the capture-agent dumpcap so that it can be run by non-root users (so long as they belong to the “wireshark” system group). Although this configuration is optional, IMHO this is a good practice, and that opinion is shared by the Wireshark maintainers:
https://wiki.wireshark.org/CaptureSetup/CapturePrivileges
...therefore, in this blog we are choosing to configure this non-root user option. Use arrow-keys or Tab-key to select “Yes”, then hit <Enter> to continue.

You’ll have noted from the screenshot that we are sticking with the default (GNOME) desktop, good luck if you are installing GUI apps on some other desktop paradigm, for Wireshark I have only used GNOME.
Once the installation of base Wireshark has completed, we can check that it is known:
which wireshark

It’s in /usr/bin directory. If you like, you can open it as the root user, as that is the easy way to check that Wireshark recognises all the interfaces available (for the root user to capture from):
sudo wireshark

We can see here that the version is 3.6.5 and that interface ens33 has some traffic, and there are other interfaces available too, as well as the useful sshdump tool. In this blog we are assuming that we want to run Wireshark as non-root user, but if you are happy running as root then you can skip the next few paragraphs about configuring Wireshark for non-root user.
To check the “GUI”-method of opening Wireshark as a non-root user, go to the Show Applications icon and start typing “wireshark”, then click on the icon to start the app:


It opens, but none of our VM’s network interfaces are visible. That’s because although the installation procedure created the group “wireshark” and made it the group for /usr/bin/dumpcap, still we need to manually assign our user to the system group “wireshark”; and as it happens, we also need to manually set network privileges for dumpcap (in the following advice on wireshark.org, we ignore the link-broken-advice for Ubuntu/Debian, and instead check the advice for “Other Linux” systems):
https://wiki.wireshark.org/CaptureSetup/CapturePrivileges
[The ‘setcap’-command is about using the capabilities-concept to give a non-root process elevated privileges in a safer way than SUID-concept would: https://man7.org/linux/man-pages/man7/capabilities.7.html ].
Close Wireshark, assign ourselves to “wireshark” group, and use ‘setcap’:
sudo usermod -a -G wireshark $USER
sudo setcap cap_net_raw,cap_net_admin+eip /usr/bin/dumpcap
Now when we change user permissions, we usually need to logout and login for them to be picked up... but according to my smoke-testing, after issuing the ‘setcap’-command, this modification only gets picked up after I reboot Ubuntu. So my advice is to now reboot your Ubuntu machine. Then you can open Wireshark as your non-root user, and you have visibility of the interfaces:

Next test is to capture some network traffic, in our case we highlight ens33, then use the blue shark-fin icon or menu-path Capture -> Start - Fusion Hypervisor demands we enter a host MacBook admin-user password - fair enough, as ens33 is connected to Wi-Fi network using a technique called “Bridged Networking”, so that in effect there is a “bridge” that allows the traffic to go over host interface such as en0 on MacBook - we supply the password, and Wireshark then gets to monitor all the ens33 (en0) traffic.

So, we have just smoke-tested ok that we have a working instance of Wireshark. Use the red square or menu-path Capture -> Stop to stop the capture session. Then File -> Close to get back to main Interfaces dashboard. And we can now close Wireshark (File -> Quit) and move to the next step, which is to build and install the plugin for SAP-Dissectors from the SecureAuthCorp GitHub project.
Ubuntu Desktop doesn’t come with git pre-installed, so we install that. Then we git-clone the project, change into its root directory, make a subdirectory “build”, and change into the new subdirectory:
sudo apt install git
git clone https://github.com/SecureAuthCorp/SAP-Dissection-plug-in-for-Wireshark/
cd SAP-Dissection-plug-in-for-Wireshark/
mkdir build
cd build
Then from inside the build directory, we prepare for the ‘cmake’ step - we need to install cmake before we can use it; also, unless we have a C++ compiler, cmake will throw an error about missing “CXX compiler”, so to avoid that error we install the main build tools for Ubuntu:
sudo apt install cmake
sudo apt install build-essential
Now we can run cmake:
cmake ..

Next step is ‘make’... now this is where we hopefully benefit from the fact that our Ubuntu package manager installed wireshark and wireshark-dev, and as a consequence also installed a whole load of dependencies, including packages needed for compiling programs using ‘make’ ... let’s see:
make

Some warnings, but we aren’t caring about that, for us the excellent news is the last two lines of stdout:
[100%] Linking CXX shared module sap.so
[100%] Built target sap
Then we come to the last step for the standalone plugin build procedure:
make install

So that is good, now we have the SAP-Dissectors standalone plugin’s library, called “sap.so”, filepath for this user-local plugin is then ~/.local/lib/wireshark/plugins/3.6/epan/sap.so (3.6 was the latest plugin version in June 2022).
Now what we expect to happen, is that we can open Wireshark, and Wireshark will check for any user-local plugins in ~/.local/lib/wireshark/plugins/ that match its own major.minor version (in our case, 3.6.5 so subdirectory “3.6” will be searched), and then it will load the SAP-Dissector plugin. So we open Wireshark, and take menu-path Edit -> Preferences, then expand the Protocols branch of the tree structure and scroll down to protocols beginning with “S”, and there we find the 7 SAP-related protocols that the SAP-Dissectors plugin provides: SAPDIAG, SAPHDB, SAPIGS, SAPMS, SAPNI, SAPRFC, and SAPROUTER:

[Note that the protocol in this list called “SAP” refers to “Session Announcement Protocol” which is not related to SAP as in the software company that started out as “Systeme, Anwendungen und Produkte in der Datenverarbeitung”].
If you would like to build the SAP plugin as part of an integrated build of Wireshark from source code, there are instructions for that method below.
1.2 - Testing SAPDIAG Dissector on local Ubuntu amd64 VM interface
The easiest way to test that the SAP-Dissectors work, is to install a SAPGUI client on the same machine, then capture the local traffic when using SAPGUI to interact with an SAP system.
We install a SAPGUI for Java (Linux amd64) client… the easiest way to get hold of the installation media is as follows - go to:
https://developers.sap.com/trials-downloads.html
Search on the page using string “SAP GUI for Java”, or scroll to near the foot of the page till you find the relevant downloadable archive:

When you click on the download link, you will be prompted to either login to the SAP site using your P-user (or S-user), or to register (for free) to create a P-user and perhaps also an SAP Universal ID. Then once you have logged in, you accept the license pop-up and download the archive called something like SAP_GUI_for_Java.rar
Now if you download the rar-archive to MacBook, and you decide to extract the archive there (which makes sense, since the archive contains installation media for MacBook as well as for Linux and for Windows), then the free and excellent tool you need to install on MacBook is called The Unarchiver: https://theunarchiver.com/ - once you have The Unarchiver, configure it if needed to be default for rar files, then right-click on a rar archive, Open With -> The Unarchiver.
[The other option is to copy the rar-archive into the Ubuntu VM and then extract it using the ‘unrar’ tool which can be installed as follows: sudo apt install unrar ].
Once extracted, we pick the folder with more recent version (7.70), and in there we can see two files that could be used to install SAPGUI on Linux, the “PlatinGUI-Linux...” files. The one called “PlatinGUI-Linux-Installation-7.70rev1” is our choice, because it should work by “bootstrapping” its own JVM without any need to have a JVM or JDK pre-installed on Ubuntu.

To be able to copy files using ‘scp’, which runs on top of SSH, we need to first install openssh for Ubuntu (not sure why it doesn’t come as default):
sudo apt install openssh-server
In our example, where the VM has address 192.168.68.61 currently, then on MacBook in Terminal from the “SAP GUI for Java 770” folder we copy the file over:
scp PlatinGUI-Linux-Installation-7.70rev1 marmot@192.168.68.61:/home/marmot
Then in Ubuntu, need to make that file into an executable one:
chmod +x PlatinGUI-Linux-Installation-7.70rev1
Then execute it:
./PlatinGUI-Linux-Installation-7.70rev1

So run through the steps and hopefully SAPGUI for Java gets installed. This should work fine, but if it fails, you can try an alternative way to install: copy over the JAR file to Ubuntu; install a JDK then execute the jar:
sudo apt install openjdk-11-jdk
java -jar PlatinGUI-Linux-7.70rev1.jar
We open the SAPGUI client (easiest way is from the Show Applications icon-pad; opening from command line also works but is left as an exercise for the readers 😄). Then we need to create a connection-item for the target SAP system we want to logon to... first, find out the current IP address of the SAP VM (which in our case is running on the same Wi-Fi network 192.168.68.0/24 as our Ubuntu VM client, though on a different host machine). The SAP VM’s IP address is 192.168.68.nn, where “nn” is a number. We also need to know the instance number of the SAP system, in our case that is instance 00, so the port to connect to for SAPGUI traffic is 3200, according to the formula that SAPGUI port is 32xx where “xx” is the instance number.
In SAPGUI client we click on “New” icon, make some Description of the SAP system, switch to Advanced tab, check to ON the checkbox “Expert mode”, and enter the connection string (replacing the characters with actual numbers):
conn=/H/192.168.68.nn/S/32xx

Now we are ready to test the scenario, where the SAPGUI client on Ubuntu VM interacts with the SAP system called “NPL”, and Wireshark captures traffic on the Ubuntu interface ens33, which should include SAPGUI traffic. SAPGUI traffic uses the SAP DIAG protocol, and the plugin’s SAPDIAG Dissector will be able to decompress much of the DIAG traffic (so long as this traffic is not encrypted with SAP SNC).

Start a capture session on ens33 in Wireshark, then use SAPGUI to logon to the SAP system, and for example go to some transaction code such as SICF. Then stop the capture session. If everything is working correctly, you should be able to find some capture-items with Protocol=SAPDIAG:

We will discuss later about what kind of data we can find from the SAPDIAG capture-items, for now we are just concentrating on the capturing process. If you want to save the capture-session for later analysis, then use File -> Save.
We also discuss later about using the tcpdump utility to enable remote capturing of SAPGUI and other network traffic.
2 - Installing on Ubuntu Desktop 22.04 LTS (arm64 architecture)
This installation will work out much the same as for the amd64 Ubuntu Desktop. The Hypervisor I use is UTM, as that is the most reliable non-commercial Hypervisor (free download from website, or pay a few euros for the App Store version) for M1 MacBooks in my experience (as of June 2022). Also, we show how to use QEMU/KVM in case the user wants or needs to test Wireshark-with-SAP-Dissectors from inside the VM.
Now with the arm64 Ubuntu distro, as of June 2022, this was still only downloadable as a server distro (no GUI bundled to make it a desktop distro). But that is not a problem: we can easily install the GNOME desktop (which is the “default desktop” of Ubuntu currently).
First we install the arm64 Ubuntu Server, let’s get the latest from here (at time of writing, 22.04 LTS):
https://ubuntu.com/download/server/arm
During installation, be sure to check “Install OpenSSH Server” - though if you forget, you can always install it later manually:
sudo apt install openssh-server
Once installed, we reboot and login to the console [UTM users: if first reboot hangs, power off the VM from UTM, then clear the CD Drive]. We make sure everything is up to date, use the <Tab> to select “<OK>” then <Enter> when prompted to restart some services:
sudo apt update && sudo apt upgrade

Install the desktop:
sudo apt install ubuntu-gnome-desktop
Then reboot and login to the GNOME desktop.
sudo shutdown -r now
On the login screen, when the field for entering password opens, go to Settings icon in bottom-right and choose “Ubuntu on Xorg” (“GNOME on Xorg” also tested ok), as those are the only options that I got Wireshark running with. (Probably the GUI app Wireshark depends on Xorg runtime).
UTM users may also want to install the host-guest copying tools for UTM (convenient if you have a load of commands from a blogsite that you want to implement in the guest VM):
sudo apt install spice-vdagent spice-webdavd
Now we follow the main method described above for the amd64 case, only this time on our arm64 Ubuntu VM…
sudo add-apt-repository ppa:wireshark-dev/stable -y
sudo apt-get update
sudo apt-get install wireshark wireshark-dev
We choose Yes when prompted for the non-root user approach to dumpcap:

Assign ourselves to “wireshark” group, and use ‘setcap’:
sudo usermod -a -G wireshark $USER
sudo setcap cap_net_raw,cap_net_admin+eip /usr/bin/dumpcap
Reboot the VM. If you like you can open Wireshark and start capturing traffic from an active local interface. To generate TCP traffic, you can quickly “browse” the net using ‘wget’ for example:
wget google.fi

Close Wireshark. Now we build the standalone SAP-Dissectors plugin:
sudo apt install git
git clone https://github.com/SecureAuthCorp/SAP-Dissection-plug-in-for-Wireshark/
cd SAP-Dissection-plug-in-for-Wireshark/
mkdir build
cd build
sudo apt install cmake
sudo apt install build-essential
cmake ..
make
make install

To check that the plugin library is picked up correctly, open Wireshark and go to Edit -> Preferences, then expand the Protocols branch of the tree structure and scroll down to protocols beginning with “S”, and there we find the 7 SAP-related protocols that the SAP-Dissectors plugin provides: SAPDIAG, SAPHDB, SAPIGS, SAPMS, SAPNI, SAPRFC, and SAPROUTER.
If you prefer to use the integrated build method instead of the main method for installing, then the instructions below also work for arm64 Ubuntu (assuming you have already set up GNOME desktop).
2.1 - Testing SAPDIAG Dissector on local Ubuntu arm64 VM interface
In this arm64 Ubuntu case, the easiest way to test that we can capture for example SAPGUI traffic via SAPDIAG Dissector, is to use remote capture as per section 6.1 below. The reason being that as of June 2022, SAP offers no working SAPGUI for Java for Linux client on arm64 (i.e. no client that does not crash at build-time or runtime). In this section we show a workaround for this, in case no remote capture option available, but it’s not ideal… anyway first we show why direct installation of SAPGUI for Java on arm64 Linux looks like it works, though we soon find that it doesn’t really…
If you copy across the “executable file installer”, make it executable, and run it, you get an error, because this file is only meant to be executed on amd64 (x86_64) architecture:

If you copy across the JAR archive, install a suitable JDK, and use
java -jar PlatinGUI-Linux-7.70rev1.jar
to run the installer, this will actually install the client. However, when you create a connection item for example to the SAP system NPL, you will not actually be able to connect to the SAP system using the connection item:


So those errors are all due to us being on arm64 Ubuntu trying to run a SAPGUI client which runs on amd64 architecture only.
If your Hypervisor supports nested virtualisation, you can use this section's nested-VM-workaround instructions - note that the nested VM with GUI will run very slowly, so you need to be rather patient… personally I recommend M1 MacBook users to use instead the advice below in 6.1 – Wireshark on Ubuntu, tcpdump on MacBook-with-SAPGUI-client, as this “Ubuntu nested VM”-way is just too slow. But now we anyway describe the nested VM scenario... first we need some packages:
sudo apt install qemu-kvm libvirt-daemon-system libvirt-clients bridge-utils qemu-system
sudo apt install virt-manager
Reboot. Copy the ISO media for Ubuntu amd64 (x86_64) Desktop (the default ISO file you get from https://ubuntu.com/#download) into the arm64 VM. Open Virtual Machine Manager from the GUI Applications… Create new VM … architecture x86_64… Browse to find the ISO file. Give it as much memory and processors as you can spare (without bricking the host VM) and create a storage disk. Choose the default NAT network (the nested NAT network) … Then begin the installation of the x86_64 Desktop as nested VM - this might take an hour or so.
Then you can start up the nested VM and install SAPGUI in the same way that we showed earlier for the (non-nested) amd64 Ubuntu VM.
Once we’ve made sure NPL is up and running, we can try to get to the main logon screen from our nested VM, using SAPGUI and a connection-item… let’s say the SAP VM has IP address 192.168.64.11, the connection string in the connection item for NPL instance 00 is:
conn=/H/192.168.64.11/S/3200
nae bother, it works (though very slow due to nested emulation of amd64) …

We should test that Wireshark in the arm64 VM can capture the traffic.

In the arm64 VM, open Wireshark… let’s try to capture from vnet0…

We can capture SAPDIAG packets, for example (192.168.122.236 is the IP address of the nested VM with SAPGUI client):

3 - Alternative Ubuntu Install Method - Integrated Build (amd64 and arm64)
It’s also possible to build Wireshark on Ubuntu from its source code, including the SAP-Dissectors plugin as part of the build process, so that we end up with an integrated Wireshark-with-SAP-Dissectors installed.
Although this method can work (tested ok), and we describe it below, IMHO this process is more fragile than the main method (i.e. than the method of installing Wireshark using Ubuntu package manager and then building the standalone plugin). The fragility comes from the fact that you need to work out yourself what are all the relevant libraries needed for the main Wireshark build process. In addition, you need to remember to install the libssh-dev library in case you want remote capture tool sshdump to be part of the resulting Wireshark instance.
Something like the following set of packages is needed (note that the below list worked for me, but it was assembled ad hoc via trial and error, and may not be exactly what works in future or for different Ubuntu releases etc):
sudo apt install libssh-dev
sudo apt install -y libgcrypt-dev
sudo apt install -y libc-ares-dev flex bison qtbase5-dev qtchooser qt5-qmake qtbase5-dev-tools qttools5-dev qtmultimedia5-dev libpcap-dev
sudo apt install openssh-server git cmake build-essential
Now we run through the procedure described by SecureAuth Labs on GitHub - https://github.com/SecureAuthCorp/SAP-Dissection-plug-in-for-Wireshark - to build Wireshark with the SAP-Dissectors (in June 2022 release target was 3.6):
git clone https://gitlab.com/wireshark/wireshark
cd wireshark
git checkout release-3.6
git clone https://github.com/SecureAuthCorp/SAP-Dissection-plug-in-for-Wireshark/ plugins/epan/sap
git apply plugins/epan/sap/wireshark-release-3.6.patch
mkdir -p build
cd build
cmake ..
make
sudo make install
Check whether the built-from-source plugin library “sap.so” has been included with the other standard plugins in /usr/local/lib/wireshark/plugins/3.6/epan/ directory - if it’s not there, and for example you find it instead “on its own” in /usr/local/lib directory, then move it to be with the other plugins:
sudo mv /usr/local/lib/sap.so /usr/local/lib/wireshark/plugins/3.6/epan/sap.so
To run this built-from-source Wireshark as a non-root user, add group “wireshark” (if it doesn’t already exist), assign your user to it, and then note that the built-from-source instance of dumpcap is at a different location (/usr/local/bin instead of /usr/bin), so modify the chgrp and ‘setcap’ commands accordingly:
sudo groupadd wireshark
sudo usermod -a -G wireshark $USER
sudo chgrp wireshark /usr/local/bin/dumpcap
sudo setcap cap_net_raw,cap_net_admin+eip /usr/local/bin/dumpcap
You may need to reboot to pick up the ‘setcap’ modifications.
Now check that your Wireshark instance opens (the version displayed may be a bit higher than the PPA-version), and from menu-path Edit -> Preferences -> Protocols check that the SAP-Dissectors are there. sshdump tool should be near the bottom of the scrollable list of interfaces. Then you can smoke-test that you are able to capture traffic on some interface:

4 - Installing on Intel-based MacBook (amd64 architecture)
The maintainers of the SAP-Dissectors plugin project are mainly focusing on Ubuntu and Debian, but they also provide possibility to install their plugin on macOS. As of June 2022 I couldn’t manage to install the standalone plugin on macOS (either Intel-based or M1-based), so we are only going to show how to do the integrated build on macOS (for both architectures).
[In case anyone knows how to succeed with the MacBook standalone plugin build, feel free to tell us the solution. The ‘make’ step is ending for me with the following error:
clang: error: linker command failed with exit code 1 (use -v to see invocation)
make[2]: *** [sap.so] Error 1
make[1]: *** [CMakeFiles/sap.dir/all] Error 2
]
As with Ubuntu, it’s ok to have two Wireshark instances - so you can get the DMG packaged Wireshark and install it on MacBook, it runs side-by-side with any instance you build from source.
UPDATE April 2023: it seems that nowadays, you sometimes need to also install (or in my case remove and reinstall) the DMG-packaged Wireshark from https://www.wireshark.org , AND install from the same DMG the package called "Install ChmodBPF.pkg" as well, in order for your own Wireshark instance to be able to listen to and record from any of your network interfaces. Once this is done, check first that this is working using the /Applications/Wireshark.app standard instance. Luckily this Chmod.BPF ability is also then available to any custom-built Wireshark instances you might build or already have built. So this is actually a pretty essential step, as otherwise your custom-built instance will not be useful!
Now a funny thing is, that if you have previously installed the integrated Wireshark-with-SAP-Dissectors from source, the libraries created by this installation process, at /usr/local/lib/wireshark, will prevent you from re-running the build workflow successfully. So the first thing to do is to delete any existing set of wireshark libraries from that location:
sudo rm -rf /usr/local/lib/wireshark
The way I found to make this integrated build work, starts from the advice here on wireshark.org:
https://wiki.wireshark.org/BuildingAndInstalling#building-with-homebrew
Before we start, it’s a good idea to have the Apple Xcode command-line tools installed (not sure if they are needed for this Wireshark activity or not, but they might be, and anyway they are useful to have):
xcode-select --installThen install Homebrew if you don’t already have it. https://brew.sh/
Replace the wiki-advice about installing Homebrew with the one-liner as according to the Homebrew maintainers:
/bin/bash -c "$(curl -fsSL https://raw.githubusercontent.com/Homebrew/install/HEAD/install.sh)"
Then we take the wiki-advice about homebrew packages to install:
brew install c-ares cmake glib gnutls lua qt5
I also installed this library (before reading the wiki-advice), so it might be needed, and does no harm, so install it:
brew install libgcrypt
To include the sshdump tool in the build, we need the relevant library:
brew install libssh
Also, we follow the wiki-advice about informing macOS before each build run where (Homebrew’s) qt5 binaries are found:
export PATH=/usr/local/opt/qt5/bin:$PATH
Then from https://github.com/SecureAuthCorp/SAP-Dissection-plug-in-for-Wireshark
Section “As part of Wireshark” ...:
git clone https://gitlab.com/wireshark/wireshark
cd wireshark
git checkout release-3.6
Copy the SAP Wireshark Plugin to a new plugins/epan/sap directory.
git clone https://github.com/SecureAuthCorp/SAP-Dissection-plug-in-for-Wireshark/ plugins/epan/sap
Configure the plugin to be included in the build process. This step can be performed using the patch file provided. At the root directory run:
git apply plugins/epan/sap/wireshark-release-3.6.patch
Perform a new build including the plugin. At the root directory run:
mkdir -p build
cd build
cmake ..
make
make install
If this all goes well, we have a new Wireshark instance. Open it from Spotlight Search (<cmd>+<spacebar>) typing “wire”; if (like me) you also have the DMG-packaged instance of Wireshark, then in Spotlight the difference is that the DMG-version has sub-category (folder) “Applications” while the built-from-source version has sub-category “run” - so we pick the “Wireshark - run” instance:

... or (only works on Intel-based MacBook) you can open Wireshark the from the root directory of your wireshark Git project:
./run/wireshark
From Wireshark -> Preferences -> Protocols we can see the SAP-related Dissectors were installed also:

4.1 - Testing SAPDIAG Dissector on local Intel-based MacBook interface
We need a SAPGUI for Java client. Earlier we used The Unarchiver to extract installation media for these clients, including for MacBook:

So just double-click on the DMG installer file and follow the steps to install SAPGUI for Java on MacBook, easy.

Now we can make a connection-item in SAPGUI as usual for the SAP VM, start up a Wireshark capture session on en0 (in our case) and then logon to SAP using the MacBook’s SAPGUI client, we see in the screenshot that plenty of SAPDIAG capture-items were recorded (ordered the items by “Protocol”):

5 - Installing on M1-based MacBook (arm64 architecture)
There are only two differences for the installation run on M1-based MacBook compared to the Intel-based MacBook - one is that because on M1 MacBooks Homebrew uses /opt/homebrew instead of /usr/local directory to install packages to, so we modify the path-export command accordingly. The other change is that the final step of ‘make install’ needs to be run as sudo. The two changed commands, I have put them in bold case.
So, those steps for the M1 MacBook installation in full…
UPDATE April 2023: it seems that nowadays, you sometimes need to also install (or in my case remove and reinstall) the DMG-packaged Wireshark from https://www.wireshark.org , AND install from the same DMG the package called "Install ChmodBPF.pkg" as well, in order for your own Wireshark instance to be able to listen to and record from any of your network interfaces. Once this is done, check first that this is working using the /Applications/Wireshark.app standard instance. Luckily this Chmod.BPF ability is also then available to any custom-built Wireshark instances you might build or already have built. So this is actually a pretty essential step, as otherwise your custom-built instance will not be useful!
In case you already have wireshark libraries at /usr/local/lib/wireshark, delete them:
sudo rm -rf /usr/local/lib/wireshark
xcode-select --installThen install Homebrew if you don’t already have it. https://brew.sh/
Replace the wiki-advice about installing Homebrew with the one-liner as according to the Homebrew maintainers:
/bin/bash -c "$(curl -fsSL https://raw.githubusercontent.com/Homebrew/install/HEAD/install.sh)"
The wiki-advice about homebrew packages to install still seems to be correct though, so install these ones:
brew install c-ares cmake glib gnutls lua qt5
I also installed this library (before reading the wiki-advice), so it might be needed, and does no harm if not needed, so recommend you also install it:
brew install libgcrypt
To include the sshdump tool in the build process, we need the relevant library:
brew install libssh
Also, we follow the wiki-advice about informing macOS before each build run where (Homebrew’s) qt5 binaries are found:
export PATH=/opt/homebrew/opt/qt5/bin:$PATH
Then from https://github.com/SecureAuthCorp/SAP-Dissection-plug-in-for-Wireshark
Section “As part of Wireshark” ...:
git clone https://gitlab.com/wireshark/wireshark
cd wireshark
git checkout release-3.6
Copy the SAP Wireshark Plugin to a new plugins/epan/sap directory.
git clone https://github.com/SecureAuthCorp/SAP-Dissection-plug-in-for-Wireshark/ plugins/epan/sap
Configure the plugin to be included in the build process. This step can be performed using the patch file provided. At the root directory run:
git apply plugins/epan/sap/wireshark-release-3.6.patch
Perform a new build including the plugin. At the root directory run:
mkdir -p build
cd build
cmake ..
make
sudo make install
Once installed, open your instance and you can check the SAP Dissectors are installed from Wireshark -> Preferences -> Protocols:

5.1 - Testing SAPDIAG Dissector on local M1-based MacBook interface
We need a SAPGUI for Java client… earlier we used The Unarchiver to extract installation media for these clients, including for MacBook. However, the DMG for SAPGUI for Java on macOS version 7.70 rev1, doesn’t work on M1 MacBooks (later DMG versions on the SAP Software Downloads site do work, but we want to avoid requiring people to have an S-user with download authorisations); so to install SAPGUI client, you need to have some suitable JDK on your MacBook such as openJDK 11 Temurin or the latest SapMachine JDK (pick aarch64 for macOS):
https://adoptium.net/temurin/releases/
https://sap.github.io/SapMachine/
Once you have a JDK, just go to the folder with the relevant JAR and start the installer:
java -jar PlatinGUI-MacOSX-7.70rev1.jar

That should work, at least for me logging on to SAP with the client installed from this jar works fine.
We have switched the SAP VM (192.168.65.3) to sit on the Hypervisor’s NAT network, now we use SAPGUI from the host machine (192.168.65.1 on the NAT network, host machine uses bridge100 to, well, bridge across to the NAT network) and confirm that we can capture the bridge100 traffic between M1 MacBook and SAP VM:

Since the SAP VM is running on the same host as Wireshark and SAPGUI in this scenario, this is maybe the easiest configuration - one computer, with the work mostly done on the host, and less “VM/host-context-switching” for the human user to keep track of.
6 - Using tcpdump to enable remote capture of network traffic
tcpdump is a utility for capturing network packets. If we have the possibility to login over SSH to a remote machine where for example a user is using SAPGUI, or even to SSH into the remote machine an SAP server is on, then in these cases with the help of the remote machine’s tcpdump and Wireshark’s plugin sshdump (for executing tcpdump remotely), we can capture SAPGUI traffic remotely.
[Note that we avoided “Bridged Networking to Wi-Fi for Ubuntu VM” scenarios when demonstrating remote capture, because this is rather tricky and leads to hackaround solutions, as the VM’s “sudo” is not enough to capture the host machine’s en0 interface traffic (which the Ubuntu VM’s interface is “bridged” with, hence the term “Bridged Networking”) - this is the reason why we need to supply a host machine admin-user name and password when e.g. manually running tcpdump as sudo from Ubuntu VM. In Wireshark sshdump we then get stuck as we have no programmatic way of supplying host admin-user credentials… there may be a hackaround involving logging in as root user and some other stuff but let's stick to good practices instead of questionable practices].
6.1 - Wireshark on Ubuntu, tcpdump on MacBook-with-SAPGUI-client
[This scenario is particularly helpful when you are running Wireshark on an arm64 Ubuntu VM and SAPGUI on a MacBook, as it gets around the lack of SAPGUI client for arm64 Ubuntu].
MacBooks come with an Apple implementation of the tcpdump utility - note that tcpdump needs to be run as sudo:
https://developer.apple.com/documentation/network/recording_a_packet_trace
We will use Wireshark’s sshdump utility to run MacBook’s tcpdump, then in MacBook we logon to SAP using SAPGUI client, and Wireshark will be remotely capturing the traffic thanks to tcpdump running on the MacBook.

First we check that tcpdump exists and is working on MacBook:
sudo tcpdump --versionsudo tcpdump -i en0 -n
There should be plenty of output, if not try opening a webpage or pinging a website. <Ctrl>+C to quit from the tcpdump capture session.
Also in MacBook, in System Preferences -> Sharing switch on Remote Login checkbox, then you either list the allowed Mac users (recommended way) or you can open SSH for all users.
Now in Ubuntu we can open Wireshark, select the sshdump interface, and click on the options icon:

Enter the ssh details of the MacBook as it appears on the Hypervisor’s NAT network (at 192.168.65.1), port is 22:

Enter your Mac-user (one with admin rights) and password in Authentication tab. Then in Capture-tab specify the name of the MacBook interface that SAPGUI traffic between MacBook and the SAP VM on NAT network goes over - in our case that is bridge100 (you could use your MacBook Wireshark dashboard to check for your case, or even use MacBook tcpdump if you like doing things the hard way… anyway in my case I know that bridge100 is the right interface). Also we use some options to get the captured items written to our stream, here is the command:
tcpdump -i bridge100 -w -
Then you need to switch on the checkbox “Use sudo on the remote machine”, as tcpdump is executed with sudo:

Then Start the remote capture session, and do some SAPGUI stuff using MacBook SAPGUI for Java client to generate some traffic… sometimes there can be several seconds delay before streaming of data occurs in Wireshark, be patient and you should be able to capture SAPDIAG items:

6.2 - Wireshark on Ubuntu (arm64), tcpdump on SAP server, SAPGUI-client on MacBook
Since our SAP system is a non-commercial Developer Edition system, running on a VM where we naturally have access to the OS layer, so we can use tcpdump of the SAP server OS, in our case that OS is openSUSE Leap 15.3.
Attention: running tcpdump on an SAP server gives you the opportunity to capture all SAPGUI traffic between that SAP server and all the SAPGUI user sessions, so in case you would ever want to do this exercise in “real-life” then you would want to be very open about the reasons why you would need to do this. In our case of Developer Edition, where I haven’t given anyone else a user ID, and anyway there is no business data in the SAP system, so I’m granting myself permission to proceed.
First we need to install a capture-agent like tcpdump on the SAP server VM:
sudo zypper install tcpdump
Next thing is to see if we can get it working locally… write output to a file (use <Ctrl>+C to end capture session)… first we check in SAP VM (hostname “vhcalnplci”) what our interface name is, then we can start tcpdump for that interface, writing the output to a file.
ip a

sudo tcpdump -i eth0 -w dump001

Now we can read the file locally, so we see there is interaction with 192.168.65.1 which is the host MacBook from where I logon to SAP using SAPGUI:
sudo tcpdump -r dump001

As it happens, the SAPGUI client and Wireshark are running on the same machine, and passing through the same local interface to reach the SAP VM interface, however SAPGUI client and Wireshark have no local interaction here and the SAPGUI client could have been running elsewhere e.g. in nested VM of Ubuntu VM or wherever; Wireshark is not capturing traffic at the local interface, but instead Wireshark captures (via tcpdump streaming over a pipe created by sshdump) the traffic from the SAP VM’s eth0 interface:

So, to do remote capturing, from MacBook Wireshark click on the Options-icon for sshdump tool, supply the VM address (192.165.65.3) and port number 22, supply marmot’s credentials, then supply the SAP VM’s interface eth0; and the remote command:
tcpdump -i eth0 -w -
Also, you need to fill the checkbox “Use sudo on the remote machine” as tcpdump is executed with sudo:

Start the capture session, and in MacBook SAPGUI client (or in any other SAPGUI client with a connection to SAP VM) do so SAPGUI stuff, and the remote capture session will record some SAPDIAG-items (note that it may take up to 30 seconds or more for the captured data to start displaying -“patience young Padawan”):

When you stop the capture session, an error-message may appear, but that is just because we break the temporary pipe over which data was streaming, anyway you can safely ignore the message and click “OK” to continue.
7 - Finding SAP user ID and password from SAPDIAG captured items
We can just follow the advice from the SecureAuth plugin GitHub site, they offer two filters for finding the password:
https://github.com/SecureAuthCorp/SAP-Dissection-plug-in-for-Wireshark#sap-diag-gui-logon-password-f...
“SAP Diag Gui Logon Password filter
DYNT_ATOM items contain data entered into screen fields. The following filter could be used for identifying packets containing fields marked as "invisible" (fields that are masked in the SAP GUI screen) in search for sensitive data. Early packets in a Diag session probably contains values for user id and password fields.
sapdiag.item.value.dyntatom.item.attr.INVISIBLE == 1
The same results can be achieved also using expert info (security group):
sapdiag.item.value.dyntatom.item.password
... ”
Ok, let’s analyse some captured session (you can either create a new capture session and logon to SAP, or, if you have saved some previous sessions where you logged on, then open that saved file for analysis in Wireshark).
Using the first filter, we find the password of my test user MEERKAT (it is “Down1oad”, as I set it to be the same as the current default SAP user password for NPL users supplied by SAP for the Developer Edition). Note you should click on the arrow at right side of filter field for the search of packets to occur:

The second filter also finds the password just fine - showing here more data from the middle pane (“Packet Details”), where we see that the password is also captured as text:

8 - Discover other data and tcodes viewed and entered by a SAPGUI user
We can switch on a capture session, then we opened a SAPGUI session, logged on as MEERKAT to client 001, went to tcode (transaction code) SE38, entered “rspfpar” as search string, selected report RSPFPAR from the drop-down list that appeared, and hit Execute to get to the Selection Screen of the report. Then stopped the capture session and saved it as the file “run-se38-rspfpar-01.pcapng”.
Let's start by using the filters to home in on likely items of interest… when you type “sapdiag.” into the filter box, a drop-down list of available filters that start with “sapdiag.” appears, and so on. We try:
sapdiag.item.value.menu
...which returns 4 lines in the Packet List (upper) pane, sent by the SAP system to the SAPGUI client machine:

That sounds about right, there would have been 4 screens accessed, in chronological order: the logon screen (capture-item 16), the post-logon screen (capture-item 235), the main SE38 screen (capture-item 280), and the selection-screen of report RSPFPAR (capture-item 350). Let’s see if we can confirm that guess by analysing the other panes, such as the Packet Details (middle) pane and even occasionally the Packet Diagram (right-hand text output of lower pane).
The Message “APPL”-item of most interest is the item that tells us which TCODE is in focus; as we see, when someone wants to logon, tcode S000 is presented:

and we can easily enough find the other tcodes too by searching those 4 capture-items, so we confirm this way that chronologically the four tcodes were: S000, SESSION_MANAGER, SE38, and SE38 again (as the Abap report runs inside SE38 transaction).
By checking through items sent from client to SAP server, we can find various data input by the user: for example, here is the user input data specifying that RSPFPAR is the report they want to execute… the first screenshot (details of capture-item 317, i.e. occurs after capture-item 280 where the first screen of SE38 was sent) shows that SAPGUI is sending a search-string “rspfpar” (which I typed in lower-case) to the SAP server, so that SAP can return the best matches:

… as it happens the best match would be “RSPFPAR”, which at client side is what the user selected and then pressed the “Execute button”, so in the next screenshot (details of capture-item 338) we see that SAPDIAG protocol is passing the value “RSPFPAR” to the server so that SAP will start that report and send its initial screen (capture-item 350) of said report:

You might have noticed that I switched to using MacBook Wireshark for the analyses of user input of the session-capture-file - the host-machine has more screen-space, which is convenient for these kinds of search-activities.
So, by working through the various SAPDIAG-items from a capture session, you can find out plenty of data, both data sent by the SAP system and data input by the user.
Good luck now in your Wireshark travels and remember kids: use the tools ethically.
Appendix - capturing SAPGUI for HTML (HTTP) traffic
"SAPGUI for HTML" means the delivery of SAPGUI-like screens as HTML pages. It's still quite common to find organisations enabling SAPGUI for HTML usage without TLS/SSL, i.e. delivered as plain HTTP pages instead of HTTPS.
You can easily capture insecure (plain HTTP) SAPGUI for HTML data (for your own browser session) without the SAP Dissectors plugin, in fact without Wireshark at all... we show here how to capture username and password when they are sent over plain HTTP (i.e. as clear-text), first using browser tools, then using Wireshark.
In our SAP system we have SAPGUI for HTML (a.k.a. Webgui) activated in SICF tcode, for path /default_host/sap/bc/gui/sap/its/webgui - note from the configuration of the node under Logon Data, that Security Requirement "Standard" (i.e. plain old HTTP) has been selected.

We can either r-click on the active node in the "SICF-tree" screen and choose Test Service, or we can just use the URL and paste into any browser that accepts insecure HTTP, so our URL is:
http://vhcalnplci.dummy.nodomain:8000/sap/bc/gui/sap/its/webgui?sap-client=001&sap-language=EN
Most browsers will warn you that sending data over plain HTTP is not secure, and the SAP web page itself displays a warning about this:

If you know how to display developer tools of your browser - in this case, MacBook Firefox, Tools -> Browser Tools -> Web Developer Tools, then you can open those, go to the Network tab, then logon to SAP and one of the items should contain the username and password details:

If you run a Wireshark session (with or without the SAP Dissectors plugin) for the user logon activity (e.g. close Firefox, reopen it, go to logon URL, switch on Wireshark session, logon to SAP), then you can easily enough find the HTTP POST item that contains the username and password:

If you capture the user logon session using server-side tcpdump and Wireshark sshdump like described in section 6.2 above, from the captured data you should be able to find an item where the client is sending an HTTP POST request according to the "TCP payload" and/or "TCP segment data" info in the lower pane:

... scroll down through the segment data to find for example the username and password details:

Addendum: Cross-referencing with the SAP-Dissection-plug-in-for-Wireshark project
The lead maintainer of the SAP Dissectors project kindly added a link (via this commit) to this blog, which is thus now referred to on their project README (section "Installation & Build").
--EndOfFile
- SAP Managed Tags:
- Basis Technology
2 Comments
You must be a registered user to add a comment. If you've already registered, sign in. Otherwise, register and sign in.