
- SAP Community
- Products and Technology
- Technology
- Technology Blogs by SAP
- SAP BTP: How to call protected app across regions ...
Technology Blogs by SAP
Learn how to extend and personalize SAP applications. Follow the SAP technology blog for insights into SAP BTP, ABAP, SAP Analytics Cloud, SAP HANA, and more.
Turn on suggestions
Auto-suggest helps you quickly narrow down your search results by suggesting possible matches as you type.
Showing results for
Product and Topic Expert
Options
- Subscribe to RSS Feed
- Mark as New
- Mark as Read
- Bookmark
- Subscribe
- Printer Friendly Page
- Report Inappropriate Content
06-10-2022
9:38 AM
In this tutorial we’re going to create 2 little apps and deploy them to 2 different trial accounts.
We configure trust (based on SAML) and create a destination configuration of type OAuth2SAMLBearerAssertion.
This tutorial is based on the explanations given in the previous blog post.
Part 1: Theory-Torture (previous blog)
0.1. Introduction
0.2. Prerequisites
0.3. Preparation
Part 2: Practice-Party (this blog)
1. Create Backend Application
2. Create Frontend Application
3. Configure Trust
4. Create Destination
5. Run Scenario
6. Cleanup
Appendix 1: Sample Code for Backend Application
Appendix 2: Sample Code for Frontend Application
Appendix 3: Sample Code for Destination Configuration
Our backend application offers a REST endpoint which can be called by other applications.
However, it is protected with OAuth, so it requires a valid JWT token to be sent along with the request.
We login to the Trial account which represents the backend.
In my example, I've created a subaccount with name Backend_Subaccount.
We open the overview page of the subaccount to view and copy the API Endpoint.
We need it to point our CLI to this CF api and login with CLI.
Then we can change to command prompt and run the login command, followed by the api endpoint and (optionally) org name.
In my example:
cf login -a https://api.cf.ap21.hana.ondemand.com -o backendorg
Our backend application endpoint is protected with OAuth.
As such, we need to create an instance of XSUAA service
The configuration for our service instance can be found in file backend-security.json.
It doesn’t contain anything interesting, so we just go ahead.
(see next blogs 3 and 4 for something interesting)
On command line, we navigate to folder c:\crossapp\backend and execute the following command:
cf cs xsuaa application backendXsuaa -c backend-security.json
Our backend application is a little node.js server app, as minimalistic as possible, based on express.
To serve the needs of our tutorial, it only exposes a REST endpoint, to be called by our external frontend app.
The REST endpoint is protected with OAuth.
The protection is handled by the passport middleware, which validates the incoming JWT token with xssec.
Our implementation grabs the JWT token, reads it and writes some user info to the log.
At the end, it returns the JWT token as response.
The complete sample code can be found in the appendix 1.
After deploy, we can open the URL of our REST endpoint, to make sure it is correct.
In my example:
https://backend.cfapps.ap21.hana.ondemand.com/endpoint
As a result we get an error, because we aren’t sending a JWT token – that’s ok for now.
Now that we have our backend application up and running in the backend Trial account, we tell our friends about it ….. and in fact, there is one friend (must be a really good friend) who wants to call our silly app, from his frontend app.
Unfortunately, he has his own Trial account, so we have to find a way to enable him to call our endpoint.
For the moment, we switch our identity:
Now we log on to the Trial account used for the frontend.
The Trial account is hosted in a different region, in my example in US East (VA).
Again, we need to find out the API Endpoint for Cloud Foundry, which we need to configure our Cloud Foundry command line client.
We find the API Endpoint in the overview screen of the subaccount.
On command line, we run the modified login command.
In my example:
cf login -a https://api.cf.us10.hana.ondemand.com -o frontendorg
For the showcase of our tutorial, we don’t really need to protect our frontend app.
However, we need a user login to get hold of a user-JWT-token.
And such a user-token must contain a certain scope, which is required by the destination service (we'll explain later).
As such, we create a security configuration for our frontend app, as follows:
We can see that we add the uaa.user scope to a role template.
This role will be assigned later to our end user.
This uaa.user scope is available in Cloud Foundry as per default, so we don’t need to define a scope here. See Cloud Foundry docu.
In addition, we define a role collection.
This is usually a step done by the admin in the cockpit: to create role collections and add roles and assign users.
However, this predefined role collection containing our role will make our life easier while going through this tutorial.
To create the XSUAA instance, we change to command line, step into the folder C:\crossapp\frontend and execute the following command:
cf cs xsuaa application frontendXsuaa -c frontend-security.json
In this tutorial, the destination is an essential part, as it helps us to obtain a JWT token from the SAML Bearer Assertion.
To access the destination configuration from our code, we need an instance of the Destination Service.
We create that instance without config file and just run the following command (from any folder):
cf cs destination lite frontendDestination
Our frontend application is a user-centric app.
Why does it need to be user-centric? Why can’t we do app-2-app communication without user?
Reason:
SAML doesn’t make sense without user, as it was designed to transport user-login-information between systems.
Thus, our frontend app consist of 2 components:
The core component which is a server app which offers a REST endpoint.
The approuter, which takes care of user-login and forwards to that endpoint.
As usual, our apps are as simple as possible - however, a couple of steps are required:
1. Get hold of the user-JWT-token
2. Do token exchange
3. Call destination service
4. Call backend application
Code Walkthrough
2.3.1. The user-JWT-token
What is a user-JWT-token?
Our end-user will access our app via a URL that points to approuter.
Approuter (together with XSUAA server) will handle the login.
If login is successful, a JWT token is issued by the XSUAA server.
This token will be forwarded by approuter to the protected endpoint of core app, which will validate and accept it.
The token contains the information about the logged-in user, e.g. email and scopes.
This is why I call it user-JWT-token.
The token is sent in the Authorization header, but there is a convenient way to access it:
We can use the convenience object authInfo to access it:
2.3.2. Do token exchange
In step 3 we want to call the destination service, because it helps us to fetch a token for the backend app.
However, the destination service is protected with OAuth, se we need to fetch a JWT token to call it.
That's what we're doing now.
Why token exchange?
The destination service provides its credentials in the binding.
We could just use them, but for certain types of destination configurations, a certain scope is required (uaa.user).
This scope (wrapped in a role) has been added to the user (we've seen it when creating the XSUAA instance), so the user-JWT-token contains this required scope.
As such, we send that user-token while fetching a destinationservice-token.
This is why we use token exchange.
It is the trick to get the uaa.user scope into the destinationservice-token.
If we would fetch a destinationservice-token via client-credentials, we wouldn’t get the uaa.user scope in the token.
To learn more about token exchange, I recommend to go through this very helpful tutorial.
We call our helper method which in turn uses the @Sap/xssec helper method to do the token exchange:
2.3.3. Call destination service
Usually, calling the destination service is done in order to read the details that are configured in the destination configuration.
That is basically the URL of the target (backend) application which we want to call.
In addition, the destination service offers convenience to provide us with the credentials, required to call that URL.
With other words, the destination service is able to do the OAuth flow for us, to fetch a JWT token.
And in our case, this is essential.
Because in our case, we need a sophisticated flow:
As described earlier, we need to cross borders which are protected with high walls and broad rivers (with crocodiles) to reach the targeted backend app.
To manage it, we’ll configure trust between both sides of the crocodiles.
This trust is based on SAML.
In a normal SAML-scenario, the end-user gets a SAML bearer assertion issued after login (Identity Provider), which is then sent to the target system (Service Provider).
n our case, the target application doesn’t accept a SAML bearer assertion (XML), it requires an OAuth JWT token (JSON).
To exchange a SAML for OAuth, there’s a special OAuth flow.
And this is what the destination service is handling for us.
Really appreciate it, Dundee.
The destination service is called via its REST API:
Note:
To save few lines of code. we're using the node-fetch library for doing HTTP calls.
The result is an object containing the 2 pieces of information which we need:
The target URL of our backend app, which we enter in the destination configuration.
The authorization for calling it, the JWT token which is fetched by the destination service.
We use it in the next step
2.3.4. Call backend application
So finally, we’re ready to call our target backend application.
We have a JWT token that should be accepted by the OAuth-protected endpoint.
Afterwards, what we’re doing with the result, doesn’t really deserve a 2.3.5-numbering, as our tutorial actually should finish here, after successful call to backend app.
However, we can spend some lines of code to visualize all involved JWT tokens in the browser.
As such, we print:
The user-JWT-token.
The destinationservice-token which we get after token exchange.
The backendapp-token which the destination service fetches for us.
The response of the backend app, which is the token which is has received (should be the same)
The complete sample code can be found in the appendix 2.
About approuter, there’s not much to explain.
If newcomer-info is needed, I can recommend my little approuter-tutorial.
Our approuter is bound to the same instance of XSUAA as the core app.
As such, the JWT token which is issued, will be accepted by the endpoint of core app.
The approuter is configured with just one route:
The route requires authentication based on XSUAA.
That’s what we want, as it will lead to user-login screen.
The route delegates the incoming call to our core-app, via destination.
This destination can be created in the cockpit, but we just define it as environment variable in the manifest:
Note that using env var is not the productive way.
We just do it to avoid making our tutorial even longer.
We can see that the destination is configured to forward the JWT token.
That means:
After user login, the XSUAA server issues a JWT token and the approuter keeps it in a session and forwards it only if required.
In our case, our endpoint requires it.
The destination points to the base URL of our frontend-core-service.
The desired endpoint segment of that service has to be appended to the URL, when calling the approuter.
It is accessed via the "target" property in the route definition.
This makes the destination flexible.
As such, at the end we will call the approuter URL as follows:
https://frontendrouter.cfapps.us10.hana.ondemand.com/tofrontend/endpoint
Whenever approuter receives this request, it will read the route+destination and forward to
https://frontend.cfapps.us10.hana.ondemand.com/endpoint
That endpoint is protected and requires a JWT token.
But remember: we specified in the destination, that approuter should forward the JWT token.
As such, our user-token, which was issued during login and stored by approuter, will be forwarded to the endpoint.
All fine.
Before we deploy, quick look into the manifest
As we can see, there’s nothing to explain.
We deploy both modules which will result in 2 applications running in Cloud Foundry.
Our core app is bound to both service instances, XSUAA and destination.
We can also see, that the approuter application will have an environment variable, which will be a JSON object with name “destinations” being a JSON array with one entry.
As mentioned, this way of defining a destination is used only during prototyping and will be replaced by real destination in productive deployments.
After deploy, we don’t open our app, as it doesn’t work yet.
Reason:
The destination configuration doesn't exist yet.
We haven't established trust between the subaccounts yet.
So let's go for it.
After we've explained and deployed our 2 silly apps, we're coming to the interesting part of the tutorial: The configuration.
ok ok ok - I agree: it is boring, too
In this third (boring) chapter, we're configuring the trust between our 2 subaccounts.
Don't remember which trust and which subaccounts?
In the intro, we had stared at a diagram:
We saw that the trust is configured on subaccount level of both trial accounts.
In detail, we had learned:
The frontend party wants to call, so it needs to show that it is trustworthy.
This is done by showing its metadata
The backend party is fearful and doesn't trust just anybody because of its nice name.
As such, it takes and stores and validates the metadata.
Configuring trust is easy.
The following steps are done in the SAP BTP Cockpit.
First thing we need to do is to go to the subaccount that wants access.
It is the subaccount to which we deploy the frontend application.
The frontend application wants to call the backend app endpoint.
As such, it is the frontend subaccount which has to prove that it is trustworthy.
To prove that, it has to show its SAML metadata.
Download IdP Metadata
We can find the SAML metadata at
Subaccount->Connectivity->Destinations
Then we press the button "Download IDP Metadata"
The downloaded fie can be copied to the frontend app folder and renamed to IdP_Metadata_Frontend.xml
The IDP Metadata file contains e.g. the entityID as follows:
This is interesting:
we can see that the entityID is a concatenated string containing the domain and the subaccount ID.
We can verify that by having a look at the cockpit of our Trial account, in the Overview tab of our subaccount:
We can see the Subaccount ID, but it looks boring...
We can also see, the Metadata contains a tag which describes the Identity Provider SSO mechanism:
The following steps are performed in the Subaccount which represents the backend.
In my example, I login to my other Trial account, where I’ve created a subaccount called Backend_Subaccount.
Our Backend application is deployed here, so this subaccount has to accept incoming calls from the frontend.
As such, this subaccount has to trust the frontend subaccount.
How to configure trust in a Cloud Foundry subaccount?
To trust the frontend subaccount, we require the SAML Metadata of the frontend IdP.
We've downloaded it in the previous step.
Configure Trust
We go to subaccount -> Security -> Trust Configuration
We press the button "New Trust Configuration"
In the dialog, we’re supposed to enter the metadata of the Identity Provider whom we want to trust.
Good that we were proactive and downloaded the metadata from the Frontend_Subaccount, it is stored in our frontend folder and called IdP_Metadata_Frontend.xml
So all we need to do is to upload that file in this dialog.
In addition, we enter a name for this trust configuration, I my example: frontend_IDP
Also, we disable the checkbox “Available for User Logon”
After pressing save, the frontend_IDP is added to the list of trusted Identity Providers.
With other words: we have a new Identity Provider (frontend) whom we trust.
Or: users from frontend_IDP are now allowed
Summary
To configure trust, we just copy the IdP metadata from one subaccount into the other.
More precisely:
The backend subaccount needs a new trust config, which contains the IdP metadata of the calling frontend subaccount.
At this point we’ve configured trust between our 2 subaccounts of our 2 Trial accounts in 2 different regions.
More precisely, the Frontend_Subaccount is allowed to access the Backend_Subaccount.
With other words, an application deployed to Frontend_Subaccount will be able to call an application deployed to the Backend_Subaccount.
To call the backend application, we create a destination.
We need this destination to handle the necessary security flow.
Where do we create the destination?
To avoid confusion, let’s try to make it crystal clear.
When we say “Destination”, we mean in fact a “Destination Configuration”.
In the dashboard, we write down some data that describe a target destination endpoint.
As such:
The destination is NOT created in the destination subaccount.
Because the destination subaccount IS already the destination.
OK?
Makes sense?
It is obvious, right?
As such, we create the destination configuration in the frontend subaccount, where we deploy the frontend app which calls the destination.
With other words, the destination is created next to the app which needs it.
Below diagram makes it even more clear:
As such:
To create the destination, we will logon to the Trial account containing the Frontend_Subaccount.
But:
Not now.
First we should collect all required data.
Before we actually can create the destination configuration, we should prepare the required data.
As the destination points to the backend, we need to collect some data there.
As such, we logon to the backend Trial account.
4.1.1. View SAML Metadata
In the cockpit (of the backend account), we navigate to Security-> Trust Configuration
There we just press the button for downloading the SAML Metadata
Note:
The same metadata file can be downloaded from this location:
https://<subdomain>.authentication.<region>.hana.ondemand.com/saml/metadata
In my example:
https://backendsubdomain.authentication.ap21.hana.ondemand.com/saml/metadata
After download, we open the file in an editor.
It is helpful to apply an xml formatter or pretty printer.
In my example, it looks as follows:
We stare at the xml and don’t understand a word.
Let’s clarify at least a few words.
Optional Explanation of SAML Metadata:
What we're staring at, is the identity card of the backend subaccount.
In SAML language, our backend subaccount player is an Entity.
* This entity is described by the root xml-element <EntityDescriptor>.
Remember, we use the backend subaccount for hosting our REST endpoint which we want to call.
That REST endpoint is our protected resource (PR).
In terms of SAML, the backend subaccount takes the role of Service Provider (SP).
* The xml document describes this SAML Service Provider.
We can recognize it by the xml-child-element <SPSSODescriptor>, which contains the actually interesting information.
Remember? In the IDP Metadata we saw the element <IDPSSODescriptor>
(OK, not everybody has looked at it...)
* As we can see, the SP supports SSO (obviously, that’s why SAML is used at all).
This means that an SP has to offer an endpoint, which is called by an Identity Provider.
It is necessary, because the IDP will send the login-info-doc (assertion) of the user to that endpoint.
As such, the endpoint is a service for assertions of consumers.
Brief: <AssertionConsumerService>
(See screenshot)
* The metadata also describe how the name ID should look like.
What?
Remember, the Identity Provider will issue a little document (assertion) which describes the user after login.
The user has user information, but the SAML IdP will also create a name Identifier.
This <nameIDFormat> can be formatted in different ways and the Service Provider declares which ways he understands.
* One more info contained in the metadata is the <KeyInfo>,
the public key of the Service Provider.
* Interesting to note:
The order of the elements is fixed. This info makes it easier for us to find the required elements.
So now, what information of this cryptic xml do we need?
-> Three attributes
First:
We need the entityID
In my example:
https://backendsubdomain.authentication.ap21.hana.ondemand.com
Second:
We need the NameIDFormat
Value:
urn:oasis:names:tc:SAML:1.1:nameid-format:emailAddress
Third:
We need the last AssertionConsumerService, for URI-Binding
In my example:
https://backendsubdomain.authentication.ap21.hana.ondemand.com/oauth/token/alias/backendsubdomain.az...
4.1.2. View XSUAA credentials
We’re now leaving the SAML world and entering the OAuth world.
Still in the Backend_Subaccount, we now need to identify the credentials of the OAuth client.
At the end, this is what we need: We need to fetch a JWT token which will be accepted by our OAuth-protected-endpoint.
Our backend application is bound to an instance of XSUAA, which represents the OAuth client and which reveals its credentials in the binding.
In the OAuth flow, the client needs credentials in order to fetch a JWT token from the OAuth-Authorization-Server.
As such, we need the user/password, with better words: client/secret.
To view the credentials in the binding, we can use the cockpit.
We’re anyways logged in to the backend Trial account, so we can just head to the details screen of our deployed backendapp.
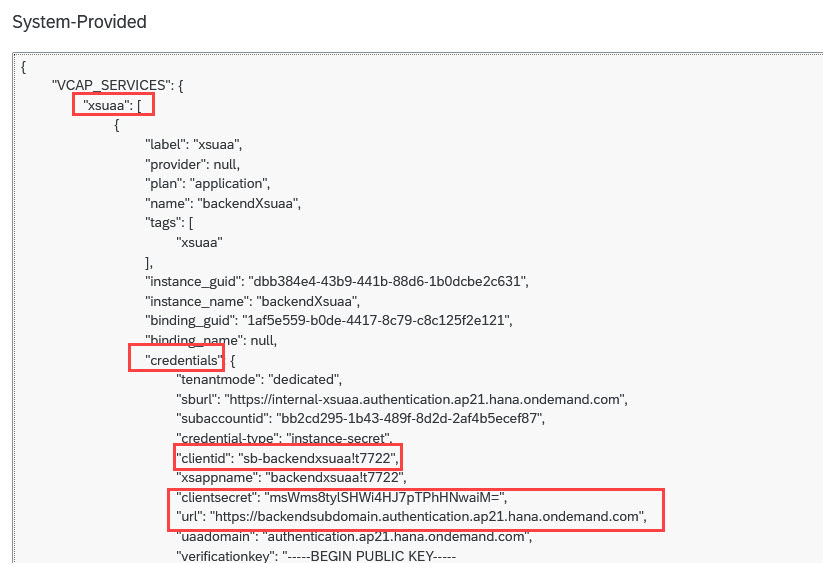
We click on “Environment Variables” and find the “System-Provided” section
From the json document, we take a note of the mentioned 2 properties and its values
In my example:
"clientid": "sb-backendxsuaa!t7722"
"clientsecret": "msWms8tylSHWi4HJ7pTPhHNwaiM="
Note:
Command line users type: cf env backend
4.1.3. View Application URL
Finally, for the destination configuration we need the most prominent info: the target URL.
This is the REST endpoint which we want to call from within the frontend app.
We’ve tried it already after deployment of backend app.
As we’ve anyways the cockpit open. we can view the (base) URL of our deployed application in the cockpit, details screen of backend app, overview page:
Note:
Command line users type: cf app backend
In my example:
https://backend.cfapps.ap21.hana.ondemand.com/endpoint
4.1.4. View Documentation
In this page I've found the following info:
authnContextClassRef:
"urn:oasis:names:tc:SAML:2.0:ac:classes:PreviousSession"
Now that we’ve collected all required information from the backend-world, we can switch back to the frontend-world.
As such, we logout from the backend trial account and login to the frontend Trial account.
Why frontend subaccount?
Remember: The frontend app is bound to the destination service instance, because it helps to call the target URL.
As such, the destination configuration needs to be created in the frontend subaccount.
We navigate to Frontend_Subaccount -> Connectivity -> Destinations -> New Destination
Now we need to fill in quite some fields.
For better understanding,
there’s some basic data (e.g. name),
there’s the SAML data,
and there’s the XSUAA data.
Let's create the destination configuration together.
Name
We enter any name of our choice.
BUT, we need to make sure that we use exactly the same name in the code of the frontend app.
In my example: "destination_to_backend".
Type
The type of the destination is "HTTP".
Description
Any description of our choice, e.g.
"Destination pointing to backend app endpoint in backend account"
URL
The URL of the target endpoint of our backend app, as collected in chapter 2.1.
In my example:
https://backend.cfapps.ap21.hana.ondemand.com/endpoint
Proxy Type
Here we choose “Internet”
(because we aren’t calling onPrem system via cloud connector).
Authentication
Here we choose "OAuth2SAMLBearerAssertion"
(which opens up like hundred more fields, claiming to be filled in)
Key Store Location
We ignore this field
Key Store Password
We ignore this field as well (nice)
Audience
This is the expected receiver of the authentication mechanism.
In our case it is the SAML Service Provider, identified by its entityID
(the entityID is an attribute of the SAML metadata of the targeted subaccount)
We collected the value above.
In my example:
https://backendsubdomain.authentication.ap21.hana.ondemand.com
AuthnContextClassRef
Here we enter the value as collected above:
"urn:oasis:names:tc:SAML:2.0:ac:classes:PreviousSession"
Client Key
Here we enter the value of the property clientid, as collected above
In my example:
"sb-backendxsuaa!t7722"
Token Service URL Type
Here we choose “Dedicated” which is anyways the default value.
(The “Common” value has to be selected for multitenant applications, where the URL is modified for each tenant)
Token Service URL
Here we use the SAML metadata as collected in the preparation.
The URL is copied from the “Location” attribute of the AssertionConsumerService element
In my example:
https://backendsubdomain.authentication.ap21.hana.ondemand.com/oauth/token/alias/backendsubdomain.az...
Token Service User
Remember that we were talking about user and pwd that are used to fetch a JWT token.
They are found in the credentials of the XSUAA instance, bound to the backend app.
It is the clientid as collected above and the same which we already used for the field “Client Key”
In my example:
sb-backendxsuaa!t7722
Token Service Password
Finally, the last field to fill in is the password to be used when fetching a JWT token.
It is the value of property clientsecret, which we collected above.
In my example:
msWms8tylSHWi4HJ7pTPhHNwaiM=
Additional Properties
We’re having fun with filling fields, so we add one more field (really the last one) by pressing “New Property”.
New Property Name:
We enter “nameIdFormat” as new property name.
New Property Value
Here we enter the nameIDFormat which we collected above:
urn:oasis:names:tc:SAML:1.1:nameid-format:emailAddress
After filling in all fields, we should not forget to press “Save”.
In addition, we can export the destination configuration, so we can reuse it next time.
Note:
Destination Configurations can be imported. I've added my exported config in the appendix 3.
After finishing with the 2 required configurations, we (still) cannot call our application.
We first need to assign the role, which we defined in our xs-security file, to our user.
Remember: In our frontend XSUAA instance, we’ve defined a role-template.
This was required, because the uaa.user scope must be contained in the user-JWT-token.
However, this scope is only added to the token, if the corresponding role is assigned to the user.
In our security configuration file, we’ve already defined a role-collection, which is already configured with the role.
So now we only need to find that role collection and add our user to it.
So now we need to take over the task of an admin: configure our user with role collection.
We make sure to login to our frontend Trial account.
We navigate to the frontend_subaccount -> Security -> Role Collections.
Find and select the collection with name “Frontend_Roles”, press “Edit”.
Add our user
It is important to use code-completion only the code completion will fill in all fields properly.
Finally press “Save”
To start the flow, we enter our frontend application via the approuter URL.
This is:
ApprouterURL + route + endpoint + slash
In my example:
https://frontendrouter.cfapps.us10.hana.ondemand.com/tofrontend/homepage
As a result, we get a login screen in which we enter the credentials of our valid BTP user.
Afterwards, we’re redirected to the homepage of our frontend app, which is the /homepage endpoint of our core server module.
We can be happy if we don’t see error messages.
Done with boring tutorial.
However....even if we’re tired, for good reason, let’s not quit the tutorial before having had a closer look at the result JWTs (and no, scrolling down to the end of the tutorial is not an option)
Explanation of JWT content:
5.2.1. User-JWT-token
The first output is the decoded and formatted JWT token which we get after login:
As we know, the Approuter handles the login together with XSUAA server and the

OAuth flow used is the one called authorization code.
This flow takes an additional security step: after entering correct user/password, the server sends a “code” to the configured redirect-URI. Approuter takes care of offering such redirext-endpoint and to fetch the JWT token based on the code.
In the screenshot we can see the URL of the OAuth token endpoint, which approuter is reading from the binding.
Just like the client id.
Also, we can see the origin, which is the default Identity Provider associated with a subaccount in SAP BTP.
An important claim is the audience which states that the JWT token is intended to be understood by the OAuth client frontendxsuaa, which is our instance of XSUAA
In the extended attributes section, we can see the identity zone, which in my example is called frontendsubdomain.
With this information, we just confirm that the JWT token is issued by the frontendXSUAA.
As additional information, we can see the data which belongs to my user: the name, the role collection and the scope, which we require.
Bottom line:
As expected, the JWT is a user-token and belongs to the frontend-world.
5.2.2. Destination-JWT-token
The next boring text belongs to the JWT token which we received after token exchange.
Remember:
We need a token to call the destination service. Instead of just using the credentials provided by destination service, we take the user-token and send it as well.
The grant type for this OAuth flow is called JWT Bearer Token Grant and this is what we can see in the screenshot below:
What else is interesting in the second JWT?
Nothing is really interesting, but let’s consider the following:
We’re still in the same identity zone.
The OAuth client is now the destinationService one and it is as well contained in the audience.
This means, that we can safely send this token to the destination Service REST API.
The token contains all scopes that are required for using the destination service.
In addition, we can see that all user-specific data is preserved in the token: the name, scope, role collections. This is interesting, yes.
5.2.3. SAML-JWT-token
At this point, we’ve used the second JWT token to call the destination service.
As a result, we received the destination configuration info, and in addition, we received a JWT token, which we use to call the backend application.
The destination service internally has executed the SAML2 Bearer Grant flow.
This flow has accomplished the mission impossible: fetch a kind of user token across regional borders.
(omg – how boring)
The screenshot shows that the issuer, the subaccount and identity zone are now located in the backend world.
The client id and the audience point at our XSUAA instance which we created in the backend trial account.
The user information has been preserved, we can see the name.
Interesting is the origin claim: cfapps.us10.hana.ondemand.com22cece3
Remember?
After all this lengthy tutorial we have an excuse to forget such boring text.
To remember it, we just need to look into the IDP metadata of the frontend subaccount
<ns3:EntityDescriptor
entityID="cfapps.us10.hana.ondemand.com/22cece36-3c8c-4420-bad5-60e1787230da"
The entity ID of the Identity Provider is a combination of the domain and subaccount ID of the frontend trial.
However, it doesn’t match exactly.
Who cares?
However, this leads us to the backend trial account, where we have configured a second Identity Provider.
More precisely, we’ve configured trust configuration, based on the SAML metadata of the IDP in frontend account.
And in the backend account, security->trust, we can find exactly that string which we were searching for:
cfapps.us10.hana.ondemand.com22cece3
Conclusion
This leads us to the amazing conclusion:
All that configuration effort, the trust, the SAML, that has led to the capability of transporting frontend user information across the border to the backend, and has made it even into a JWT token which is issued by backend XSUAA server.
Wow – superboring.
Frontend Subaccount:
Manually delete destination configuration.
Delete artifacts:
cf login -a https://api.cf.us10.hana.ondemand.com -o frontendorg
cf d frontend -r -f
cf d frontendrouter -r -f
cf ds frontendXsuaa -f
cf ds frontendDestination -f
Backend Subaccount:
Manually delete trust configuration.
Delete artifacts:
cf login -a https://api.cf.ap21.hana.ondemand.com -o backendorg
cf d backend -r -f
cf ds backendXsuaa -f
The torture of this tutorial has teached us:
How to configure trust between 2 subaccounts of SAP BTP, Cloud Foundry.
How to create a destination of type OAuth2SAMLBearerAssertion and fill in the fields.
Understand the scenario, SAML and OAuth and JWT properties.
How to write minimal useless node apps that are protected and use destination service.
Configure Trust:
Download IdP metadata from Destinations menu in frontend subaccount cockpit.
Create new Trust Config in backend subaccount cockpit and paste the IdP metadata.
Create Destination:
Use SAML metadata and XSUAA credentials from backend.
Note: the token Url is not taken from credentials.
To keep the anyways lengthy and complicated tutorial a little bit simpler, we've ignored the authorization aspect so far. Means, our backend app endpoint doesn't require a scope.
The next tutorial will take care of it.
If you have own custom Identity Provider, you might prefer the fourth blog post.
See links section of previous blog post.
backend-security.json
manifest.yml
package.json
server.js
frontend-security.json
manifest.yml
app
package.json
server.js
package.json
xs-app.json
destination_to_backend
We configure trust (based on SAML) and create a destination configuration of type OAuth2SAMLBearerAssertion.
This tutorial is based on the explanations given in the previous blog post.
Quicklinks:
Quick Guide
Sample Code
Content
Part 1: Theory-Torture (previous blog)
0.1. Introduction
0.2. Prerequisites
0.3. Preparation
Part 2: Practice-Party (this blog)
1. Create Backend Application
2. Create Frontend Application
3. Configure Trust
4. Create Destination
5. Run Scenario
6. Cleanup
Appendix 1: Sample Code for Backend Application
Appendix 2: Sample Code for Frontend Application
Appendix 3: Sample Code for Destination Configuration
1. Create Backend Application
Our backend application offers a REST endpoint which can be called by other applications.
However, it is protected with OAuth, so it requires a valid JWT token to be sent along with the request.
1.0. Preparation
We login to the Trial account which represents the backend.
In my example, I've created a subaccount with name Backend_Subaccount.
We open the overview page of the subaccount to view and copy the API Endpoint.
We need it to point our CLI to this CF api and login with CLI.
Then we can change to command prompt and run the login command, followed by the api endpoint and (optionally) org name.
In my example:
cf login -a https://api.cf.ap21.hana.ondemand.com -o backendorg
1.1. Create XSUAA Service Instance
Our backend application endpoint is protected with OAuth.
As such, we need to create an instance of XSUAA service
The configuration for our service instance can be found in file backend-security.json.
It doesn’t contain anything interesting, so we just go ahead.
(see next blogs 3 and 4 for something interesting)
On command line, we navigate to folder c:\crossapp\backend and execute the following command:
cf cs xsuaa application backendXsuaa -c backend-security.json
1.2. Create Backend Application
Our backend application is a little node.js server app, as minimalistic as possible, based on express.
To serve the needs of our tutorial, it only exposes a REST endpoint, to be called by our external frontend app.
The REST endpoint is protected with OAuth.
The protection is handled by the passport middleware, which validates the incoming JWT token with xssec.
Our implementation grabs the JWT token, reads it and writes some user info to the log.
At the end, it returns the JWT token as response.
app.get('/endpoint', passport.authenticate('JWT', {session: false}), (req, res) => {

    const auth = req.authInfo

    console.log(`===> [backendapp] called by user '${auth.getGivenName()}' from subdomain '${auth.getSubdomain()}' with oauth client: '${auth.getClientId()}'`)

    res.json({

        'message': 'BACKEND successfully called',

        'jwtToken': auth.getAppToken()})

})
The complete sample code can be found in the appendix 1.
1.3. Deploy
After deploy, we can open the URL of our REST endpoint, to make sure it is correct.
In my example:
https://backend.cfapps.ap21.hana.ondemand.com/endpoint
As a result we get an error, because we aren’t sending a JWT token – that’s ok for now.
2. Create Frontend Application
Now that we have our backend application up and running in the backend Trial account, we tell our friends about it ….. and in fact, there is one friend (must be a really good friend) who wants to call our silly app, from his frontend app.
Unfortunately, he has his own Trial account, so we have to find a way to enable him to call our endpoint.
2.0. Preparation
For the moment, we switch our identity:
Now we log on to the Trial account used for the frontend.
The Trial account is hosted in a different region, in my example in US East (VA).
Again, we need to find out the API Endpoint for Cloud Foundry, which we need to configure our Cloud Foundry command line client.
We find the API Endpoint in the overview screen of the subaccount.
On command line, we run the modified login command.
In my example:
cf login -a https://api.cf.us10.hana.ondemand.com -o frontendorg
2.1. Create XSUAA Service Instance
For the showcase of our tutorial, we don’t really need to protect our frontend app.
However, we need a user login to get hold of a user-JWT-token.
And such a user-token must contain a certain scope, which is required by the destination service (we'll explain later).
As such, we create a security configuration for our frontend app, as follows:
{

    "xsappname": "frontendxsuaa",

    "tenant-mode": "dedicated",

    "role-templates": [{

        "name": "uaaUserDefaultRole",

        "description": "Default role uaa.user required for user centric scenarios",

        "scope-references": ["uaa.user"]

    }],

    "role-collections": [{

          "name": "Frontend_Roles",

          "role-template-references": [ "$XSAPPNAME.uaaUserDefaultRole" ]

        }

    ]

}
We can see that we add the uaa.user scope to a role template.
This role will be assigned later to our end user.
This uaa.user scope is available in Cloud Foundry as per default, so we don’t need to define a scope here. See Cloud Foundry docu.
In addition, we define a role collection.
This is usually a step done by the admin in the cockpit: to create role collections and add roles and assign users.
However, this predefined role collection containing our role will make our life easier while going through this tutorial.
To create the XSUAA instance, we change to command line, step into the folder C:\crossapp\frontend and execute the following command:
cf cs xsuaa application frontendXsuaa -c frontend-security.json
2.2. Create Destination Service Instance
In this tutorial, the destination is an essential part, as it helps us to obtain a JWT token from the SAML Bearer Assertion.
To access the destination configuration from our code, we need an instance of the Destination Service.
We create that instance without config file and just run the following command (from any folder):
cf cs destination lite frontendDestination
2.3. Create Core Application
Our frontend application is a user-centric app.
Why does it need to be user-centric? Why can’t we do app-2-app communication without user?
Reason:
SAML doesn’t make sense without user, as it was designed to transport user-login-information between systems.
Thus, our frontend app consist of 2 components:
The core component which is a server app which offers a REST endpoint.
The approuter, which takes care of user-login and forwards to that endpoint.
As usual, our apps are as simple as possible - however, a couple of steps are required:
1. Get hold of the user-JWT-token
2. Do token exchange
3. Call destination service
4. Call backend application
Code Walkthrough
2.3.1. The user-JWT-token
What is a user-JWT-token?
Our end-user will access our app via a URL that points to approuter.
Approuter (together with XSUAA server) will handle the login.
If login is successful, a JWT token is issued by the XSUAA server.
This token will be forwarded by approuter to the protected endpoint of core app, which will validate and accept it.
The token contains the information about the logged-in user, e.g. email and scopes.
This is why I call it user-JWT-token.
The token is sent in the Authorization header, but there is a convenient way to access it:
We can use the convenience object authInfo to access it:
app.get('/endpoint', passport.authenticate('JWT', {session: false}), async (req, res) => {

const userJwtToken = req.authInfo.getAppToken()
2.3.2. Do token exchange
In step 3 we want to call the destination service, because it helps us to fetch a token for the backend app.
However, the destination service is protected with OAuth, se we need to fetch a JWT token to call it.
That's what we're doing now.
Why token exchange?
The destination service provides its credentials in the binding.
We could just use them, but for certain types of destination configurations, a certain scope is required (uaa.user).
This scope (wrapped in a role) has been added to the user (we've seen it when creating the XSUAA instance), so the user-JWT-token contains this required scope.
As such, we send that user-token while fetching a destinationservice-token.
This is why we use token exchange.
It is the trick to get the uaa.user scope into the destinationservice-token.
If we would fetch a destinationservice-token via client-credentials, we wouldn’t get the uaa.user scope in the token.
To learn more about token exchange, I recommend to go through this very helpful tutorial.
We call our helper method which in turn uses the @Sap/xssec helper method to do the token exchange:
xssec.requests.requestUserToken(bearerToken, DESTINATION_CREDENTIALS, null, null, null, null, (error, token)=>{2.3.3. Call destination service
Usually, calling the destination service is done in order to read the details that are configured in the destination configuration.
That is basically the URL of the target (backend) application which we want to call.
In addition, the destination service offers convenience to provide us with the credentials, required to call that URL.
With other words, the destination service is able to do the OAuth flow for us, to fetch a JWT token.
And in our case, this is essential.
Because in our case, we need a sophisticated flow:
As described earlier, we need to cross borders which are protected with high walls and broad rivers (with crocodiles) to reach the targeted backend app.
To manage it, we’ll configure trust between both sides of the crocodiles.
This trust is based on SAML.
In a normal SAML-scenario, the end-user gets a SAML bearer assertion issued after login (Identity Provider), which is then sent to the target system (Service Provider).
n our case, the target application doesn’t accept a SAML bearer assertion (XML), it requires an OAuth JWT token (JSON).
To exchange a SAML for OAuth, there’s a special OAuth flow.
And this is what the destination service is handling for us.
Really appreciate it, Dundee.
The destination service is called via its REST API:
const destServiceUrl = `${DESTINATION_CREDENTIALS.uri}/destination-configuration/v1/destinations/${destinationName}`

const options = {

   headers: { Authorization: 'Bearer ' + jwtToken}

}

const response = await fetch(destServiceUrl, options)

const responseJson = await response.json()
Note:
To save few lines of code. we're using the node-fetch library for doing HTTP calls.
The result is an object containing the 2 pieces of information which we need:
The target URL of our backend app, which we enter in the destination configuration.
The authorization for calling it, the JWT token which is fetched by the destination service.
We use it in the next step
2.3.4. Call backend application
So finally, we’re ready to call our target backend application.
We have a JWT token that should be accepted by the OAuth-protected endpoint.
async function _callBackend (destination){

   const backendUrl = destination.destinationConfiguration.URL

   const options = {

      headers: {

         Authorization : destination.authTokens[0].http_header.value  // contains the "Bearer" plus space

      }

   }

   const response = await fetch(backendUrl, options)

   const responseText = await response.text()
Afterwards, what we’re doing with the result, doesn’t really deserve a 2.3.5-numbering, as our tutorial actually should finish here, after successful call to backend app.
However, we can spend some lines of code to visualize all involved JWT tokens in the browser.
As such, we print:
The user-JWT-token.
The destinationservice-token which we get after token exchange.
The backendapp-token which the destination service fetches for us.
The response of the backend app, which is the token which is has received (should be the same)
res.send(`

   <h4>JWT after user login:</h4>${userJwtTokenDecoded}

   <h4>JWT after token exchange (used to call destination service):</h4>${destJwtTokenDecoded}

   <h4>JWT issued by OAuth2SAMLBearerAssertion destination:</h4>${samlBearerJwtTokenDecoded}

   <h4>Response of BACKEND call:</h4>${responseJson.message}. The token: ${responseJwtTokenDecoded} `)
The complete sample code can be found in the appendix 2.
2.4. Create Approuter
About approuter, there’s not much to explain.
If newcomer-info is needed, I can recommend my little approuter-tutorial.
Our approuter is bound to the same instance of XSUAA as the core app.
As such, the JWT token which is issued, will be accepted by the endpoint of core app.
The approuter is configured with just one route:
    "source": "^/tofrontend/(.*)$",

    "target": "$1",

    "destination": "destination_frontend",

    "authenticationType": "xsuaa"
The route requires authentication based on XSUAA.
That’s what we want, as it will lead to user-login screen.
The route delegates the incoming call to our core-app, via destination.
This destination can be created in the cockpit, but we just define it as environment variable in the manifest:
    env:

      destinations: >

        [

          {

            "name":"destination_frontend",

            "url":https://frontend.cfapps.us10.hana.ondemand.com,

            "forwardAuthToken": true
Note that using env var is not the productive way.
We just do it to avoid making our tutorial even longer.
We can see that the destination is configured to forward the JWT token.
That means:
After user login, the XSUAA server issues a JWT token and the approuter keeps it in a session and forwards it only if required.
In our case, our endpoint requires it.
The destination points to the base URL of our frontend-core-service.
The desired endpoint segment of that service has to be appended to the URL, when calling the approuter.
It is accessed via the "target" property in the route definition.
This makes the destination flexible.
As such, at the end we will call the approuter URL as follows:
https://frontendrouter.cfapps.us10.hana.ondemand.com/tofrontend/endpoint
Whenever approuter receives this request, it will read the route+destination and forward to
https://frontend.cfapps.us10.hana.ondemand.com/endpoint
That endpoint is protected and requires a JWT token.
But remember: we specified in the destination, that approuter should forward the JWT token.
As such, our user-token, which was issued during login and stored by approuter, will be forwarded to the endpoint.
All fine.
2.5. Deploy
Before we deploy, quick look into the manifest
applications:

  - name: frontend

    routes:

    - route: frontend.cfapps.us10.hana.ondemand.com

    services:

      - frontendXsuaa

      - frontendDestination

  - name: frontendrouter

    routes:

    - route: frontendrouter.cfapps.us10.hana.ondemand.com

    env:

      destinations: >

        [

          {

            "name":"destination_frontend",

            "url":"https://frontend.cfapps.us10.hana.ondemand.com",

            "forwardAuthToken": true

          }

        ]

    services:

      - frontendXsuaa
As we can see, there’s nothing to explain.
We deploy both modules which will result in 2 applications running in Cloud Foundry.
Our core app is bound to both service instances, XSUAA and destination.
We can also see, that the approuter application will have an environment variable, which will be a JSON object with name “destinations” being a JSON array with one entry.
As mentioned, this way of defining a destination is used only during prototyping and will be replaced by real destination in productive deployments.
After deploy, we don’t open our app, as it doesn’t work yet.
Reason:
The destination configuration doesn't exist yet.
We haven't established trust between the subaccounts yet.
So let's go for it.
3. Configure Trust
After we've explained and deployed our 2 silly apps, we're coming to the interesting part of the tutorial: The configuration.
ok ok ok - I agree: it is boring, too
In this third (boring) chapter, we're configuring the trust between our 2 subaccounts.
Don't remember which trust and which subaccounts?
In the intro, we had stared at a diagram:

We saw that the trust is configured on subaccount level of both trial accounts.
In detail, we had learned:
The frontend party wants to call, so it needs to show that it is trustworthy.
This is done by showing its metadata
The backend party is fearful and doesn't trust just anybody because of its nice name.
As such, it takes and stores and validates the metadata.

Configuring trust is easy.
The following steps are done in the SAP BTP Cockpit.
3.1. Frontend Subaccount
First thing we need to do is to go to the subaccount that wants access.
It is the subaccount to which we deploy the frontend application.
The frontend application wants to call the backend app endpoint.
As such, it is the frontend subaccount which has to prove that it is trustworthy.
To prove that, it has to show its SAML metadata.
Download IdP Metadata
We can find the SAML metadata at
Subaccount->Connectivity->Destinations
Then we press the button "Download IDP Metadata"

The downloaded fie can be copied to the frontend app folder and renamed to IdP_Metadata_Frontend.xml
The IDP Metadata file contains e.g. the entityID as follows:
<ns3:EntityDescriptor

entityID="cfapps.us10.hana.ondemand.com/22cece36-3c8c-4420-bad5-60e1787230da"
This is interesting:
we can see that the entityID is a concatenated string containing the domain and the subaccount ID.
We can verify that by having a look at the cockpit of our Trial account, in the Overview tab of our subaccount:

We can see the Subaccount ID, but it looks boring...
We can also see, the Metadata contains a tag which describes the Identity Provider SSO mechanism:
<ns3:IDPSSODescriptor

   WantAuthnRequestsSigned="true"

   protocolSupportEnumeration="urn:oasis:names:tc:SAML:2.0:protocol">

   <ns3:KeyDescriptor use="signing">

      <KeyInfo>

         <X509Data>

            <X509Certificate>

               MIIFiDCCA3CgAwIBAgIKA+0DUF8qXHmtnzANBgkqhkiG9w0BAQ0FADCBgjFLMEkG

               A1UEAwxCY2ZhcHBzLnVzMTAuaGFuYS5vbmRlbWFuZC5jb20vMjJjZWNlMzYtM2M4

               Yy00NDIwLWJhZDUtNjBlMTc4NzIzMGRhMQwwCgYDVQQKDANTQVAxJTAjBgNVBAsM

               blablabla
3.2. Backend Subaccount
The following steps are performed in the Subaccount which represents the backend.
In my example, I login to my other Trial account, where I’ve created a subaccount called Backend_Subaccount.
Our Backend application is deployed here, so this subaccount has to accept incoming calls from the frontend.
As such, this subaccount has to trust the frontend subaccount.
How to configure trust in a Cloud Foundry subaccount?
To trust the frontend subaccount, we require the SAML Metadata of the frontend IdP.
We've downloaded it in the previous step.
Configure Trust
We go to subaccount -> Security -> Trust Configuration
We press the button "New Trust Configuration"

In the dialog, we’re supposed to enter the metadata of the Identity Provider whom we want to trust.
Good that we were proactive and downloaded the metadata from the Frontend_Subaccount, it is stored in our frontend folder and called IdP_Metadata_Frontend.xml
So all we need to do is to upload that file in this dialog.
In addition, we enter a name for this trust configuration, I my example: frontend_IDP
Also, we disable the checkbox “Available for User Logon”

After pressing save, the frontend_IDP is added to the list of trusted Identity Providers.
With other words: we have a new Identity Provider (frontend) whom we trust.
Or: users from frontend_IDP are now allowed
Summary
To configure trust, we just copy the IdP metadata from one subaccount into the other.
More precisely:
The backend subaccount needs a new trust config, which contains the IdP metadata of the calling frontend subaccount.
4. Create Destination
At this point we’ve configured trust between our 2 subaccounts of our 2 Trial accounts in 2 different regions.
More precisely, the Frontend_Subaccount is allowed to access the Backend_Subaccount.
With other words, an application deployed to Frontend_Subaccount will be able to call an application deployed to the Backend_Subaccount.
To call the backend application, we create a destination.
We need this destination to handle the necessary security flow.
Where do we create the destination?
To avoid confusion, let’s try to make it crystal clear.
When we say “Destination”, we mean in fact a “Destination Configuration”.
In the dashboard, we write down some data that describe a target destination endpoint.
As such:
The destination is NOT created in the destination subaccount.
Because the destination subaccount IS already the destination.
OK?
Makes sense?
It is obvious, right?
As such, we create the destination configuration in the frontend subaccount, where we deploy the frontend app which calls the destination.
With other words, the destination is created next to the app which needs it.
Below diagram makes it even more clear:

As such:
To create the destination, we will logon to the Trial account containing the Frontend_Subaccount.
But:
Not now.
First we should collect all required data.
4.1. Prepare the data for Destination Configuration
Before we actually can create the destination configuration, we should prepare the required data.
As the destination points to the backend, we need to collect some data there.
As such, we logon to the backend Trial account.
4.1.1. View SAML Metadata
In the cockpit (of the backend account), we navigate to Security-> Trust Configuration
There we just press the button for downloading the SAML Metadata

Note:
The same metadata file can be downloaded from this location:
https://<subdomain>.authentication.<region>.hana.ondemand.com/saml/metadata
In my example:
https://backendsubdomain.authentication.ap21.hana.ondemand.com/saml/metadata
After download, we open the file in an editor.
It is helpful to apply an xml formatter or pretty printer.
In my example, it looks as follows:

We stare at the xml and don’t understand a word.
Let’s clarify at least a few words.
Optional Explanation of SAML Metadata:
What we're staring at, is the identity card of the backend subaccount.
In SAML language, our backend subaccount player is an Entity.
* This entity is described by the root xml-element <EntityDescriptor>.
Remember, we use the backend subaccount for hosting our REST endpoint which we want to call.
That REST endpoint is our protected resource (PR).
In terms of SAML, the backend subaccount takes the role of Service Provider (SP).
* The xml document describes this SAML Service Provider.
We can recognize it by the xml-child-element <SPSSODescriptor>, which contains the actually interesting information.
Remember? In the IDP Metadata we saw the element <IDPSSODescriptor>
(OK, not everybody has looked at it...)
* As we can see, the SP supports SSO (obviously, that’s why SAML is used at all).
This means that an SP has to offer an endpoint, which is called by an Identity Provider.
It is necessary, because the IDP will send the login-info-doc (assertion) of the user to that endpoint.
As such, the endpoint is a service for assertions of consumers.
Brief: <AssertionConsumerService>
(See screenshot)
* The metadata also describe how the name ID should look like.
What?
Remember, the Identity Provider will issue a little document (assertion) which describes the user after login.
The user has user information, but the SAML IdP will also create a name Identifier.
This <nameIDFormat> can be formatted in different ways and the Service Provider declares which ways he understands.
* One more info contained in the metadata is the <KeyInfo>,
the public key of the Service Provider.
* Interesting to note:
The order of the elements is fixed. This info makes it easier for us to find the required elements.
So now, what information of this cryptic xml do we need?
-> Three attributes
First:
We need the entityID
In my example:
https://backendsubdomain.authentication.ap21.hana.ondemand.com
Second:
We need the NameIDFormat
Value:
urn:oasis:names:tc:SAML:1.1:nameid-format:emailAddress
Third:
We need the last AssertionConsumerService, for URI-Binding
In my example:
https://backendsubdomain.authentication.ap21.hana.ondemand.com/oauth/token/alias/backendsubdomain.az...
4.1.2. View XSUAA credentials
We’re now leaving the SAML world and entering the OAuth world.
Still in the Backend_Subaccount, we now need to identify the credentials of the OAuth client.
At the end, this is what we need: We need to fetch a JWT token which will be accepted by our OAuth-protected-endpoint.
Our backend application is bound to an instance of XSUAA, which represents the OAuth client and which reveals its credentials in the binding.
In the OAuth flow, the client needs credentials in order to fetch a JWT token from the OAuth-Authorization-Server.
As such, we need the user/password, with better words: client/secret.
To view the credentials in the binding, we can use the cockpit.
We’re anyways logged in to the backend Trial account, so we can just head to the details screen of our deployed backendapp.
We click on “Environment Variables” and find the “System-Provided” section

From the json document, we take a note of the mentioned 2 properties and its values
In my example:
"clientid": "sb-backendxsuaa!t7722"
"clientsecret": "msWms8tylSHWi4HJ7pTPhHNwaiM="
Note:
Command line users type: cf env backend
4.1.3. View Application URL
Finally, for the destination configuration we need the most prominent info: the target URL.
This is the REST endpoint which we want to call from within the frontend app.
We’ve tried it already after deployment of backend app.
As we’ve anyways the cockpit open. we can view the (base) URL of our deployed application in the cockpit, details screen of backend app, overview page:

Note:
Command line users type: cf app backend
In my example:
https://backend.cfapps.ap21.hana.ondemand.com/endpoint
4.1.4. View Documentation
In this page I've found the following info:
authnContextClassRef:
"urn:oasis:names:tc:SAML:2.0:ac:classes:PreviousSession"
4.2. Create Destination Configuration
Now that we’ve collected all required information from the backend-world, we can switch back to the frontend-world.
As such, we logout from the backend trial account and login to the frontend Trial account.
Why frontend subaccount?
Remember: The frontend app is bound to the destination service instance, because it helps to call the target URL.
As such, the destination configuration needs to be created in the frontend subaccount.
We navigate to Frontend_Subaccount -> Connectivity -> Destinations -> New Destination

Now we need to fill in quite some fields.
For better understanding,
there’s some basic data (e.g. name),
there’s the SAML data,
and there’s the XSUAA data.
Let's create the destination configuration together.
Name
We enter any name of our choice.
BUT, we need to make sure that we use exactly the same name in the code of the frontend app.
In my example: "destination_to_backend".
Type
The type of the destination is "HTTP".
Description
Any description of our choice, e.g.
"Destination pointing to backend app endpoint in backend account"
URL
The URL of the target endpoint of our backend app, as collected in chapter 2.1.
In my example:
https://backend.cfapps.ap21.hana.ondemand.com/endpoint
Proxy Type
Here we choose “Internet”
(because we aren’t calling onPrem system via cloud connector).
Authentication
Here we choose "OAuth2SAMLBearerAssertion"
(which opens up like hundred more fields, claiming to be filled in)
Key Store Location
We ignore this field
Key Store Password
We ignore this field as well (nice)
Audience
This is the expected receiver of the authentication mechanism.
In our case it is the SAML Service Provider, identified by its entityID
(the entityID is an attribute of the SAML metadata of the targeted subaccount)
We collected the value above.
In my example:
https://backendsubdomain.authentication.ap21.hana.ondemand.com
AuthnContextClassRef
Here we enter the value as collected above:
"urn:oasis:names:tc:SAML:2.0:ac:classes:PreviousSession"
Client Key
Here we enter the value of the property clientid, as collected above
In my example:
"sb-backendxsuaa!t7722"
Token Service URL Type
Here we choose “Dedicated” which is anyways the default value.
(The “Common” value has to be selected for multitenant applications, where the URL is modified for each tenant)
Token Service URL
Here we use the SAML metadata as collected in the preparation.
The URL is copied from the “Location” attribute of the AssertionConsumerService element
In my example:
https://backendsubdomain.authentication.ap21.hana.ondemand.com/oauth/token/alias/backendsubdomain.az...
Token Service User
Remember that we were talking about user and pwd that are used to fetch a JWT token.
They are found in the credentials of the XSUAA instance, bound to the backend app.
It is the clientid as collected above and the same which we already used for the field “Client Key”
In my example:
sb-backendxsuaa!t7722
Token Service Password
Finally, the last field to fill in is the password to be used when fetching a JWT token.
It is the value of property clientsecret, which we collected above.
In my example:
msWms8tylSHWi4HJ7pTPhHNwaiM=
Additional Properties
We’re having fun with filling fields, so we add one more field (really the last one) by pressing “New Property”.
New Property Name:
We enter “nameIdFormat” as new property name.
New Property Value
Here we enter the nameIDFormat which we collected above:
urn:oasis:names:tc:SAML:1.1:nameid-format:emailAddress

After filling in all fields, we should not forget to press “Save”.
In addition, we can export the destination configuration, so we can reuse it next time.
Note:
Destination Configurations can be imported. I've added my exported config in the appendix 3.
5. Run Scenario
After finishing with the 2 required configurations, we (still) cannot call our application.
We first need to assign the role, which we defined in our xs-security file, to our user.
5.1. Assign Role
Remember: In our frontend XSUAA instance, we’ve defined a role-template.
This was required, because the uaa.user scope must be contained in the user-JWT-token.
However, this scope is only added to the token, if the corresponding role is assigned to the user.
In our security configuration file, we’ve already defined a role-collection, which is already configured with the role.
So now we only need to find that role collection and add our user to it.
So now we need to take over the task of an admin: configure our user with role collection.
We make sure to login to our frontend Trial account.
We navigate to the frontend_subaccount -> Security -> Role Collections.
Find and select the collection with name “Frontend_Roles”, press “Edit”.
Add our user
It is important to use code-completion only the code completion will fill in all fields properly.
Finally press “Save”

5.2. Run
To start the flow, we enter our frontend application via the approuter URL.
This is:
ApprouterURL + route + endpoint + slash
In my example:
https://frontendrouter.cfapps.us10.hana.ondemand.com/tofrontend/homepage
As a result, we get a login screen in which we enter the credentials of our valid BTP user.
Afterwards, we’re redirected to the homepage of our frontend app, which is the /homepage endpoint of our core server module.
We can be happy if we don’t see error messages.
Done with boring tutorial.
However....even if we’re tired, for good reason, let’s not quit the tutorial before having had a closer look at the result JWTs (and no, scrolling down to the end of the tutorial is not an option)
Explanation of JWT content:
5.2.1. User-JWT-token
The first output is the decoded and formatted JWT token which we get after login:
As we know, the Approuter handles the login together with XSUAA server and the
OAuth flow used is the one called authorization code.
This flow takes an additional security step: after entering correct user/password, the server sends a “code” to the configured redirect-URI. Approuter takes care of offering such redirext-endpoint and to fetch the JWT token based on the code.
In the screenshot we can see the URL of the OAuth token endpoint, which approuter is reading from the binding.
Just like the client id.
Also, we can see the origin, which is the default Identity Provider associated with a subaccount in SAP BTP.
An important claim is the audience which states that the JWT token is intended to be understood by the OAuth client frontendxsuaa, which is our instance of XSUAA
In the extended attributes section, we can see the identity zone, which in my example is called frontendsubdomain.
With this information, we just confirm that the JWT token is issued by the frontendXSUAA.
As additional information, we can see the data which belongs to my user: the name, the role collection and the scope, which we require.
Bottom line:
As expected, the JWT is a user-token and belongs to the frontend-world.
5.2.2. Destination-JWT-token
The next boring text belongs to the JWT token which we received after token exchange.
Remember:
We need a token to call the destination service. Instead of just using the credentials provided by destination service, we take the user-token and send it as well.
The grant type for this OAuth flow is called JWT Bearer Token Grant and this is what we can see in the screenshot below:

What else is interesting in the second JWT?
Nothing is really interesting, but let’s consider the following:
We’re still in the same identity zone.
The OAuth client is now the destinationService one and it is as well contained in the audience.
This means, that we can safely send this token to the destination Service REST API.
The token contains all scopes that are required for using the destination service.
In addition, we can see that all user-specific data is preserved in the token: the name, scope, role collections. This is interesting, yes.
5.2.3. SAML-JWT-token
At this point, we’ve used the second JWT token to call the destination service.
As a result, we received the destination configuration info, and in addition, we received a JWT token, which we use to call the backend application.
The destination service internally has executed the SAML2 Bearer Grant flow.
This flow has accomplished the mission impossible: fetch a kind of user token across regional borders.
(omg – how boring)

The screenshot shows that the issuer, the subaccount and identity zone are now located in the backend world.
The client id and the audience point at our XSUAA instance which we created in the backend trial account.
The user information has been preserved, we can see the name.
Interesting is the origin claim: cfapps.us10.hana.ondemand.com22cece3
Remember?
After all this lengthy tutorial we have an excuse to forget such boring text.
To remember it, we just need to look into the IDP metadata of the frontend subaccount
<ns3:EntityDescriptor
entityID="cfapps.us10.hana.ondemand.com/22cece36-3c8c-4420-bad5-60e1787230da"
The entity ID of the Identity Provider is a combination of the domain and subaccount ID of the frontend trial.
However, it doesn’t match exactly.
Who cares?
However, this leads us to the backend trial account, where we have configured a second Identity Provider.
More precisely, we’ve configured trust configuration, based on the SAML metadata of the IDP in frontend account.
And in the backend account, security->trust, we can find exactly that string which we were searching for:
cfapps.us10.hana.ondemand.com22cece3

Conclusion
This leads us to the amazing conclusion:
All that configuration effort, the trust, the SAML, that has led to the capability of transporting frontend user information across the border to the backend, and has made it even into a JWT token which is issued by backend XSUAA server.
Wow – superboring.
6. Cleanup
Frontend Subaccount:
Manually delete destination configuration.
Delete artifacts:
cf login -a https://api.cf.us10.hana.ondemand.com -o frontendorg
cf d frontend -r -f
cf d frontendrouter -r -f
cf ds frontendXsuaa -f
cf ds frontendDestination -f
Backend Subaccount:
Manually delete trust configuration.
Delete artifacts:
cf login -a https://api.cf.ap21.hana.ondemand.com -o backendorg
cf d backend -r -f
cf ds backendXsuaa -f
Summary
The torture of this tutorial has teached us:
How to configure trust between 2 subaccounts of SAP BTP, Cloud Foundry.
How to create a destination of type OAuth2SAMLBearerAssertion and fill in the fields.
Understand the scenario, SAML and OAuth and JWT properties.
How to write minimal useless node apps that are protected and use destination service.
Quick Guide
Configure Trust:
Download IdP metadata from Destinations menu in frontend subaccount cockpit.
Create new Trust Config in backend subaccount cockpit and paste the IdP metadata.
Create Destination:
Use SAML metadata and XSUAA credentials from backend.
Note: the token Url is not taken from credentials.
Next Steps
To keep the anyways lengthy and complicated tutorial a little bit simpler, we've ignored the authorization aspect so far. Means, our backend app endpoint doesn't require a scope.
The next tutorial will take care of it.
If you have own custom Identity Provider, you might prefer the fourth blog post.
Links
See links section of previous blog post.
Appendix 1: Sample Code for Backend Application
backend-security.json
{

    "xsappname": "backendxsuaa",

    "tenant-mode": "dedicated"

}
manifest.yml
---

applications:

  - name: backend

    path: app

    memory: 64M

    routes:

    - route: backend.cfapps.ap21.hana.ondemand.com

    services:

      - backendXsuaa
app
package.json
{

  "dependencies": {

    "@sap/xsenv": "latest",

    "@sap/xssec": "latest",

    "express": "^4.17.1",

    "passport": "^0.4.0"

  }

}
server.js
const xsenv = require('@sap/xsenv')

const UAA_CREDENTIALS = xsenv.getServices({myXsuaa: {tag: 'xsuaa'}}).myXsuaa


const express = require('express')

const app = express();

const xssec = require('@sap/xssec')

const passport = require('passport')

const JWTStrategy = xssec.JWTStrategy

passport.use('JWT', new JWTStrategy(UAA_CREDENTIALS))

app.use(passport.initialize())

app.use(express.json())


// start server

app.listen(process.env.PORT)


app.get('/endpoint', passport.authenticate('JWT', {session: false}), (req, res) => {

    const auth = req.authInfo

    console.log(`===> [backendapp] called by user '${auth.getGivenName()}' from subdomain '${auth.getSubdomain()}' with oauth client: '${auth.getClientId()}'`)

    res.json({

        'message': 'BACKEND successfully called',

        'jwtToken': auth.getAppToken()})

})
Appendix 2: Sample Code for Frontend Application
frontend-security.json
{

    "xsappname": "frontendxsuaa",

    "tenant-mode": "dedicated",

    "role-templates": [{

        "name": "uaaUserDefaultRole",

        "description": "Default role uaa.user required for user centric scenarios",

        "scope-references": ["uaa.user"]

    }],

    "role-collections": [{

          "name": "Frontend_Roles",

          "role-template-references": [ "$XSAPPNAME.uaaUserDefaultRole" ]

        }

    ]

}
manifest.yml
---

applications:

  - name: frontend

    path: app

    memory: 64M

    routes:

    - route: frontend.cfapps.us10.hana.ondemand.com

    services:

      - frontendXsuaa

      - frontendDestination

  - name: frontendrouter

    routes:

    - route: frontendrouter.cfapps.us10.hana.ondemand.com

    path: approuter

    memory: 128M

    env:

      destinations: >

        [

          {

            "name":"destination_frontend",

            "url":"https://frontend.cfapps.us10.hana.ondemand.com",

            "forwardAuthToken": true

          }

        ]

    services:

      - frontendXsuaa
app
package.json
{

  "dependencies": {

    "@sap/destinations": "latest",

    "@sap/xsenv": "latest",

    "@sap/xssec": "^3.2.13",

    "express": "^4.17.1",

    "node-fetch": "2.6.2",

    "passport": "^0.4.0"

  }

}
server.js
const xsenv = require('@sap/xsenv')

const INSTANCES = xsenv.getServices({

    myXsuaa: {tag: 'xsuaa'},

    myDestination: {tag: 'destination'}

})

const XSUAA_CREDENTIALS = INSTANCES.myXsuaa

const DESTINATION_CREDENTIALS = INSTANCES.myDestination


const fetch = require('node-fetch')

const xssec = require('@sap/xssec')

const passport = require('passport')

const JWTStrategy = xssec.JWTStrategy

passport.use('JWT', new JWTStrategy(XSUAA_CREDENTIALS))

const express = require('express')

const app = express();

app.use(passport.initialize())

app.use(express.json())


// start server

app.listen(process.env.PORT)


// calling destination service with user token and token exchange

app.get('/homepage', passport.authenticate('JWT', {session: false}), async (req, res) => {


    const userJwtToken = req.authInfo.getAppToken()


    // instead of client creds, we must use token exchange

    const destJwtToken = await _doTokenExchange(userJwtToken)


    // read destination

    const destination = await _readDestination('destination_to_backend', destJwtToken)

    const samlbearerJwtToken = destination.authTokens[0].value


    // call backend app endpoint

    const response = await _callBackend(destination)

    const responseJson = JSON.parse(response)

    const responseJwtTokenDecoded = decodeJwt(responseJson.jwtToken)


    // print token info to browser

    const htmlUser = _formatClaims(userJwtToken)

    const htmlDest = _formatClaims(destJwtToken)

    const htmlBearer = _formatClaims(samlbearerJwtToken)


    res.send(`  <h4>JWT after user login</h4>${htmlUser}

                <h4>JWT after token exchange</h4>${htmlDest}

                <h4>JWT issued by OAuth2SAMLBearerAssertion destination</h4>${htmlBearer}

                <h4>Response from Backend</h4>${responseJson.message}. The token: <p>${JSON.stringify(responseJwtTokenDecoded)}</p>`)

})


/* HELPER */


async function _readDestination(destinationName, jwtToken, userToken){

    const destServiceUrl = `${DESTINATION_CREDENTIALS.uri}/destination-configuration/v1/destinations/${destinationName}`

    const options = {

       headers: { Authorization: 'Bearer ' + jwtToken}

    }

    const response = await fetch(destServiceUrl, options)

    const responseJson = await response.json()

    return responseJson

}


async function _doTokenExchange (bearerToken){

    return new Promise ((resolve, reject) => {

       xssec.requests.requestUserToken(bearerToken, DESTINATION_CREDENTIALS, null, null, null, null, (error, token)=>{

          resolve(token)

       })

    })

}


async function _callBackend (destination){

    const backendUrl = destination.destinationConfiguration.URL

    const options = {

       headers: {

          Authorization : destination.authTokens[0].http_header.value  // contains the "Bearer" plus space

       }

    }

    const response = await fetch(backendUrl, options)

    const responseText = await response.text()

    return responseText

}


function decodeJwt(jwtEncoded){

    return new xssec.TokenInfo(jwtEncoded).getPayload()

}


function _formatClaims(jwtEncoded){

    // const jwtDecodedJson = new xssec.TokenInfo(jwtEncoded).getPayload()

    const jwtDecodedJson = decodeJwt(jwtEncoded)

    console.log(`===> The full JWT: ${JSON.stringify(jwtDecodedJson)}`)


     const claims = new Array()

     claims.push(`issuer: ${jwtDecodedJson.iss}`)

     claims.push(`<br>client_id: ${jwtDecodedJson.client_id}</br>`)

     claims.push(`grant_type: ${jwtDecodedJson.grant_type}`)

     claims.push(`<br>scopes: ${jwtDecodedJson.scope}</br>`)

     claims.push(`ext_attr: ${JSON.stringify(jwtDecodedJson.ext_attr)}`)

     claims.push(`<br>aud: ${jwtDecodedJson.aud}</br>`)

     claims.push(`origin: ${jwtDecodedJson.origin}`)

     claims.push(`<br>name: ${jwtDecodedJson.given_name}</br>`)

     claims.push(`xs.system.attributes: ${JSON.stringify(jwtDecodedJson['xs.system.attributes'])}`)

     return claims.join('')

}
approuter
package.json
{

    "dependencies": {

        "@sap/approuter": "latest"

    },

    "scripts": {

        "start": "node node_modules/@sap/approuter/approuter.js"

    }

}
xs-app.json
{

  "authenticationMethod": "route",

  "routes": [

    {

      "source": "^/tofrontend/(.*)$",

      "target": "$1",

      "destination": "destination_frontend",

      "authenticationType": "xsuaa"

    }

  ]

}
Appendix 3: Sample Code for Destination Configuration
destination_to_backend
#clientKey=<< Existing password/certificate removed on export >>

#tokenServicePassword=<< Existing password/certificate removed on export >>

#

#Fri Jun 10 07:09:11 UTC 2022

Description=Destination pointing to backend app endpoint in backend account

Type=HTTP

authnContextClassRef=urn\:oasis\:names\:tc\:SAML\:2.0\:ac\:classes\:PreviousSession

audience=https\://backendsubdomain.authentication.ap21.hana.ondemand.com

Authentication=OAuth2SAMLBearerAssertion

Name=destination_to_backend

tokenServiceURL=https\://backendsubdomain.authentication.ap21.hana.ondemand.com/oauth/token/alias/backendsubdomain.azure-ap21

ProxyType=Internet

URL=https\://backend.cfapps.ap21.hana.ondemand.com/endpoint

nameIdFormat=urn\:oasis\:names\:tc\:SAML\:1.1\:nameid-format\:emailAddress

tokenServiceURLType=Dedicated

tokenServiceUser=sb-backendxsuaa\!t7722
Labels:
1 Comment
You must be a registered user to add a comment. If you've already registered, sign in. Otherwise, register and sign in.
Labels in this area
-
ABAP CDS Views - CDC (Change Data Capture)
2 -
AI
1 -
Analyze Workload Data
1 -
BTP
1 -
Business and IT Integration
2 -
Business application stu
1 -
Business Technology Platform
1 -
Business Trends
1,658 -
Business Trends
92 -
CAP
1 -
cf
1 -
Cloud Foundry
1 -
Confluent
1 -
Customer COE Basics and Fundamentals
1 -
Customer COE Latest and Greatest
3 -
Customer Data Browser app
1 -
Data Analysis Tool
1 -
data migration
1 -
data transfer
1 -
Datasphere
2 -
Event Information
1,400 -
Event Information
66 -
Expert
1 -
Expert Insights
177 -
Expert Insights
293 -
General
1 -
Google cloud
1 -
Google Next'24
1 -
Kafka
1 -
Life at SAP
780 -
Life at SAP
13 -
Migrate your Data App
1 -
MTA
1 -
Network Performance Analysis
1 -
NodeJS
1 -
PDF
1 -
POC
1 -
Product Updates
4,577 -
Product Updates
341 -
Replication Flow
1 -
RisewithSAP
1 -
SAP BTP
1 -
SAP BTP Cloud Foundry
1 -
SAP Cloud ALM
1 -
SAP Cloud Application Programming Model
1 -
SAP Datasphere
2 -
SAP S4HANA Cloud
1 -
SAP S4HANA Migration Cockpit
1 -
Technology Updates
6,873 -
Technology Updates
419 -
Workload Fluctuations
1
Related Content
- First hand experience at SAP Build Code - Learn, Try it out, Get a badge, SAP Discovery Centre in Technology Blogs by SAP
- Cloud Integration: AMQP Adapter, Client Certificate, Solace PubSub+ [2]: Certificate Chain in Technology Blogs by SAP
- Cloud Integration: AMQP Adapter, Client Certificate, Solace PubSub+ [1]: Intro in Technology Blogs by SAP
- SAP Recognized as a Leader in 2024 Gartner® Magic Quadrant™ for iPaaS in Technology Blogs by SAP
- AI Foundation on SAP BTP: Q4 2023 Release Highlights in Technology Blogs by SAP
Top kudoed authors
| User | Count |
|---|---|
| 35 | |
| 25 | |
| 14 | |
| 13 | |
| 7 | |
| 7 | |
| 6 | |
| 6 | |
| 5 | |
| 5 |