
- SAP Community
- Products and Technology
- Technology
- Technology Blogs by Members
- All-In-One Travel App with AppGyver – SAP No Code ...
Technology Blogs by Members
Explore a vibrant mix of technical expertise, industry insights, and tech buzz in member blogs covering SAP products, technology, and events. Get in the mix!
Turn on suggestions
Auto-suggest helps you quickly narrow down your search results by suggesting possible matches as you type.
Showing results for
aoyang
Contributor
Options
- Subscribe to RSS Feed
- Mark as New
- Mark as Read
- Bookmark
- Subscribe
- Printer Friendly Page
- Report Inappropriate Content
06-08-2022
8:45 PM
1. Purpose
This is my entry for SAP no-code challenge. I entered because I never used AppGyver before and want to familiarize with low-code app development as well as getting the hands-on experience.
2. My App
I love travelling and visiting new places. It's great but I feel like you need to depend on so many apps/websites from different places to get the information you need. That's why I decided to create an app that user can access travel related information in one place.
All-In-One Travel App helps you with basic needs and provide essential information in single app platform, wherever you are travelling to.
I will go through each page of the app for a simple tutorial, as well as what AppGyver features are used and the logic behind them.
The app is deployed to https://all-in-one-travelapp.appgyverapp.com/
2.1 Home page
The first page asks user to enter the travel destination. The input field have autocomplete as the user types in the names. If the country is entered, the city will be suggested by all cities from that country. Of course, there is an empty check when the search button is pressed.
2.2 Overview page
The Overview page shows the general description about the city, as well as currency, language, calling code, population, etc. There is also "Add to My Favorite button", which will register the city as your favorite and selectable from the Home page.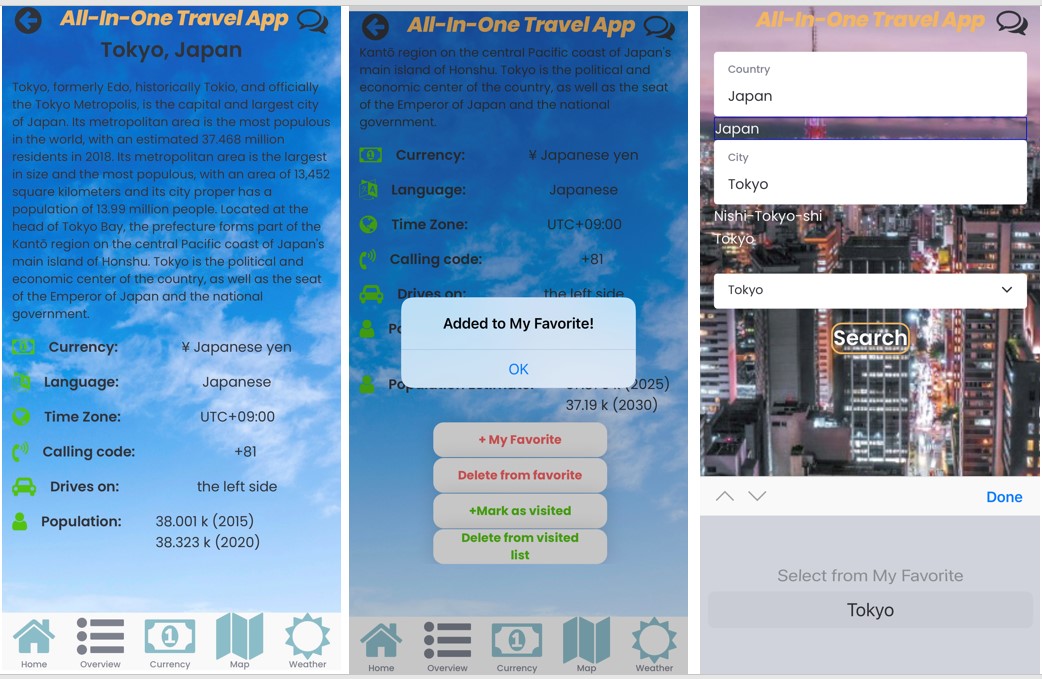
2.3 Currency Converter
Currency converter is absolute necessity when shopping in foreign currencies(at least for me!).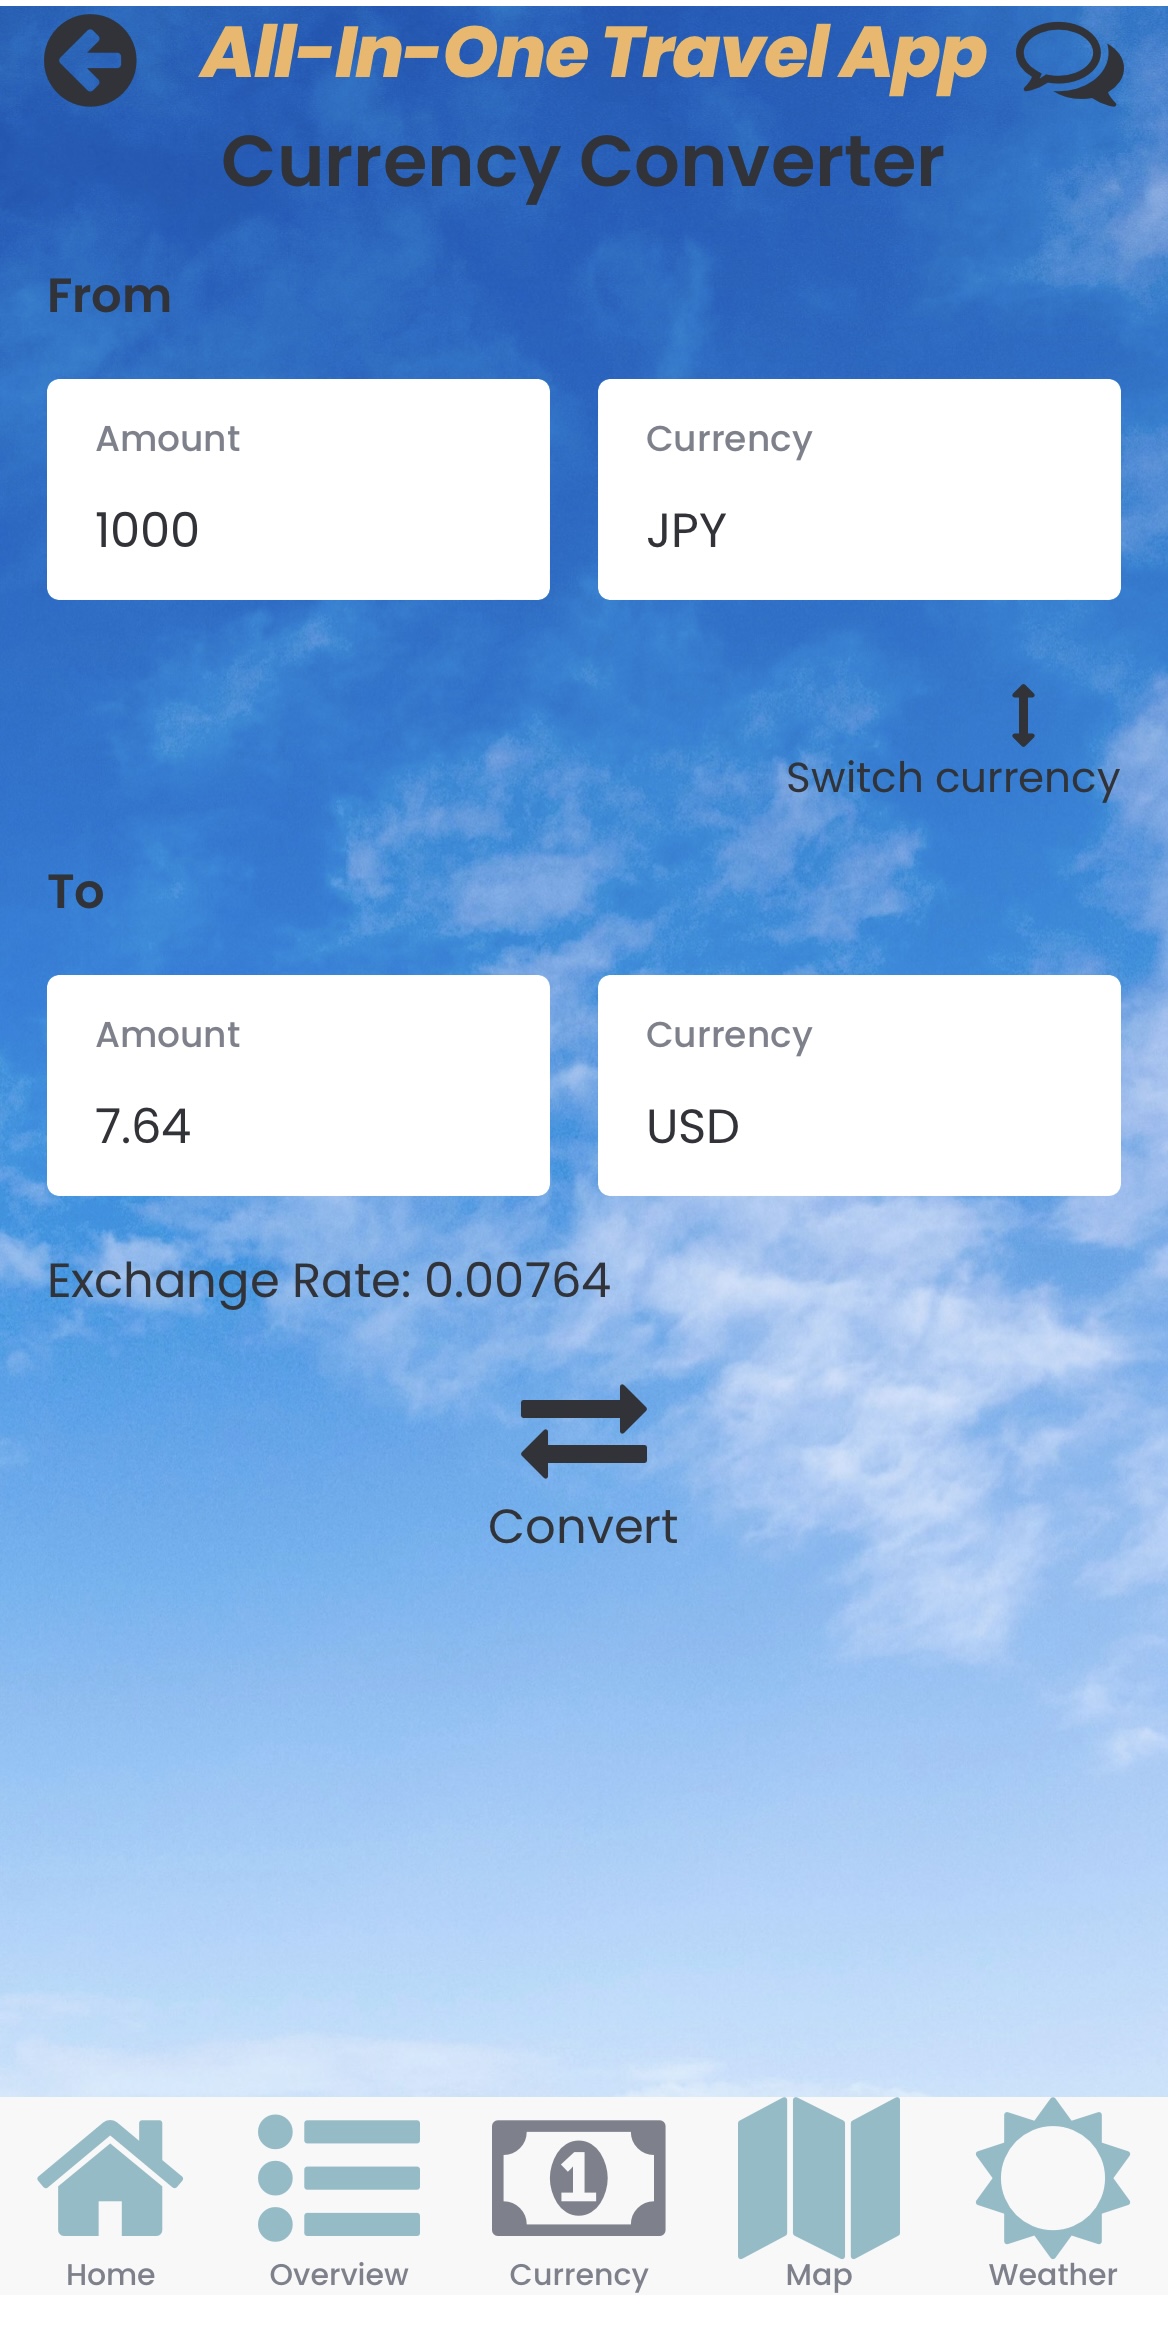
2.4 Map
Map shows the city you are visiting with red marker. It also detects the GPS location of your device and shows your current location with blue marker so you can navigate through the city. User can also mark the city as "the visited city" in the overview page. All the visited cities are displayed with pink markers. Unfortunately I am in Europe right now so it's shown on the other side of the map of Tokyo😅.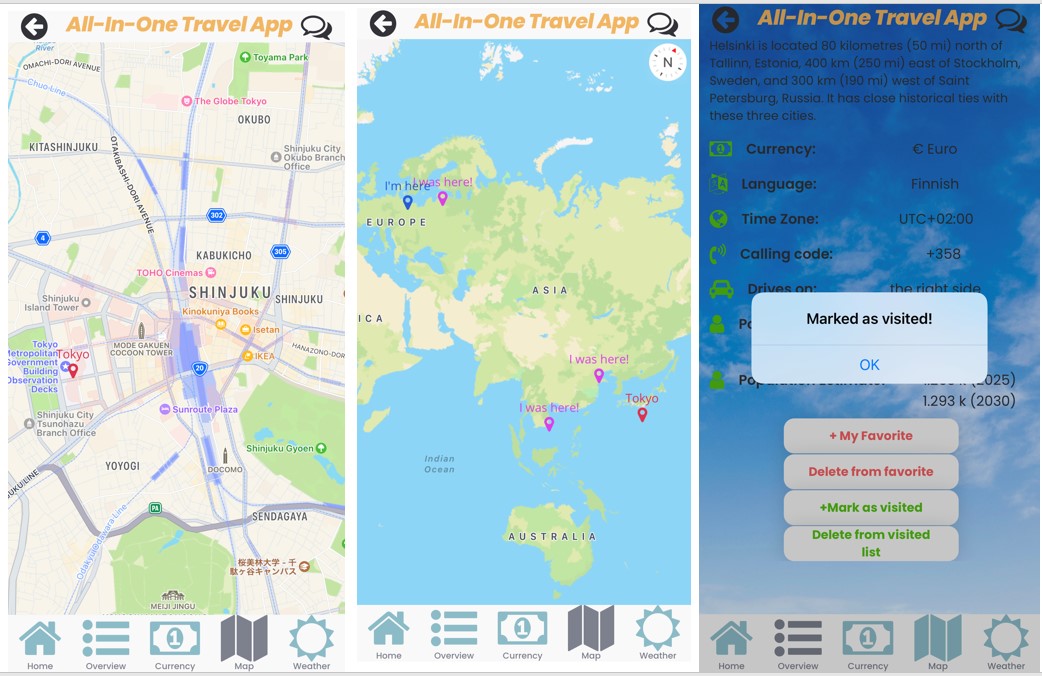
2.5 Weather forecast

Sometimes your trip can be affected by the weather, so it's good idea to check the forecast. This page shows the weather forecast of the city with span of 3 hours.
2.6 Google Translate
Exactly as the title says, app is calling google translator web page. There is no free public translator API(at least I did not find it) so I decided to just call WebView in AppGyver. I obviously got lazy here... but this way was the best way to create a translator page.
2.7 Step counter

 I often like to activate step counter on my phone during my trip and get satisfied how many steps I walked in one day(or is it only me?). I tried to create the same kind of counter with AppGyver sensor variables.
2.8 Personal Calendar
Keeping track of your travel plan and schedule is a part of a smooth and successful trip. This calendar shows you the current date/month, where you can register/unregister your plans to the date you pressed. 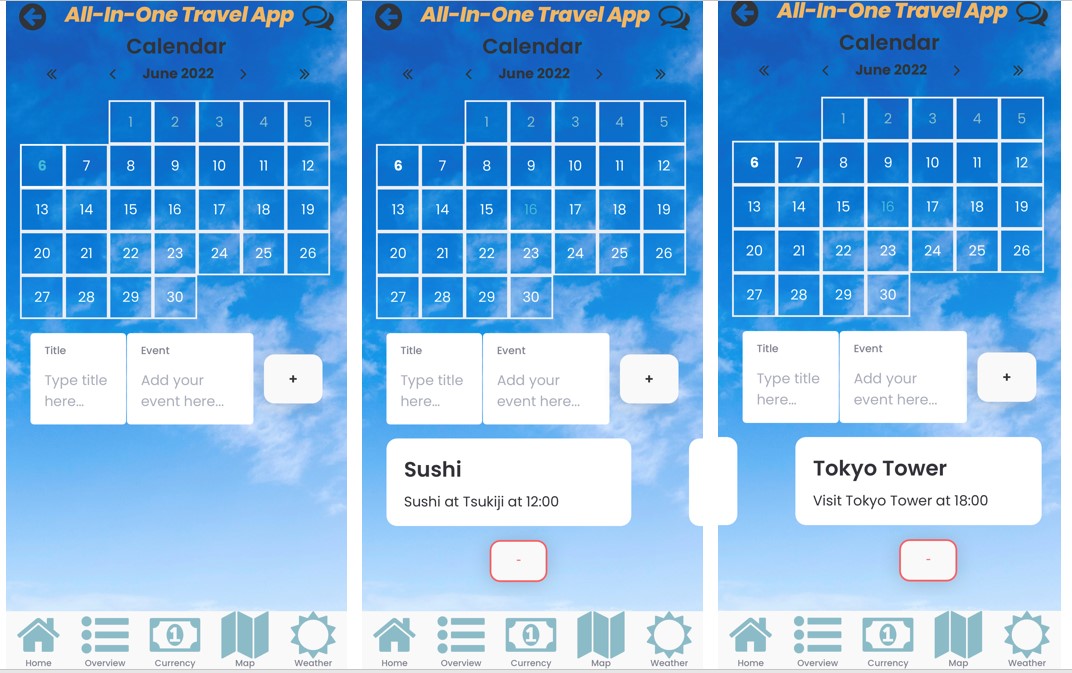
2.9 Customer support chat bot
My initial motivation was that I wanted to integrate SAP Conversational AI in AppGyver, and thought every legitimate app has chatbot these days, so I integrated my SAP CAI chatbot in this app. It's a QA chat bot that answers certain questions with predefined answers. 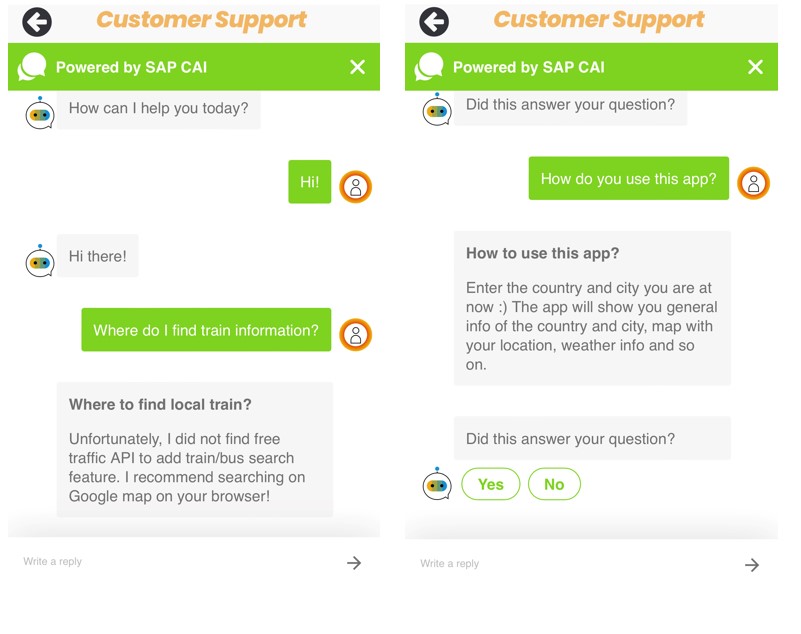
Page navigation
Video clip
*Disclaimer*
As some components are not supported on the web, I've only tested the app on my preview app on Iphone. The app may show misalignment and different positioning of components, some features will not be supported and other issues if it's used on web browser.
3. Technical details and AppGyver features
3.1 Data source
Since I don't have any subscription to paid API or data source, nor do I have server of my own to expose my own API, the data this app is pulling from are all free public API & data source. I do have SAP BTP trail account but there is 365 days limit and data will be deleted after the trial ends so I decided not use it for this challenge.
So all the free API used in the app are: OpenWeatherMap, RestCountries API, CountriesNow(by Postman API), ExchangeRate API(from AppGyver marketplace), and WikiAPI.
Besides API, my personal Google Firestore(free) is used to pull the population data. There I've only mapped population of some of the biggest cities from the internet.
3.2 Input with autocomplete
Firstly, store all the values(in my case countries) into a variable. Then create component trees as below. In the text component, repeat with the variable and the repeated data will be named "current". Then set the content of the text component as "current.name_of_your_value". Go back to "Repeat with" and use formula to find the match for the value entered by user.
What it's doing is to find matching countries from obj_country(list of countries) that contains the current user input value(search_country), and create a range item of 3 rows.
SLICE(SELECT(appVars.obj_country, CONTAINS(LOWERCASE(item.country_name), LOWERCASE(pageVars.search_country))), 0, 3)3.3 Scrollable background cover with viewport height/width
This app has 2 main background cover, a city at night on the Home page and beautiful blue sky on the rest of the page(both from MS PowerPoint open pictures). I think the background looks nice because it stretches over the whole screen. On the scrollable pages like Overview page and Weather page, the image will not cut off even if user scrolls over to the edge.
To create such background, first place a container with background image of your choice. Set containers width/height to the below formulas. Then make sure to set absolute as its position set 0px for left and top so that the container starts from the top left corner.
systemVars.dimensions.viewport.width

systemVars.dimensions.viewport.height
Finally, check on "Stretch to the viewport height" checkbox on the page style tab.
If the page needs to be scrolled, add Scroll view inside that container and set the viewport width/height as well.
3.4 Struggle with step counter logic
The best way to detect steps would be to use accelerometer but I am novice and didn't even know what x,y,z return variables represent(for how to interpret the data, refer to this). I later found out that proper step counter needs complex algorithm. I cannot wrap my head around the complexity of this, but still I gave it a try with my own logic.
So each variable represents movement of x = forward/back, y = left/right, z = up/down. The formula is basically saying if either of below is true, increment the step count.
- If any of xyz is greater than 1(which is the power needed to accelerate the movement). This includes less than -1 because negative means how much acceleration is slowing down.
- None of xyz has to be greater than 1(or less than -1), but if all of them combines create a acceleration of more than 1.5(or less than 1.5).
( ABS(outputs["Get single accelerometer value"].value.x) >= 1 || ABS(outputs["Get single accelerometer value"].value.y) >= 1 ) || ( ABS(outputs["Get single accelerometer value"].value.x) + ABS(outputs["Get single accelerometer value"].value.y) + ABS(outputs["Get single accelerometer value"].value.z) > 1.5 )It works ok if you just mock the actual steps by shaking the phone. But if I put the phone in my pocket, the count is not accurate.
I understand my logic is very premature, so if anyone who is experienced with sensor and accelerometer, I'd highly appreciate your advise!
3.5 Custom calendar with containers
The logic behind this custom calendar is not a simple one, but since the "Date picker calendar" from the market is not flexible and only supported on web, I decided to do my own.
A. First step is to create the calendar design. Create a component trees like below by inserting containers into one another. You should get page design like below. Next, create page variables with below data types. In "Current Month Days", set repeated with "calendar_days". 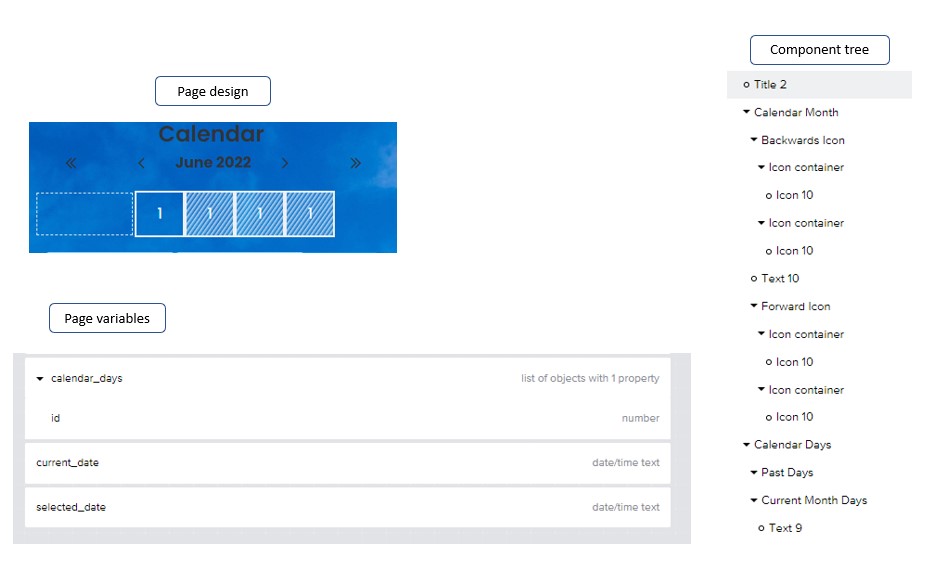
B. Do the followings to make the containers look like a calendar.
- Check "Wrap overflowing components to new row" in "Calendar Days" and make it horizontal.
- Set width of "Current Month Days" to 14% of the parent container, which will divide each repeated container to approximately 1/7th of the size.
- Set width of "Past Days" to the following formula, which calculates how many days is before the current date and how much space needed for the padding.
MOD(FLOOR(DATETIME_DIFFERENCE(SET_DATETIME_COMPONENT(pageVars.current_date, 1, "date"), "2020-01-06T00:00:00Z", "days", true)), 7)*14+"%"
C. Now for the logic, create a flow of logic as below when the page is mounted. Please note that "Set component property" has nothing to do with the calendar so it can be ignored.
In the first two Set page variable , set current date/time using NOW() to "current_date" & "selected_date". In the last one, use below formula to map the date of the month to "calendar_days".

ADD_DURATION to get the next month of the current date. SET_DATETIME_COMPONENT to get the last date of the previous month by passing 0(pretty neat!). Then get that date, which is the last date of the current month, and generate range and map it to "calendar_days".
MAP(GENERATE_RANGE(1, GET_DATETIME_COMPONENT( SET_DATETIME_COMPONENT(ADD_DURATION(pageVars.current_date, 1, "months"), 0, "date"), "date")),{id: item})
D. To detect the date user has pressed, add flow logic to set the date pressed to "current_date" with following formula.
SET_DATETIME_COMPONENT(pageVars.current_date, repeated.current.id, "date")Finally, add below formula to the date text to change the style of the text when the date is selected.
//Font color of the date text

IF(DATETIME_IS_SAME(pageVars.selected_date, SET_DATETIME_COMPONENT(pageVars.current_date, repeated.current.id, "date"),"day"),theme.$smartColorPalette_app.secondary, IF(DATETIME_IS_BEFORE(SET_DATETIME_COMPONENT(pageVars.current_date, repeated.current.id,"date"),NOW(),"day"),theme.$smartColorPalette_app.secondaryLowContrast,theme.$smartColorPalette_positive.positive))


//Font weight of the date text

IF(DATETIME_IS_SAME(SET_DATETIME_COMPONENT(pageVars.current_date, repeated.current.id,"date"),NOW(),"day"),"700","400")
3.6 Composite Component
I had to reuse the scrollable menu bar at the bottom over and over, so that part is made into a composite component. It was tricky at first when you can't access all your variables defined outside of composite component but once I'm used to using two-way biding properties & receiving/triggering events, it saves so much time not having to create the same menu bar over and over.
3.7 Cloud Firestore Integration
Population information in the overview page is pulled from my Cloud Firestore account. The configuration is so simple and AppGyver provides great implementation guide.
3.8 On-device storage
"Add to favorite city" and "Mark as visited" on the overview & events on the calendar page are both stored into on-device storage. ID field is the key and mandatory to use for data structure, which is bit less flexible. Other than that, I feel like it's a great feature!
3.9 SAP Conversational AI Integration
Probably much easier using BTP to integrate SAP CAI but as mentioned above, BTP is not used for this challenge. Chatbot page is calling my QA bot from SAP CAI trial account. CAI provides light-weighted, easy to integrate channel to embed the bot into html page. All you need is to add the below script to html.
So I thought using Web View Component from the market will display my bot using html content rendering. However, apparently there is a limit to what Web View can render and chatbot is not showing. So as a workaround, I hosted my html code to my GitHub account and published the page. The published GitHub URL are called by Web View in AppGyver and this way it shows the bot on the app properly.
Now checking the required capabilities for the no code challenge...
- Connect to a free, public REST/OData service ✔️->3.1
- Create a data store on your device ✔️->3.8
- Incorporate native capabilities of your mobile device ✔️->2.4, 2.7
- Use a formula ✔️->3.2, 3.4, 3.5 and so on..
- Create at least 3 pages and a menu for navigation within your app ✔️->2
- Use one item from the Component Marketplace or Flow Function Market ✔️->Embedded map view in 2.4, Web view in 2.6 and so on..
- Use at least 1 page parameter or page variable to store data ✔️->3.2, 3.5 and so on..
- Create a composite component ✔️->3.6
- Set the theme, and change the colors of your components ✔️->3.5 and most components of the app
- Build and deploy your app to SAP AppGyver server ✔️->https://all-in-one-travelapp.appgyverapp.com/
4. My experience
4.1 What I found cool about AppGyver:👏👏
・Formula is powerful
Formula allows you to play around with data object and access different part of the object node and assign the value to another part of variable. The flexibility is worth noting. Another cool part is that the function dictionary and examples are at your tip of your finger. No need to search for official documents on the browser!
・Ctr+C, Ctr+V, Ctr+Z all the time!
Copy paste works the same way in AppGyver too. This saves so much efforts in reusing components, flow logic, etc.
・Version management
AppGyver's own version management system. It shows which page is changed and can rollback to the version. Version list can be accessed by the history button. It seems like it only keep certain number of versions.
・API handling and response property schema detection
It's been so easy to handle API calls. What amazes me more is the auto detection of response property schema. This saves me from defining the data structure to consume the API. It saves so much effort that I feel like being spoiled.
・Very basic yet AG debugger works fine
AG debugger includes only events/function flow, console and variable state. No break-point, no step-in/step-out buttons, no stack information. Yet debugging was not a struggle at all for me. Only thing I realized is custom JS cannot be debugged and the syntax error cannot be caught at the time of compiling. One way to check is to use Console in debugger. Syntax error will be displayed there and anything Console.log() shows will be displayed as well.
..and above all, user friendly app development platform that produces simple ~ complex apps effectively and quickly.
4.2 Feature request on AppGyver:✋
・Dependency check
When I change one variable to another name, I have to fix it wherever it's used, but there is no dependency check. If you forget to change in one place, you will not find out until you face an error and debug it. Is there dependency check in AppGyver?
・Property scan(source scan)
When the app is big and many complex formula are used, I forget which component has which formula used and which flow logic is in which buttons. Maybe not a necessary feature but definitely a useful if we can scan with keywords(IF, GET_DATETIME_COMPONENT, etc) and get the list of components that is using the keyword.
・Comment
When the logic gets complex, there is nowhere to add comments.
・Analytical/Data visualizing components
So far there is only "D3.js/Google chart" when it comes to the data analysis/visualizing component, and it seems you need custom JS to be able to use it. More of those chart/graph components would be nice.
・Not supported/only supported on web
Some components(map, webview) are not supported on the browser.
In summary
Overall a big thumb up👍 for AppGyver. I never used AppGyver before this challenge and now I am a big fan! Thank you daniel.wroblewski for hosting this challenge and for this learning opportunity.
I work with SAP development(mostly ABAP and some UI5) and cannot wait for the day I can try AppGyver out in BTP and consume Odata from S4 HANA. I'm not sure if deploying BTP AppGyver apps to S4 UI5 repository and convert into BSP application is in the road map or not, but if it is, that would be very exciting(because then no need to develop custom UI with ABAP and SAPUI5).
Either way, I will definitely invest more time on AppGyver and looking forward to the feature update and the road map in SAP BTP.
- SAP Managed Tags:
- SAP Conversational AI,
- SAP Build Apps
6 Comments
You must be a registered user to add a comment. If you've already registered, sign in. Otherwise, register and sign in.
Labels in this area
-
"automatische backups"
1 -
"regelmäßige sicherung"
1 -
505 Technology Updates 53
1 -
ABAP
14 -
ABAP API
1 -
ABAP CDS Views
2 -
ABAP CDS Views - BW Extraction
1 -
ABAP CDS Views - CDC (Change Data Capture)
1 -
ABAP class
2 -
ABAP Cloud
2 -
ABAP Development
5 -
ABAP in Eclipse
1 -
ABAP Platform Trial
1 -
ABAP Programming
2 -
abap technical
1 -
absl
1 -
access data from SAP Datasphere directly from Snowflake
1 -
Access data from SAP datasphere to Qliksense
1 -
Accrual
1 -
action
1 -
adapter modules
1 -
Addon
1 -
Adobe Document Services
1 -
ADS
1 -
ADS Config
1 -
ADS with ABAP
1 -
ADS with Java
1 -
ADT
2 -
Advance Shipping and Receiving
1 -
Advanced Event Mesh
3 -
AEM
1 -
AI
7 -
AI Launchpad
1 -
AI Projects
1 -
AIML
9 -
Alert in Sap analytical cloud
1 -
Amazon S3
1 -
Analytical Dataset
1 -
Analytical Model
1 -
Analytics
1 -
Analyze Workload Data
1 -
annotations
1 -
API
1 -
API and Integration
3 -
API Call
2 -
Application Architecture
1 -
Application Development
5 -
Application Development for SAP HANA Cloud
3 -
Applications and Business Processes (AP)
1 -
Artificial Intelligence
1 -
Artificial Intelligence (AI)
4 -
Artificial Intelligence (AI) 1 Business Trends 363 Business Trends 8 Digital Transformation with Cloud ERP (DT) 1 Event Information 462 Event Information 15 Expert Insights 114 Expert Insights 76 Life at SAP 418 Life at SAP 1 Product Updates 4
1 -
Artificial Intelligence (AI) blockchain Data & Analytics
1 -
Artificial Intelligence (AI) blockchain Data & Analytics Intelligent Enterprise
1 -
Artificial Intelligence (AI) blockchain Data & Analytics Intelligent Enterprise Oil Gas IoT Exploration Production
1 -
Artificial Intelligence (AI) blockchain Data & Analytics Intelligent Enterprise sustainability responsibility esg social compliance cybersecurity risk
1 -
ASE
1 -
ASR
2 -
ASUG
1 -
Attachments
1 -
Authorisations
1 -
Automating Processes
1 -
Automation
1 -
aws
2 -
Azure
1 -
Azure AI Studio
1 -
B2B Integration
1 -
Backorder Processing
1 -
Backup
1 -
Backup and Recovery
1 -
Backup schedule
1 -
BADI_MATERIAL_CHECK error message
1 -
Bank
1 -
BAS
1 -
basis
2 -
Basis Monitoring & Tcodes with Key notes
2 -
Batch Management
1 -
BDC
1 -
Best Practice
1 -
bitcoin
1 -
Blockchain
3 -
BOP in aATP
1 -
BOP Segments
1 -
BOP Strategies
1 -
BOP Variant
1 -
BPC
1 -
BPC LIVE
1 -
BTP
11 -
BTP Destination
2 -
Business AI
1 -
Business and IT Integration
1 -
Business application stu
1 -
Business Architecture
1 -
Business Communication Services
1 -
Business Continuity
1 -
Business Data Fabric
3 -
Business Partner
12 -
Business Partner Master Data
10 -
Business Technology Platform
2 -
Business Trends
1 -
CA
1 -
calculation view
1 -
CAP
2 -
Capgemini
1 -
Catalyst for Efficiency: Revolutionizing SAP Integration Suite with Artificial Intelligence (AI) and
1 -
CCMS
2 -
CDQ
12 -
CDS
2 -
Cental Finance
1 -
Certificates
1 -
CFL
1 -
Change Management
1 -
chatbot
1 -
chatgpt
3 -
CL_SALV_TABLE
2 -
Class Runner
1 -
Classrunner
1 -
Cloud ALM Monitoring
1 -
Cloud ALM Operations
1 -
cloud connector
1 -
Cloud Extensibility
1 -
Cloud Foundry
3 -
Cloud Integration
6 -
Cloud Platform Integration
2 -
cloudalm
1 -
communication
1 -
Compensation Information Management
1 -
Compensation Management
1 -
Compliance
1 -
Compound Employee API
1 -
Configuration
1 -
Connectors
1 -
Conversion
1 -
Cosine similarity
1 -
cryptocurrency
1 -
CSI
1 -
ctms
1 -
Custom chatbot
3 -
Custom Destination Service
1 -
custom fields
1 -
Customer Experience
1 -
Customer Journey
1 -
Customizing
1 -
Cyber Security
2 -
Data
1 -
Data & Analytics
1 -
Data Aging
1 -
Data Analytics
2 -
Data and Analytics (DA)
1 -
Data Archiving
1 -
Data Back-up
1 -
Data Governance
5 -
Data Integration
2 -
Data Quality
12 -
Data Quality Management
12 -
Data Synchronization
1 -
data transfer
1 -
Data Unleashed
1 -
Data Value
8 -
database tables
1 -
Datasphere
2 -
datenbanksicherung
1 -
dba cockpit
1 -
dbacockpit
1 -
Debugging
2 -
Delimiting Pay Components
1 -
Delta Integrations
1 -
Destination
3 -
Destination Service
1 -
Developer extensibility
1 -
Developing with SAP Integration Suite
1 -
Devops
1 -
Digital Transformation
1 -
Documentation
1 -
Dot Product
1 -
DQM
1 -
dump database
1 -
dump transaction
1 -
e-Invoice
1 -
E4H Conversion
1 -
Eclipse ADT ABAP Development Tools
2 -
edoc
1 -
edocument
1 -
ELA
1 -
Embedded Consolidation
1 -
Embedding
1 -
Embeddings
1 -
Employee Central
1 -
Employee Central Payroll
1 -
Employee Central Time Off
1 -
Employee Information
1 -
Employee Rehires
1 -
Enable Now
1 -
Enable now manager
1 -
endpoint
1 -
Enhancement Request
1 -
Enterprise Architecture
1 -
ETL Business Analytics with SAP Signavio
1 -
Euclidean distance
1 -
Event Dates
1 -
Event Driven Architecture
1 -
Event Mesh
2 -
Event Reason
1 -
EventBasedIntegration
1 -
EWM
1 -
EWM Outbound configuration
1 -
EWM-TM-Integration
1 -
Existing Event Changes
1 -
Expand
1 -
Expert
2 -
Expert Insights
1 -
Fiori
14 -
Fiori Elements
2 -
Fiori SAPUI5
12 -
Flask
1 -
Full Stack
8 -
Funds Management
1 -
General
1 -
Generative AI
1 -
Getting Started
1 -
GitHub
8 -
Grants Management
1 -
groovy
1 -
GTP
1 -
HANA
5 -
HANA Cloud
2 -
Hana Cloud Database Integration
2 -
HANA DB
1 -
HANA XS Advanced
1 -
Historical Events
1 -
home labs
1 -
HowTo
1 -
HR Data Management
1 -
html5
8 -
Identity cards validation
1 -
idm
1 -
Implementation
1 -
input parameter
1 -
instant payments
1 -
integration
3 -
Integration Advisor
1 -
Integration Architecture
1 -
Integration Center
1 -
Integration Suite
1 -
intelligent enterprise
1 -
Java
1 -
job
1 -
Job Information Changes
1 -
Job-Related Events
1 -
Job_Event_Information
1 -
joule
4 -
Journal Entries
1 -
Just Ask
1 -
Kerberos for ABAP
8 -
Kerberos for JAVA
8 -
Launch Wizard
1 -
Learning Content
2 -
Life at SAP
1 -
lightning
1 -
Linear Regression SAP HANA Cloud
1 -
local tax regulations
1 -
LP
1 -
Machine Learning
2 -
Marketing
1 -
Master Data
3 -
Master Data Management
14 -
Maxdb
2 -
MDG
1 -
MDGM
1 -
MDM
1 -
Message box.
1 -
Messages on RF Device
1 -
Microservices Architecture
1 -
Microsoft Universal Print
1 -
Middleware Solutions
1 -
Migration
5 -
ML Model Development
1 -
Modeling in SAP HANA Cloud
8 -
Monitoring
3 -
MTA
1 -
Multi-Record Scenarios
1 -
Multiple Event Triggers
1 -
Neo
1 -
New Event Creation
1 -
New Feature
1 -
Newcomer
1 -
NodeJS
1 -
ODATA
2 -
OData APIs
1 -
odatav2
1 -
ODATAV4
1 -
ODBC
1 -
ODBC Connection
1 -
Onpremise
1 -
open source
2 -
OpenAI API
1 -
Oracle
1 -
PaPM
1 -
PaPM Dynamic Data Copy through Writer function
1 -
PaPM Remote Call
1 -
PAS-C01
1 -
Pay Component Management
1 -
PGP
1 -
Pickle
1 -
PLANNING ARCHITECTURE
1 -
Popup in Sap analytical cloud
1 -
PostgrSQL
1 -
POSTMAN
1 -
Process Automation
2 -
Product Updates
4 -
PSM
1 -
Public Cloud
1 -
Python
4 -
Qlik
1 -
Qualtrics
1 -
RAP
3 -
RAP BO
2 -
Record Deletion
1 -
Recovery
1 -
recurring payments
1 -
redeply
1 -
Release
1 -
Remote Consumption Model
1 -
Replication Flows
1 -
Research
1 -
Resilience
1 -
REST
1 -
REST API
1 -
Retagging Required
1 -
Risk
1 -
Rolling Kernel Switch
1 -
route
1 -
rules
1 -
S4 HANA
1 -
S4 HANA Cloud
1 -
S4 HANA On-Premise
1 -
S4HANA
3 -
S4HANA_OP_2023
2 -
SAC
10 -
SAC PLANNING
9 -
SAP
4 -
SAP ABAP
1 -
SAP Advanced Event Mesh
1 -
SAP AI Core
8 -
SAP AI Launchpad
8 -
SAP Analytic Cloud Compass
1 -
Sap Analytical Cloud
1 -
SAP Analytics Cloud
4 -
SAP Analytics Cloud for Consolidation
1 -
SAP Analytics Cloud Story
1 -
SAP analytics clouds
1 -
SAP BAS
1 -
SAP Basis
6 -
SAP BODS
1 -
SAP BODS certification.
1 -
SAP BTP
20 -
SAP BTP Build Work Zone
2 -
SAP BTP Cloud Foundry
5 -
SAP BTP Costing
1 -
SAP BTP CTMS
1 -
SAP BTP Innovation
1 -
SAP BTP Migration Tool
1 -
SAP BTP SDK IOS
1 -
SAP Build
11 -
SAP Build App
1 -
SAP Build apps
1 -
SAP Build CodeJam
1 -
SAP Build Process Automation
3 -
SAP Build work zone
10 -
SAP Business Objects Platform
1 -
SAP Business Technology
2 -
SAP Business Technology Platform (XP)
1 -
sap bw
1 -
SAP CAP
1 -
SAP CDC
1 -
SAP CDP
1 -
SAP Certification
1 -
SAP Cloud ALM
4 -
SAP Cloud Application Programming Model
1 -
SAP Cloud Integration for Data Services
1 -
SAP cloud platform
8 -
SAP Companion
1 -
SAP CPI
3 -
SAP CPI (Cloud Platform Integration)
2 -
SAP CPI Discover tab
1 -
sap credential store
1 -
SAP Customer Data Cloud
1 -
SAP Customer Data Platform
1 -
SAP Data Intelligence
1 -
SAP Data Services
1 -
SAP DATABASE
1 -
SAP Dataspher to Non SAP BI tools
1 -
SAP Datasphere
9 -
SAP DRC
1 -
SAP EWM
1 -
SAP Fiori
2 -
SAP Fiori App Embedding
1 -
Sap Fiori Extension Project Using BAS
1 -
SAP GRC
1 -
SAP HANA
1 -
SAP HCM (Human Capital Management)
1 -
SAP HR Solutions
1 -
SAP IDM
1 -
SAP Integration Suite
9 -
SAP Integrations
4 -
SAP iRPA
2 -
SAP Learning Class
1 -
SAP Learning Hub
1 -
SAP Odata
2 -
SAP on Azure
1 -
SAP PartnerEdge
1 -
sap partners
1 -
SAP Password Reset
1 -
SAP PO Migration
1 -
SAP Prepackaged Content
1 -
SAP Process Automation
2 -
SAP Process Integration
2 -
SAP Process Orchestration
1 -
SAP S4HANA
2 -
SAP S4HANA Cloud
1 -
SAP S4HANA Cloud for Finance
1 -
SAP S4HANA Cloud private edition
1 -
SAP Sandbox
1 -
SAP STMS
1 -
SAP SuccessFactors
2 -
SAP SuccessFactors HXM Core
1 -
SAP Time
1 -
SAP TM
2 -
SAP Trading Partner Management
1 -
SAP UI5
1 -
SAP Upgrade
1 -
SAP-GUI
8 -
SAP_COM_0276
1 -
SAPBTP
1 -
SAPCPI
1 -
SAPEWM
1 -
sapmentors
1 -
saponaws
2 -
SAPUI5
4 -
schedule
1 -
Secure Login Client Setup
8 -
security
9 -
Selenium Testing
1 -
SEN
1 -
SEN Manager
1 -
service
1 -
SET_CELL_TYPE
1 -
SET_CELL_TYPE_COLUMN
1 -
SFTP scenario
2 -
Simplex
1 -
Single Sign On
8 -
Singlesource
1 -
SKLearn
1 -
soap
1 -
Software Development
1 -
SOLMAN
1 -
solman 7.2
2 -
Solution Manager
3 -
sp_dumpdb
1 -
sp_dumptrans
1 -
SQL
1 -
sql script
1 -
SSL
8 -
SSO
8 -
Substring function
1 -
SuccessFactors
1 -
SuccessFactors Time Tracking
1 -
Sybase
1 -
system copy method
1 -
System owner
1 -
Table splitting
1 -
Tax Integration
1 -
Technical article
1 -
Technical articles
1 -
Technology Updates
1 -
Technology Updates
1 -
Technology_Updates
1 -
Threats
1 -
Time Collectors
1 -
Time Off
2 -
Tips and tricks
2 -
Tools
1 -
Trainings & Certifications
1 -
Transport in SAP BODS
1 -
Transport Management
1 -
TypeScript
1 -
unbind
1 -
Unified Customer Profile
1 -
UPB
1 -
Use of Parameters for Data Copy in PaPM
1 -
User Unlock
1 -
VA02
1 -
Validations
1 -
Vector Database
1 -
Vector Engine
1 -
Visual Studio Code
1 -
VSCode
1 -
Web SDK
1 -
work zone
1 -
workload
1 -
xsa
1 -
XSA Refresh
1
- « Previous
- Next »
Related Content
- Embracing Simplicity to Boost Innovation: Driving Bosch's Centennial Journey of Excellence Forwards in Technology Blogs by SAP
- SAP Build Apps Challenge: Can You Enable a Dropdown With an Options List in Under 20 Minutes? in Technology Blogs by Members
- Get your organization in shape: Keep a Clean Core with SAP Business Technology Platform in Technology Blogs by SAP
- Error Free SAP Build Process Automation in BTP Trial Account for AWS US EAST Setup in 10 steps in Technology Blogs by SAP
- SAP Japan Low-Code No-Code Hackathon for Partners Interview Blog Vol.3 ~SAP Solution Extension Division, Grand Prize Winner~ in Technology Blogs by SAP
Top kudoed authors
| User | Count |
|---|---|
| 8 | |
| 8 | |
| 7 | |
| 7 | |
| 5 | |
| 4 | |
| 4 | |
| 4 | |
| 3 | |
| 3 |