
- SAP Community
- Products and Technology
- Technology
- Technology Blogs by SAP
- Create SDA remote source in SAP HANA CLOUD using S...
Technology Blogs by SAP
Learn how to extend and personalize SAP applications. Follow the SAP technology blog for insights into SAP BTP, ABAP, SAP Analytics Cloud, SAP HANA, and more.
Turn on suggestions
Auto-suggest helps you quickly narrow down your search results by suggesting possible matches as you type.
Showing results for
Advisor
Options
- Subscribe to RSS Feed
- Mark as New
- Mark as Read
- Bookmark
- Subscribe
- Printer Friendly Page
- Report Inappropriate Content
06-03-2022
1:37 PM
SAP Cloud Connector serves as a link between SAP BTP applications and on-premise systems. Runs as on-premise agent in a secured network and provides control over on-premise systems and resources that can be accessed by cloud applications.
In this blog, you will learn how to enable cloud connector for HANA Cloud Instance, install and configure the cloud connector. Also to connect an SAP HANA on-premise database to SAP HANA Cloud using SDA remote source.
Cloud connector enablement for SAP HANA Cloud Instance
For New instance
- Go to SAP BTP home page and enter your account
- Enter Subaccount and then Space
- Click on SAP HANA Cloud on the left navigation menu
- Click on Create and then select SAP HANA database
- Follow the steps in wizard to create instance
- Under SAP HANA Database Advanced Settings, you can specify what IP addresses you allow by selecting enable the cloud connector option

- 7. Proceed with other settings and click on Create Instance
- 8. Instance created can be connected with the cloud connector
For Existing instance
- Open SAP Hana Cloud Central Cockpit
- Select the instance that you want to connect to an SAP HANA on-premise database
- Click on Manage Configurations

4. Select Edit 
- 5.Navigate to Connections tab and enable the Cloud Connector

- 6. Save the changes
Install Cloud Connector
Download the cloud connector from Hana tools.
Refer SAP Help Document for supported browsers.
After the installation is complete, open a browser and enter "https://localhost:8443"
"8443" is the default port specified during installation.
"Administrator/manage" is the default login credentials which is case-sensitive. On first login, password needs to be changed.
Define Subaccount
In the Cloud connector, Subaccount needs to be defined to map to the subaccount that your SAP HANA Cloud database instance is located.
- Select the region of the subaccount
- Enter the subaccount ID
Details of Region and Subaccount ID can be obtained from the BTP cockpit as seen in the below image

3. Provide the credentials of the subaccount on SAP BTP Cockpit- 4. Location ID is optional but needed when setting up remote source
- 5. Save

Connect to SAP HANA on-premise system
- Click on Cloud To On-Premise on the left panel
- Click on the plus icon in the top right corner to add system mapping
 3. From the drop-down menu Back-end Type, select SAP HANA
 4. Select TCP from the drop-down menu for the protocol. Refer here for more information on TCP
- 5. Enter the internal host and internal port of your on-premise HANA system
- 6. Specify the virtual host and virtual port to expose your internal host to the public network
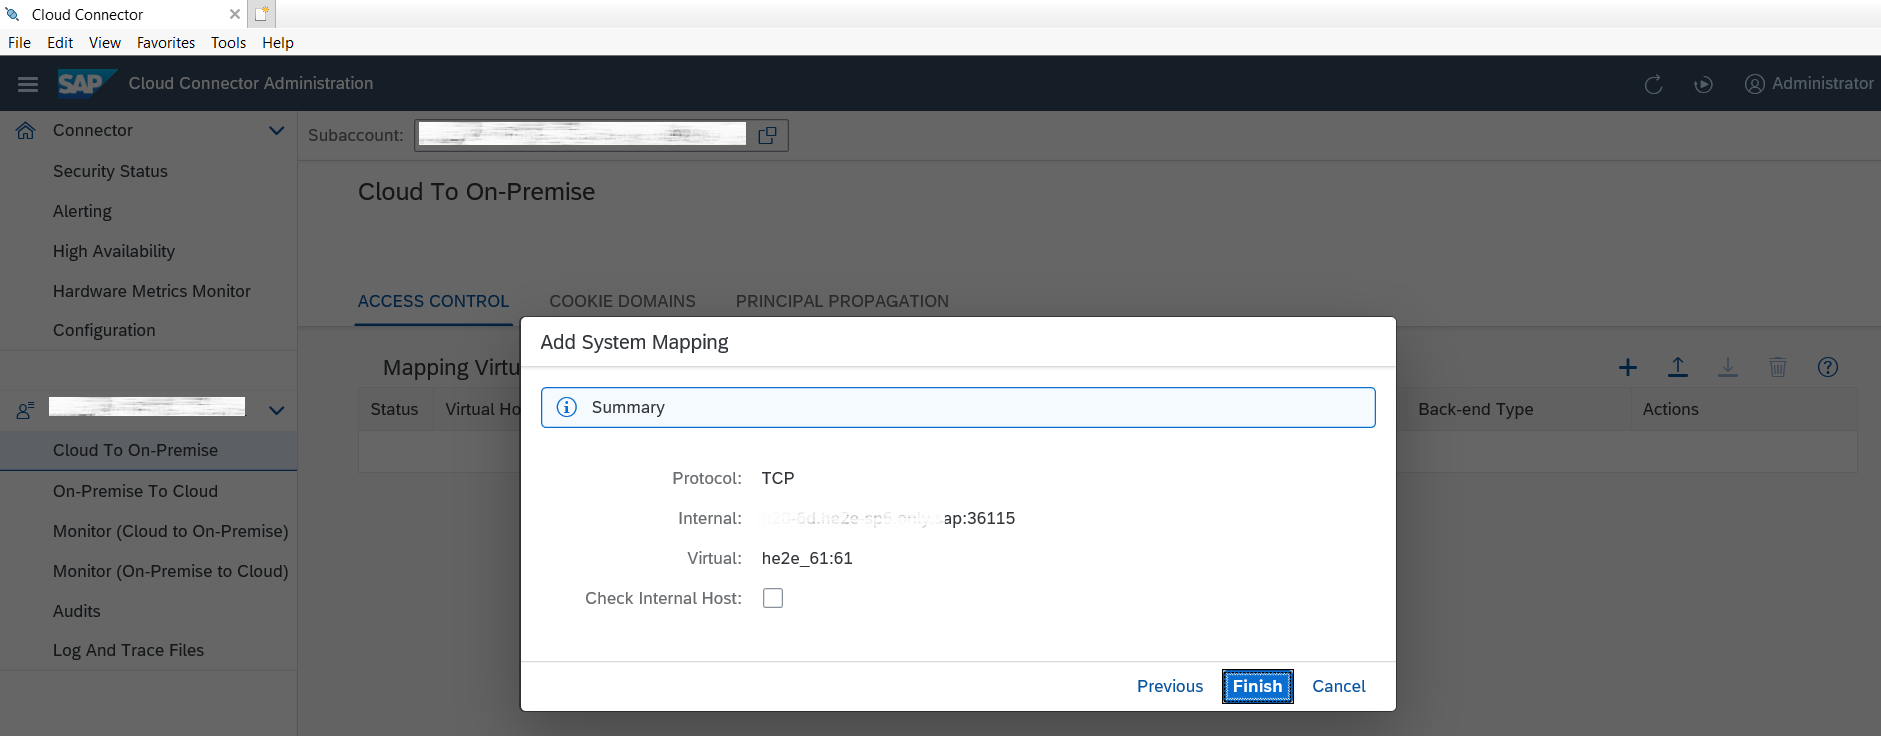
- 7. Proceed and the click on Finish
 8. After finish, status is Unchecked in the column Check Result. Click on the glass icon under Actions column
 9.Status will be changed to Reachable which means cloud connector can reach SAP HANA On-Premise system
Create SDA Remote Source Using Cloud Connector
Create a remote source in SAP HANA Cloud,SAP HANA Database to an SAP HANA on-premise database.
Prerequisites
- Need CREATE REMOTE SOURCE system privilege.
- The remote source is reachable by the network from the computer you are using.
- Download and import the SSL certificate signed by DigiCert.
REST API-based adapters communicate with the endpoint through an HTTP client. To ensure secure communication, the adapters require client certificates from the endpoint services. Connections to an SAP HANA database in SAP HANA Cloud, which are based on the hanaodbc adapter, also require an SSL certificate.
Refer the document Import Certificates for SSL Connections to Remote Sources.
Create a Remote Source Using SQL Syntax
In SQL console, execute a CREATE REMOTE SOURCE command by specifying the required properties
CREATE REMOTE SOURCE "SDA_CC"
ADAPTER "hanaodbc"
CONFIGURATION '<?xml version="1.0" encoding="UTF-8"?><ConnectionProperties name="connectionproperties"><PropertyEntry name="adapterversion">1.0</PropertyEntry><PropertyEntry name="connectionmode">adapterproperties</PropertyEntry><PropertyEntry name="driver">libodbcHDB.so</PropertyEntry><PropertyEntry name="server">virtual_host</PropertyEntry><PropertyEntry name="port">virtual_port</PropertyEntry><PropertyEntry name="dml_mode">readwrite</PropertyEntry><PropertyEntry name="extraadapterproperties">use_haas_socks_proxy=true;scc_location_id=locationid</PropertyEntry></ConnectionProperties>'
WITH CREDENTIAL TYPE 'PASSWORD' USING 'user=<user_name>;password=<password>';
Create a Remote Source Using Database Explorer
- In Database explorer, right-click the Remote Sources object in your database catalog and click Add Remote Source

2. Specify a remote source name- 3. In the Adapter Name dropdown list, choose HANA (ODBC)
- 4. Enter the required information under the properties section
- Server: Virtual Host , Port: Virtual Port (Specified in the Cloud Connector)
- 5. Extra Adapter properties to be specified as "use_haas_socks_proxy=true;scc_location_id=<loc_id>"
Location_ID is the ID set up in the Cloud Connector

6. Specify the credentials- 7. Click on Create
After the connection is established the schemas and tables can be accessed from the HANA On-Premise system via the remote source.
- SAP Managed Tags:
- SAP HANA Cloud,
- SAP HANA Cloud, SAP HANA database,
- SAP HANA,
- SAP Business Technology Platform
Labels:
11 Comments
You must be a registered user to add a comment. If you've already registered, sign in. Otherwise, register and sign in.
Labels in this area
-
ABAP CDS Views - CDC (Change Data Capture)
2 -
AI
1 -
Analyze Workload Data
1 -
BTP
1 -
Business and IT Integration
2 -
Business application stu
1 -
Business Technology Platform
1 -
Business Trends
1,658 -
Business Trends
93 -
CAP
1 -
cf
1 -
Cloud Foundry
1 -
Confluent
1 -
Customer COE Basics and Fundamentals
1 -
Customer COE Latest and Greatest
3 -
Customer Data Browser app
1 -
Data Analysis Tool
1 -
data migration
1 -
data transfer
1 -
Datasphere
2 -
Event Information
1,400 -
Event Information
66 -
Expert
1 -
Expert Insights
177 -
Expert Insights
299 -
General
1 -
Google cloud
1 -
Google Next'24
1 -
Kafka
1 -
Life at SAP
780 -
Life at SAP
13 -
Migrate your Data App
1 -
MTA
1 -
Network Performance Analysis
1 -
NodeJS
1 -
PDF
1 -
POC
1 -
Product Updates
4,577 -
Product Updates
344 -
Replication Flow
1 -
RisewithSAP
1 -
SAP BTP
1 -
SAP BTP Cloud Foundry
1 -
SAP Cloud ALM
1 -
SAP Cloud Application Programming Model
1 -
SAP Datasphere
2 -
SAP S4HANA Cloud
1 -
SAP S4HANA Migration Cockpit
1 -
Technology Updates
6,873 -
Technology Updates
423 -
Workload Fluctuations
1
Related Content
- Consuming on-Premise Service in CAP Project in Technology Q&A
- Exploring Integration Options in SAP Datasphere with the focus on using SAP extractors - Part II in Technology Blogs by SAP
- Services not visible in BAS S/4 Hana Public Cloud. in Technology Q&A
- ABAP Cloud Developer Trial 2022 Available Now in Technology Blogs by SAP
- When to Use Multi-Off in 3SL in Technology Blogs by SAP
Top kudoed authors
| User | Count |
|---|---|
| 40 | |
| 25 | |
| 17 | |
| 14 | |
| 8 | |
| 7 | |
| 7 | |
| 7 | |
| 6 | |
| 6 |