
- SAP Community
- Products and Technology
- CRM and Customer Experience
- CRM and CX Blogs by SAP
- How to synchronize material master data of SAP S/4...
CRM and CX Blogs by SAP
Stay up-to-date on the latest developments and product news about intelligent customer experience and CRM technologies through blog posts from SAP experts.
Turn on suggestions
Auto-suggest helps you quickly narrow down your search results by suggesting possible matches as you type.
Showing results for
former_member28
Participant
Options
- Subscribe to RSS Feed
- Mark as New
- Mark as Read
- Bookmark
- Subscribe
- Printer Friendly Page
- Report Inappropriate Content
05-30-2022
8:42 AM
In this blog post, we explain step by step how to configure SAP S/4HANA and SAP Customer Checkout manager to transfer material master data from SAP S/4HANA to SAP Customer Checkout manager. The credits for this blog post go to harald.tebbe who collected all the required steps that are summarized in this blog. This blog is part of a series that conveys how the out-of-the-box integration of SAP Customer Checkout manager works for the sync materials, business partners, posting of receipts and the stock check.
In the following, we first configure the SAP Customer Checkout manager to provide an inbound endpoint for material master data synchronization calls, and continue then with SAP S/4HANA.
First, we configure a technical user in SAP Customer Checkout manager. For that, open the app Users.
In the users app, click on the "+" button to create a new user. In the create screen, enter the following:
Select a user name, enter the password, leave the role assignment empty, take the "Force password change" flag out and set the "Technical user" flag to true. This is very important for the following. Leave all other fields empty and save the new user.
After saving the user successfully, navigate to the tab "Permissions", click on Edit and set the permission "Access SAP Customer Checkout manager" to Yes for this user. Save the change.
Go back to the home screen and navigate to the app "Communication systems". Click on the "+" button to create a new system. Select the scenario "SAP S/4HANA", enter a name and set the status to "Active". Save the communication system.
In order to receive material master data from SAP S/4HANA, no further configuration is needed in this app. Go back to the home screen and navigate to the app "Communication arrangements". Click on the "+" button to create the according communication arrangement.
Click on Save. As next, navigate to the tab "Configuration". Click on Edit and in the dropdown for "Inbound user", select the above created technical user for SAP S/4HANA integration.
Save the change and navigate to the tab "Inbound services". Here you see two entries, one for the business partner master data sync, one for the material master data. Select the entry "ProductMerchandiseViewReplicationBulk".
In the detail page of the service, click on Edit, set the status of the service to Active and save the change.
Navigate to the tab "Configuration". Here you can configure the settings of the material inbound call handling for this inbound service. See SAP Help for further information about the settings.
By setting the inbound service to active, a SOAP endpoint got activated and can be consumed. For that, open a new browser tab and enter "http(s)://<servername>:<port>/ccos/soap". Here all active SOAP endpoints are listed.
With that, SAP Customer Checkout manager is prepared to receive material master data from SAP S/4HANA. In order to have the most convenience after material sync, two further actions should be taken: Configure the plants as POS groups in SAP Customer Checkout manager and adapt the tax settings.
During the material sync, SAP Customer Checkout manager will create price lists on the fly for each triple of plant, condition type and currency (e.g. ALE1_VKP0_EUR). If the according POS group is found during the sync, SAP Customer Checkout manager will assign the newly created price list automatically with the POS group.
To create a POS group, navigate back to the SAP Customer Checkout manager home screen and open the app "Organizational structure". Click on the "+" button and select "POS group" to create a new POS group.
Do not forget to set the Plant ID field by which the explained mechanism works.
Compare the settings in SAP Customer Checkout manager against the configuration in SAP S/4HANA, if the tax codes and rates are aligned. The same has to be done later between SAP Customer Checkout manager and SAP Customer Checkout. In SAP Customer Checkout manager, these are maintained in the app "Tax rates".
In the following, we configure the outbound call on SAP S/4HANA side.
In this section, we create a business system, the replication model and configure the outbound implementation. We will then assign sites to a reference site, set up the SOAP endpoint, define the filter criteria and initiate the call to sync materials.
First, we create a business system and define the outbound implementations. Open the transaction DRFIMG.
Select "Define Technical Settings for Business Systems". Click here on "New Entries". Enter in the column "Business System" a name for the business system, e.g., "CCOM". Leave the other fields empty and click on save. Despite the validation marks the empty columns, the business system is created, which is enough for our purposes.
Once saved, click on Exit to navigate back to the main page. Open the entry "Define Replication Model".
Create here an new replication model, e.g., "CCOM_POS". Select the newly created replication model and navigate in the dialog structure to "Assign Outbound Implementation". Select here the outbound implementation "0100" and save the change.
Select the outbound implementation "0100" and open in the Dialog structure the node "Assign Target Systems for Replication". Assign here the newly created business system "CCOM" and save the change.
Open the node "Assign Outbound Parameter" in the dialog structure. Here, you can set the parameters that influence prices for which validity period will be sent out, the package sizes, etc..
Open the node "Assign Language" to assign languages that shall be supported in outbound calls.
Make sure that all changes are stored. As next, we assign the sites to our outbound implementation.
Open the transaction REFSITE.
Click on "Creation" to create a new reference site. In the dialog, set the group type "POS Outbound" and enter the reference site. Once created, you can select sites to assign receiving stores.
The next step is to configure the web service endpoint in the SOA manager. Open the transaction SOAMANAGER. Select here the link "Web Service Configuration".
For the search criterion "Object Name", enter "ProductMerchandiseViewReplicationBulkRequest_Out" and click on search. In the list below, you will find an entry with the internal name "CO_WART_PRMRCHV_REPLBLKQ_OUT". Open the entry by clicking on the link.
In the opened view, click on "Create" and select "WSDL Based Configuration".
Enter a logical port name and set the logical port as default.
In the WSDL Information section, leave the WSDL base as "Via HTTP Access" and enter the URL for the WSDL access. For that, open the SOAP endpoint page of SAP Customer Checkout manager (e.g. http://localhost:6060/ccos/soap), navigate to the WSDL link and copy the URL from the browser URL address input including the "?wsdl" suffix.
In the section "Binding Selection", check that one binding is shown as depicted below.
In the section "Customer Security", enter the user name and password of the technical integration user that we created in the beginning of the blog. All other flags remain as they are.
In the section "HTTPSettings", no change is needed. Check that the values are set as shown in the screenshot.
In the section "SOAP Protocol", make sure that as RM Protocol "SAP RM" is selected and as Message ID Protocol "SAP Message ID". If these two values are not set, the communication to SAP Customer Checkout manager will not work successfully.
In the section "Identifiable Business Context", leave the sender and receiver fields empty and the Suppress sending of IBC identifier on false. In the last section "Operation Settings", set the flag in the Transport Binding section to false, if set.
With that, the logical port is finally configured. If not already done, please ensure that the logical port is active and that it is set as default. Otherwise, no call will be sent out.
Use the ping function to check if the connection to your SAP Customer Checkout manager can be established.
In the following, we define the filter criteria. Open the transaction DRFF.
Select here the Product Merchandise replication model. Set here the filter criteria according to your needs.
We prepared the SAP S/4HANA POS outbound to send material master data. Let's initiate a call from SAP S/4HANA to SAP Customer Checkout manager.
Open the transaction DRFOUT. Select first our replication model "CCOM_POS". Then, select the Outbound Implementation "0100". You can choose between an initial full sync, a delta sync ("Changes") or a manual selection of articles to be sent out. Select "Initialization" and click on "Execute".
The initial load might take a while. Once the call is made, the view changes and the logs are displayed.
By clicking on the magnifier in the "Det." column, you can drill down and gather more information on the payload generation.
Open the transaction SRT_MONI. Configure the filter according to the needs and click on Execute.
Here, you can see the status of the call to SAP Customer Checkout manager on SAP S/4HANA side.
Doubleclick on the entry to open the detail page. Here, you can see the payload sent out and access it as well as XML.
In SAP Customer Checkout manager, you can check if the call has reached and if the payload is processed successfully. For that, you find three apps in the Monitoring section, Inbound call monitoring, Master data queue and Master data results.
In the app "Inbound call monitoring", we can check if the call from SAP S/4HANA has successfully reached the SAP Customer Checkout manager and at what time precisely. The status is success when the payload of the external system could be mapped and queued properly. The processing itself happens asynchronously.
In the app "Master data queue", entries can be seen when payloads are not yet or currently in processing. Once the entries are processed, the results can be seen in the "Master data results" app.
When an entry is selected, one can see per material in the payload the processing result. If any error came up, these are shown in the "Error message" column.
After all these steps, the articles are successfully synced to SAP Customer Checkout manager, price lists are created per triple of site, condition type and currency. If the according POS groups have been created before, the price lists are assigned to the POS groups and the articles can be synced to the cash desks. The article groups (material groups) in the payload are created on the fly in SAP Customer Checkout manager and can be brought in hierarchy if desired.
With SAP S/4HANA via the Product merchandise SOAP call, we support the sync of sales sets and generic articles (variants) to SAP Customer Checkout manager as well.
In this blog, we showed step by step, how to configure SAP Customer Checkout manager and SAP S/4HANA for an out of the box integration of material master data from SAP S/4HANA to SAP Customer Checkout manager. We first configured the communication system and arrangement for SAP S/4HANA and activated the inbound service. In SAP S/4HANA, we configured in DRFIMG the replication model and the according outbound implementation, in REFSITE the reference site assignment, in SOAMANAGER the endpoint to SAP Customer Checkout manager, in DRFF the filter criteria for the payload and initiated finally via DRFOUT the call to SAP Customer Checkout manager. In SRT_MONI, we checked if the call went out successfully.
In SAP Customer Checkout manager, we saw in the app Inbound call monitoring, if the call reached SAP Customer Checkout manager and in the app Master data results we checked if all articles in the payload are successfully created in SAP Customer Checkout manager.
We hope you enjoyed reading the blog post and that it helped to clarify how to set up the material sync between SAP S/4HANA and SAP Customer Checkout manager.
Feel free to share your comments and give feedback about the blog.
In the following, we first configure the SAP Customer Checkout manager to provide an inbound endpoint for material master data synchronization calls, and continue then with SAP S/4HANA.
Configuring SAP Customer Checkout manager
First, we configure a technical user in SAP Customer Checkout manager. For that, open the app Users.

The users app in SAP Customer Checkout manager
In the users app, click on the "+" button to create a new user. In the create screen, enter the following:
Select a user name, enter the password, leave the role assignment empty, take the "Force password change" flag out and set the "Technical user" flag to true. This is very important for the following. Leave all other fields empty and save the new user.

The SAP S/4HANA integration user
After saving the user successfully, navigate to the tab "Permissions", click on Edit and set the permission "Access SAP Customer Checkout manager" to Yes for this user. Save the change.

The permission needs to be set
Go back to the home screen and navigate to the app "Communication systems". Click on the "+" button to create a new system. Select the scenario "SAP S/4HANA", enter a name and set the status to "Active". Save the communication system.

New communication system
In order to receive material master data from SAP S/4HANA, no further configuration is needed in this app. Go back to the home screen and navigate to the app "Communication arrangements". Click on the "+" button to create the according communication arrangement.

Select the according communication system
Click on Save. As next, navigate to the tab "Configuration". Click on Edit and in the dropdown for "Inbound user", select the above created technical user for SAP S/4HANA integration.

Save the change and navigate to the tab "Inbound services". Here you see two entries, one for the business partner master data sync, one for the material master data. Select the entry "ProductMerchandiseViewReplicationBulk".

The inbound services for SAP S/4HANA in SAP Customer Checkout manager
In the detail page of the service, click on Edit, set the status of the service to Active and save the change.

The ProductMerchandiseViewReplicationBulk inbound service
Navigate to the tab "Configuration". Here you can configure the settings of the material inbound call handling for this inbound service. See SAP Help for further information about the settings.

The material inbound service settings
By setting the inbound service to active, a SOAP endpoint got activated and can be consumed. For that, open a new browser tab and enter "http(s)://<servername>:<port>/ccos/soap". Here all active SOAP endpoints are listed.

The active SOAP endpoints of SAP Customer Checkout manager
With that, SAP Customer Checkout manager is prepared to receive material master data from SAP S/4HANA. In order to have the most convenience after material sync, two further actions should be taken: Configure the plants as POS groups in SAP Customer Checkout manager and adapt the tax settings.
POS group configuration
During the material sync, SAP Customer Checkout manager will create price lists on the fly for each triple of plant, condition type and currency (e.g. ALE1_VKP0_EUR). If the according POS group is found during the sync, SAP Customer Checkout manager will assign the newly created price list automatically with the POS group.
To create a POS group, navigate back to the SAP Customer Checkout manager home screen and open the app "Organizational structure". Click on the "+" button and select "POS group" to create a new POS group.

New POS group
Do not forget to set the Plant ID field by which the explained mechanism works.
Tax rate configuration
Compare the settings in SAP Customer Checkout manager against the configuration in SAP S/4HANA, if the tax codes and rates are aligned. The same has to be done later between SAP Customer Checkout manager and SAP Customer Checkout. In SAP Customer Checkout manager, these are maintained in the app "Tax rates".
In the following, we configure the outbound call on SAP S/4HANA side.
Configuring SAP S/4HANA POS outbound
In this section, we create a business system, the replication model and configure the outbound implementation. We will then assign sites to a reference site, set up the SOAP endpoint, define the filter criteria and initiate the call to sync materials.
Replication model
First, we create a business system and define the outbound implementations. Open the transaction DRFIMG.

DRFIMG
Select "Define Technical Settings for Business Systems". Click here on "New Entries". Enter in the column "Business System" a name for the business system, e.g., "CCOM". Leave the other fields empty and click on save. Despite the validation marks the empty columns, the business system is created, which is enough for our purposes.

Create business system in DRFIMG
Once saved, click on Exit to navigate back to the main page. Open the entry "Define Replication Model".
Create here an new replication model, e.g., "CCOM_POS". Select the newly created replication model and navigate in the dialog structure to "Assign Outbound Implementation". Select here the outbound implementation "0100" and save the change.
Select the outbound implementation "0100" and open in the Dialog structure the node "Assign Target Systems for Replication". Assign here the newly created business system "CCOM" and save the change.
Open the node "Assign Outbound Parameter" in the dialog structure. Here, you can set the parameters that influence prices for which validity period will be sent out, the package sizes, etc..

The outbound parameters
Open the node "Assign Language" to assign languages that shall be supported in outbound calls.

Assign languages
Reference site assignment
Make sure that all changes are stored. As next, we assign the sites to our outbound implementation.
Open the transaction REFSITE.

Reference Site Assignment
Click on "Creation" to create a new reference site. In the dialog, set the group type "POS Outbound" and enter the reference site. Once created, you can select sites to assign receiving stores.

Assign plant
SOA manager
The next step is to configure the web service endpoint in the SOA manager. Open the transaction SOAMANAGER. Select here the link "Web Service Configuration".

The SOA manager
For the search criterion "Object Name", enter "ProductMerchandiseViewReplicationBulkRequest_Out" and click on search. In the list below, you will find an entry with the internal name "CO_WART_PRMRCHV_REPLBLKQ_OUT". Open the entry by clicking on the link.

The entry in the SOA manager
In the opened view, click on "Create" and select "WSDL Based Configuration".

Select WSDL based configuration
Enter a logical port name and set the logical port as default.

Logical Port Name
In the WSDL Information section, leave the WSDL base as "Via HTTP Access" and enter the URL for the WSDL access. For that, open the SOAP endpoint page of SAP Customer Checkout manager (e.g. http://localhost:6060/ccos/soap), navigate to the WSDL link and copy the URL from the browser URL address input including the "?wsdl" suffix.

The WSDL information
In the section "Binding Selection", check that one binding is shown as depicted below.

The binding selection
In the section "Customer Security", enter the user name and password of the technical integration user that we created in the beginning of the blog. All other flags remain as they are.
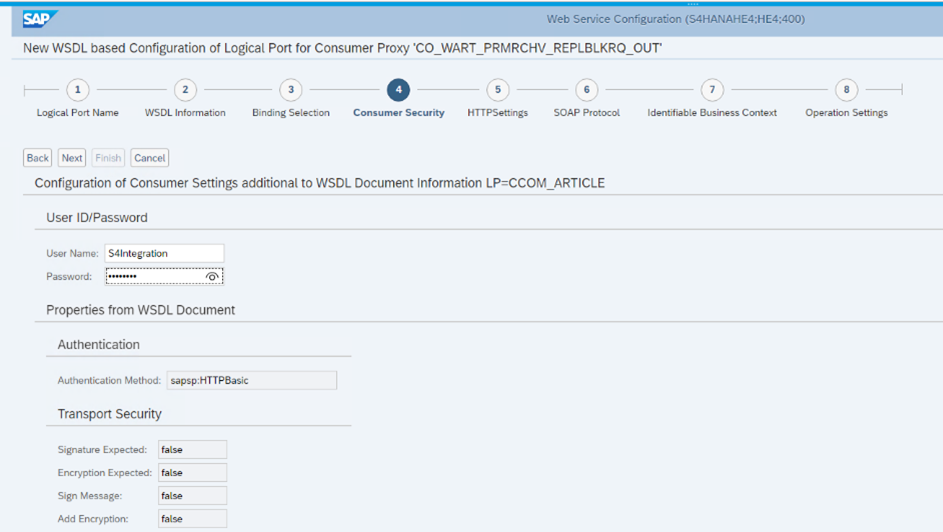
The user name and password
In the section "HTTPSettings", no change is needed. Check that the values are set as shown in the screenshot.

The HTTP settings
In the section "SOAP Protocol", make sure that as RM Protocol "SAP RM" is selected and as Message ID Protocol "SAP Message ID". If these two values are not set, the communication to SAP Customer Checkout manager will not work successfully.

The SOAP protocol
In the section "Identifiable Business Context", leave the sender and receiver fields empty and the Suppress sending of IBC identifier on false. In the last section "Operation Settings", set the flag in the Transport Binding section to false, if set.

Operation Settings
With that, the logical port is finally configured. If not already done, please ensure that the logical port is active and that it is set as default. Otherwise, no call will be sent out.

The logical port overview page after configuration
Use the ping function to check if the connection to your SAP Customer Checkout manager can be established.
Configuring the filter criteria
In the following, we define the filter criteria. Open the transaction DRFF.

Define filter criteria
Select here the Product Merchandise replication model. Set here the filter criteria according to your needs.

Setting the filter criteria
We prepared the SAP S/4HANA POS outbound to send material master data. Let's initiate a call from SAP S/4HANA to SAP Customer Checkout manager.
Configuring the data replication framework
Open the transaction DRFOUT. Select first our replication model "CCOM_POS". Then, select the Outbound Implementation "0100". You can choose between an initial full sync, a delta sync ("Changes") or a manual selection of articles to be sent out. Select "Initialization" and click on "Execute".

DRFOUT
The initial load might take a while. Once the call is made, the view changes and the logs are displayed.

The results
By clicking on the magnifier in the "Det." column, you can drill down and gather more information on the payload generation.
Call monitoring
Open the transaction SRT_MONI. Configure the filter according to the needs and click on Execute.
Here, you can see the status of the call to SAP Customer Checkout manager on SAP S/4HANA side.

The execution overview
Doubleclick on the entry to open the detail page. Here, you can see the payload sent out and access it as well as XML.

Message details
Checking incoming master data calls in SAP Customer Checkout manager
In SAP Customer Checkout manager, you can check if the call has reached and if the payload is processed successfully. For that, you find three apps in the Monitoring section, Inbound call monitoring, Master data queue and Master data results.

In the app "Inbound call monitoring", we can check if the call from SAP S/4HANA has successfully reached the SAP Customer Checkout manager and at what time precisely. The status is success when the payload of the external system could be mapped and queued properly. The processing itself happens asynchronously.

The inbound calls for master data
In the app "Master data queue", entries can be seen when payloads are not yet or currently in processing. Once the entries are processed, the results can be seen in the "Master data results" app.

Master data processing results
When an entry is selected, one can see per material in the payload the processing result. If any error came up, these are shown in the "Error message" column.

The processing result details
After all these steps, the articles are successfully synced to SAP Customer Checkout manager, price lists are created per triple of site, condition type and currency. If the according POS groups have been created before, the price lists are assigned to the POS groups and the articles can be synced to the cash desks. The article groups (material groups) in the payload are created on the fly in SAP Customer Checkout manager and can be brought in hierarchy if desired.
With SAP S/4HANA via the Product merchandise SOAP call, we support the sync of sales sets and generic articles (variants) to SAP Customer Checkout manager as well.
Summary
In this blog, we showed step by step, how to configure SAP Customer Checkout manager and SAP S/4HANA for an out of the box integration of material master data from SAP S/4HANA to SAP Customer Checkout manager. We first configured the communication system and arrangement for SAP S/4HANA and activated the inbound service. In SAP S/4HANA, we configured in DRFIMG the replication model and the according outbound implementation, in REFSITE the reference site assignment, in SOAMANAGER the endpoint to SAP Customer Checkout manager, in DRFF the filter criteria for the payload and initiated finally via DRFOUT the call to SAP Customer Checkout manager. In SRT_MONI, we checked if the call went out successfully.
In SAP Customer Checkout manager, we saw in the app Inbound call monitoring, if the call reached SAP Customer Checkout manager and in the app Master data results we checked if all articles in the payload are successfully created in SAP Customer Checkout manager.
We hope you enjoyed reading the blog post and that it helped to clarify how to set up the material sync between SAP S/4HANA and SAP Customer Checkout manager.
Feel free to share your comments and give feedback about the blog.
- SAP Managed Tags:
- SAP Customer Checkout,
- SAP Point-of-Sale,
- SAP S/4HANA,
- SAP S/4HANA Public Cloud
Labels:
11 Comments
You must be a registered user to add a comment. If you've already registered, sign in. Otherwise, register and sign in.
Labels in this area
-
Business Trends
270 -
Business Trends
11 -
chitchat
1 -
customerexperience
1 -
Event Information
256 -
Event Information
18 -
Expert Insights
30 -
Expert Insights
51 -
Life at SAP
133 -
Life at SAP
1 -
Product Updates
666 -
Product Updates
24 -
SAP HANA Service
1 -
SAPHANACloud
1 -
SAPHANAService
1 -
Technology Updates
453 -
Technology Updates
15
Related Content
- RFID wristbands for FEC (Family Entertainment Center) Business in CRM and CX Questions
- SAP Commerce Cloud Q1 ‘24 Release Highlights in CRM and CX Blogs by SAP
- Retrieve return invoices to other tills e.g. directly from SAP CCO Manager in CRM and CX Questions
- SAP Customer Checkout 2.0 Feature Pack 19 (Released on 26-MARCH-2024) in CRM and CX Blogs by SAP
- After adding Pager cannot print a order and only sales receipt printing with pager ID in CRM and CX Questions
Top kudoed authors
| User | Count |
|---|---|
| 4 | |
| 2 | |
| 2 | |
| 2 | |
| 2 | |
| 1 | |
| 1 | |
| 1 | |
| 1 | |
| 1 |