
- SAP Community
- Products and Technology
- Technology
- Technology Blogs by SAP
- Step-by-step Guide to Set Up Inbound Client Certif...
Technology Blogs by SAP
Learn how to extend and personalize SAP applications. Follow the SAP technology blog for insights into SAP BTP, ABAP, SAP Analytics Cloud, SAP HANA, and more.
Turn on suggestions
Auto-suggest helps you quickly narrow down your search results by suggesting possible matches as you type.
Showing results for
Product and Topic Expert
Options
- Subscribe to RSS Feed
- Mark as New
- Mark as Read
- Bookmark
- Subscribe
- Printer Friendly Page
- Report Inappropriate Content
05-29-2022
8:11 AM
This blog post aims to provide you with a step-by-step tutorial on how to generate a client certificate (issued by SAP) and use it to trigger integration flow deployed on SAP Cloud Integration tenant in the Cloud Foundry environment. In this example we will be using Postman to mock a sender system.
Please refer to SAP Help Portal documentation Client Certificate Authentication for Integration Flow Processing for any additional information on the process.
Please note:
In this example we will use a simple integration flow with a single step – Groovy Script. This iFlow is configured to generate a response based of the payload it was initialized with.
Make sure to set Authorization as ‘User Role’ in connection details of your Sender Adapter. You can either leave User Role parameter as ‘ESBMessaging.send’ (which is default) or specify a custom role (see Managing User Roles, Cloud Foundry Environment for details).
If you have made any changes to your integration flow, make sure to save it and deploy.
Next, we need to generate a client certificate that we can use to authenticate a sender when calling the integration flow that we have just deployed. This can be done quite easily in SAP BTP Cockpit.
Please go through Creating Service Instance guide and create an instance with ‘integration-flow’ service plan.
Then go through Creating Service Key guide and create a service key with a ‘Certificate’ key type.
With that, you should be presented with a credentials of the key in JSON format. Click ‘Download’ to store the file on your device.
Next, we need to retrieve certificate and key pair values, format and save them in the separate files.
For that, open the .txt file you have just downloaded, locate ‘certificate’ attribute, copy its value (it starts with ‘-----BEGIN CERTIFICATE-----’ and ends with ‘-----END CERTIFICATE-----\n’) and paste into your favorite text/code editor (I have used VSCode).
Now, we need to format the certificate by replacing all ‘\n’ occurrences with line breaks. To achieve this task, you can utilize Find & Replace feature of your editor.
Validate that your certificate looks similar to the one on the screenshot below:
Notice that there are in fact 3 certificates bundled in one – that is because Process Integration Runtime service instance generates a PEM-encoded certificate chain. The certificate chain contains a root certificate supported by SAP (see Load Balancer Root Certificates Supported by SAP).
Save the certificate with .pem extension – I named it as ‘cert.pem’.
Now, we need to do the same formatting for a key pair. Locate ‘key’ attribute in the same .txt file (it starts with ‘-----BEGIN RSA PRIVATE KEY-----’ and ends with ‘-----END RSA PRIVATE KEY-----\n’), paste the value into your favorite text/code editor and replace all ‘\n’ occurrences so it looks similar to the one on the screenshot below:
Save the key pair with .key extension – I named it as ‘key.key’.
Note: in case your text editor (e.g., Notepad++) doesn’t provide an option to replace all ‘\n’ occurrences with line breaks, what you can do is the following:
Click on Service Key you’ve created to open credentials information, select 'Form' tab and copy contents of certificate attribute (here you can see that it doesn’t have any ‘\n’ characters).
Paste the certificate value to your text editor and format it by adding line breaks before and after ‘-----BEGIN CERTIFICATE-----' and ‘-----END CERTIFICATE-----', so that it looks similar to the one below (remove all ‘\n’ characters as well if they are automatically added by your text editor)
Save the file with .pem extension.
Proceed with doing the same for key attribute. Make sure that it has the similar structure to the key you see on the screenshot below.
Save the file with .key extension.
In your Postman application open Settings.
Navigate to Certificates tab and click on ‘Add Certificate’.
Locate ‘url’ attribute in your .txt file, copy its value (everything apart from https://) – this is your Host. Attach .pem file (as CRT file) and .key file. Finally, click on ‘Add’.
Next, add new request in Postman and enter the endpoint of your deployed integration flow as a request URL. You can grab this URL from Cloud Integration Web UI by navigating to Monitor -> Manage Integration Content.
Finally, set Authorization Type as ‘No Auth’ and send.
This concludes the step-by-step guide on how to set up inbound client certificate authentication for SAP Cloud Integration in Cloud Foundry environment. By following steps described above you should be able to generate a certificate and a key pair issued by SAP and use them to authenticate a sender when executing a call to Cloud Integration iFlow.
Please refer to SAP Help Portal documentation Client Certificate Authentication for Integration Flow Processing for any additional information on the process.
Please note:
This key pair is not preinstalled when you operate a Cloud Integration trial tenant. Therefore, client certificate inbound authentication is not supported for trial.
Configure and Deploy Integration Flow
In this example we will use a simple integration flow with a single step – Groovy Script. This iFlow is configured to generate a response based of the payload it was initialized with.

Make sure to set Authorization as ‘User Role’ in connection details of your Sender Adapter. You can either leave User Role parameter as ‘ESBMessaging.send’ (which is default) or specify a custom role (see Managing User Roles, Cloud Foundry Environment for details).

If you have made any changes to your integration flow, make sure to save it and deploy.
Create Service Instance and Service Key in SAP BTP Cockpit
Next, we need to generate a client certificate that we can use to authenticate a sender when calling the integration flow that we have just deployed. This can be done quite easily in SAP BTP Cockpit.
Please go through Creating Service Instance guide and create an instance with ‘integration-flow’ service plan.
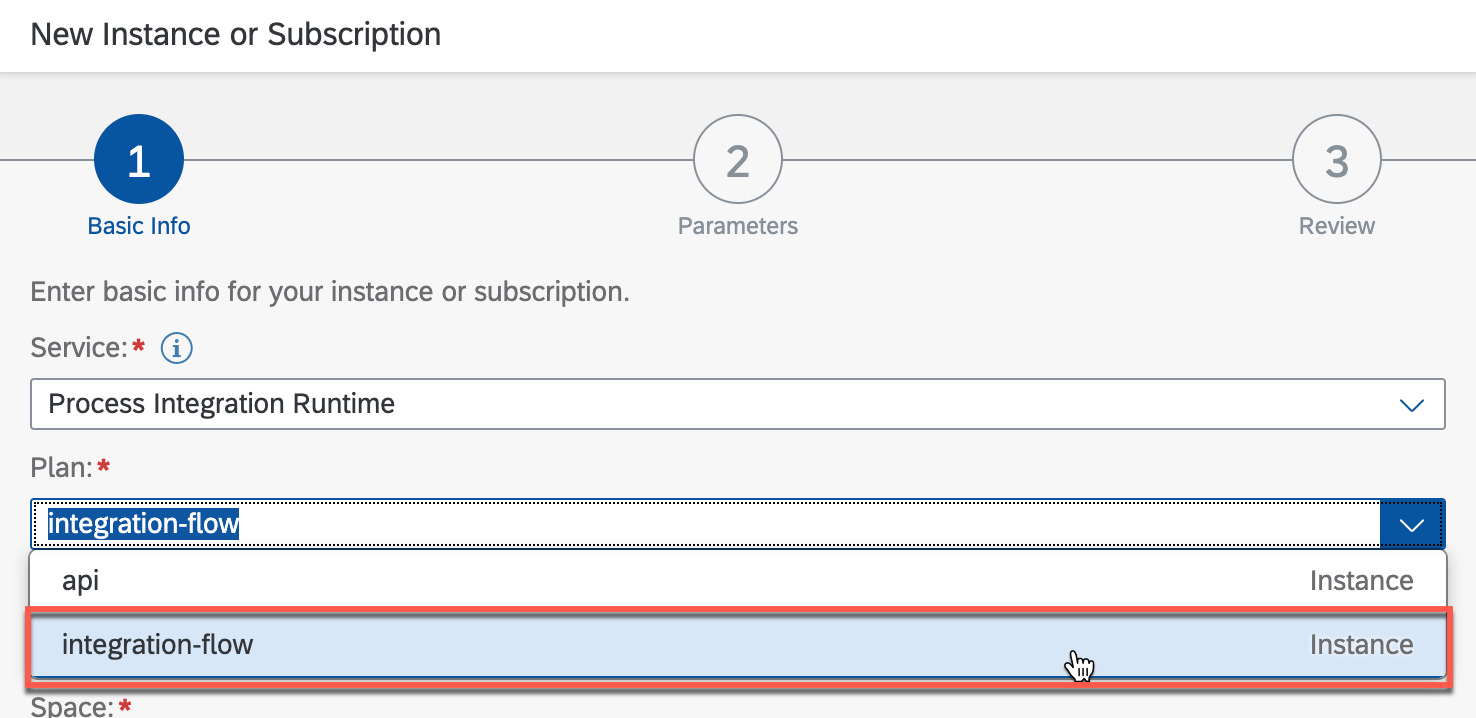
Then go through Creating Service Key guide and create a service key with a ‘Certificate’ key type.

With that, you should be presented with a credentials of the key in JSON format. Click ‘Download’ to store the file on your device.

Create Certificate and Key Files
Next, we need to retrieve certificate and key pair values, format and save them in the separate files.
For that, open the .txt file you have just downloaded, locate ‘certificate’ attribute, copy its value (it starts with ‘-----BEGIN CERTIFICATE-----’ and ends with ‘-----END CERTIFICATE-----\n’) and paste into your favorite text/code editor (I have used VSCode).
Now, we need to format the certificate by replacing all ‘\n’ occurrences with line breaks. To achieve this task, you can utilize Find & Replace feature of your editor.

Validate that your certificate looks similar to the one on the screenshot below:

Notice that there are in fact 3 certificates bundled in one – that is because Process Integration Runtime service instance generates a PEM-encoded certificate chain. The certificate chain contains a root certificate supported by SAP (see Load Balancer Root Certificates Supported by SAP).
Save the certificate with .pem extension – I named it as ‘cert.pem’.
Now, we need to do the same formatting for a key pair. Locate ‘key’ attribute in the same .txt file (it starts with ‘-----BEGIN RSA PRIVATE KEY-----’ and ends with ‘-----END RSA PRIVATE KEY-----\n’), paste the value into your favorite text/code editor and replace all ‘\n’ occurrences so it looks similar to the one on the screenshot below:

Save the key pair with .key extension – I named it as ‘key.key’.
Note: in case your text editor (e.g., Notepad++) doesn’t provide an option to replace all ‘\n’ occurrences with line breaks, what you can do is the following:
Click on Service Key you’ve created to open credentials information, select 'Form' tab and copy contents of certificate attribute (here you can see that it doesn’t have any ‘\n’ characters).

Paste the certificate value to your text editor and format it by adding line breaks before and after ‘-----BEGIN CERTIFICATE-----' and ‘-----END CERTIFICATE-----', so that it looks similar to the one below (remove all ‘\n’ characters as well if they are automatically added by your text editor)

Save the file with .pem extension.
Proceed with doing the same for key attribute. Make sure that it has the similar structure to the key you see on the screenshot below.

Save the file with .key extension.
Set Up Postman Environment and Send the Request
In your Postman application open Settings.

Navigate to Certificates tab and click on ‘Add Certificate’.
Locate ‘url’ attribute in your .txt file, copy its value (everything apart from https://) – this is your Host. Attach .pem file (as CRT file) and .key file. Finally, click on ‘Add’.

Next, add new request in Postman and enter the endpoint of your deployed integration flow as a request URL. You can grab this URL from Cloud Integration Web UI by navigating to Monitor -> Manage Integration Content.

Finally, set Authorization Type as ‘No Auth’ and send.

This concludes the step-by-step guide on how to set up inbound client certificate authentication for SAP Cloud Integration in Cloud Foundry environment. By following steps described above you should be able to generate a certificate and a key pair issued by SAP and use them to authenticate a sender when executing a call to Cloud Integration iFlow.
- SAP Managed Tags:
- SAP Integration Suite,
- Cloud Integration
Labels:
44 Comments
You must be a registered user to add a comment. If you've already registered, sign in. Otherwise, register and sign in.
Labels in this area
-
ABAP CDS Views - CDC (Change Data Capture)
2 -
AI
1 -
Analyze Workload Data
1 -
BTP
1 -
Business and IT Integration
2 -
Business application stu
1 -
Business Technology Platform
1 -
Business Trends
1,658 -
Business Trends
103 -
CAP
1 -
cf
1 -
Cloud Foundry
1 -
Confluent
1 -
Customer COE Basics and Fundamentals
1 -
Customer COE Latest and Greatest
3 -
Customer Data Browser app
1 -
Data Analysis Tool
1 -
data migration
1 -
data transfer
1 -
Datasphere
2 -
Event Information
1,400 -
Event Information
69 -
Expert
1 -
Expert Insights
177 -
Expert Insights
322 -
General
1 -
Google cloud
1 -
Google Next'24
1 -
GraphQL
1 -
Kafka
1 -
Life at SAP
780 -
Life at SAP
13 -
Migrate your Data App
1 -
MTA
1 -
Network Performance Analysis
1 -
NodeJS
1 -
PDF
1 -
POC
1 -
Product Updates
4,576 -
Product Updates
368 -
Replication Flow
1 -
REST API
1 -
RisewithSAP
1 -
SAP BTP
1 -
SAP BTP Cloud Foundry
1 -
SAP Cloud ALM
1 -
SAP Cloud Application Programming Model
1 -
SAP Datasphere
2 -
SAP S4HANA Cloud
1 -
SAP S4HANA Migration Cockpit
1 -
Technology Updates
6,873 -
Technology Updates
454 -
Workload Fluctuations
1
Related Content
- On the lookout with SAP BTP Core services. Cis patrol. in Technology Blogs by SAP
- Consuming SAP with SAP Build Apps - Web App in SAP Build Work Zone, standard edition in Technology Blogs by SAP
- Extract blob data (PDF) from CAPM using python library of Document information extraction service. in Technology Blogs by Members
- External System Integration in DMC in Technology Blogs by Members
- Govern SAP APIs living in various API Management gateways in a single place with Azure API Center in Technology Blogs by Members
Top kudoed authors
| User | Count |
|---|---|
| 24 | |
| 8 | |
| 8 | |
| 7 | |
| 7 | |
| 6 | |
| 6 | |
| 6 | |
| 6 | |
| 6 |