
- SAP Community
- Products and Technology
- Technology
- Technology Blogs by SAP
- AI on mobile: Powering your field force - Part 4 o...
Technology Blogs by SAP
Learn how to extend and personalize SAP applications. Follow the SAP technology blog for insights into SAP BTP, ABAP, SAP Analytics Cloud, SAP HANA, and more.
Turn on suggestions
Auto-suggest helps you quickly narrow down your search results by suggesting possible matches as you type.
Showing results for
Advisor
Options
- Subscribe to RSS Feed
- Mark as New
- Mark as Read
- Bookmark
- Subscribe
- Printer Friendly Page
- Report Inappropriate Content
05-26-2022
10:00 AM
TensorFlow Lite deployment in browser using WebAssembly
Dear readers, I am a software developer, and this is my very first blog post. I would like to thank gunteralbrecht for inspiring me to research on the topic of WebAssembly. There have been several attempts to run inferencing for ML models on the web browser using TensorFlow.js, ONNX runtime web etc. We wanted to explore the possibility of using WebAssembly backend for this purpose as it is lighter with smaller binary size and faster than javascript.
Abstract
We have seen in the Part 3 of this blog post series from lsm1401, "Building deep learning model within SAP BTP" who has explained how we trained the model and converted to tflite and stored the model. In this blog post you will learn how to load a TensorFlow Lite Machine Learning model in C++ and run inference on the web browser with the help of WebAssembly backend. Here we take the example of passing the meter reading image as an input to the TensorFlow Lite model and decode the output predictions to the string matching the digits of the meter reading captured.

Overview of WebAssembly Binary creation
Overview
In this blog post we will look into the following learning journey:
- Creating WebAssembly binary
- System Information
- Pre-requisites
- Build libraries for the application
- C++ application code for the meter reading scenario
- Test WebAssembly binary
Creating WebAssembly Binary
A simple “Hello World” example is provided in this emscripten tutorial for generating the WebAssembly binary and the related JavaScript and html glue code from the C++ application code:
https://emscripten.org/docs/getting_started/Tutorial.html
In the following sections I will describe some of the pre-requisites to compile a C++ application code to WebAssembly binary for our meter reading scenario.
System Information
I am using a MacBook Pro with Apple M1 Max chip. Here I am using a Linux VDI to compile the TensorFlow Lite library with CMake.
Pre-requisites
The following need to be installed on the Linux VDI:
- Git
- Emscripten SDK
- CMake (version 3.20.2 used here) (Optional at this point)
- TensorFlow - Clone the TensorFlow git repository using the following command (Optional at this point):
- git clone https://github.com/tensorflow/tensorflow.git tensorflow_src
- Python (to test the application) – here I have used version 2.7
Build libraries for the application
I will now describe the steps to build the library files:
- Follow steps 1-3 from the following TensorFlow Lite documentation:
- Open a bash terminal and make sure to set the EMSDK environment variables as explained in the Emscripten tutorial https://emscripten.org/docs/getting_started/downloads.html.
- Run the build commands with the following compiler flags. In the below code snippet replace the path to the respective "emcmake", "cmake", "tensorflow lite source directory" according to your local settings as depicted in the picture below from my local setup:
/path/to/emcmake /path/to/cmake_binary /path/to/tensorflow_lite/source -DCMAKE_CXX_FLAGS="-lpthread" -DTFLITE_ENABLE_MMAP=OFF -DTFLITE_ENABLE_NNAPI=OFF -DTFLITE_ENABLE_RUY=ON -DTFLITE_ENABLE_XNNPACK=ON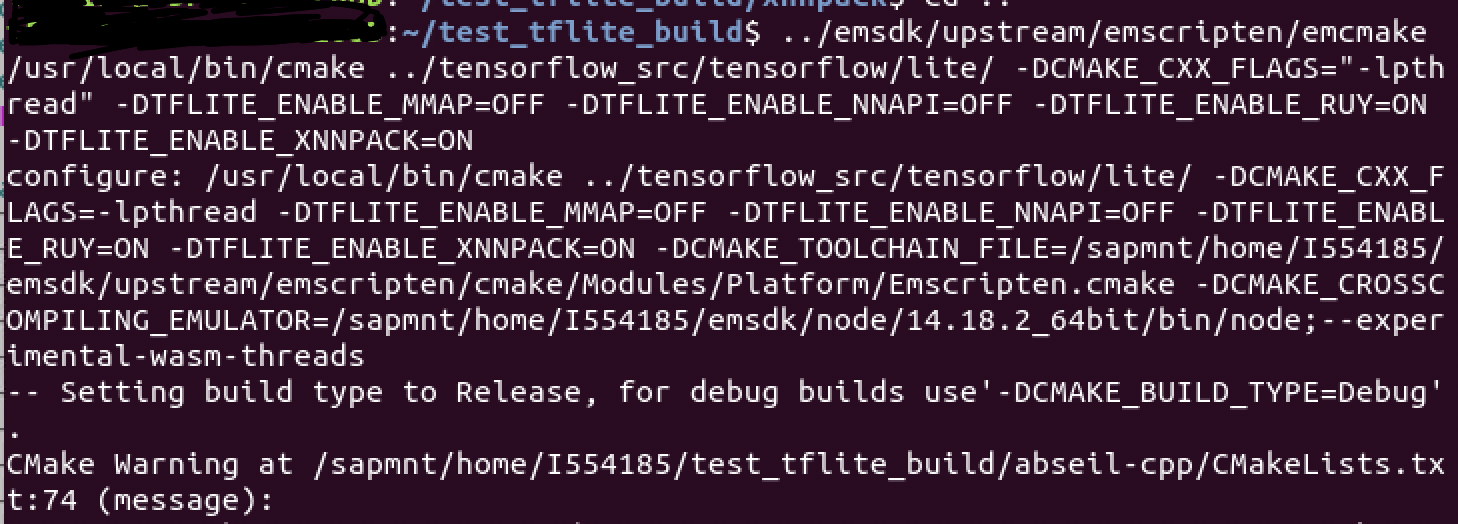
CMake build Step
This build initially failed for me as Emscripten is not one of the CMAKE_SYSTEM_NAME in couple of library paths generated duringthe build. This is the failure I observed:
CMake build error
- Perform the following changes to make the build successful. Here I have updated the CMakeLists.txt file inside the "cpuinfo" directory as follows:

File Diff
Also similarly add the missing CMAKE_SYSTEM_NAME for “Emscripten” to the "xnnpack" directory’s CMakelists.txt file and add all the source files to the same CMakeListst.txt inside the "xnnpack" directory to avoid getting any “undefined reference errors” during the build. Repeat the step - 3 CMake build with flags of this section to re-build.
Next run the following command to build the library files:
/path/to/emcmake /path/to/cmake_binary --build .
Once the build is successful you will get the following message:
Build Successful
C++ application code for the meter reading scenario
We will create a CMakeLists.txt file for the project like one below:
cmake_minimum_required(VERSION 2.4)


project(meter_reading)


include_directories("/path/to/flatbuffers/include")

include_directories("path/to/current/directory/of/CMakeLists.txt")

link_directories("/path/to/libraries/")

link_directories("/path/to/libraries/pthreadpool")

link_directories("./path/to/_deps/ruy-build/ruy")

link_directories("/path/to/_deps/fft2d-build")

link_directories("/path/to/_deps/flatbuffers-build")

link_directories("/path/to/_deps/xnnpack-build")

link_directories("/path/to/_deps/farmhash-build")

link_directories("/path/to/_deps/clog-build")

link_directories("/path/to/_deps/cpuinfo-build")

add_executable(meter_reading demo.cpp)

set(CMAKE_EXECUTABLE_SUFFIX ".html")

set_target_properties(meter_reading PROPERTIES LINK_FLAGS "-s LLD_REPORT_UNDEFINED -s WASM=1 -s NO_EXIT_RUNTIME=1 -s EXPORTED_FUNCTIONS='['_evaluate', '_malloc', '_free']' -s 'EXPORTED_RUNTIME_METHODS=['ccall', 'printErr']' -s TOTAL_MEMORY=65536000 -s INITIAL_MEMORY=65601536 -s ALLOW_MEMORY_GROWTH=1 -s ABORTING_MALLOC=0")


target_link_libraries(meter_reading -lrt -Wl --shared-memory --no-check-features

-ldl

-lpthread

-lflatbuffers

-lpthreadpool

-lruy_kernel_avx2_fma

-lruy_prepacked_cache

-lruy_kernel_arm

-lruy_have_built_path_for_avx512

-lruy_have_built_path_for_avx2_fma

-lruy_frontend

-lruy_pack_avx512

-lruy_pack_arm

-lruy_block_map

-lruy_blocking_counter

-lruy_denormal

-lruy_kernel_avx512

-lruy_context

-lruy_context_get_ctx

-lruy_wait

-lruy_allocator

-lruy_system_aligned_alloc

-lruy_tune

-lruy_have_built_path_for_avx

-lruy_apply_multiplier

-lruy_ctx

-lruy_pack_avx2_fma

-lruy_trmul

-lruy_pack_avx

-lruy_prepare_packed_matrices

-lruy_kernel_avx

-lruy_thread_pool

-lruy_cpuinfo

-lclog

-lXNNPACK

-lcpuinfo

-lfft2d_fftsg2d

-lfft2d_fftsg

-lfarmhash

-ltensorflow-lite

)
This is a typical way to create a CMake project with the required include directories and link directories added. The library files generated from the above section could be copied to a local directory, here “assets” and linked as shown above to the “meter_reading” project.
In addition, the link flags are added using “set_target_properties” to link the application to a webassembly binary file along with JavaScript and html glue code as shown above.
The export function “_evaluate” is the one that is exposed from the C++ application to the front end via the webassembly binary.
Now let us talk about the content of the demo.cpp file which contains the application code.
- The “evaluate” method will contain the main logic of the application where we read the input parameters sent by the front end, load the ML model, and run prediction on the input image and return the output string decoded.
- Include files:
- Include the relevant files for the application, here I have included the system headers taking reference from the TensorFlow lite minimal example:https://github.com/tensorflow/tensorflow/blob/master/tensorflow/lite/examples/minimal/minimal.cc
- Include the emscripten system header to export the “evaluate” method.
- Write a decoding function to map the output predictions to the dictionary as per the model output.
Build this application code to generate the webassembly binary and the glue code as below:
Create the “build_test” directory where the source files are present and run the following commands.
/path/to/emcmake /path/to/cmake_binary ..Find below my local setup command for reference:

Application CMake build
Then execute the following in the same directory:
/path/to/emcmake /path/to/cmake_binary --build .The build directory will contain the following output:

File Structure
Test WebAssembly binary
I have updated the “meter_reading.html” file generated above to read an input image of the meter reading and fetch the ML model from the smart meter service endpoint URL and pass these parameters as input to the “evaluate” method.
I have written the following methods in JavaScript:
- Get the Meter Reading:
Here 350*50 is the input image resolution with 3 channels which is accepted by the model and 11 is each output tensor array’s number of columns.
// get the meter reading

		function getMeterReading() {

			//Read Image

			var canvas = document.getElementById("myCanvas");

		    var ctx = canvas.getContext("2d");

		    var img = document.getElementById("test-image");

			ctx.drawImage(img, 0, 0, canvas.width, canvas.height);

			//Read pixel data

			let pixData = tf.browser.fromPixels(ctx.getImageData(0, 0, canvas.width, canvas.height))

			// Convert it into float

			let pixDataFloat = pixData.div(255.0);

			// Transpose Image data to 350 * 50

			let transposedPixDataFloat = tf.transpose(pixDataFloat, perm=[1, 0, 2]);

			// Expand dimension to 1 * 350 * 50

			let dimsImgPixDataFloat = tf.expandDims(transposedPixDataFloat, 0);

			// Convert pixel data array to pointer

			const arrayPointer = arrayToPtr(dimsImgPixDataFloat.dataSync(), Module, 4);

			const modelPointer = modelToPtr(modelData, Module, 1);

			// Import function from Emscripten generated file

		    var result = Module.ccall(

		        'evaluate',     // name of exported C function

		        'string',       // return type

		        ['number', 'number', 'number' ,'number', 'number', 'number', 'number'],     // argument types

		        [arrayPointer, 50, 350, 3, 11, modelPointer, modelLen]  // arguments

			);

			console.log("Result from Meter Reader: ", result);

			Module._free(arrayPointer);

		}
- Array to Pointer Conversion methods for input image and model:
// convert input array to a pointer
function arrayToPtr(array, Module, bytesPerPixel) {
// Get data byte size, allocate memory on Emscripten heap, and get pointer, for 4 bytes per pixel
var ptr = Module._malloc(array.length * bytesPerPixel)
// Copy data to Emscripten heap
Module.HEAPF32.set(array, ptr / bytesPerPixel)
return ptr
}
function modelToPtr(array, Module, bytesPerPixel) {
// Get data byte size, allocate memory on Emscripten heap, and get pointer, for 4 bytes per pixel
var ptr = Module._malloc(array.length * bytesPerPixel)
// Copy data to Emscripten heap
Module.HEAPU8.set(array, ptr / bytesPerPixel)
return ptr
}
- I call this getMeterReading function from the html file:
<button id="btn-capture" type="button" class="button" onclick="getMeterReading()">Get Meter Reading</button>
<canvas id="myCanvas" width="350px" height="50px"style="border:1px solid #d3d3d3;">
<image src="http://localhost:8000/00025332.png" id="test-image"/>
- Finally using a python http server, we can test the end-to-end implementation:
python -m SimpleHTTPServer
This starts the http server on the localhost at port 8000 in my case.

HTTP Server
We can see the output when we open the meter_reading.html file on the http://localhost:8000 as I have logged in the console upon pressing the “Get Meter Reading” button.

- Get the Meter Reading:
Console Output
I hope by following this blog post you can build your very first application running inference for TensorFlow Lite model on the web browser using WebAssembly. In the next part of this blog post series Part 5 we will learn from namangupta about the front end application.
Please feel free to Like, Comment and ask any questions you have about this blog post.
References
- Web Assembly
- WebAssembly vs js
- TensorFlow Lite build with cmake
- Emscripten
- Preamble.js
- Passing a js array to C++ webassembly
Credits
I would like to thank the team who has worked on this amazing project with me: lsm1401, vriddhishetty, gunteralbrecht, anoop.mittal, roopa.prabhu, namangupta, @S Deepak Chethan
- SAP Managed Tags:
- Machine Learning,
- Artificial Intelligence,
- SAP BTP, Cloud Foundry runtime and environment,
- SAP HANA
Labels:
You must be a registered user to add a comment. If you've already registered, sign in. Otherwise, register and sign in.
Labels in this area
-
ABAP CDS Views - CDC (Change Data Capture)
2 -
AI
1 -
Analyze Workload Data
1 -
BTP
1 -
Business and IT Integration
2 -
Business application stu
1 -
Business Technology Platform
1 -
Business Trends
1,658 -
Business Trends
91 -
CAP
1 -
cf
1 -
Cloud Foundry
1 -
Confluent
1 -
Customer COE Basics and Fundamentals
1 -
Customer COE Latest and Greatest
3 -
Customer Data Browser app
1 -
Data Analysis Tool
1 -
data migration
1 -
data transfer
1 -
Datasphere
2 -
Event Information
1,400 -
Event Information
66 -
Expert
1 -
Expert Insights
177 -
Expert Insights
293 -
General
1 -
Google cloud
1 -
Google Next'24
1 -
Kafka
1 -
Life at SAP
780 -
Life at SAP
12 -
Migrate your Data App
1 -
MTA
1 -
Network Performance Analysis
1 -
NodeJS
1 -
PDF
1 -
POC
1 -
Product Updates
4,577 -
Product Updates
340 -
Replication Flow
1 -
RisewithSAP
1 -
SAP BTP
1 -
SAP BTP Cloud Foundry
1 -
SAP Cloud ALM
1 -
SAP Cloud Application Programming Model
1 -
SAP Datasphere
2 -
SAP S4HANA Cloud
1 -
SAP S4HANA Migration Cockpit
1 -
Technology Updates
6,873 -
Technology Updates
417 -
Workload Fluctuations
1
Related Content
- Gamifying SAP C4C with BTP, the Flutter or Build Apps way. in Technology Blogs by SAP
- Partner-2-Partner Collaboration in Professional Services in Technology Blogs by SAP
- It's Christmas! Ollama+Phi-2 on SAP AI Core in Technology Blogs by SAP
- What’s New in SAP Analytics Cloud Release 2023.25 in Technology Blogs by SAP
- Vector Search in pure ABAP (any DB) in Technology Blogs by Members
Top kudoed authors
| User | Count |
|---|---|
| 34 | |
| 25 | |
| 12 | |
| 7 | |
| 7 | |
| 6 | |
| 6 | |
| 6 | |
| 5 | |
| 4 |