
- SAP Community
- Products and Technology
- CRM and Customer Experience
- CRM and CX Blogs by SAP
- Create Your First Product Carousel with Intelligen...
CRM and CX Blogs by SAP
Stay up-to-date on the latest developments and product news about intelligent customer experience and CRM technologies through blog posts from SAP experts.
Turn on suggestions
Auto-suggest helps you quickly narrow down your search results by suggesting possible matches as you type.
Showing results for
Product and Topic Expert
Options
- Subscribe to RSS Feed
- Mark as New
- Mark as Read
- Bookmark
- Subscribe
- Printer Friendly Page
- Report Inappropriate Content
05-23-2022
7:24 PM
Abstract
As you know, Intelligent Selling Services (aka ISS) for SAP Commerce Cloud provides real-time personalization through data driven merchandising product carousels as well as machine learning based product recommendations. Meanwhile, It also supports a reporting and management tool to monitor and improve personalization performance. (cf. a brief introduction here)
In this blog post, I am going to walk you through the essentials steps for creating your first product carousel based on Intelligent Selling Services and SAP Commerce Cloud. I'll also briefly show how to test and monitor the personalization performance of the product carousel within Intelligent Selling Services.
Sounds interesting? Let's get started!
Prerequisite
you should have:
- a provisioned Intelligent Selling Services tenant with admin role access.
- a SAP Commerce Cloud running instance with a storefront.
- successfully configured connection between the 2 systems above. (If you haven't performed the connection configuration yet, in this blog post there is a step-by-step description of the process)
We will walk through the process by:
- conduct the setup in the Intelligent Selling Services tenant
- conduct the setup in the SAP Commerce Cloud instance via SmartEdit
- test the configuration on the web page of SAP Commerce Cloud
- monitor the performance of the configuration in Intelligent Selling Services.
Setup in Intelligent Selling Services
Please log into your Intelligent Selling Services tenant and make sure the site (top right) is set to the site you want to use on the SAP Commerce Cloud storefront. If it doesn't exist yet you can create it in the Site Management (step-by-step guide can be found here).

Select The Site
Now navigate to Merchandising | Product Mixes, here you will see all the product mixes which are created in the selected site. As we are going to create a new one, please click on the "Create Product Mix" button.

Ready to Create A New Product Mix
In the product mix builder workspace (more details cf. here), the first thing you should notice is the setting:

Setting of Product Mix
Under "Type", you can select which type of product mix you want to create next (cf. here for more details):
- Trending Products: recommends products based on various influencers that can be configured. (we will get into the "Influencers" tab later)
- Related Products: is usually used on the product detail page and recommends products related to the current product based on what all the customers have viewed before. Specifically, machine learning is used here to analyze the behaviors of all the customers.
- Personalized Products: can be used anywhere and recommends products based on the current user's click history. Specifically, the behaviors of the current user are being analyzed.
- Recently Viewed: recommends up to 25 last products in user's viewed history.
Depending on which type of product mix you select, you can control the "Category sensitivity" to restrict the product recommendation to
- a "current category" (where product recommendations will change according to which category is currently being viewed, e.g. in a category page) or a "fixed category" (predefined to set to a certain category only), in the case of Trending Products, or
- "all categories" (i.e. not category related) or "current category" (depending on which category page is being viewed) in the cases of Related Products or Personalized Product.
As an example, we are going to create a product recommendation to display the products that are most frequently added into shopping carts. While choosing the "Trending Products" and keeping the "Category sensitivity" as "current category", you can fill the Name and Description fields that best describe the product mix, such as the example below.

Creating a Trending Product Carousel
Please note, if you choose any machine learning based product mixes (such as "Related Products" or "Personalized Products"), you'll need to wait for some time until the machine learning based analysis is activated:

Machine Learning based Product Mixes
Now you can click on the Influencers tab and then the "Add Influencer" button

Add an Influencer
Please note, if you hover over the question mark to the right of the "Add influencer" button, you can see a very detailed description about the functionalities of each influencers listed.
As an example, please choose "Add to Cart rate". Now you will see the influencer being added, while a preview of the product recommendation is being displayed on the right hand side. You should also set the weight of the influencer, either by typing the value directly in the field or drag the glider ball to the desired value directly.

Configuring Influencer(s) with Preview
Please note:
- 0 means the influencer has no effect for the product recommendation and negative value makes the products less important if they get inserted carts more frequently.
- weights of influencers are essential with the cases of multiple influencers. (which you can also add if you like)
- Every time you change a weight value, the preview product recommendation will also change accordingly, showing the possibility to test right away whether the recommended products match your expectation or not.
Now switch to the last tab of "Catalog",

Preview Products and Fix Products
Here you have 2 possibilities to work with:
- choose a certain category via the dropbox to see (in the left panel) how products are recommended with the added influencers in the previous tab
- drag any product from the left panel and drop it to the right panel, if you want to always promote certain products in the product recommendation.
In our example, you can choose any category (such as "Sony"), observe the product recommendation changed, then drag the DSC-T90 pink camera (or any other product) to the right panel.
Now we are done with creating a new product mix, don't forget to click the save button to keep the configuration.

Save The Newly Created Product Mix
As the next step, please navigate to Merchandising | Strategies. Here you can see all the available strategies of the selected site. You can also create a new Strategy by clicking on the "Create Strategy" button.

Strategy Listing and Create a New Strategy
Every strategy:
- is the key to connect to a product carousel CMS component in the web pages of SAP Commerce Cloud. (We will detail this later)
- can relate to one or more product mixes, allowing product recommendation based on contexts of the more prioritised product mix.
- can be used for A/B testing to define the distribution of related product mixes.
In the Strategy Builder Workspace (more details cf. here), please fill the name and description fields, and click the "Add Product Mix" button.

Strategy Builder Workspace
Please note, when you click on the "Add Product Mix" button, the strategy is already automatically saved and you don't have to hit the "Save" button any more.
In the "Add Product Mix" pop up window, make sure you select the previous product mix, and hit the save button:

Choose and Add the Product Mix
Please note:
- you don't select any category here, because in our simple example we don't want the product recommendation to be limited to any category.
- you don't choose a start/stop date, making the product mix activated all the time.
Now the setup in the Intelligent Selling Services tenant is done, let's take a look at how to setup in the SAP Commerce Cloud instance next.
Setup in SAP Commerce Cloud
Please log into SmartEdit of your SAP Commerce Cloud instance, make sure "Electronics Site" (assuming you have configured it to connect with the Intelligent Selling Services tenant, a step-by-step description here) is chosen and click on the "Homepage" of the "Staged" catalog version.

Select A Staged Page in SmartEdit
Please note: for simplicity the homepage is chosen to display the product recommendation, but depending on your requirement, you can choose any other web pages as well.
Under Basic Edit mode, click on "+ Component" and in the pop-up window, type "merc" in the search field of "Component Types" and locate the intelligent Selling Services Carousel (labeled as "Merchandising Carousel", or similar name in 2105 version or before) appearing as the result in the filtered component type list.

Edit Homepage to Include the ISS Carousel
Now drag the Carousel component type and drop it to a prominent position on the page, e.g. above the "SAVE BIG" Camera promotion image.

Drag-and-drop the ISS Carousel
On the pop-up window, make sure to fill in the essential information to create the carousel component:
- Name: a unique ID/name for the carousel component
- Number to Display: number of products to be recommended from Intelligent Selling Services
- Scroll Type: either one (one-by-one) or all (entire row), to define how the products can be scrolled within the carousel
- Strategy: most important field, please select the strategy for providing the product recommendation, e.g. the one that is configured in the Intelligent Selling Services tenant in the previous section.
- Title name: localized name of the carousel that is displayed as the component headline later in the web page.
- Don't forget to click on "save" at the end. Further details about all fields can be found here.

Complete the ISS Carousel
After making sure the product carousel is inserted into the desired position in the web page, switch to "Advanced Edit" mode, then change the page status from "Draft" to "Ready To Sync":

Switch to Advanced Edit
Next, click on the "Sync" menu bar besides "+ Component" and check "All Slots And Page Inform...", then hit "Sync" button to start the synchronization process.
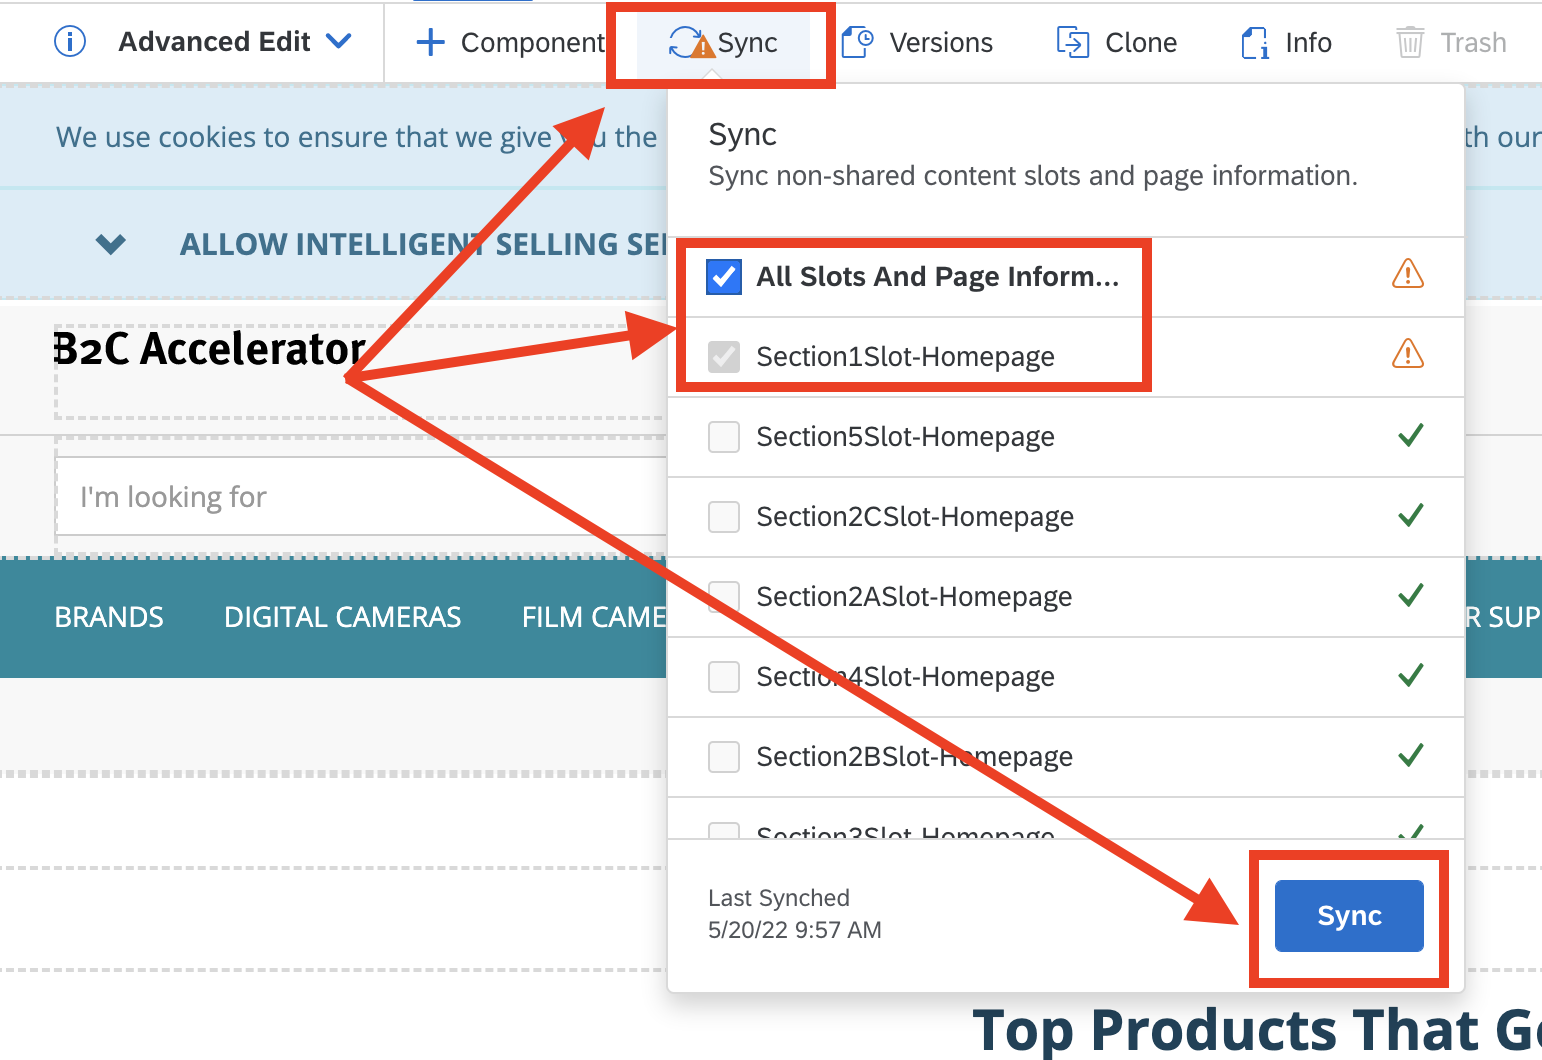
Synchronize to Online Version
After making sure the web page is successfully synchronized, we are done with the setup on SAP Commerce Cloud. Let's move on to testing everything together.
Testing
Go to the storefront of your SAP Commerce Cloud instance. Now you should notice the product recommendation carousel is displayed in the desired location as you set before.

Homepage with ISS carousel
Please note, as GDPR is supported out-of-the-box, the consent related Intelligent Selling Services message is also displayed on the top of the page. Clicking on "Accept" button will then allow contextual data (of either anonymous or registered user) to be sent to Intelligent Selling Services.
Even if you missed the consent agreement at some point, e.g., accidentally rejecting the consent, you can go to MY ACCOUNT | Consent Management, then locate the Intelligent Selling Services consent and approve it again:

ISS Consent Management on SAP Commerce Cloud
If you log into the Intelligent Selling Services tenant, make sure the configured site (e.g. cxEduSite in our example) is chosen on the top right, and navigate to Merchandising | Product Mixes, then select the product mix created before. You can see the exact same recommendation products are being displayed in the Preview panel of the Product Mix Builder workspace.

ISS Product Mix View
Now, there are 2 ways to test the product recommendation carousel with Intelligent Selling Services directly:
- you can trigger some relevant actions on the SAP Commerce Cloud page
- you can configure the product mix directly in the Intelligent Selling Services tenant according to your specific needs.
For the first way, as the influencer in our example above is "Add to Cart Rate", we can simulate that various users have added a specific product (e.g. the PowerShot A480, or any other products that are not in the product recommendation list yet) to the cart.
We can achieve this on different browsers (or via incognito mode of the same browser), or with different registered users. Just remember, every time you have a new session, make sure to accept the consent of Intelligent Selling Services on the top of the page.

Add a Product into Cart
After triggering those actions and waiting for some minutes, you will be able to see that the product carousel on the SAP Commerce Cloud storefront changes according to what you have added into the carts before.

Product Recommendation Changes Accordingly
For the second way, please again log into the Intelligent Selling Services tenant, while selecting the previously configured product mix, you can change the product order in the preview panel, via:
- modifying the influencers under "Influencers" tab
- fix/add any products via "Catalog" tab

Configure the Product Mix
Just don't forget to hit the "save" button to save the product mix and confirm the change by acknowledging the influence on the related strategy.

Save the Product Mix
Make sure you wait for some minutes, then go back to the storefront of SAP Commerce Cloud, you can see that the carousel is now displaying the recommendation products exactly the same as you have configured in the Intelligent Selling Services tenant.
Monitoring
Now log into the Intelligent Selling Services Tenant, you can see a simple statistical report about the site data in the Overview workspace.

Overview of Site Statistics
The overview includes:
- 24 hours of product views and carousel views, and the clicking number on the product carousels, as well as a simple comparison with the previous day respectively.
- catalog synchronization status, which also implies the successful connection between Intelligent Selling Services and SAP Commerce Cloud.
- ML Training status, which indicates the availability of machine learning based analysis regarding different kinds of product recommendations
Make sure you select the related site, then navigate to Merchandising | Reporting, where you can monitor the performance of all merchandising efforts (more details cf. here😞
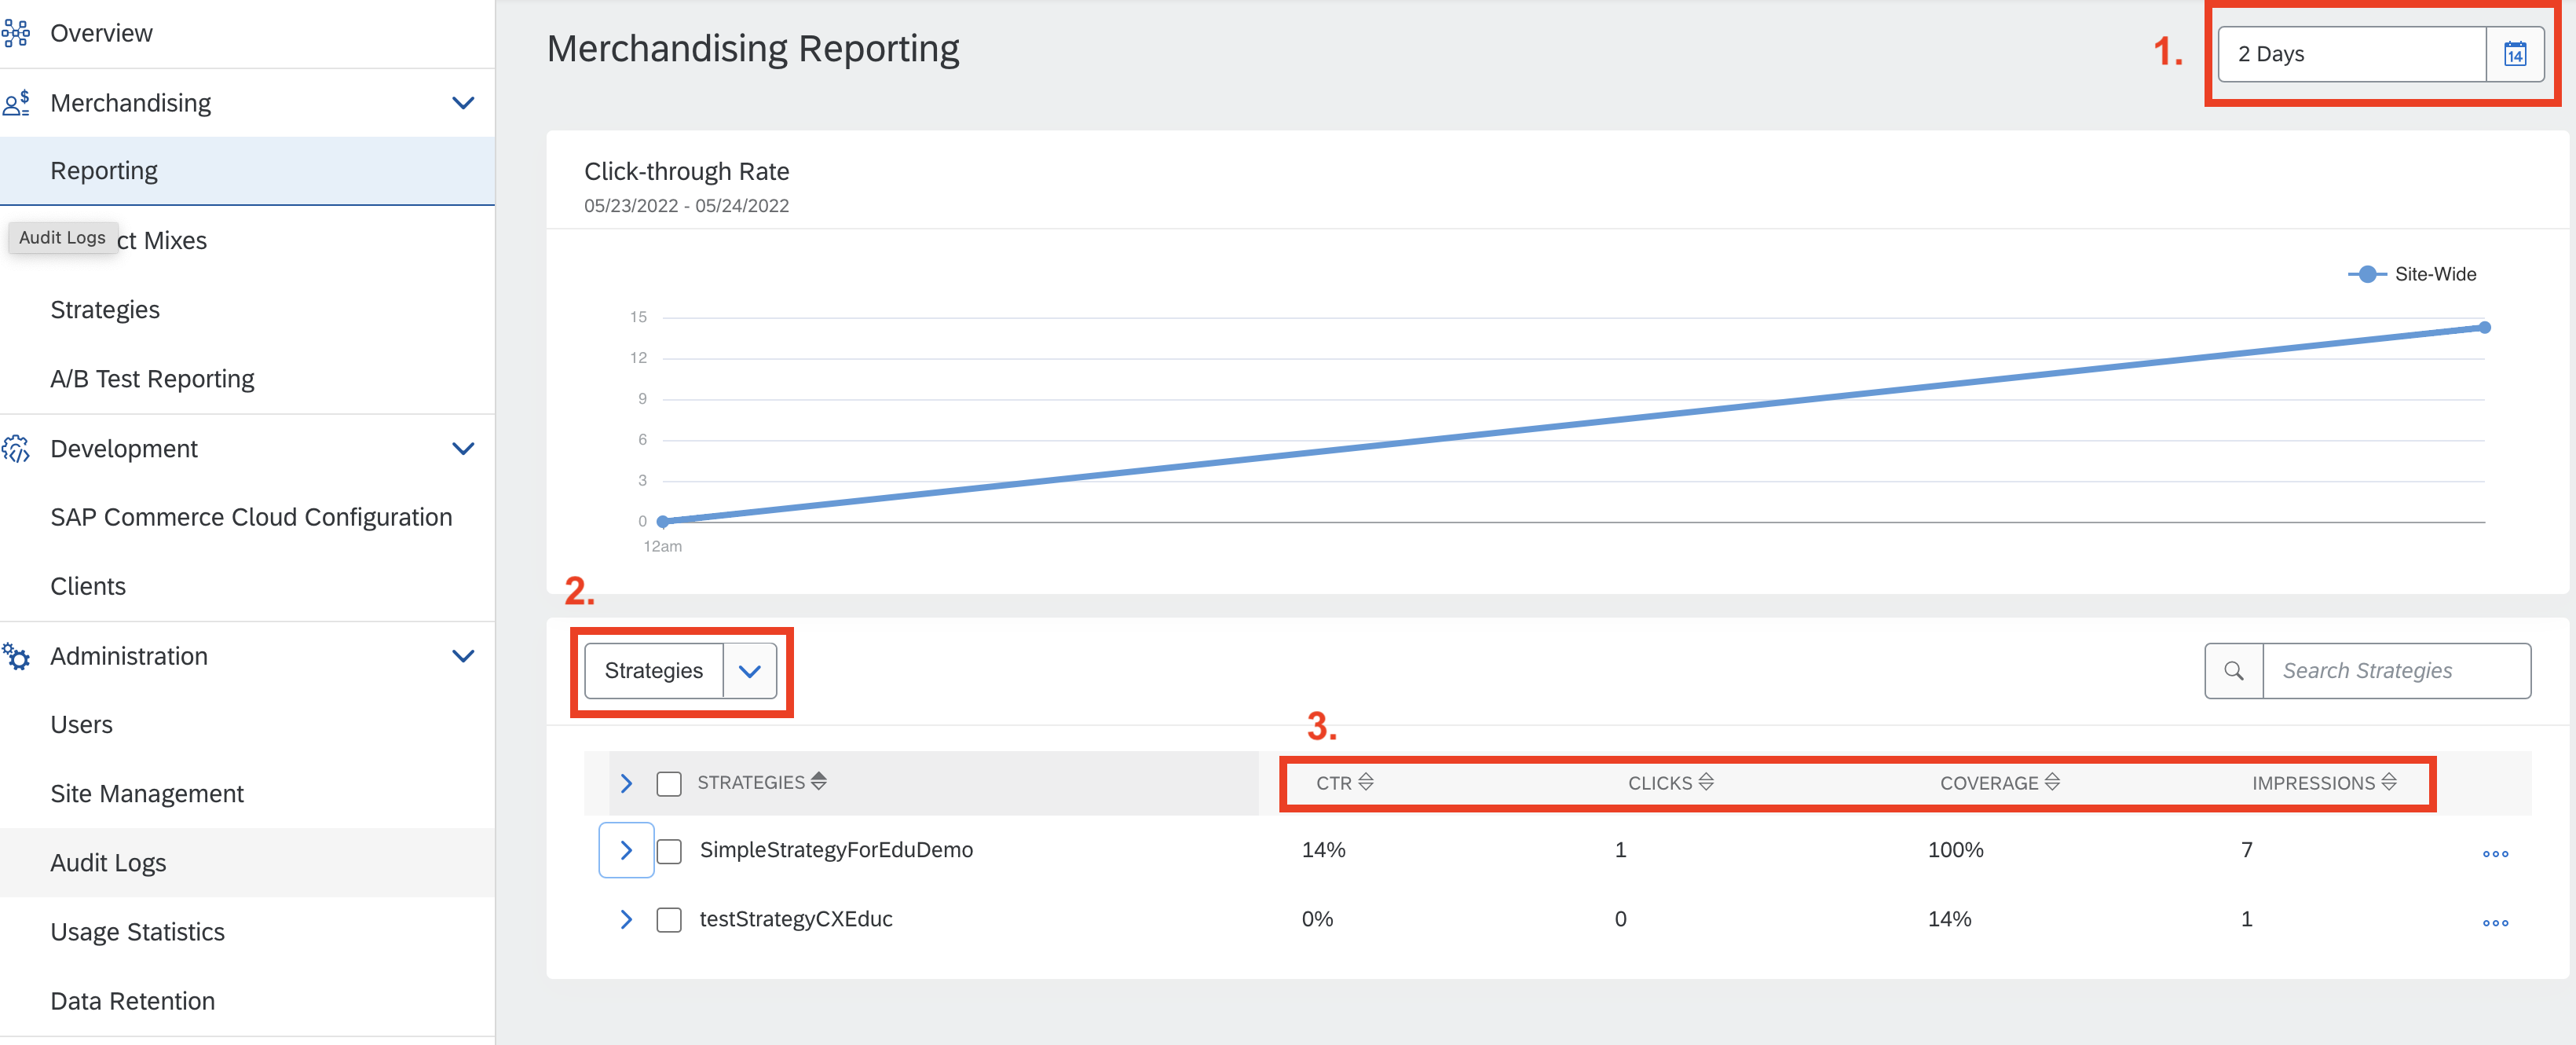
Reporting Workspace
You can see the performance in a time series graph, as well as the KPIs (Key Performance Indicators) table. please note:
- the time/period picker is used to control date range where the graph and data should be presented.
- filter drop-down menu allows you to show the KPI data depending on Strategies, Product mixes or Carousels (coming from SAP Commerce Cloud)
- the essential KPIs include (from right to left):
- IMPRESSIONS: Unique number of users who has viewed the merchandising effort related to Intelligent Selling Services. In the above example, 7 users (both anonymous and registered) were identified in the last 2 days (on the demo system).
- COVERAGE: number of IMPRESSIONS divided by number of the total web site visitors. In the above example, 100% indicates all the web site visitors have seen the product recommendation carousel defined in the earlier step of the blog post. Please note e.g. if the product carousel is not placed in the home page but a certain category or product page, the coverage value will be lower than 100%, because not all web site visitors will navigate to the specific page with ISS carousels.
- CLICKS: unique number of users that have clicked on the carousel(s). In our example, there was only 1 user (of 7 identified users) clicked on the product carousel.
- CTR: click-through-rate, the unique number of CLICKS divided by the number of the IMPRESSIONS. In the example above, 14% of the identified users have clicked on the carousels related to a strategy called SimpleStrategyForEduDemo (the one we used through out this blog post)
- All data illustrated in the CTR graph as well as the KPI table are collected only from customers who have granted ISS consent. In other words, in an extrem case, if all views had been created by customers who never granted ISS consent, all KPIs will be 0.
Let's try to trigger some actions to influence the report, please register as a new user in SAP Commerce Cloud storefront (possibly via incognito mode). Don't forget to click the "Accept" button on the top right to allow data being sent to Intelligent Selling Services.

Register a New User
Then logged in as the new user, go to the homepage and click on any of the product that is in the recommendation product carousel.
You can repeat this several times to get a higher number of CTR, or you can also use existing user accounts to perform the same action. E.g. in the demo case, I created 2 new users and also used one existing user to performed the clicking on the "TopAddedIntoCarts" carousel respectively, then when navigating back to the reporting workspace in Intelligent Selling Services after some minutes, the KPIs graph and table are updated accordingly:
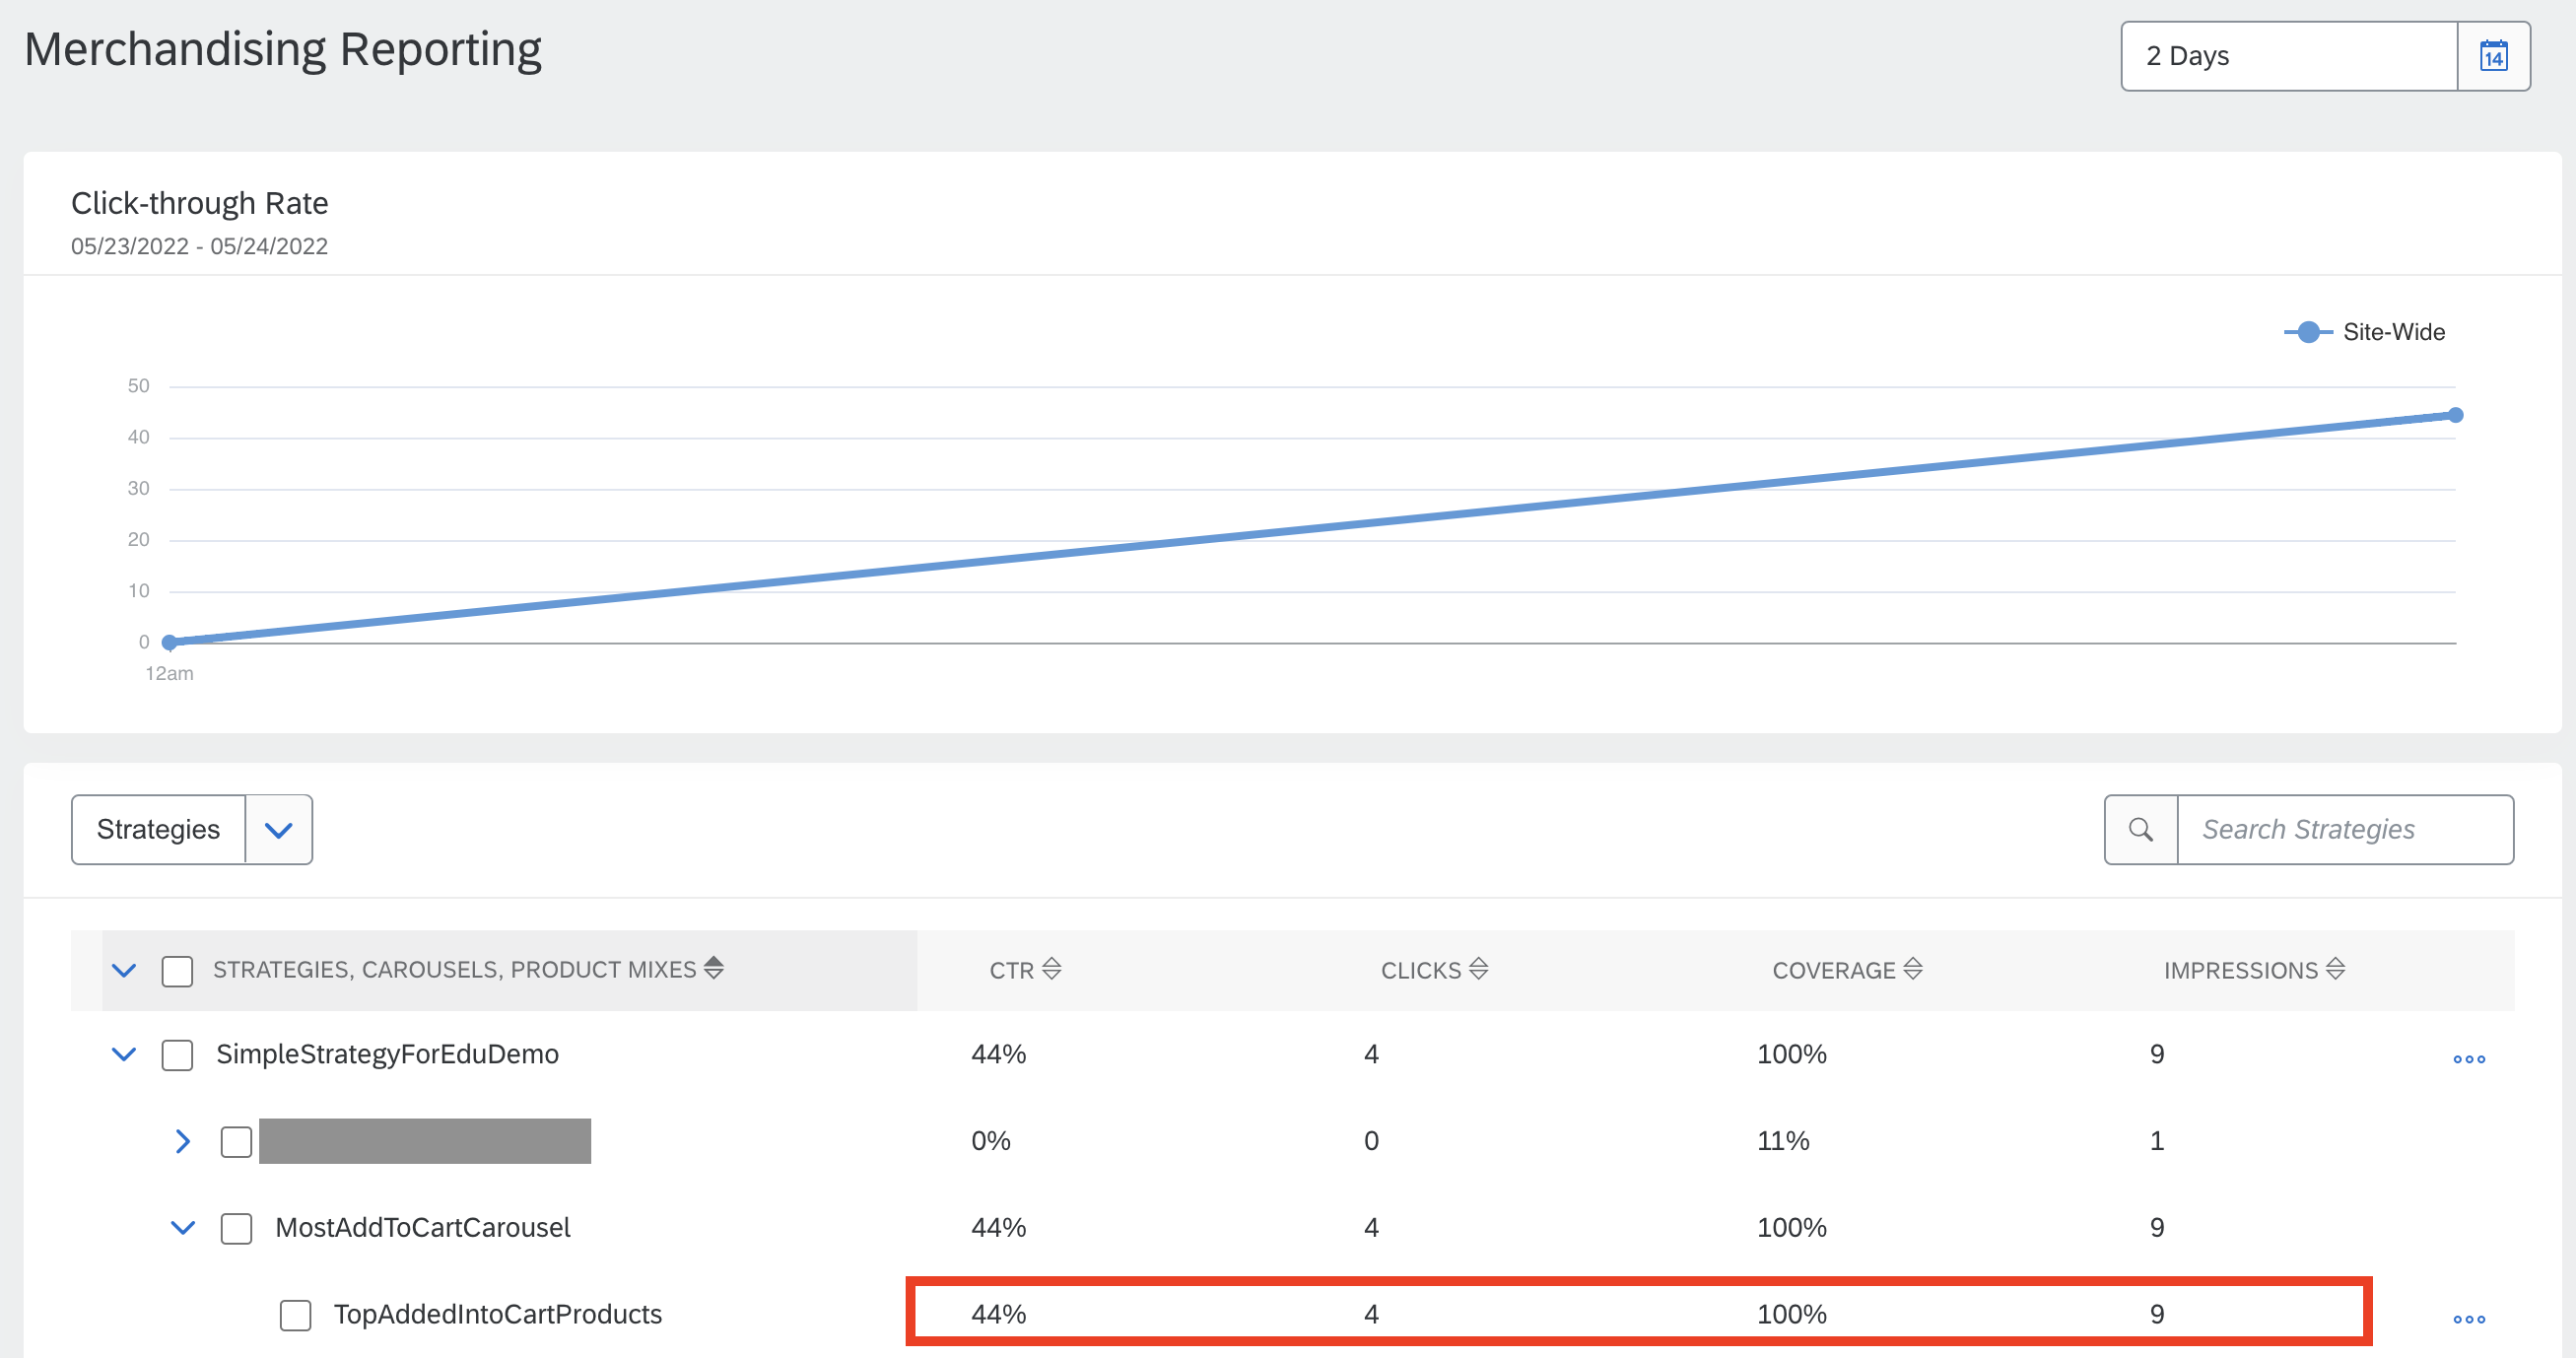
Updated KPIs Graph and Table
specifically:
- 9 instead of 7 users are identified (2 new users added),
- 4 instead of 1 CLICKS shows 3 more users clicked on the carousel (2 new users and 1 existing user)
- CTR is now 44% instead of 14%, actually matching with the increased data, indicates that 44% of the users that have viewed the carousel also clicked on a product in the carousel in the last 2 days.
Furthermore, you can also compare the performance of different merchandising efforts, in this example:

Comparison of More Than 1 Merchandising Efforts
when you check more than one merchandising effort, such as the "MostAddToCartCarousel" and "TopAddToCartCarousel", the time series graph will be updated to contain the 2 CTRs at the same time yet with different colours.
Last but not least, if you want to know more about details of the reporting tooling, especially the A/B testing support, please take a look at here and here.
Summary
The blog post introduces how to
- create a product merchandising carousel with Intelligent Selling Services for SAP Commerce Cloud, and
- test and monitor the performance of the product carousel with the tooling of Intelligent Selling Services.
If you want to know more?
Please take a look at the portal page of Intelligent Selling Services:
https://help.sap.com/viewer/product/INTELLIGENT_SELLING_SERVICES/
Also pay attention to the up-coming blog post (e.g to follow me on SAP Community) and planned live session on SAP Learning Hub about Intelligent Selling Services for SAP Commerce Cloud.
That’s it and thanks for reading!
- SAP Managed Tags:
- SAP Commerce,
- SAP Commerce Cloud,
- Customer Experience
Labels:
You must be a registered user to add a comment. If you've already registered, sign in. Otherwise, register and sign in.
Labels in this area
-
Business Trends
270 -
Business Trends
11 -
chitchat
1 -
customerexperience
1 -
Event Information
256 -
Event Information
18 -
Expert Insights
30 -
Expert Insights
51 -
Life at SAP
133 -
Life at SAP
1 -
Product Updates
666 -
Product Updates
24 -
SAP HANA Service
1 -
SAPHANACloud
1 -
SAPHANAService
1 -
Technology Updates
453 -
Technology Updates
15
Related Content
- When is the right time to compose? in CRM and CX Blogs by SAP
- Power of E-commerce Subscription Models in Increasing Conversions and Boosting Average Order Value in CRM and CX Blogs by SAP
- SAP Commerce Cloud Q1 ‘24 Release Highlights in CRM and CX Blogs by SAP
- SAP MaxAttention Workshop 'Accelerate Business Transformation with AI and Data' (May 14-15, 2024) in CRM and CX Blogs by SAP
- Set up Test Tenant for Intelligent Selling Services for SAP Commerce Cloud in CRM and CX Questions
Top kudoed authors
| User | Count |
|---|---|
| 4 | |
| 2 | |
| 2 | |
| 2 | |
| 2 | |
| 1 | |
| 1 | |
| 1 | |
| 1 | |
| 1 |