Introduction
The SAP Business ByDesign(ByD) offers a wide range of SOAP and OData API's to access data sources, ByD business objects and reports. You can find an overview of all ByD API's in the SAP Community blog post SAP Business ByDesign - API Overview . The Web Services can be tested manually using SOAP UI Tool ( for SOAP API's ) and Postman tool ( SOAP/OData API's) . API testing is critical for automation testing because it can cope with frequent changes without breaking the test outputs. Postman tool can be effectively used to create test automates for SOAP and OData API's. This blog provides you with steps to automate API tests using Postman tool for both SOAP and OData API's.
Requirements
The User must be familiar with Postman and have it installed
Postman API Development Environment.
Setup
SOAP API Example -
Please follow the below steps to setup the postman collection for a SOAP service in ByD.
- Login to relevant ByD system and open 'Application and User Management - Communication Arrangements'
- Select the relevant arrangement, click on 'Edit' and Select the 'Technical Data' tab.
- Click on 'Edit Advanced Settings', select the communication and click on 'Download WSDL'.
- Open Postman, go to File Menu -> Import, under files section click on upload files.
- Select the WSDL file uploaded in the Postman and click on Import.
- Add the communication arrangement credentials in the 'Authorization' tab.
- Now the collection is ready to use in Postman.
OData API Example -
Please take a look at the following blog post to find examples of OData API's in ByD and set it up in Postman -
SAP Business ByDesign - OData API Examples
Configuration -
Environment Variables -
Variables can enable you to store values and reuse it within or across the collections, test scripts and authorization settings. The variables can also be used to pass data between requests and tests. The variables can be created if you will be using the same values in multiple requests, for example - request URL, username, password, parameters etc.
Setting Global environment variables -
- Select the environment quick look icon
 at the top right of Postman.
- Click on 'Add'/ 'Edit' next to Globals and Add a new variable with all the details. The type can be set to secret if there is any sensitive information like password in the value or can be kept as default for other values.

- Click on 'Save'.
- To access the variable with variable name 'user_name' you can use it as {{user_name}}

Setting Collection variables -
- Select the relevant collection and click on 'Variables' tab.
- Create variables with all the details.

Defining variables -
You can also set any value in the request url, request body etc to a variable in the following way -
- Select the value, click on 'Set as Variable' and enter the relevant details.

Authorization -
The authorization details can be maintained at Collection level or request level to validate the sender of the request. Several authorization models are supported in the Postman tool and the user can select the one relevant to the API. Variables can also be used to set the details for authorization if the values are reused in several requests in a collection.
Pre-request Script -
Pre-request scripts can be used for pre processing of data before running any request or collection to set a variable, parameter, header or body data. The scripts are based on Javascript and Postman provides snippets for general scripts.
- To write pre processing scripts for all requests in a collection, Click on the collection and click on 'Pre-request Script'.

- To write pre processing scripts for a particular request, Click on the request and click on 'Pre-request Script'
Examples of pre-request scripts using existing snippets -
- Setting an environment variable - Select the 'Set an environment variable' snippet and pass the key and value pair for the environment variable.
pm.environment.set("key", "value");
- Getting a variable - Select any of the relevant get variable snippets.
var id = pm.environment.get("variable")
Testing -
Once the collection is setup in the Postman with relevant environment variables, authorization settings and pre-request scripts if any, we can proceed with the tests scripts.
The test scripts are also based on Javascript and postman provides snippets for test scripts too. Tests can again be written on collection, folder or request level. To write the test scripts you can click on Collection, folder or request and click on 'Tests' tab. You will find code snippets for various checks in the response body. Please find a few examples of test scripts below -
- Status code check for the response - Select the 'Status code : Code is 200' snippet and change the parameter to match the expected response.
pm.test("Status code is 200", function () {
pm.response.to.have.status(200);
});
- To validate of the response contains of a particular text - 'Response body - Contains string'
pm.test("Body matches string", function () {
pm.expect(pm.response.text()).to.include("string_you_want_to_search");
});
Once the test scripts are ready for the collection, you can either manually test the collection or schedule testing on hourly or weekly basis ( as supported by Postman version - ). To monitor the API health you can monitor a collection in the following way -
- Click on '...' / 'view more actions' at the collection level.

- Click on 'Monitor Collection'.
- Fill in the relevant details for monitoring - The frequency can be set in 'Run this monitor' section.
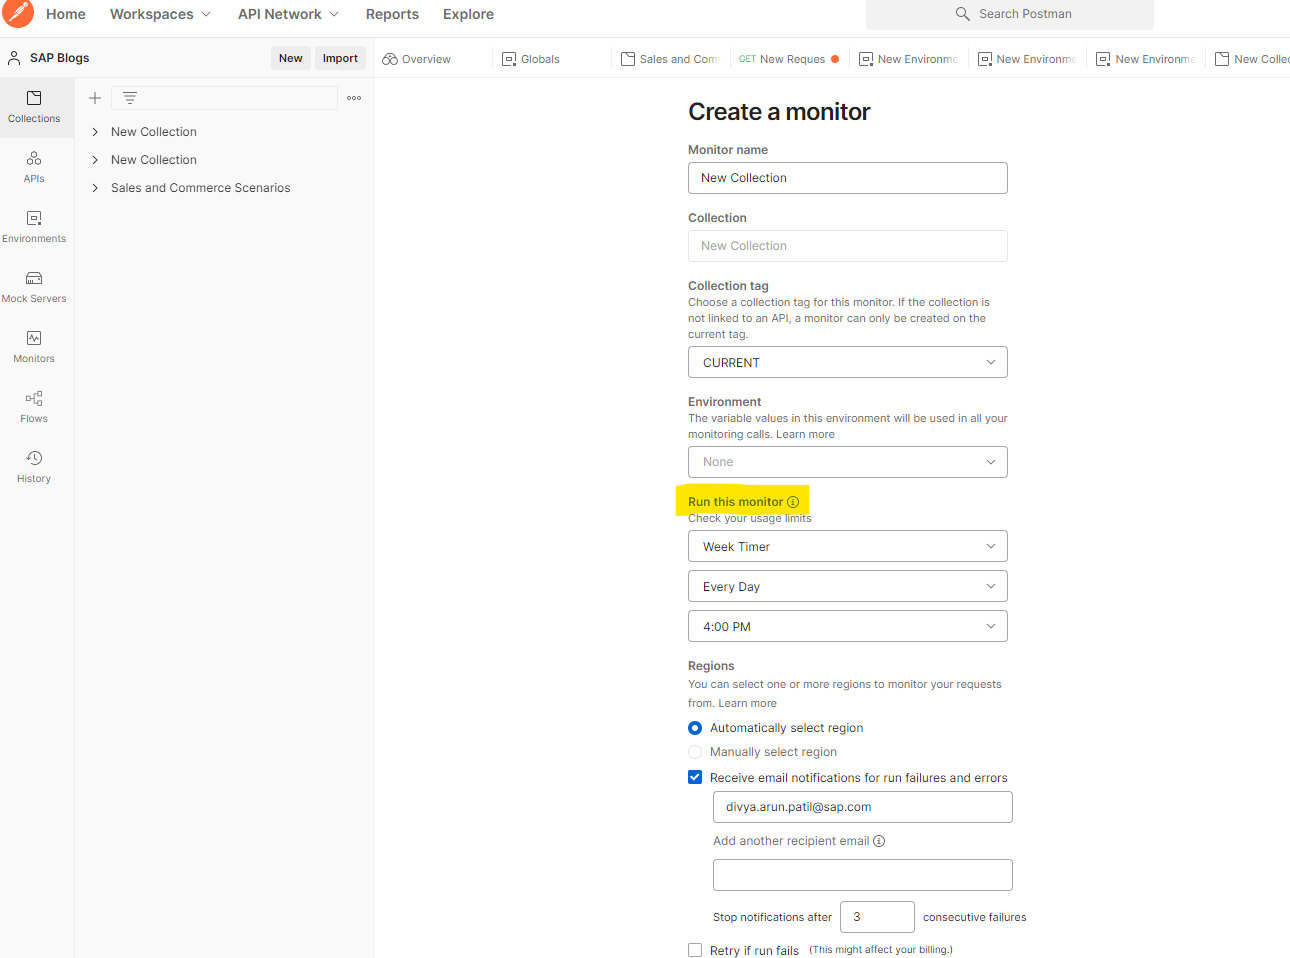
- You can mention the recipient's email for the monitoring report.

- Click on 'Create Monitor'.
- Click on 'Run; to start the first schedule.
- To view the summary, Click on 'Monitors' on the left side of the screen.

Conclusion -
This blog summarizes how Postman tool can be used to monitor tests. The blog does not cover all possible test scripts, but the Postman provides most of the snippets that can be further manipulated.
