UPDATE: In the configuration in the destination below, 2 properties may be incorrect:
- Port likely has to be 587
- mail.smtp.ssl.enable should be false
|
Within the low-code, no-code space, I'm working hard to master SAP AppGyver (see my
100-day challenge), but I was helping someone out with something else and learned how to send emails within an automation, which I thought was cool. So I thought to write about it.
Note that I am using automations within SAP Process Automation, and not standalone iRPA, but (1) You should start to use SAP Process Automation, a combination of iRPA, workflows and other fun stuff; (2) I think you can do the same thing in iRPA.
Also note that this method requires you to do the email sending within an automation, not the workflow. I will do a second blog on sending within a workflow.
Set up mail server
DISCLAIMER: You must ensure that security is maintained properly for your email server. I will show you how I was able to send emails from a separate Gmail account, but you must guarantee security for yourself.
I created a separate Gmail account, and created an app password (not currently recommended) as an alternative to the account password. The first time I sent an email it was flagged and I had to tell Google that it was OK for my app to connect to my Gmail account.
Then I defined a destination in BTP as in the following screenshot. Note the name (which is a flag to SPA, the type, and the port). I'm not sure you really need all these parameters -- check the
documentation.
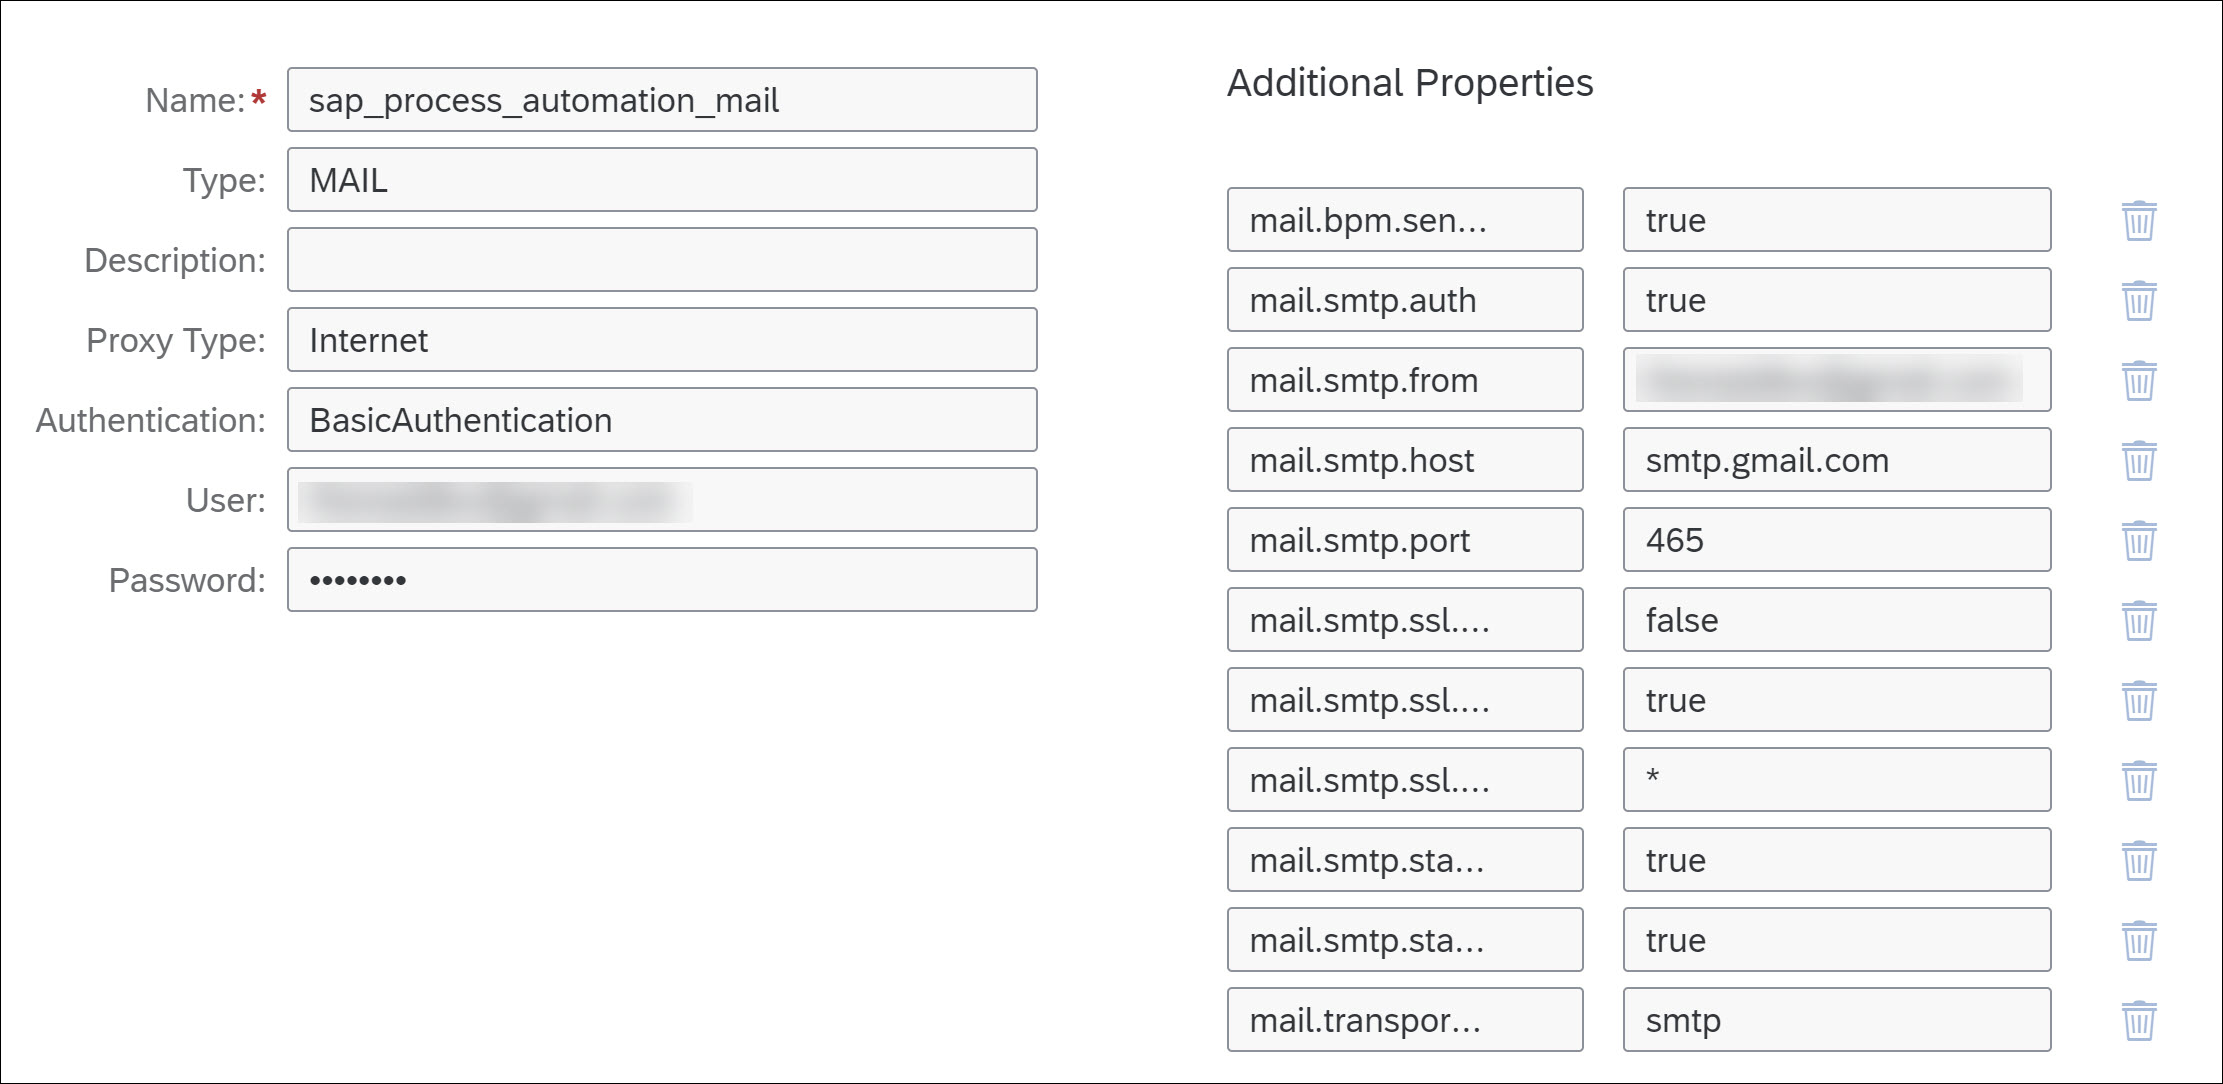
Once this is set, if you go back to SPA lobby, and then go to Settings > Mail Server, you will see the mail server. You do not have to do anything here.

Send mail
In short, the way it works is this:
You create an
Alert object in your project. All that this defines is the base text message, the severity, and any additional parameters you want to the automation to pass in during execution.

In your automation, you add a
Raise Alert activity. All you define here is the alert you just created, plus values for any parameters.

Finally, you need to create an
Alert Handler outside your project, in the
Settings > Alert Handlers area (I assume this is considered a task for admins who don't want developers of automations to send emails without their approval). Click
Add Alert Handler.

Specify the alert for which you want an alert handler.
I
MPORTANT: You will not see your alert here until you have deployed your automation. I learned that the hard way
😀.

Fill out the details of your email. Here you can use any parameters you sent from the automations, plus some built-in parameters.

Now you can run the automation and test the emails. But note that if you just run a test of your automation, it will not send the emails. You must submit the form that triggers your process, which then sets off the automation. I also learned this the hard way, after probably 20 tests
🙄.
Start the process, like this:

Don't test the automation, like this:

Add dynamic email addresses
The above, however, requires me to send the email to a fixed email address. But you can get email addresses from your automation, of API calls, and pass them to the alert handler.
Define a parameter in the alert for another email address.

In your
Raise Alert activity, specify the email address.

Finally, in your alert handler, add the passed parameter to the To field. The parameter will appear in the parameter dropdowns.

