
- SAP Community
- Products and Technology
- Technology
- Technology Blogs by SAP
- Adaptation Project: Freestyle SAPUI5 App - Adding ...
Technology Blogs by SAP
Learn how to extend and personalize SAP applications. Follow the SAP technology blog for insights into SAP BTP, ABAP, SAP Analytics Cloud, SAP HANA, and more.
Turn on suggestions
Auto-suggest helps you quickly narrow down your search results by suggesting possible matches as you type.
Showing results for
Advisor
Options
- Subscribe to RSS Feed
- Mark as New
- Mark as Read
- Bookmark
- Subscribe
- Printer Friendly Page
- Report Inappropriate Content
05-06-2022
8:49 AM
Introduction
After we have adapted an SAP Fiori elements application in my last blog post, today we are going to make changes to a freestyle SAPUI5 application. Before you proceed, please make sure you understand the different capabilities of SAPUI5 Flexibility by reading this blog.
We will start with a purchasing app and add a custom column to an existing table of products. This column will contain a link to a Google search for the corresponding product so that the end user can quickly access more information about it. Let’s briefly review how to create an Adaptation Project in SAP Business Application Studio and then implement the extension using Visual Editor.
Target Audience: Developers who want to compatibly adapt and extend existing freestyle applications by changing their appearance and/or functionality.
Creating the Adaptation Project and Starting the Visual Editor
SAP Business Application Studio is an SAP Business Technology Platform (BTP) service that offers a development environment optimized for business applications. Please refer to the sections Creating the Adaptation Project in SAP Business Application Studio and Working with the SAPUI5 Visual Editor in my last blog post and follow the steps described there. I named the project for this example OrderProducts.adapt. Once you are in the editor, you can proceed to the next section. The app we will be adapting originally looks like this:

Application before adaptation
Adding the XML Fragments
In this application, we are dealing with an sap.m.Table (Responsive Table). To learn about the structure of this table (or any other standard control) and to help you decide how to make your changes, you can check the SAPUI5 Samples and API Reference.
From the documentation, we learn that the column header (title) should be an extension of the columns aggregation on the table while the link itself should be added to each line of the table, using aggregation cells – which are bound to the table items (products). This way the column header will always be present and static while the link for each item will be dynamic (triggering the search for the corresponding product name).
Both the column and the cell will be new XML fragments on the application. To add a fragment, we need to make a change to an existing control. Let’s start with the column: In Edit mode, on the table and choose Add Fragment.

Add fragment to table
In the pop-up we need to select the Target Aggregation and the index (position in the aggregation) for the new fragment. In our example we use the Columns aggregation and the index 10 – so the column will be added at the end. We only see six columns in the screenshot – that’s because some columns are hidden. Click on Create New and choose a name for our fragment. Let’s call it MoreInformationColumn. This will create a new change on the /webapp/changes folder and a new file called MoreInformationColumn.fragment.xml in the /webapp/changes/fragments folder. Before we start modifying the XML, notice the comment on the first line: Use stable and unique IDs! When working with SAPUI5 Flexibility, it is very important to understand and use stable IDs. More details on the topic can be found here.
We already learned about internationalization and resource bundles in my previous blog post, so let’s create the XML fragment already with translatable texts. The MoreInformationColumn.fragment.xml file should look like this – the column properties were copied from the other columns in the table, so they all have the same appearance:
<core:FragmentDefinition xmlns:core='sap.ui.core' xmlns='sap.m'>

    <Column id="moreInformationColumn"

        width="12em"

        hAlign="Right"

        styleClass="sapRTSTOrdProdColumnProductTable"

        vAlign="Middle">

        <Text id="moreInformationColumnHeaderText" text="{i18n>MORE_INFORMATION_COLUMN_HEADER}" />

    </Column>

</core:FragmentDefinition>
Add the following lines to the /i18n/i18.properties file:
# More Information Column

MORE_INFORMATION_COLUMN_HEADER=More Info
Once the fragment is finalized, restart the Visual Editor to see the new column header. However, the content is still missing. Let’s take care of that next.
![]()
Application with new column
If we click on any of the line items on the table, all the items are selected. This is because we are selecting an aggregation binding – meaning the items are generated based on the underlying data. As our link should also be displayed on each line and refer to the item on that line, our next fragment should be added to this aggregation. Right-click on any line and select Add Fragment:
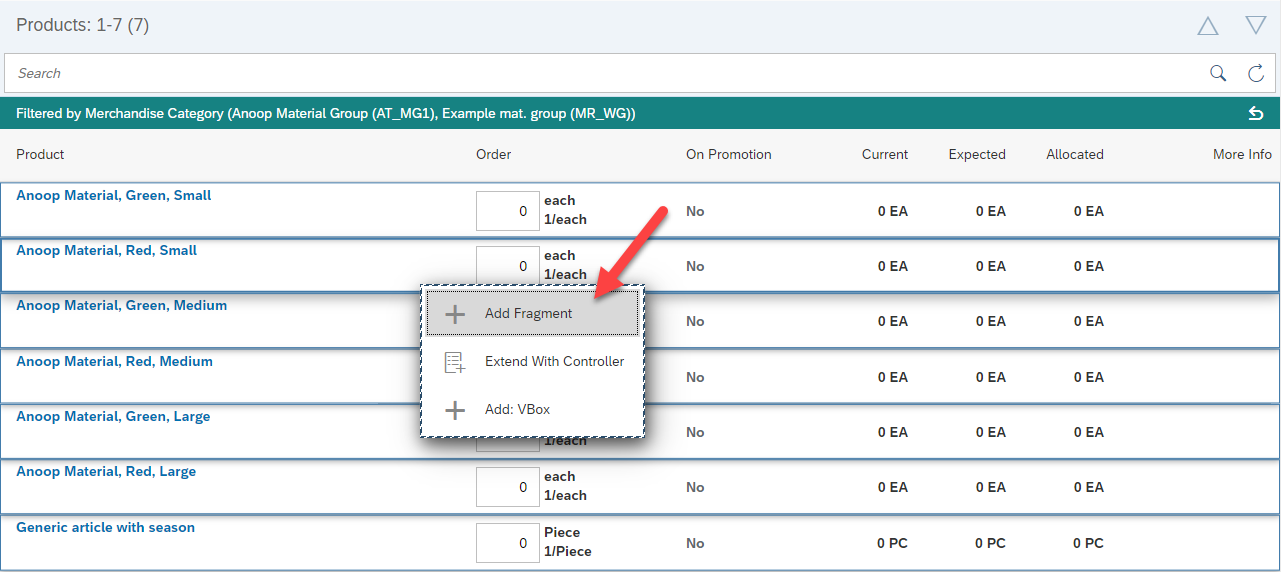
Add fragment to items
The proposed aggregation – cells – is the one we are looking for and the index should be the same which was chosen for the table (in our example, 10). Click on Create new – let’s call it SearchLink. This fragment is very simple – it only contains a link with a text.
<core:FragmentDefinition xmlns:core='sap.ui.core' xmlns='sap.m'>

    <Link id="searchLink" text="{i18n>SEARCH_LINK}"/>

</core:FragmentDefinition>
Add the following lines to the /i18n/i18.properties file:
# More Information Column

SEARCH_LINK=Search in Google
If we restart the Visual Editor, the line items will now contain links. If we click on them, nothing happens – because we still need to define their behavior. This is done using a Controller Extension.

Column with link
Add the Custom Controller Extension
On the editor, right-click on the view and select Extend with Controller. We enter a name for our controller and choose Extend.

Adding a controller extension
For this example, let’s use SearchLinkImplementation. The file will be created in the /webapp/changes/coding/ folder. The editor will open it automatically. The controller extension is created with guidelines to support with the implementation. For the sake of brevity, these comments have been removed in the example below, leaving only the code necessary for our functionality:
sap.ui.define([

    'sap/ui/core/mvc/ControllerExtension',

    'sap/m/library'

    ],

    function (

        ControllerExtension,

        mobileLibrary

    ) {

        "use strict";

        return ControllerExtension.extend("OrderProducts.adapt.SearchLinkImplementation", {

            handleLinkPress: function(oEvent) {

                var oClickedLink = oEvent.oSource;

                var oBindingContext = oClickedLink.getBindingContext();

                var sProductName = oBindingContext.getObject().ProductName;

                var sTargetURL = "https://www.google.com/search?q=" + sProductName;

                var oURLHelper = mobileLibrary.URLHelper;

                oURLHelper.redirect(sTargetURL, /*bNewWindow =*/ true);

            }

        });

    });
We want the link to trigger a custom function that opens a search link with the product name in a new tab. From the sap.m.Link API documentation, we find that the event for clicking on the link is called “press”. We can declare an event handler for it in the controller extension. The event handler receives the event as a parameter and we can use it to retrieve the exact control that was clicked (oClickedLink).
Now we want to retrieve the product name, which is coming from the data bound to the items. As the link is part of a binding template, we can use getBindingContext() to retrieve information about it. With the binding context, call getObject() to get the actual data item related to the link and finally read the ProductName property.
Now that we have the product name, we can focus on triggering the search. To handle the opening of the Google search link in another tab, we will use the URLHelper control (API reference) from the sap.m library. The target URL is built using the product name previously retrieved and we can finally call the redirect method to open the URL. If the second parameter is “true”, it opens in a new window.
The last step is to connect the link control to this event handler. This is done on the XML fragment. The fragment needs to know where to look for the function, so we must make sure that the path is prefixed with “.extension.” and the namespace of the controller (as described in the documentation😞
<core:FragmentDefinition xmlns:core='sap.ui.core' xmlns='sap.m'>

    <Link id="searchLink" text="{i18n>SEARCH_LINK}" press=".extension.OriginalOrderProducts.adapt.SearchLinkImplementation.handleLinkPress"/>

</core:FragmentDefinition>
And we are done! If we reload the application and click on a link, a new tab will open with a Google search for the product name. If you have difficulties, you can find more information about testing applications and debugging inside the Visual Editor in my previous blog post.
Wrap Up and Further Steps
In this article we went through another simple example of an extension done using Adaptation Project, this time for a freestyle application. Don’t forget to check the other available tutorials and courses provided by SAP and keep an eye on this blog as we will be updating with further resources as soon as they are available.
I would like to thank storkd, hristotsolev, mikhail.benderskiy and oelchen for helping prepare and review the content of this post.
We would love to hear from you! Please leave your feedback below – and let us know which topic you’d like to see next.
- SAP Managed Tags:
- SAP Business Application Studio,
- SAP Fiori,
- SAPUI5,
- SAP Fiori for SAP S/4HANA,
- SAP S/4HANA
Labels:
19 Comments
You must be a registered user to add a comment. If you've already registered, sign in. Otherwise, register and sign in.
Labels in this area
-
ABAP CDS Views - CDC (Change Data Capture)
2 -
AI
1 -
Analyze Workload Data
1 -
BTP
1 -
Business and IT Integration
2 -
Business application stu
1 -
Business Technology Platform
1 -
Business Trends
1,658 -
Business Trends
108 -
CAP
1 -
cf
1 -
Cloud Foundry
1 -
Confluent
1 -
Customer COE Basics and Fundamentals
1 -
Customer COE Latest and Greatest
3 -
Customer Data Browser app
1 -
Data Analysis Tool
1 -
data migration
1 -
data transfer
1 -
Datasphere
2 -
Event Information
1,400 -
Event Information
73 -
Expert
1 -
Expert Insights
177 -
Expert Insights
345 -
General
1 -
Google cloud
1 -
Google Next'24
1 -
GraphQL
1 -
Kafka
1 -
Life at SAP
780 -
Life at SAP
14 -
Migrate your Data App
1 -
MTA
1 -
Network Performance Analysis
1 -
NodeJS
1 -
PDF
1 -
POC
1 -
Product Updates
4,575 -
Product Updates
387 -
Replication Flow
1 -
REST API
1 -
RisewithSAP
1 -
SAP BTP
1 -
SAP BTP Cloud Foundry
1 -
SAP Cloud ALM
1 -
SAP Cloud Application Programming Model
1 -
SAP Datasphere
2 -
SAP S4HANA Cloud
1 -
SAP S4HANA Migration Cockpit
1 -
Technology Updates
6,871 -
Technology Updates
478 -
Workload Fluctuations
1
Related Content
- VS Code SAPUI5 Adaptation project error - Request failed with status code 401 in Technology Q&A
- Controller Replacement in Fiori Adaptation Project in Technology Q&A
- Digital Twins of an Organization: why worth it and why now in Technology Blogs by SAP
- Changes are not visible in the MyInbox fiori app after extending it using adapation project in Technology Q&A
- Adaptation Project: Add arbitrary fields and controller logic in Technology Q&A
Top kudoed authors
| User | Count |
|---|---|
| 17 | |
| 15 | |
| 13 | |
| 11 | |
| 9 | |
| 8 | |
| 7 | |
| 7 | |
| 7 | |
| 7 |