
- SAP Community
- Products and Technology
- Technology
- Technology Blogs by SAP
- Creating entity relationship through CDS Graphical...
Technology Blogs by SAP
Learn how to extend and personalize SAP applications. Follow the SAP technology blog for insights into SAP BTP, ABAP, SAP Analytics Cloud, SAP HANA, and more.
Turn on suggestions
Auto-suggest helps you quickly narrow down your search results by suggesting possible matches as you type.
Showing results for
Advisor
Options
- Subscribe to RSS Feed
- Mark as New
- Mark as Read
- Bookmark
- Subscribe
- Printer Friendly Page
- Report Inappropriate Content
05-03-2022
3:34 AM
In this blog post, we'll demonstrate how to create entity relationships for CDS models by using the CDS Graphical Modeler for Visual Studio Code.
CDS Graphical Modeler is now available on Visual Studio Code as well, and if you want to use the modeler in VSCODE platform you can download and install the modeler extension from https://marketplace.visualstudio.com/items?itemName=SAPSE.vscode-wing-cds-editor-vsc. For more details please refer to the previous blog post at https://blogs.sap.com/2022/04/29/an-introduction-to-cds-graphical-modeler-for-visual-studio-code/.
Previouslly I wrote a blog post about how to create entity relationships by using the CDS modeler for SAP Business Application Studio at https://blogs.sap.com/2021/04/08/cds-entity-relationship-modeling-using-cds-graphical-modeler/. Now we have a new way of creating entity relationships much more easily by just using simple drag and drop, which offers the developer better productivity in creating complex entity relationships very quickly even for complex CDS models.
Supposed we have below CDS model for espm:
We now want to create the entity relationships among those entities using the CDS modeler. Open the CDS file using CDS Graphical Modeler for Visual Studio Code:
Now if we want to create a to-many association relationship from the Customers entity to the Orders entity, click the Customers entity and select "Add Relationship" context menu:
You will see a pointer line that moves along with your mouse pointer:
Move the line end point to the target Orders entity and release your mouse:
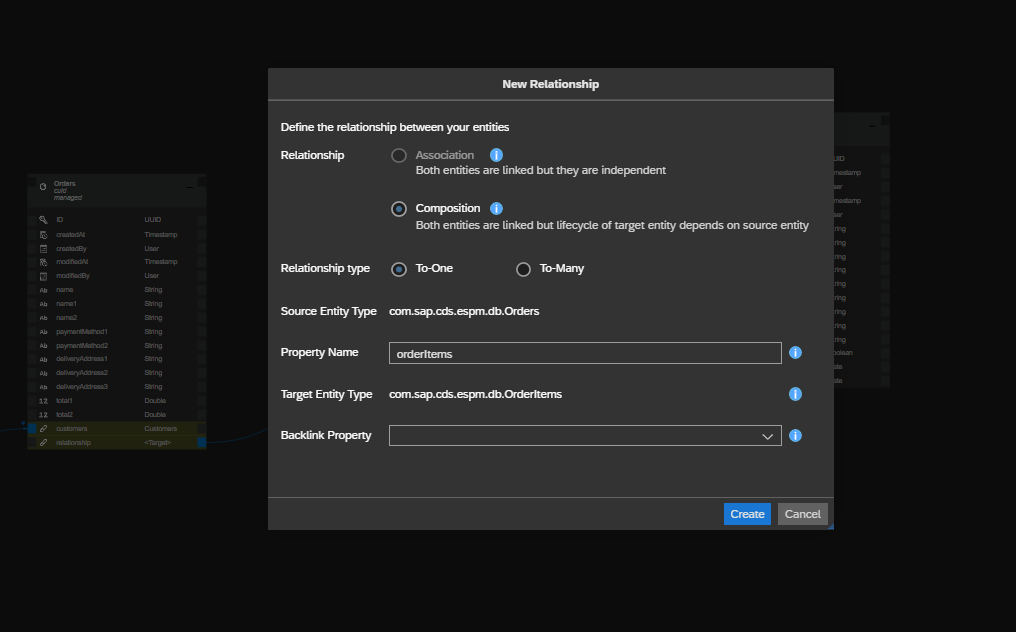
The relationship dialog shows up:
Change the "Relationship type" to "To-Many", you will notice that a backlink property is automatically filled:
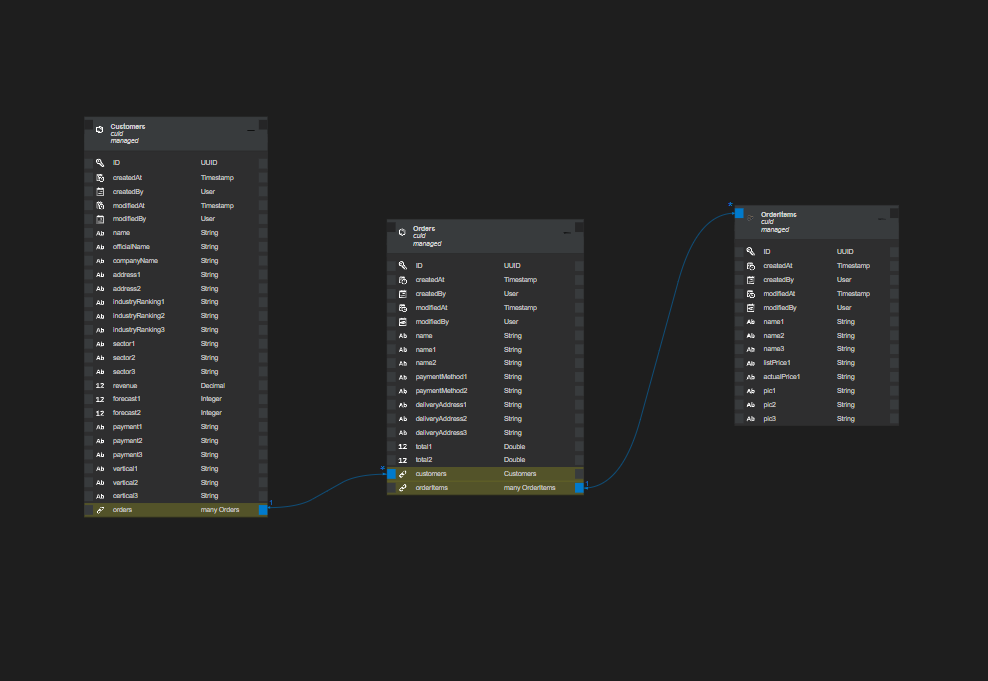
Click "Create" button to dismiss the dialog, you will see the relationship has been created between the Customers entity and the Orders entity:
Checking the CDS file content you will see the corresponding associations have been created as well:
Now we want to create a to-many composition from the Orders to the OrderItems entity:
and the relationship dialog pops up:
Since the OrderItems is an aspect, so the only relationship that is allowed here is Composition. change the relationship type to "To-Many":
Click "Create" button to close the dialog, and you will see the relationship has been created between the Orders and OrderItems:
We can also verify that by checking the CDS file content:
Now let's create a to-one managed association from the OrderItems to Products entity:
Keep everything default and click "Create" button to dismiss the dialog, and the relationship is setup:
If we want to keep some of the product detail information to a separate ProductDetails entity to keep the Products entity clean, we need to setup a bi-directional association relationship between the 2 entities. First try to create a to-one managed association from the ProductDetails entity to the Products entity:
In the popped up relationship dialog as below, leave everything as default:
Click "Create" button to finish the relationship setup:
Now make the relationship bi-directional so that we can navigate from the Products to ProductDetails by creating a to-one association from the Products entity to the ProductDetails:
In the relationship dialog, keep everything as default:
Click "Create" button to finish the relationship setup:
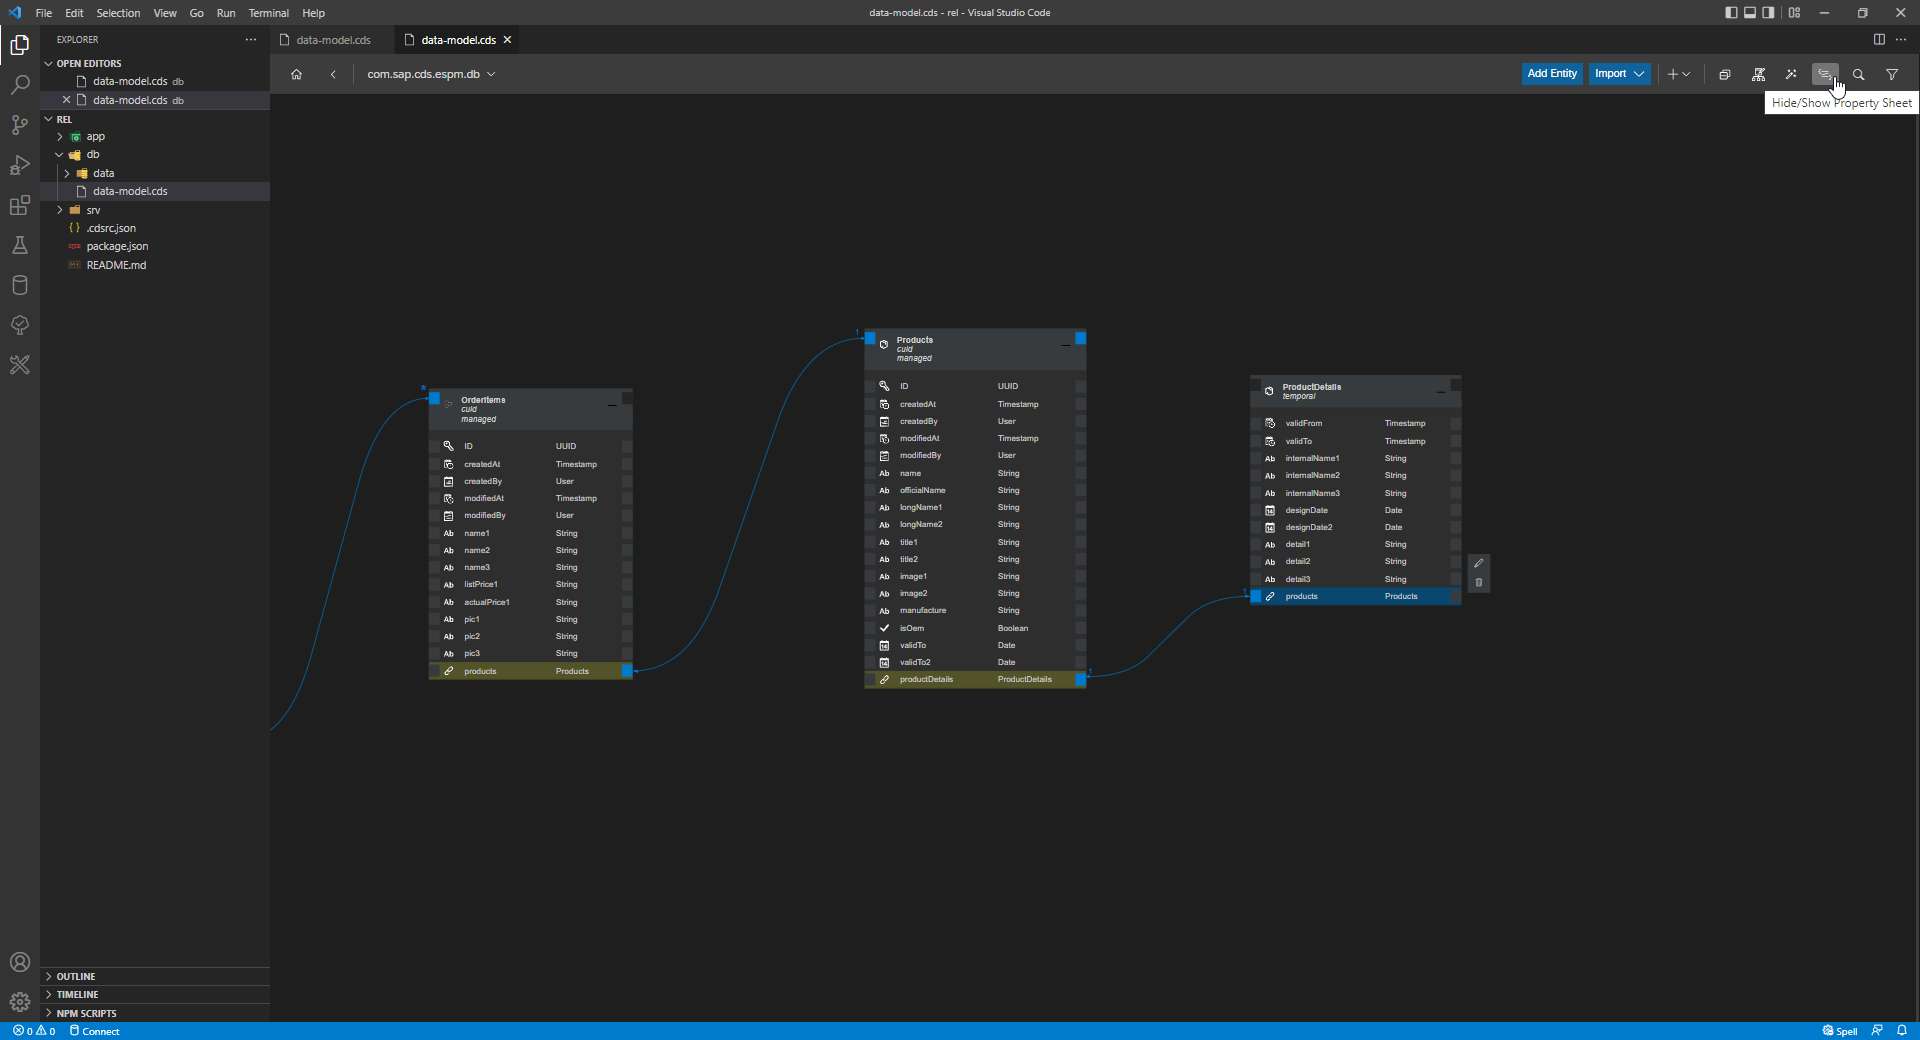
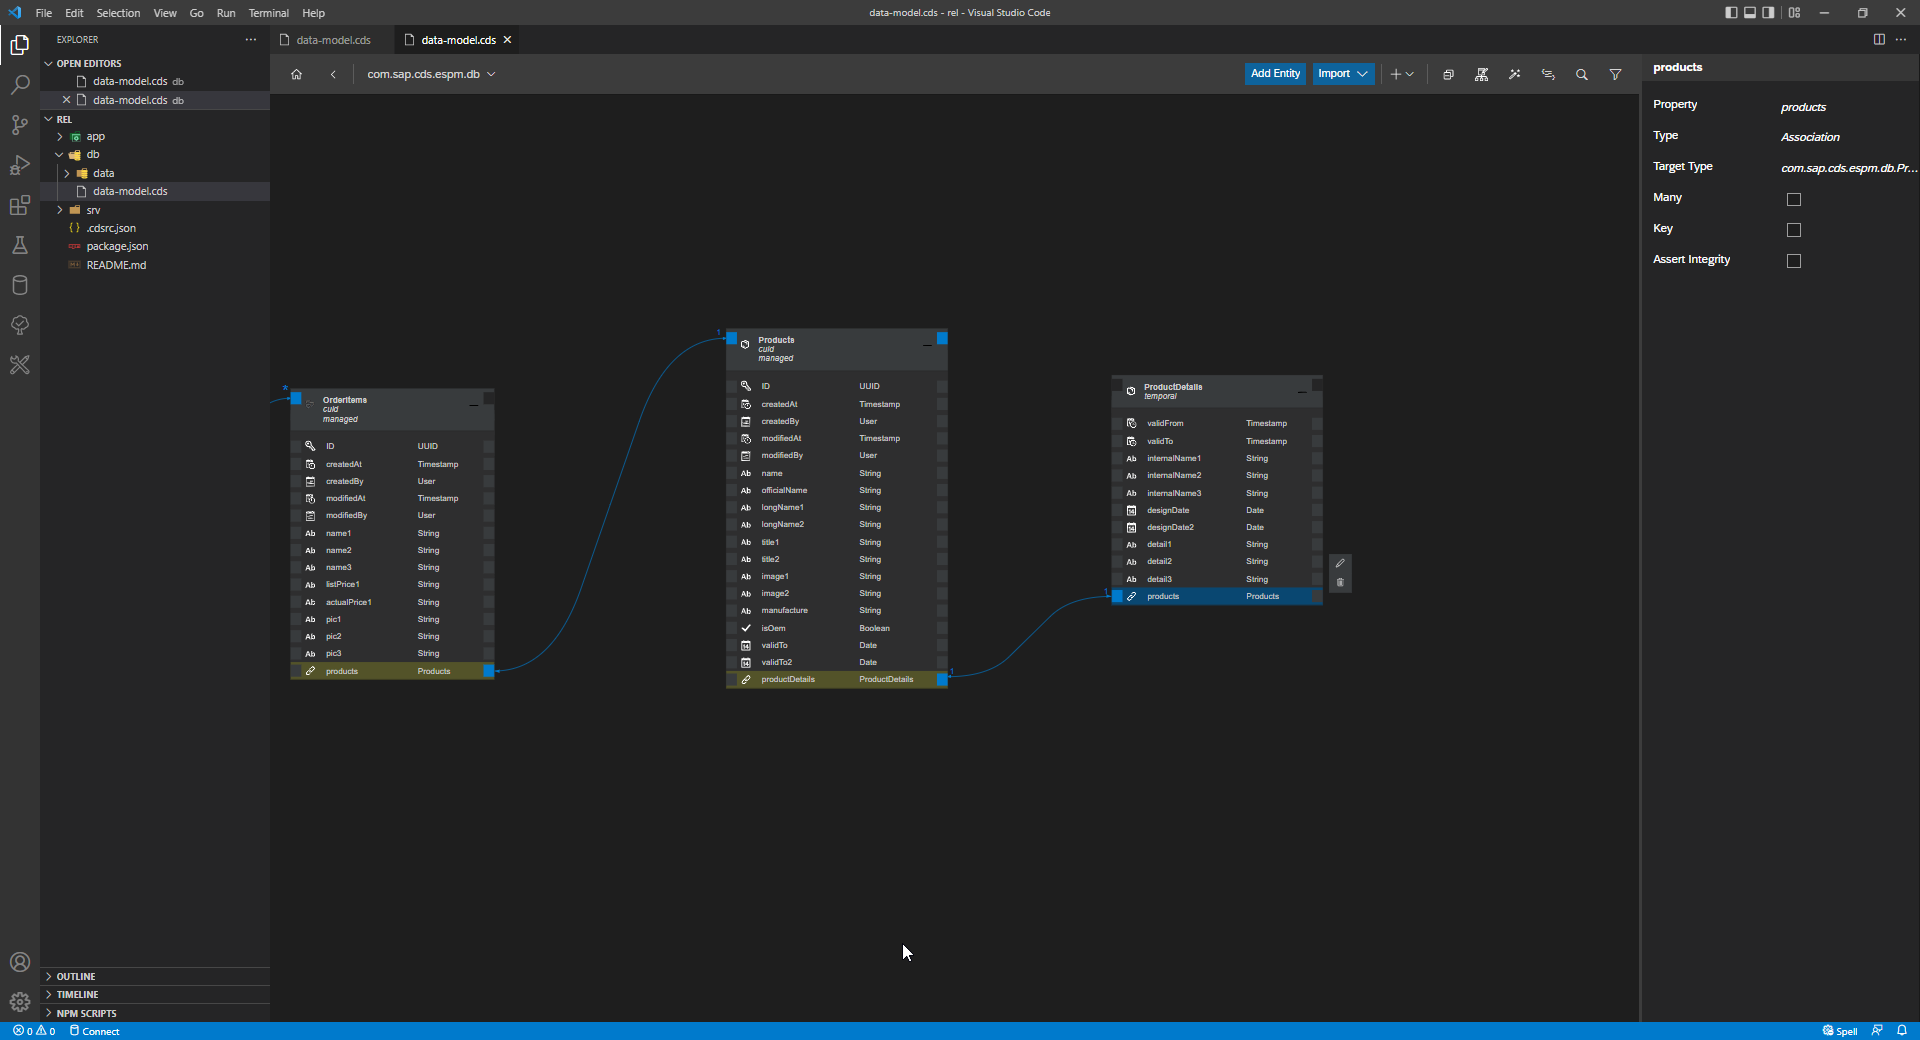
The last thing we want to do is to make the "products" association in the ProductDetails entity the key property. Click the "products" property and click "Hide/Show Property Sheet" toolbar button:
You will see the property sheet has shown up:
Check the "Key" checkbox and notice the products to-one managed association has now become the key property for the entity:
Now the entire relationships for the CDS model have been successfully by using the CDS Graphical Modeler:
In the blog post, we have demonstrated how to create entity relationships for CDS models through drag and drop together with the relationship dialog very easily by using the CDS Graphical Modeler for Visual Studio Code.
CDS entity relationship modeling using CDS Graphical Modeler
An introduction to CDS Graphical Modeler for Visual Studio Code
CDS Entity Relationship Modeling using CDS modeler for VSCODE
CDS Graphical Modeler is now available on Visual Studio Code as well, and if you want to use the modeler in VSCODE platform you can download and install the modeler extension from https://marketplace.visualstudio.com/items?itemName=SAPSE.vscode-wing-cds-editor-vsc. For more details please refer to the previous blog post at https://blogs.sap.com/2022/04/29/an-introduction-to-cds-graphical-modeler-for-visual-studio-code/.
Previouslly I wrote a blog post about how to create entity relationships by using the CDS modeler for SAP Business Application Studio at https://blogs.sap.com/2021/04/08/cds-entity-relationship-modeling-using-cds-graphical-modeler/. Now we have a new way of creating entity relationships much more easily by just using simple drag and drop, which offers the developer better productivity in creating complex entity relationships very quickly even for complex CDS models.
Supposed we have below CDS model for espm:
namespace com.sap.cds.espm.db;


using

{

    cuid,

    managed,

    temporal

}

from '@sap/cds/common';


entity Customers : cuid, managed

{

    name : String;

    officialName : String;

    companyName : String;

    address1 : String;

    address2 : String;

    industryRanking1 : String;

    industryRanking2 : String;

    industryRanking3 : String;

    sector1 : String;

    sector2 : String;

    sector3 : String;

    revenue : Decimal;

    forecast1 : Integer;

    forecast2 : Integer;

    payment1 : String;

    payment2 : String;

    payment3 : String;

    vertical1 : String;

    vertical2 : String;

    certical3 : String;

}


entity Orders : cuid, managed

{

    name : String;

    name1 : String;

    name2 : String;

    paymentMethod1 : String;

    paymentMethod2 : String;

    deliveryAddress1 : String;

    deliveryAddress2 : String;

    deliveryAddress3 : String;

    total1 : Double;

    total2 : Double;

}


aspect OrderItems : cuid, managed

{

    name1 : String;

    name2 : String;

    name3 : String;

    listPrice1 : String;

    actualPrice1 : String;

    pic1 : String;

    pic2 : String;

    pic3 : String;

}


entity Products : cuid, managed

{

    name : String;

    officialName : String;

    longName1 : String;

    longName2 : String;

    title1 : String;

    title2 : String;

    image1 : String;

    image2 : String;

    manufacture : String;

    isOem : Boolean;

    validTo : Date;

    validTo2 : Date;

}


entity ProductDetails : temporal

{

    internalName1 : String;

    internalName2 : String;

    internalName3 : String;

    designDate : Date;

    designDate2 : Date;

    detail1 : String;

    detail2 : String;

    detail3 : String;

}
We now want to create the entity relationships among those entities using the CDS modeler. Open the CDS file using CDS Graphical Modeler for Visual Studio Code:


Now if we want to create a to-many association relationship from the Customers entity to the Orders entity, click the Customers entity and select "Add Relationship" context menu:

You will see a pointer line that moves along with your mouse pointer:

Move the line end point to the target Orders entity and release your mouse:

The relationship dialog shows up:

Change the "Relationship type" to "To-Many", you will notice that a backlink property is automatically filled:

Click "Create" button to dismiss the dialog, you will see the relationship has been created between the Customers entity and the Orders entity:

Checking the CDS file content you will see the corresponding associations have been created as well:
entity Customers : cuid, managed

{

    name : String;

    officialName : String;

    companyName : String;

    address1 : String;

    address2 : String;

    industryRanking1 : String;

    industryRanking2 : String;

    industryRanking3 : String;

    sector1 : String;

    sector2 : String;

    sector3 : String;

    revenue : Decimal;

    forecast1 : Integer;

    forecast2 : Integer;

    payment1 : String;

    payment2 : String;

    payment3 : String;

    vertical1 : String;

    vertical2 : String;

    certical3 : String;

    orders : Association to many Orders on orders.customers = $self;

}


entity Orders : cuid, managed

{

    name : String;

    name1 : String;

    name2 : String;

    paymentMethod1 : String;

    paymentMethod2 : String;

    deliveryAddress1 : String;

    deliveryAddress2 : String;

    deliveryAddress3 : String;

    total1 : Double;

    total2 : Double;

    customers : Association to one Customers;

}
Now we want to create a to-many composition from the Orders to the OrderItems entity:

and the relationship dialog pops up:
Since the OrderItems is an aspect, so the only relationship that is allowed here is Composition. change the relationship type to "To-Many":

Click "Create" button to close the dialog, and you will see the relationship has been created between the Orders and OrderItems:
We can also verify that by checking the CDS file content:
entity Orders : cuid, managed

{

    name : String;

    name1 : String;

    name2 : String;

    paymentMethod1 : String;

    paymentMethod2 : String;

    deliveryAddress1 : String;

    deliveryAddress2 : String;

    deliveryAddress3 : String;

    total1 : Double;

    total2 : Double;

    customers : Association to one Customers;

    orderItems : Composition of many OrderItems;

}


aspect OrderItems : cuid, managed

{

    name1 : String;

    name2 : String;

    name3 : String;

    listPrice1 : String;

    actualPrice1 : String;

    pic1 : String;

    pic2 : String;

    pic3 : String;

}
Now let's create a to-one managed association from the OrderItems to Products entity:

Keep everything default and click "Create" button to dismiss the dialog, and the relationship is setup:

If we want to keep some of the product detail information to a separate ProductDetails entity to keep the Products entity clean, we need to setup a bi-directional association relationship between the 2 entities. First try to create a to-one managed association from the ProductDetails entity to the Products entity:

In the popped up relationship dialog as below, leave everything as default:

Click "Create" button to finish the relationship setup:

Now make the relationship bi-directional so that we can navigate from the Products to ProductDetails by creating a to-one association from the Products entity to the ProductDetails:

In the relationship dialog, keep everything as default:

Click "Create" button to finish the relationship setup:

The last thing we want to do is to make the "products" association in the ProductDetails entity the key property. Click the "products" property and click "Hide/Show Property Sheet" toolbar button:
You will see the property sheet has shown up:
Check the "Key" checkbox and notice the products to-one managed association has now become the key property for the entity:

Now the entire relationships for the CDS model have been successfully by using the CDS Graphical Modeler:

Conclusion
In the blog post, we have demonstrated how to create entity relationships for CDS models through drag and drop together with the relationship dialog very easily by using the CDS Graphical Modeler for Visual Studio Code.
References
CDS entity relationship modeling using CDS Graphical Modeler
An introduction to CDS Graphical Modeler for Visual Studio Code
- SAP Managed Tags:
- SAP Cloud Application Programming Model,
- OData,
- SAP Business Technology Platform
Labels:
1 Comment
You must be a registered user to add a comment. If you've already registered, sign in. Otherwise, register and sign in.
Labels in this area
-
ABAP CDS Views - CDC (Change Data Capture)
2 -
AI
1 -
Analyze Workload Data
1 -
BTP
1 -
Business and IT Integration
2 -
Business application stu
1 -
Business Technology Platform
1 -
Business Trends
1,661 -
Business Trends
88 -
CAP
1 -
cf
1 -
Cloud Foundry
1 -
Confluent
1 -
Customer COE Basics and Fundamentals
1 -
Customer COE Latest and Greatest
3 -
Customer Data Browser app
1 -
Data Analysis Tool
1 -
data migration
1 -
data transfer
1 -
Datasphere
2 -
Event Information
1,400 -
Event Information
65 -
Expert
1 -
Expert Insights
178 -
Expert Insights
284 -
General
1 -
Google cloud
1 -
Google Next'24
1 -
Kafka
1 -
Life at SAP
784 -
Life at SAP
11 -
Migrate your Data App
1 -
MTA
1 -
Network Performance Analysis
1 -
NodeJS
1 -
PDF
1 -
POC
1 -
Product Updates
4,577 -
Product Updates
330 -
Replication Flow
1 -
RisewithSAP
1 -
SAP BTP
1 -
SAP BTP Cloud Foundry
1 -
SAP Cloud ALM
1 -
SAP Cloud Application Programming Model
1 -
SAP Datasphere
2 -
SAP S4HANA Cloud
1 -
SAP S4HANA Migration Cockpit
1 -
Technology Updates
6,886 -
Technology Updates
410 -
Workload Fluctuations
1
Related Content
- ABAP RAP - Behavior Projection and Implementation Class in Technology Q&A
- Partner-2-Partner Collaboration in Manufacturing in Technology Blogs by SAP
- SAP Build Code - Speed up your development with Generative AI Assistant - Joule in Technology Blogs by SAP
- SAP Datasphere is ready to take over the role of SAP BW in Technology Blogs by SAP
- SAP Datasphere: Using Variable derivation for currency conversion measures within Analytic Model in Technology Blogs by SAP
Top kudoed authors
| User | Count |
|---|---|
| 15 | |
| 12 | |
| 10 | |
| 10 | |
| 9 | |
| 7 | |
| 6 | |
| 5 | |
| 5 | |
| 5 |