
- SAP Community
- Products and Technology
- Technology
- Technology Blogs by SAP
- Control a Google Map with Chatbot Client APIs
Technology Blogs by SAP
Learn how to extend and personalize SAP applications. Follow the SAP technology blog for insights into SAP BTP, ABAP, SAP Analytics Cloud, SAP HANA, and more.
Turn on suggestions
Auto-suggest helps you quickly narrow down your search results by suggesting possible matches as you type.
Showing results for
Developer Advocate
Options
- Subscribe to RSS Feed
- Mark as New
- Mark as Read
- Bookmark
- Subscribe
- Printer Friendly Page
- Report Inappropriate Content
04-12-2022
10:28 AM
Since SAP Conversational AI introduced the speech-to-text client API, it's worth taking a look at all the ways you can control your chatbot from the client side.
You can:
At the end of the blog post, you'll see how I can control a Google Map in a web page via a chatbot.
There is also a related capability that let's the chatbot send data to the Web Client, and therefore to your app, via a "client data" message that sends data but does not display it in the chatbot. That is also explained below.
The Web Client APIs come automatically when you add your Web Client script to your web application. All the APIs are in the object:
So as a demo example, in an SAPUI5 app, I can add a input field and button:
And add an event listener to open the chatbot and send a message to the chatbot, for example, to provide help via an FAQ bot, or start a conversation based on something happening in the app:
For the
To use the Web Client Bridge APIs, you must create callback functions in the object:
For example, I intercepted the text "SENDING AVATAR" from the chatbot, which told me to load an image in the app:
I could have implemented this particular feature with the Client Data message (see next section).
The following is based on a blog post by timothy.janssen where he implemented a way to control an app via the chatbot, but was written before the Client Data was available: https://blogs.sap.com/2018/12/17/how-to-control-your-web-application-with-an-integrated-ai-bot/
And then define the data I want to send as JSON, most likely using some scripting. Here I send an action name and the coordinates from the location entity.
In the app, I can intercept the messages – the same as any message as explained above with the standard Web Client Bridge API. But now I check if it is a Client Data message, and if so, I can get the data.
The data is provided in an array called
Here is how the application works: The map starts in the middle of Australia, zoomed out (I assume that's the default example they give with the Google Maps API).
I can say "move to" and the map will move.
I can say "zoom in 4" and the map will zoom in.
For more details on how the chatbot works, you can see the original blog by timothy.janssen
You can:
- Add a button to open and close the Web Client.
- Let your app send a message to the chatbot
- Provide your chatbot with client information from the app
- Change the appearance or the titles of the buttons or the intro text, based on which app is hosting your chatbot
- Let your app intercept messages, either from the user or from the chatbot, and update the app based on the conversation
- Update the memory of the chatbot, which can completely change the flow of the conversation
At the end of the blog post, you'll see how I can control a Google Map in a web page via a chatbot.
| The formal documentation for all the Web Client APIs is available in GitHub, plus a new tutorial, Let Your Web App Interact with Your Chatbot. |
There is also a related capability that let's the chatbot send data to the Web Client, and therefore to your app, via a "client data" message that sends data but does not display it in the chatbot. That is also explained below.
How Web Client APIs work
The Web Client APIs come automatically when you add your Web Client script to your web application. All the APIs are in the object:
window.sap.cai.webclientSo as a demo example, in an SAPUI5 app, I can add a input field and button:

And add an event listener to open the chatbot and send a message to the chatbot, for example, to provide help via an FAQ bot, or start a conversation based on something happening in the app:
onPressMessage: function (evt) {

    var oView = this.getView(),

        myinput = oView.byId("messageText");

    window.sao.cai.webclient.show();

    window.sap.cai.webclient.sendMessage(myinput.getValue());

},
For the
setTheme method, you will need to supply the formal theme name (e.g., sap_belize). I created a data model so I could load the themes in a Select box for the user. I believe the below list are supported, but there may be more and, of course, it will likely change over time.var themes = {
"themes": [
{
"name": "SAP Belize",
"theme": "sap_belize"
},
{
"name": "SAP Belize High Contrast Black",
"theme": "sap_belize_hcb"
},
{
"name": "SAP Belize High Contrast White",
"theme": "sap_belize_hcw"
},
{
"name": "SAP Quartz",
"theme": "sap_fiori_3"
},
{
"name": "SAP Quartz Dark",
"theme": "sap_fiori_3_dark"
},
{
"name": "SAP Quartz High Contrast White",
"theme": "sap_fiori_3_hcw"
},
{
"name": "SAP Quartz High Contrast Black",
"theme": "sap_fiori_3_hcb"
},
{
"name": "SAP Horizon",
"theme": "sap_horizon"
},
{
"name": "SAP Horizon Experimental",
"theme": "sap_horizon_exp"
}
]
};
var oModel = new JSONModel(themes);
this.getView().setModel(oModel, "themes");How Web Client Bridge APIs work
To use the Web Client Bridge APIs, you must create callback functions in the object:
window.sapcai.webclientBridgeFor example, I intercepted the text "SENDING AVATAR" from the chatbot, which told me to load an image in the app:
const webclientBridge = {


  onMessage: (payload) => {

    payload.messages.forEach(element => {

      if (element.participant.isBot) {

        if (element.attachment.content.text.startsWith("SENDING AVATAR")) {

          profile = element.attachment.content.text.substring(19);

          window.sapcai.webclientBridge.imageeditor.setSrc("https://avatars.services.sap.com/images/" + profile + ".png")

        }

      }

    });

  },

}


window.sapcai = {

    webclientBridge,

}
I could have implemented this particular feature with the Client Data message (see next section).
How Client Data message works
The following is based on a blog post by timothy.janssen where he implemented a way to control an app via the chatbot, but was written before the Client Data was available: https://blogs.sap.com/2018/12/17/how-to-control-your-web-application-with-an-integrated-ai-bot/
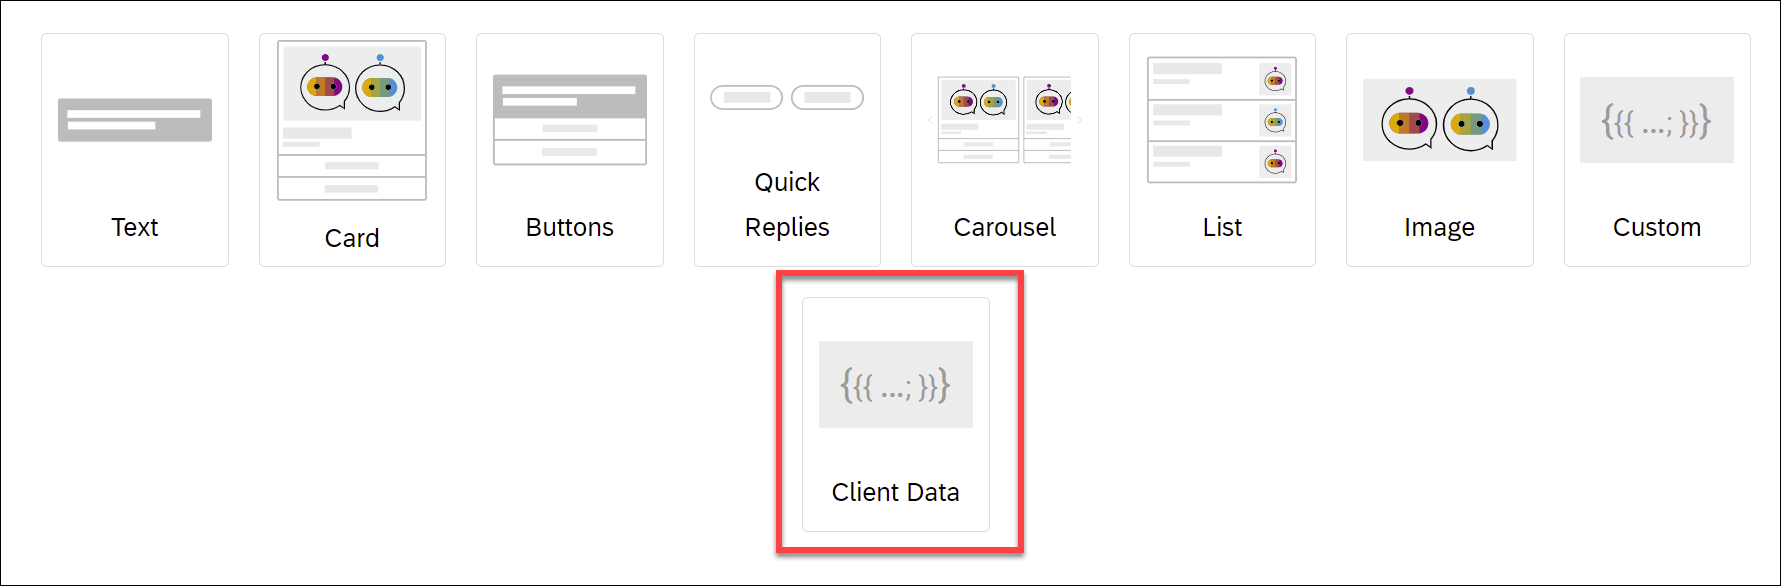
In my skill, when I'm ready to send data to my app, I can create a Client Data message:
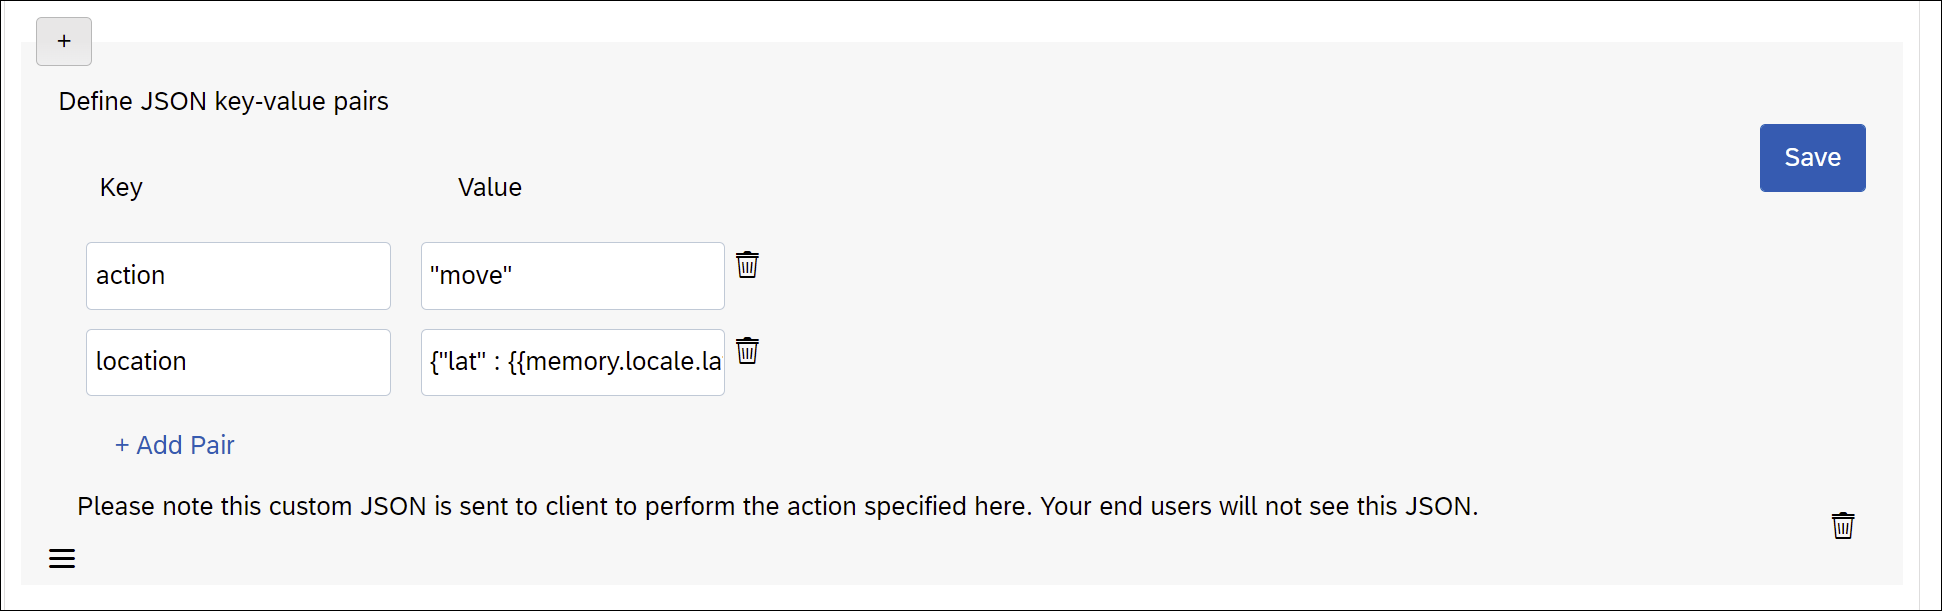
And then define the data I want to send as JSON, most likely using some scripting. Here I send an action name and the coordinates from the location entity.
In the app, I can intercept the messages – the same as any message as explained above with the standard Web Client Bridge API. But now I check if it is a Client Data message, and if so, I can get the data.
The data is provided in an array called
elements, in the order they were sent.onMessage: (payload) => {
payload.messages.map(message => {
if (message.attachment.type == 'client_data') {
let action = message.attachment.content.elements[0].value
if (action == "zoom") {
zoom(message.attachment.content.elements[1].value);
} else if (action == "move") {
let location = message.attachment.content.elements[1].value
setCenter(location.lat, location.lng);
}
}
});
}zoom and setCenter are methods that encapsulate a call to the Google Maps API.Here is how the application works: The map starts in the middle of Australia, zoomed out (I assume that's the default example they give with the Google Maps API).

I can say "move to" and the map will move.
I can say "zoom in 4" and the map will zoom in.

For more details on how the chatbot works, you can see the original blog by timothy.janssen
Labels:
2 Comments
You must be a registered user to add a comment. If you've already registered, sign in. Otherwise, register and sign in.
Labels in this area
-
ABAP CDS Views - CDC (Change Data Capture)
2 -
AI
1 -
Analyze Workload Data
1 -
BTP
1 -
Business and IT Integration
2 -
Business application stu
1 -
Business Technology Platform
1 -
Business Trends
1,661 -
Business Trends
87 -
CAP
1 -
cf
1 -
Cloud Foundry
1 -
Confluent
1 -
Customer COE Basics and Fundamentals
1 -
Customer COE Latest and Greatest
3 -
Customer Data Browser app
1 -
Data Analysis Tool
1 -
data migration
1 -
data transfer
1 -
Datasphere
2 -
Event Information
1,400 -
Event Information
64 -
Expert
1 -
Expert Insights
178 -
Expert Insights
272 -
General
1 -
Google cloud
1 -
Google Next'24
1 -
Kafka
1 -
Life at SAP
784 -
Life at SAP
11 -
Migrate your Data App
1 -
MTA
1 -
Network Performance Analysis
1 -
NodeJS
1 -
PDF
1 -
POC
1 -
Product Updates
4,578 -
Product Updates
323 -
Replication Flow
1 -
RisewithSAP
1 -
SAP BTP
1 -
SAP BTP Cloud Foundry
1 -
SAP Cloud ALM
1 -
SAP Cloud Application Programming Model
1 -
SAP Datasphere
2 -
SAP S4HANA Cloud
1 -
SAP S4HANA Migration Cockpit
1 -
Technology Updates
6,886 -
Technology Updates
397 -
Workload Fluctuations
1
Related Content
- Top Picks: Innovations Highlights from SAP Business Technology Platform (Q1/2024) in Technology Blogs by SAP
- Upload Excel using SAP RAP Only in Technology Blogs by Members
- Consume Ariba APIs using Postman in Technology Blogs by SAP
- Harnessing the Power of SAP HANA Cloud Vector Engine for Context-Aware LLM Architecture in Technology Blogs by SAP
- Part 4 - SAP MDG – A Stepping Stone for SAP S/4HANA Journey in Technology Blogs by Members
Top kudoed authors
| User | Count |
|---|---|
| 11 | |
| 11 | |
| 10 | |
| 9 | |
| 7 | |
| 7 | |
| 7 | |
| 7 | |
| 6 | |
| 5 |