
- SAP Community
- Products and Technology
- Technology
- Technology Blogs by SAP
- Consuming SOAP Web Services in SAP Cloud Applicati...
Technology Blogs by SAP
Learn how to extend and personalize SAP applications. Follow the SAP technology blog for insights into SAP BTP, ABAP, SAP Analytics Cloud, SAP HANA, and more.
Turn on suggestions
Auto-suggest helps you quickly narrow down your search results by suggesting possible matches as you type.
Showing results for
Product and Topic Expert
Options
- Subscribe to RSS Feed
- Mark as New
- Mark as Read
- Bookmark
- Subscribe
- Printer Friendly Page
- Report Inappropriate Content
04-11-2022
10:35 PM
NOTE: this blog post is intended for developers who have previous experience in developing CAP applications which consume either OData or REST APIs using SAP Business Application Studio and SAP BTP destinations, as well as handling communication scenarios and communication arrangements in S/4HANA Cloud.
You may have realized that most modern cloud applications are built to interact with other external solutions via OData and/or REST APIs (and you may have already done it yourself in several opportunities). But, there are some solutions that still do not offer 100% of services as OData or REST, providing some interfaces via SOAP web services - this is the case, for example, of S/4HANA Cloud which exposes a variety of OData services but, for same cases, still sticks with SOAP web services.
If you started programming in the last 5 years, you might not even know what I'm talking about - or if you know, it's the fault of some legacy system you have to deal with.
SOAP, or Simple Object Access Protocol (not to be confused with SOA), is a protocol for creating distributed and decentralized web services - the famous web services - which allow the exchange of information between systems, using the XML format. I don't know when this started, but the latest version is from 2007 (1.2) and was the most popular way of connecting systems in the first decade of the 2000s, before the emergence of the REST protocol that encouraged web APIs with JSON and, later, microservices - lighter ways to exchange information between systems over the web.
As previously mentioned almost all the latest web and mobile technologies offer native (or close to) support for handling REST Web APIs, but little is said about SOAP connections. The purpose of this blog post is precisely to help those who need to deal with NodeJS CAP applications on the client and SOAP on the server.
We are going to build a simple CAP application that reads Business Users from S/4HANA Cloud (which are exposed exclusively via a SOAP web service).
You can view the application architecture bellow:
Before we move forward with the instructions, let's first get prepared for development by completing the following two basic steps:
The first thing we need to do is to get the web service definition which is described in WSDL (Web Services Description Language).
WSDL is an XML notation for describing a web service. A WSDL definition tells a client how to compose a web service request and describes the interface that is provided by the web service provider.
We can get such definition from SAP API Business Hub, so access https://api.sap.com.
In the home page, first make sure to login to API Business Hub (NOTE: you must login for the download process to work properly), then, after login, click on the S/4HANA Cloud tile.
In the next page, click on the APIs tab, then, in the find box, type "business user read" and press enter. Finally, click on the Business User - Read tile.
In the next page, click on API Specification.
NOTE: make sure your communication user (set up in your destination) has access to communication scenario SAP_COM_0193 or SAP_COM_0093, via some communication arrangement, as indicated below:
Click on the down arrow next to WSDL and save the QUERYBUSINESSUSERIN.wsdl file in your local computer.
Now, go to your CAP project in Business Application Studio and create a folder named "external" under the "srv" folder, then drag & drop the recently downloaded QUERYBUSINESSUSERIN.wsdl file into it like demonstrated below:
This definition will be used later upon creation of the web service client..
The next step is to reference the web service in the project's package,json file. So, open it up and insert the following code snippet right before the last curly bracket:
After the insertion, your package.json file should look like the screenshot below:
Notice that the reference is pointing to the destination that has been previously created in BTP with the path to the actual service location.
Although the destination already points to the S/HANA Cloud host, as the WSDL file has been downloaded from SAP API Business Hub (not directly from a communication arrangement in the actual S4/HANA Cloud tenant), the service location within it is "generic", meaning it's just a "placeholder" in the format of "https://host:port/<service path>".
Therefore, we still need to replace such placeholder with the actual S/4HANA Cloud tenant host. So, open-up the WSDL file and search for "location" (it's usually at the end of the file) and replace all occurrences of "host:port" with your S/4HANA Cloud tenant host (set up in your destination), like demonstrated below:
UPDATE NOTE (May 9th, 2022): the code snippets in this blog post have been updated to dynamically set the service endpoint at runtime (thank you @Mukteshwari Rathore for the valuable insights on the setEndpoint method from the soap node package explained in your comments!). So, you can skip this step if you wish.
Now, the project is fully set up to communicate with the web service via the application code.
Before moving on to binding the services to your project, make sure to login to Cloud Foundry either via the BAS command palette (View > Find Command) or command line interface (CLI) in the terminal.
After login, create the destination and XSUAA service instances using the command lines below:
Upon successful creation of the service instances, on the left-hand pane of BAS click on the Cloud Foundry icon (small light bulb), then on the refresh button at the top right of the pane.
The newly created instances should be displayed at end of the list, like demonstrated below:
Right click on the busers-dest service instance and select "Bind service to a locally run project" and, then, in the dialog, make sure the business-users folder is selected and click on the "Select folder for .env file" button.
Now, repeat the same procedure for the busers-xsuaa service instance.
Click again on the Explorer icon in the left-hand pane and, then, in the refresh button at the right of the project name. You should see the .env file that has been created like demonstrated below:
Now, we need to rename that file to default-env.json and transform its contents into JSON format (as it's just defining a regular environment variable called VCAP_SERVICES which is not in the expected JSON format), like demonstrated below:
To facilitate the creation of SOAP clients and avoid to much effort preparing a SOAP envelope in XML format to invoke the web service's methods via HTTP request, we can use a pre-built NodeJS SOAP client manager from the "soap" package available on npm (in Java there's already native support for SOAP web services).
Also, to create an asynchronous http client and easily fetch destination data from BTP, we will utilize the "http-client" and "connectivity" node packages from the SAP Cloud SDK respectively.
So, let's install those dependencies by running the following commands:
NOTE: if you intend to deploy your application to Cloud Foundry later, you must also install the "passport" package, as the latest CDS version is enforcing security on bootstrap when deployed to production.
And, finally, to install the other dependencies from the original jump-started package.json we just run:
And with that, we are now fully ready to start the development!
In a productive scenario, we usually would have more than one web service being manipulated throughout the application code, so it's convenient to create a module with a function that facilitates the creation and handling of SOAP clients and can be largely reused.
Under the "srv" folder create a folder named "lib" and, in that folder, create a file named "soap-service.js" like demonstrated below:
Open-up that file and paste the following code snippet into it:
The code is quite simple: the getSoapService function receives the service name (defined in package.json) and the wsdl file location with the service description, then fetches the destination data from BTP and uses it to get the service endpoint and create an HTTP client, which is then passed to the createClientAsync function from the soap package, that returns a promise to get the actual SOAP client later in the application code.
Now, we must create a handler function which will invoke the web service method that returns the business users from S/4HANA Cloud as response.
In the "lib" folder, create a file named "handlers.js" like demonstrated below:
Open-up that file and paste the following code snippet into it:
Upon module loading, a promise to the service is created by the getSoapService function, which is, then, used in the readBusinessUser handler to get the actual SOAP client for the UserRead service referenced in package.json. The QueryBusinessUserIn method of the service is invoked asynchronously, passing a few required parameters (basically filters and query processing definitions), and the response is finally formatted into the expected CAP service response.
Now that we have the complete business logic of the application we can create the CAP service definition to expose the data fetched from S4/HANA Cloud via a service entity and attach the handler function to its READ event.
In the "srv" folder, create a file named "busers-service.cds" like demonstrated below:
Open-up that file and paste the following code snippet into it:
Here we are just exposing a non-persistent entity named BusinessUser containing only some relevant fields to be fetched from S/4HANA Cloud.
The last step is to attach the handler function to the READ event of the BusinessUser entity, so the CAP service can be called to retrieve the business users data from S/4HANA Cloud and return it to the client as an OData v4 response.
In the "srv" folder, create a file named "busers-service.js" like demonstrated below:
Open-up that file and paste the following code snippet into it:
As you can see, the readBusinessUser handler is attached to the ON READ event of the BusinessUser entity.
Finally, we are all set! So, let's test the application by running cds watch and, then, CTRL+Click on the http://localhost:4004 link to open-up the CAP service home page in a new tab:
Now, click on the BusinessUser entity link and, after some seconds, you should get the JSON containing the Business Users from your S/4HANA Cloud tenant, like demonstrated below:
And that's it! A fully working CAP service consuming a SOAP web service from S/4HANA Cloud.
After completing the steps from this blog post you should have successfully developed a CAP service which communicates with S/4HANA Cloud via SOAP web service to fetch its business users.
Notice that this web service is specifically for reading data, and you could use such information in your application's logic for some specific action or even to expose it to a UI via the built-in OData v4 framework from CAP.
In the second case, you could either manually implement the logic to support the OData operations such as $select, $count, $filter, $search etc. - by interpreting the SELECT query provided by CAP's CQL (CDS Query Language) via the request object - or completely hand it over to the CAP framework - by importing the business users to an entity in a data model and exposing it in the service as a projection.
If you want to execute other operations on business users' data you can use another web service which is the ManageBusinessUser (the counterpart of QueryBusinessUser).
To learn more on how to use such services, please refer to SAP's official documentation using the links below:
Hope you enjoyed this post and that it may be useful in your future developments.
Please, do not hesitate to submit your questions in SAP Community through the Q&A tag link: https://answers.sap.com/index.html
Introduction
You may have realized that most modern cloud applications are built to interact with other external solutions via OData and/or REST APIs (and you may have already done it yourself in several opportunities). But, there are some solutions that still do not offer 100% of services as OData or REST, providing some interfaces via SOAP web services - this is the case, for example, of S/4HANA Cloud which exposes a variety of OData services but, for same cases, still sticks with SOAP web services.
If you started programming in the last 5 years, you might not even know what I'm talking about - or if you know, it's the fault of some legacy system you have to deal with.
SOAP, or Simple Object Access Protocol (not to be confused with SOA), is a protocol for creating distributed and decentralized web services - the famous web services - which allow the exchange of information between systems, using the XML format. I don't know when this started, but the latest version is from 2007 (1.2) and was the most popular way of connecting systems in the first decade of the 2000s, before the emergence of the REST protocol that encouraged web APIs with JSON and, later, microservices - lighter ways to exchange information between systems over the web.
As previously mentioned almost all the latest web and mobile technologies offer native (or close to) support for handling REST Web APIs, but little is said about SOAP connections. The purpose of this blog post is precisely to help those who need to deal with NodeJS CAP applications on the client and SOAP on the server.
Application Architecture
We are going to build a simple CAP application that reads Business Users from S/4HANA Cloud (which are exposed exclusively via a SOAP web service).
You can view the application architecture bellow:

Figure 1 - Application Architecture
Preparation Steps
Before we move forward with the instructions, let's first get prepared for development by completing the following two basic steps:
- Set up a destination to your S/4HANA Cloud system using a communication user (not a business user). You can name your destination S4HC just to be compatible with the further instructions in the post. If you have trouble creating your destination just follow this tutorial on SAP Developers.
- Jumpstart a new CAP project in SAP Business Application Studio: after opening your dev space, open a new terminal window, move to the "projects" directory and initialize a new blank project with cds init business-users. Open the newly created project in a workspace to get ready for development.
Download Web Service Definition
The first thing we need to do is to get the web service definition which is described in WSDL (Web Services Description Language).
WSDL is an XML notation for describing a web service. A WSDL definition tells a client how to compose a web service request and describes the interface that is provided by the web service provider.
We can get such definition from SAP API Business Hub, so access https://api.sap.com.
In the home page, first make sure to login to API Business Hub (NOTE: you must login for the download process to work properly), then, after login, click on the S/4HANA Cloud tile.

Figure 2 - Login to SAP API Business Hub and access S/4HANA Cloud section
In the next page, click on the APIs tab, then, in the find box, type "business user read" and press enter. Finally, click on the Business User - Read tile.

Figure 3 - Locate Business User - Read SOAP API
In the next page, click on API Specification.
NOTE: make sure your communication user (set up in your destination) has access to communication scenario SAP_COM_0193 or SAP_COM_0093, via some communication arrangement, as indicated below:

Figure 4 - Access API Specification
Click on the down arrow next to WSDL and save the QUERYBUSINESSUSERIN.wsdl file in your local computer.
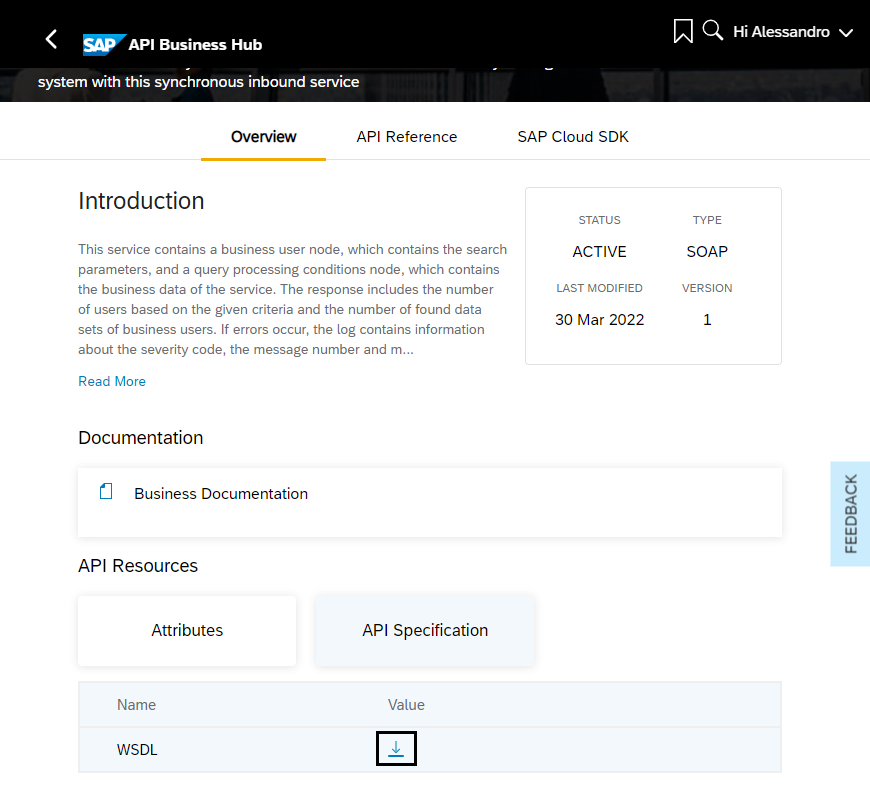
Figure 5 - Download QUERYBUSINESSUSERIN.wsdl
Now, go to your CAP project in Business Application Studio and create a folder named "external" under the "srv" folder, then drag & drop the recently downloaded QUERYBUSINESSUSERIN.wsdl file into it like demonstrated below:

Figure 6 - QUERYBUSINESSUSERIN.wsdl file imported to CAP project
This definition will be used later upon creation of the web service client..
Create Reference to Web Service Host
The next step is to reference the web service in the project's package,json file. So, open it up and insert the following code snippet right before the last curly bracket:
,

  "cds": {

    "requires": {

      "UserRead": {

        "kind": "SOAP",

        "credentials": {

          "destination": "S4HC",

          "path": "/sap/bc/srt/scs_ext/sap/querybusinessuserin"

        }

      }

    }

  }
After the insertion, your package.json file should look like the screenshot below:

Figure 7 - Reference to web service in package,json
Notice that the reference is pointing to the destination that has been previously created in BTP with the path to the actual service location.
Although the destination already points to the S/HANA Cloud host, as the WSDL file has been downloaded from SAP API Business Hub (not directly from a communication arrangement in the actual S4/HANA Cloud tenant), the service location within it is "generic", meaning it's just a "placeholder" in the format of "https://host:port/<service path>".
Therefore, we still need to replace such placeholder with the actual S/4HANA Cloud tenant host. So, open-up the WSDL file and search for "location" (it's usually at the end of the file) and replace all occurrences of "host:port" with your S/4HANA Cloud tenant host (set up in your destination), like demonstrated below:
UPDATE NOTE (May 9th, 2022): the code snippets in this blog post have been updated to dynamically set the service endpoint at runtime (thank you @Mukteshwari Rathore for the valuable insights on the setEndpoint method from the soap node package explained in your comments!). So, you can skip this step if you wish.

Figure 8 - Replace host:port with actual tenant host
Now, the project is fully set up to communicate with the web service via the application code.
Bind Destination and XSUAA Services
Before moving on to binding the services to your project, make sure to login to Cloud Foundry either via the BAS command palette (View > Find Command) or command line interface (CLI) in the terminal.
After login, create the destination and XSUAA service instances using the command lines below:
- cf create-service destination lite busers-dest
- cf create-service xsuaa application busers-xsuaa
Upon successful creation of the service instances, on the left-hand pane of BAS click on the Cloud Foundry icon (small light bulb), then on the refresh button at the top right of the pane.
The newly created instances should be displayed at end of the list, like demonstrated below:

Figure 9 - Newly created service instances
Right click on the busers-dest service instance and select "Bind service to a locally run project" and, then, in the dialog, make sure the business-users folder is selected and click on the "Select folder for .env file" button.

Figure 10 - Select business-users folder
Now, repeat the same procedure for the busers-xsuaa service instance.
Click again on the Explorer icon in the left-hand pane and, then, in the refresh button at the right of the project name. You should see the .env file that has been created like demonstrated below:

Figure 11 - .env file for services binding
Now, we need to rename that file to default-env.json and transform its contents into JSON format (as it's just defining a regular environment variable called VCAP_SERVICES which is not in the expected JSON format), like demonstrated below:

Figure 12 - Rename .env and adjust to JSON format
Install Dependencies
To facilitate the creation of SOAP clients and avoid to much effort preparing a SOAP envelope in XML format to invoke the web service's methods via HTTP request, we can use a pre-built NodeJS SOAP client manager from the "soap" package available on npm (in Java there's already native support for SOAP web services).
Also, to create an asynchronous http client and easily fetch destination data from BTP, we will utilize the "http-client" and "connectivity" node packages from the SAP Cloud SDK respectively.
So, let's install those dependencies by running the following commands:
NOTE: if you intend to deploy your application to Cloud Foundry later, you must also install the "passport" package, as the latest CDS version is enforcing security on bootstrap when deployed to production.
And, finally, to install the other dependencies from the original jump-started package.json we just run:
- npm install
And with that, we are now fully ready to start the development!
Create Module to Handle SOAP Clients
In a productive scenario, we usually would have more than one web service being manipulated throughout the application code, so it's convenient to create a module with a function that facilitates the creation and handling of SOAP clients and can be largely reused.
Under the "srv" folder create a folder named "lib" and, in that folder, create a file named "soap-service.js" like demonstrated below:

Figure 13 - Create soap-service.js file
Open-up that file and paste the following code snippet into it:
const soap = require('soap');

const client = require('@sap-cloud-sdk/http-client');

const connectivity = require('@sap-cloud-sdk/connectivity');


// Helper to create a soap service through the BTP destination service

async function getSoapService(service, wsdl, endpoint) {

    // Get the service reference

    var definition = cds.env.requires[service];

    // Get the destination data from BTP

    const dest = await connectivity.getDestination({ destinationName: definition.credentials.destination });

    // Get service endpoint

    const url = (dest.url.substr(dest.url.length-1,1) === '/') ? dest.url.substr(0,dest.url.length-1) : dest.url;

    endpoint.url = url + definition.credentials.path;


    // Create an httpClient which connects over the BTP destination

    var httpClient = {

        request: async function (url, data, callback, exheaders, exoptions) {

            client.executeHttpRequest(dest, {

                method: 'POST',

                url: url,

                data: data,

                headers: exheaders

            }, {...exoptions, fetchCsrfToken: false}).then((result) => {

                callback(null, result, result.data);

            }).catch((e) => {

                callback(e);

            });

        }

    }


    // Instantiate the service using that http client

    return soap.createClientAsync(wsdl, { httpClient: httpClient });

}


module.exports = {

    getSoapService

}
The code is quite simple: the getSoapService function receives the service name (defined in package.json) and the wsdl file location with the service description, then fetches the destination data from BTP and uses it to get the service endpoint and create an HTTP client, which is then passed to the createClientAsync function from the soap package, that returns a promise to get the actual SOAP client later in the application code.
Create Handler to Read Business Users
Now, we must create a handler function which will invoke the web service method that returns the business users from S/4HANA Cloud as response.
In the "lib" folder, create a file named "handlers.js" like demonstrated below:

Figure 14 - Create handlers.js file
Open-up that file and paste the following code snippet into it:
const { getSoapService } = require('./soap-service');


let userReadServicePromise = null;

let userReadServiceEndpoint = { url: null };


(async function () {

    // Connect to external S/4HC SOAP service

    userReadServicePromise = getSoapService('UserRead', './srv/external/QUERYBUSINESSUSERIN.wsdl', userReadServiceEndpoint);

})();


/*** HANDLERS ***/


async function readBusinessUser(req) {

    try {

        // Get the SOAP client for the UserRead service

        const userReadService = await userReadServicePromise;

        userReadService.setEndpoint(userReadServiceEndpoint.url);


        // Set the parameters for the QueryBusinessUserIn method of the sevice

        const param = {

            BusinessUser: {

                PersonIDInterval: {

                    IntervalBoundaryTypeCode: 9,

                    LowerBoundaryPersonID: "0000000000"

                },

                BusinessPartnerRoleCodeInterval: {

                    IntervalBoundaryTypeCode: 9,

                    LowerBoundaryBusinessPartnerRoleCode: "000000"

                }

            },

            QueryProcessingConditions: {

                QueryHitsUnlimitedIndicator: true

            }

        };


        // Invoke QueryBusinessUserIn method asynchronously and wait for the response

        const resp = await userReadService.QueryBusinessUserInAsync(param);


        // Prepare the actual service response

        const busUsers = [];

        if (resp && resp[0] && resp[0].BusinessUser) {

            resp[0].BusinessUser.forEach(busUser => {

                busUsers.push({

                    ID: ((busUser.User) ? busUser.User.UserID : busUser.PersonID),

                    FirstName: busUser.PersonalInformation.FirstName,

                    LastName: busUser.PersonalInformation.LastName,

                    PersonFullName: busUser.PersonalInformation.PersonFullName,

                    BusinessPartnerRoleCode: busUser.BusinessPartnerRoleCode,

                    HasUser: ((busUser.User) ? true : false)

                });

            });

        }


        return busUsers;

    } catch (err) {

        req.error(err.code, err.message);

    }

}


module.exports = {

    readBusinessUser

}
Upon module loading, a promise to the service is created by the getSoapService function, which is, then, used in the readBusinessUser handler to get the actual SOAP client for the UserRead service referenced in package.json. The QueryBusinessUserIn method of the service is invoked asynchronously, passing a few required parameters (basically filters and query processing definitions), and the response is finally formatted into the expected CAP service response.
Create the CAP Service Definition
Now that we have the complete business logic of the application we can create the CAP service definition to expose the data fetched from S4/HANA Cloud via a service entity and attach the handler function to its READ event.
In the "srv" folder, create a file named "busers-service.cds" like demonstrated below:

Figure 15 - Create busers-service.cds file
Open-up that file and paste the following code snippet into it:
namespace sap.extensions.soap.busers;


service BusinessUsers @(path : '/bussiness-users') {

    entity BusinessUser {

        ID : String(12);

        FirstName : String(128);

        LastName : String(128);

        PersonFullName : String(258);

        BusinessPartnerRoleCode : String(6);

        HasUser : Boolean;

    }

}
Here we are just exposing a non-persistent entity named BusinessUser containing only some relevant fields to be fetched from S/4HANA Cloud.
Attach the Handler Function to the READ Event
The last step is to attach the handler function to the READ event of the BusinessUser entity, so the CAP service can be called to retrieve the business users data from S/4HANA Cloud and return it to the client as an OData v4 response.
In the "srv" folder, create a file named "busers-service.js" like demonstrated below:
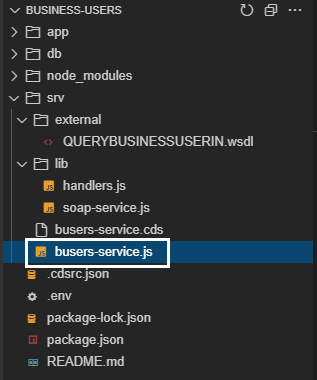
Figure 16 - Create busers-service.js file
Open-up that file and paste the following code snippet into it:
const cds = require('@sap/cds');

const {

    readBusinessUser

} = require('./lib/handlers');


module.exports = cds.service.impl(async function () {

    /*** SERVICE ENTITIES ***/

    const {

        BusinessUser

    } = this.entities;


    /*** HANDLERS REGISTRATION ***/

    // ON events

    this.on('READ', BusinessUser, readBusinessUser);

});
As you can see, the readBusinessUser handler is attached to the ON READ event of the BusinessUser entity.
Test the Application
Finally, we are all set! So, let's test the application by running cds watch and, then, CTRL+Click on the http://localhost:4004 link to open-up the CAP service home page in a new tab:

Figure 17 - CAP service home page
Now, click on the BusinessUser entity link and, after some seconds, you should get the JSON containing the Business Users from your S/4HANA Cloud tenant, like demonstrated below:
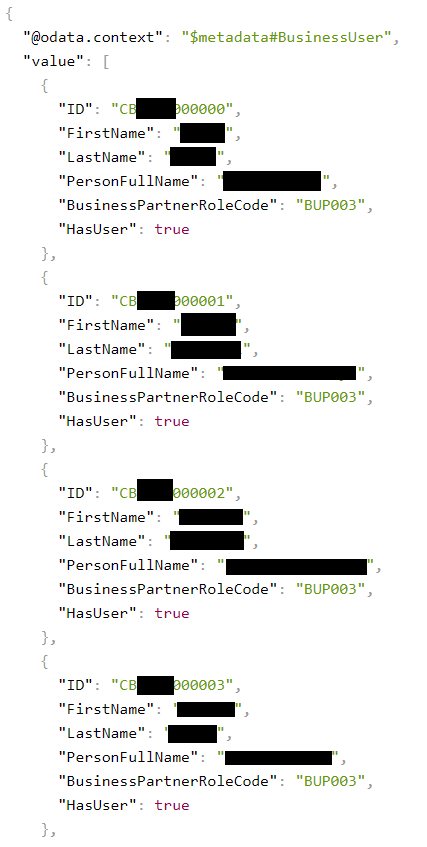
Figure 18 - Business users from S/4HANA Cloud tenant
And that's it! A fully working CAP service consuming a SOAP web service from S/4HANA Cloud.
Conclusion
After completing the steps from this blog post you should have successfully developed a CAP service which communicates with S/4HANA Cloud via SOAP web service to fetch its business users.
Notice that this web service is specifically for reading data, and you could use such information in your application's logic for some specific action or even to expose it to a UI via the built-in OData v4 framework from CAP.
In the second case, you could either manually implement the logic to support the OData operations such as $select, $count, $filter, $search etc. - by interpreting the SELECT query provided by CAP's CQL (CDS Query Language) via the request object - or completely hand it over to the CAP framework - by importing the business users to an entity in a data model and exposing it in the service as a projection.
If you want to execute other operations on business users' data you can use another web service which is the ManageBusinessUser (the counterpart of QueryBusinessUser).
To learn more on how to use such services, please refer to SAP's official documentation using the links below:
Hope you enjoyed this post and that it may be useful in your future developments.
Please, do not hesitate to submit your questions in SAP Community through the Q&A tag link: https://answers.sap.com/index.html
- SAP Managed Tags:
- SAP Cloud Application Programming Model,
- SAP S/4HANA Public Cloud
Labels:
29 Comments
You must be a registered user to add a comment. If you've already registered, sign in. Otherwise, register and sign in.
Labels in this area
-
ABAP CDS Views - CDC (Change Data Capture)
2 -
AI
1 -
Analyze Workload Data
1 -
BTP
1 -
Business and IT Integration
2 -
Business application stu
1 -
Business Technology Platform
1 -
Business Trends
1,658 -
Business Trends
93 -
CAP
1 -
cf
1 -
Cloud Foundry
1 -
Confluent
1 -
Customer COE Basics and Fundamentals
1 -
Customer COE Latest and Greatest
3 -
Customer Data Browser app
1 -
Data Analysis Tool
1 -
data migration
1 -
data transfer
1 -
Datasphere
2 -
Event Information
1,400 -
Event Information
66 -
Expert
1 -
Expert Insights
177 -
Expert Insights
299 -
General
1 -
Google cloud
1 -
Google Next'24
1 -
Kafka
1 -
Life at SAP
780 -
Life at SAP
13 -
Migrate your Data App
1 -
MTA
1 -
Network Performance Analysis
1 -
NodeJS
1 -
PDF
1 -
POC
1 -
Product Updates
4,577 -
Product Updates
345 -
Replication Flow
1 -
RisewithSAP
1 -
SAP BTP
1 -
SAP BTP Cloud Foundry
1 -
SAP Cloud ALM
1 -
SAP Cloud Application Programming Model
1 -
SAP Datasphere
2 -
SAP S4HANA Cloud
1 -
SAP S4HANA Migration Cockpit
1 -
Technology Updates
6,873 -
Technology Updates
424 -
Workload Fluctuations
1
Related Content
- App to automatically configure a new ABAP Developer System in Technology Blogs by Members
- Improving Time Management in SAP S/4HANA Cloud: A GenAI Solution in Technology Blogs by SAP
- Embracing TypeScript in SAPUI5 Development in Technology Blogs by Members
- ABAP Cloud Developer Trial 2022 Available Now in Technology Blogs by SAP
- Hack2Build on Business AI – Highlighted Use Cases in Technology Blogs by SAP
Top kudoed authors
| User | Count |
|---|---|
| 40 | |
| 25 | |
| 17 | |
| 14 | |
| 8 | |
| 7 | |
| 7 | |
| 7 | |
| 6 | |
| 6 |