
- SAP Community
- Products and Technology
- Technology
- Technology Blogs by SAP
- Let's call iRPA 2.0 bot from CAI chatbot to updat...
Technology Blogs by SAP
Learn how to extend and personalize SAP applications. Follow the SAP technology blog for insights into SAP BTP, ABAP, SAP Analytics Cloud, SAP HANA, and more.
Turn on suggestions
Auto-suggest helps you quickly narrow down your search results by suggesting possible matches as you type.
Showing results for
Product and Topic Expert
Options
- Subscribe to RSS Feed
- Mark as New
- Mark as Read
- Bookmark
- Subscribe
- Printer Friendly Page
- Report Inappropriate Content
04-07-2022
4:25 PM
In my last blog post Calling SuccessFactors OData APIs via iRPA 2.0 I wrote about how we can create an automation which is calling a SuccessFactors API for performing upsert operations. The automation however also needs to be invoked. For this I worked on developing a chatbot which would call the API based trigger of the automation. I read many blogs on parts of the topic. I intend with this blog to encourage the community members to get some hands on with these wonderful LCNC tools.
In this blog you will learn the following:
So let's start 🙂
Deploying your SAP iRPA automation from Cloud Factory
To deploy the automation in the cloud factory we need to generate a package within our project. The generated package will be available for deployment into the cloud factory environment.


Now we will configure our API trigger
We create a chatbot now in CAI which will invoke our API trigger.

Next we will create a skill that responds to the intent

We need to use oAuth2 for Authorization to call the iRPA API trigger. We will get the client credentials from the SAP BTP subaccount, using the service key for iRPA service instance.

For the payload we again need to refer our API trigger in iRPA and add the following to the body
You can refer the following json:
In my last blog post Calling SuccessFactors OData APIs via iRPA 2.0 I only had 2 input parameters. Please note that here I have an additional input parameter in my automation called role which allows me to pass the role name from the chatbot itself.
If you need to use oAuth 2.0 authentication in your project please refer my blog: Using OAuth 2.O to securely call SuccessFactors OData APIs from iRPA 2.0
I adapted the activity for Web Service call with the script below.
With this configuration in place you should be able to call the API trigger from the chatbot web client already. You will be able to see the run of the job in the cloud factory monitoring. Also the creation of role in SAP SuccessFactors instance.
We still need feedback information about the job status in our chatbot. This brings us to our last topic of this blog.
Et voila!
You are done.
Have fun getting your version of bots working 🙂
Happy learning!
In this blog you will learn the following:
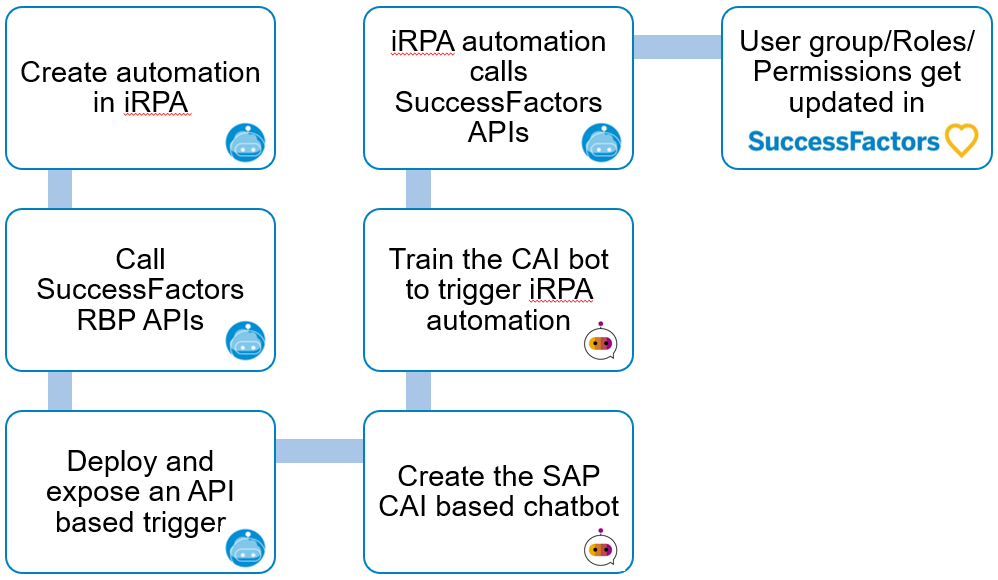
- Deploying your SAP iRPA automation from cloud factory
- Creating API based trigger for the automation
- Create an extremely simple chatbot in CAI
- Calling the created API trigger from a CAI based chatbot
- Creating notifiers in iRPA to notify/update our conversation in the chatbot
Here is our process flow:
So let's start 🙂
Deploying your SAP iRPA automation from Cloud Factory
To deploy the automation in the cloud factory we need to generate a package within our project. The generated package will be available for deployment into the cloud factory environment.
Package generation in the cloud factory
Once the package is generated we go to our environment and deploy the package.
Package deployment
Upon package generation we need to create the trigger to call the automation.
Creating API based trigger for the automation

API Trigger creation
Now we will configure our API trigger

API Trigger config
Now that API trigger has been created you can create an API token for the trigger access. Please copy the key to be used later in the chatbot skill's action .
API key
Create an extremely simple chatbot in CAI
We create a chatbot now in CAI which will invoke our API trigger.

Create an action bot
Now add the intent 'rbp' with a singular expression 'Create role'
Next we will create a skill that responds to the intent
Create Skill

Add chatbot skill trigger as our Intent
Now for the sake of this proof of concept we hardcode some memory variables needed as input parameters to invoke our iRPA API Trigger

Add a few memory variables
Calling the created API trigger from a CAI based chatbot
Now let us configure our iRPA API trigger call from the chatbot. We add the action of Create External Service - Consume API Service and add the 3 Header fields as shown in the picture below. Also please see that we will add the service key we generated in iRPA:
We need to use oAuth2 for Authorization to call the iRPA API trigger. We will get the client credentials from the SAP BTP subaccount, using the service key for iRPA service instance.
For the payload we again need to refer our API trigger in iRPA and add the following to the body
You can refer the following json:
{

    "invocationContext": {"conversationId":"{{conversation_id}}"


    },

    "input": {

        "password": "{{memory.pp}}",

        "username": "{{memory.us}}",

        "role":"{{memory.role}}"


    }

}
In my last blog post Calling SuccessFactors OData APIs via iRPA 2.0 I only had 2 input parameters. Please note that here I have an additional input parameter in my automation called role which allows me to pass the role name from the chatbot itself.
If you need to use oAuth 2.0 authentication in your project please refer my blog: Using OAuth 2.O to securely call SuccessFactors OData APIs from iRPA 2.0
I adapted the activity for Web Service call with the script below.
var i = 0;

var temp ="";

var cookieField ="";

if(cookie!=""){

    for(i=0;i<cookie.length-1;i++)

    {

        temp = cookie[i].split(";");

        cookieField = cookieField + temp[0] + "; ";

    }

    temp = cookie[i].split(";");

    cookieField = cookieField + temp[0];

}

var data = {

"__metadata": {

"uri": "RBPRole",

"type": "SFOData.RBPRole"

},

"roleDesc": "Created from Irpa;",

"roleName": role


};

var payload = {

    resolveBodyOnly : true,

    method: 'POST',

    url: 'https://apisalesdemo4.successfactors.com/odata/v2/upsert',

    headers: {

        'Authorization': 'Basic '+ cred,

        'Cookie' : cookieField,

        'Content-Type': 'application/json',

        'x-csrf-token' : csrf_token

    },

    ignoreClientCertificate: true,

    body: JSON.stringify(data)

};

return payload;
Now we need to create a Web Client for the CAI chatbot in order to call the iRPA API. This is easy to do from the connect tab.
You can access the webclient from the provided url


With this configuration in place you should be able to call the API trigger from the chatbot web client already. You will be able to see the run of the job in the cloud factory monitoring. Also the creation of role in SAP SuccessFactors instance.
We still need feedback information about the job status in our chatbot. This brings us to our last topic of this blog.
Creating notifiers in iRPA to notify/update our conversation in the chatbot
For creating notifiers for the API trigger we go back to our iRPA environment.
Choose notifier of type CAI.
Next we need to add the CAI chatbot conversation id metadata to send messages back to the chatbot
Next we need to add the CAI chatbot client credentials and developer token to the notifier. 
Et voila!
You are done.
Lets see this working below
We see the response from our notifier above and also below you see the role created in the SuccessFactors instance.
Have fun getting your version of bots working 🙂
Happy learning!
Labels:
4 Comments
You must be a registered user to add a comment. If you've already registered, sign in. Otherwise, register and sign in.
Labels in this area
-
ABAP CDS Views - CDC (Change Data Capture)
2 -
AI
1 -
Analyze Workload Data
1 -
BTP
1 -
Business and IT Integration
2 -
Business application stu
1 -
Business Technology Platform
1 -
Business Trends
1,658 -
Business Trends
91 -
CAP
1 -
cf
1 -
Cloud Foundry
1 -
Confluent
1 -
Customer COE Basics and Fundamentals
1 -
Customer COE Latest and Greatest
3 -
Customer Data Browser app
1 -
Data Analysis Tool
1 -
data migration
1 -
data transfer
1 -
Datasphere
2 -
Event Information
1,400 -
Event Information
66 -
Expert
1 -
Expert Insights
177 -
Expert Insights
298 -
General
1 -
Google cloud
1 -
Google Next'24
1 -
Kafka
1 -
Life at SAP
780 -
Life at SAP
13 -
Migrate your Data App
1 -
MTA
1 -
Network Performance Analysis
1 -
NodeJS
1 -
PDF
1 -
POC
1 -
Product Updates
4,577 -
Product Updates
343 -
Replication Flow
1 -
RisewithSAP
1 -
SAP BTP
1 -
SAP BTP Cloud Foundry
1 -
SAP Cloud ALM
1 -
SAP Cloud Application Programming Model
1 -
SAP Datasphere
2 -
SAP S4HANA Cloud
1 -
SAP S4HANA Migration Cockpit
1 -
Technology Updates
6,873 -
Technology Updates
420 -
Workload Fluctuations
1
Related Content
- SAP Successfactors Implementation and Maintenance in Projects in 2024 in Technology Blogs by Members
- Harnessing the Power of SAP HANA Cloud Vector Engine for Context-Aware LLM Architecture in Technology Blogs by SAP
- Elevating Customer Engagement: Harnessing the Power of SAP Chatbots for a Personalized Experience in Technology Blogs by Members
- Empowering Vendors: The Transformative Impact of SAP Chatbot in Technology Blogs by Members
- SAP Community Datasphere in Technology Q&A
Top kudoed authors
| User | Count |
|---|---|
| 37 | |
| 25 | |
| 17 | |
| 13 | |
| 7 | |
| 7 | |
| 7 | |
| 6 | |
| 6 | |
| 6 |