
- SAP Community
- Products and Technology
- Technology
- Technology Blogs by SAP
- Extend SAP SuccessFactors on SAP BTP with CAP - De...
Technology Blogs by SAP
Learn how to extend and personalize SAP applications. Follow the SAP technology blog for insights into SAP BTP, ABAP, SAP Analytics Cloud, SAP HANA, and more.
Turn on suggestions
Auto-suggest helps you quickly narrow down your search results by suggesting possible matches as you type.
Showing results for
Product and Topic Expert
Options
- Subscribe to RSS Feed
- Mark as New
- Mark as Read
- Bookmark
- Subscribe
- Printer Friendly Page
- Report Inappropriate Content
03-29-2022
12:46 PM
Prerequisites
To follow-up with this blog post you must have read and completed the following previous blog posts in this series:
- Series introduction and preparation
- Jumpstart the CAP Project
- Import SAP SuccessFactors OData Services definitions
- Define the CDS Data Model
- Create the CAP Service
- Add Business Logic
- Prepare the UI with CDS Annotations
- Add Security
Setup Project for SAP HANA
So far, all data persistence of our application has been utilizing a default SQLite in-memory database, which means that, each time we restart the application, all data that has been added/updated is completely gone.
It might be OK for local development, but when it goes to a cloud landscape (either development, QA or production) the data must be persisted in a standard relational database such as SAP HANA Cloud (which is going to be the selected database for our application).
Therefore, it's now time to prepare our project to deploy the data model to SAP HANA Cloud when it goes to BTP. For that, we must add the appropriate dependencies to our project using the cds add command.
1. In the Terminal type cds add hana and press Enter

Figure 1 - Add SAP HANA dependencies to project
2. On the left-hand pane click on the package.json file to open it. Examine the contents and notice the modifications in the dependencies and cds.requires sections and the new cds.hana section. Change the db.kind from the cds.requires section to "hana"

Figure 2 - Changes made to package.json
3. In the Terminal type npm install and press Enter to install the newly added dependency locally

Figure 3 - Install new dependency
Deploy to SAP HANA Cloud
IMPORTANT NOTE: before executing the next steps first make sure:
- You are properly logged to Cloud Foundry as instructed in: Jumpstart the CAP Project
- Your SAP HANA Cloud database instance (created following this tutorial) is up and running - remember: on trial accounts everything (including SAP HANA database) shuts down overnight!
4. In the Terminal type cds deploy --to hana and press Enter

Figure 4 - Deploying to the HANA Cloud database
It's going to take a while before the command completes as it's performing these operations:
- Build the database artifacts from the CAP project in the gen folder that's created under the project root folder, for further deployment to SAP HANA.
- Create a service instance named sfsf-projman-db of type SAP HANA Schemas & HDI Containers with the hdi-shared plan, that handles the HDI container
- Create the SAP HANA database artifacts from the application inside the HDI container
- Bind the service instance to the local project by modifying the default-env.json file, adding the database credentials (actually the service key from the service binding).
After the command completes, we will have achieved what we call a "hybrid approach" where your project runs locally, but the database (and the corresponding persistence) runs in the cloud.
Let's take a quick look at the default-env.json to verify what happened after command completion: on the left-hand pane click on the default-env.json file to open it:
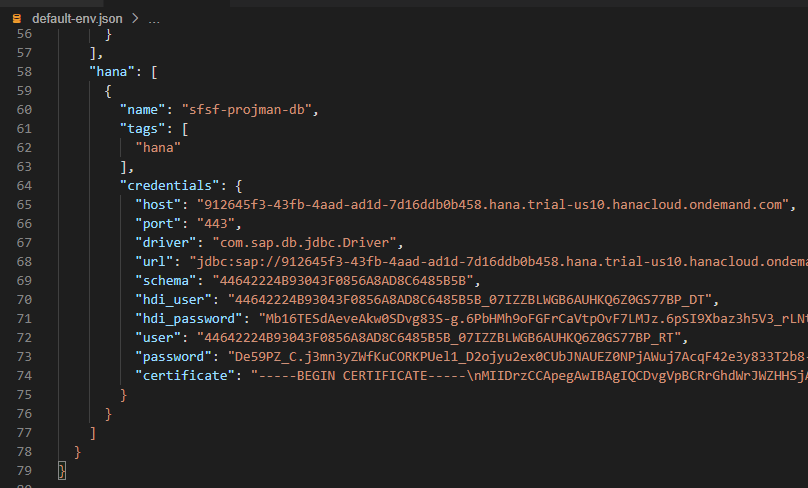
Figure 5 - Changes in default-env.json
Notice that a "hana" section has been added to the VCAP_SERVICES environment variable, with the service instance name of the HDI container and the credentials (service key) to connect to the SAP HANA Cloud database.
IMPORTANT UPDATE: From CDS version 5 and above, this procedure will not modify the default-env.json file. Instead, it will create the .cdsrc-private.json file containing the service bindings. For such CDS versions you'll need to "re-bind" the Destination and XSUAA service instances to the local project with: cds bind --to sfsf-dest,sfsf-xsuaa. Then, to run the project locally you must use: cds watch --profile hybrid. If, in the future, you switch back to the SQLite in-memory database, then you can stick with the simple cds watch.
If you click on the Cloud Foundry icon (small light bulb) on the left-hand pane and expand the services node, you'll also see the newly created service instance:

Figure 6 - HDI container service instance
Now, let's see what happens when we execute the application.
5. In the Terminal type cds watch and press Enter (IMPORTANT: you must use cds watch --profile hybrid when working with CDS version 5 and above as per the update described in the previous step)

Figure 7 - Project connected to SAP HANA Cloud database
Notice that, now, CDS is connecting to SAP HANA Cloud as the persistence mechanism of the application.
Again, in this scenario the project is running locally, but the database is running in the cloud (hybrid approach).
If you want to switch to the SQLite in-memory database again for development, just go back to package.json and change the db.kind parameter in the cds.requires section back to "sql": and notice that cds watch immediately recognizes the change and switches the connection to sqlite with the ":memory:" credentials:

Figure 8 - Switching back to SQLite in-memory
Conclusion
After having gone through the steps of this blog post you should have successfully set up your project to utilize the SAP HANA Cloud database and deployed the application data model to it. Now it's time to create the SAP Fiori Elements application into your project using the MTA (Multi-Target Application) approach as the final step to prepare the project for deployment.
NOTE: all the instructions provided in this blog post apply exactly the same to any CAP project that should utilize SAP HANA Cloud database as the persistence layer for the application.
Please, do not hesitate to submit your questions in SAP Community through the Q&A tag link: https://answers.sap.com/index.html
Next blog post in this series
Labels:
5 Comments
You must be a registered user to add a comment. If you've already registered, sign in. Otherwise, register and sign in.
Labels in this area
-
ABAP CDS Views - CDC (Change Data Capture)
2 -
AI
1 -
Analyze Workload Data
1 -
BTP
1 -
Business and IT Integration
2 -
Business application stu
1 -
Business Technology Platform
1 -
Business Trends
1,658 -
Business Trends
92 -
CAP
1 -
cf
1 -
Cloud Foundry
1 -
Confluent
1 -
Customer COE Basics and Fundamentals
1 -
Customer COE Latest and Greatest
3 -
Customer Data Browser app
1 -
Data Analysis Tool
1 -
data migration
1 -
data transfer
1 -
Datasphere
2 -
Event Information
1,400 -
Event Information
66 -
Expert
1 -
Expert Insights
177 -
Expert Insights
298 -
General
1 -
Google cloud
1 -
Google Next'24
1 -
Kafka
1 -
Life at SAP
780 -
Life at SAP
13 -
Migrate your Data App
1 -
MTA
1 -
Network Performance Analysis
1 -
NodeJS
1 -
PDF
1 -
POC
1 -
Product Updates
4,577 -
Product Updates
344 -
Replication Flow
1 -
RisewithSAP
1 -
SAP BTP
1 -
SAP BTP Cloud Foundry
1 -
SAP Cloud ALM
1 -
SAP Cloud Application Programming Model
1 -
SAP Datasphere
2 -
SAP S4HANA Cloud
1 -
SAP S4HANA Migration Cockpit
1 -
Technology Updates
6,873 -
Technology Updates
421 -
Workload Fluctuations
1
Related Content
- How to use AI services to translate Picklists in SAP SuccessFactors - An example in Technology Blogs by SAP
- Single Sign On to SAP Cloud Integration (CPI runtime) from an external Identity Provider in Technology Blogs by SAP
- SAP Datasphere: Using Variable derivation for currency conversion measures within Analytic Model in Technology Blogs by SAP
- Custom data as table, CDS, Domain, Business object and all that jazz... in Technology Blogs by SAP
- SAP Datasphere - Space, Data Integration, and Data Modeling Best Practices in Technology Blogs by SAP
Top kudoed authors
| User | Count |
|---|---|
| 38 | |
| 25 | |
| 17 | |
| 13 | |
| 7 | |
| 7 | |
| 7 | |
| 7 | |
| 6 | |
| 6 |