
- SAP Community
- Products and Technology
- Technology
- Technology Blogs by SAP
- Extend SAP SuccessFactors on SAP BTP with CAP - Ad...
Technology Blogs by SAP
Learn how to extend and personalize SAP applications. Follow the SAP technology blog for insights into SAP BTP, ABAP, SAP Analytics Cloud, SAP HANA, and more.
Turn on suggestions
Auto-suggest helps you quickly narrow down your search results by suggesting possible matches as you type.
Showing results for
Product and Topic Expert
Options
- Subscribe to RSS Feed
- Mark as New
- Mark as Read
- Bookmark
- Subscribe
- Printer Friendly Page
- Report Inappropriate Content
03-28-2022
3:35 PM
Prerequisites
To follow-up with this blog post you must have read and completed the following previous blog posts in this series:
- Series introduction and preparation
- Jumpstart the CAP Project
- Import SAP SuccessFactors OData Services definitions
- Define the CDS Data Model
- Create the CAP Service
- Add Business Logic
- Prepare the UI with CDS Annotations
Define Authorizations
So far, we have been working on a local project which only developers would have access to. Therefore, it's OK to leave our service "unprotected" as it's not yet publicly available. But, as soon as we deploy it to the cloud, it will be available to anyone who knows the service endpoint (which is not quite difficult).
In such scenario, anyone can access the service anonymously and freely make OData calls to it, which will probably cause a big mess in our application and related data. So, it's imperative to "protect" our service against such risky situation by granting access only to authenticated users.
Then, to make the service available only to authenticated users, we just need to add the requires annotation to the service definition (in the projman-service.cds file), like demonstrated below:

Figure 1 - Annotation for requiring the user to be authenticated
Now, in the service home page, when we click on any entity link (i.e. SFSF_User) a pop-up in the browser will ask for the username and password.

Figure 2 - Login pop-up for mocked authentication
As we are still in development we can provide whatever information we like and click sign in, because in this environment CAP is using what we call mocked authentication which does not utilize real users. So, after clicking sign in, you may see the data from the selected entity:

Figure 3 - Data retrieved after sign in
But, in an administrative scenario like this one, just being an authenticated user is not enough. It's appropriate that, additionally, the authenticated user must be granted some administrative role (i.e. an Admin role).
Therefore, we need to specify that the entities from our service are only viewable and maintainable by users with the Admin role. To do so, we also annotate our entities with the requires annotation, but now we specify the Admin role, instead of "authenticated-user", like demonstrated below:

Figure 4 - Restricting access to service entities for the Admin role
Now, if we click again on the same entity link (i.e. SFS_User) we should receive an HTTP 403 (Forbidden) error:

Figure 5 - Unauthorized Access
It happened because the mocked user (any dummy data you provided) was not granted the Admin role, thus cannot access any entity annotated as such.
So, let's fix it now. To do so, we just need to add an "auth" block into the cds.requires section of the package.json file, like demonstrated below:
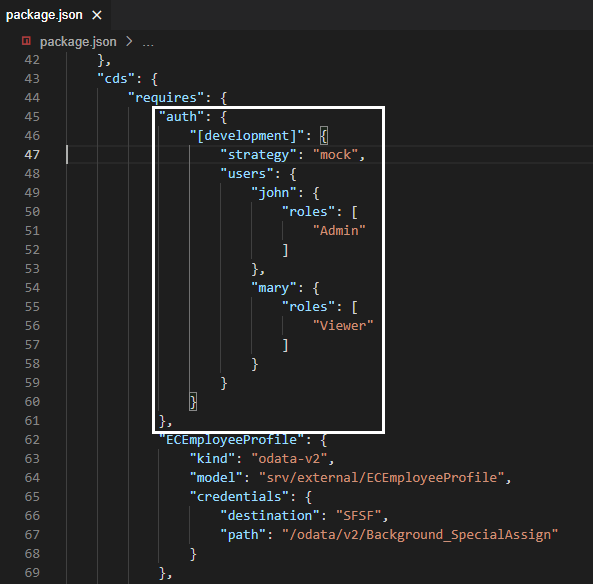
Figure 6 - Authorization config for development
This block instructs CAP to use the mock strategy (which is default) during development and it creates two mock users: john who's granted the Admin role and mary who's granted the Viewer role (which has no authorization in the context of our application).
Now, we need to login as john (with any password that you like), but CAP has already opened a session to the first mock user we utilized (who has no Admin role granted) and won't pop-up for a new login (so, we stick with the forbidden error).
To work this around, you will need to completely close your browser (not only the Business Application Studio tab), open it again and go back to your SAP BTP cockpit to access Business Application Studio from the Instances and Subscriptions page. Click on your Dev Space and when the IDE loads again make sure that cds watch is properly running, if not, run it again. Launch the service home page and click any entity link (i.e. SFSF_User).
This time the sign in pop-up should appear and you must login with john to overcome the forbidden error:

Figure 7 - Entity data successfully retrieved after login with Admin role
To learn more about authentication and authorization in CAP, you can refer to this two links from the official documentation:
Prepare Security Setup for Deployment
OK, so far we have defined a simple authorization schema to secure all service entities and verified that it's working as expected. But, in production, security will be handled by the User Account and Authentication (UAA) mechanism of Cloud Foundry which, in SAP BTP, is implemented by the XSUAA service.
Therefore, we need to configure the XSUAA service instance to recognize and apply the schema we have defined when the application is deployed on SAP BTP.
For that, we need to create a file named xs-security.json in the project root folder, and the good news is that CAP can do it for us automatically based on the security schema from the service definition.
1. In the Terminal press CTRL+C to terminate the cds watch command, then type the command:
cds compile srv/ --to xsuaa >xs-security.jsonThen, press Enter

Figure 8 - xs-security.json creation
2. On the left-hand pane click on the xs-security.json file to open it. Examine the contents and add the two lines indicated in the screenshot below right before "scopes" (if not already generated by the compiler, as older versions of it used to add them automatically). In the role-templates collection, change the description of the Admin role from "generated" to "Project Administrator":

Figure 9 - Security descriptor content
This file is used during the creation or update of the XSUAA service instance and controls the roles, scopes, attributes and role templates that will be part of the security for your application.
Let's quickly understand what's done in this descriptor.
Basically, we define a scope named Admin for the application and assign it to the Admin role template. This way, when the application is deployed to SAP BTP the Admin role will be automatically created in the platform and associated to the sfsf-projman application.
But roles are not directly assigned to the application's users. The assignment is done through role collections. So let's just add one to the file like demonstrated in the screenshot below:

Figure 10 - Create Role Collection
After deployment, we just need to assign it to the user who should be granted such authorization.
Add Additional Dependencies
Now, we just need to add four dependencies to the CAP service for it to properly handle security and other related stuff - such as the user JSON Web Token (JWT) - during runtime. Those are:
Therefore, in the Terminal, just type the following commands pressing Enter after each one:
When the commands complete, your package.json file should like the screenshot below:

Figure 11 - Installed dependencies
Conclusion
After having gone through the steps of this blog post you should have successfully secured your CAP application to be viewable and maintainable only by users with administration authorization. Now you are ready to start the steps to deploy it to SAP BTP. The next step is to deploy the application's data model to an SAP HANA Cloud database.
NOTE: all the instructions provided in this blog post apply exactly the same to any CAP project that should have security applied to its services.
Please, do not hesitate to submit your questions in SAP Community through the Q&A tag link: https://answers.sap.com/index.html
Next blog post in this series
Labels:
You must be a registered user to add a comment. If you've already registered, sign in. Otherwise, register and sign in.
Labels in this area
-
ABAP CDS Views - CDC (Change Data Capture)
2 -
AI
1 -
Analyze Workload Data
1 -
BTP
1 -
Business and IT Integration
2 -
Business application stu
1 -
Business Technology Platform
1 -
Business Trends
1,658 -
Business Trends
93 -
CAP
1 -
cf
1 -
Cloud Foundry
1 -
Confluent
1 -
Customer COE Basics and Fundamentals
1 -
Customer COE Latest and Greatest
3 -
Customer Data Browser app
1 -
Data Analysis Tool
1 -
data migration
1 -
data transfer
1 -
Datasphere
2 -
Event Information
1,400 -
Event Information
66 -
Expert
1 -
Expert Insights
177 -
Expert Insights
299 -
General
1 -
Google cloud
1 -
Google Next'24
1 -
Kafka
1 -
Life at SAP
780 -
Life at SAP
13 -
Migrate your Data App
1 -
MTA
1 -
Network Performance Analysis
1 -
NodeJS
1 -
PDF
1 -
POC
1 -
Product Updates
4,577 -
Product Updates
345 -
Replication Flow
1 -
RisewithSAP
1 -
SAP BTP
1 -
SAP BTP Cloud Foundry
1 -
SAP Cloud ALM
1 -
SAP Cloud Application Programming Model
1 -
SAP Datasphere
2 -
SAP S4HANA Cloud
1 -
SAP S4HANA Migration Cockpit
1 -
Technology Updates
6,873 -
Technology Updates
427 -
Workload Fluctuations
1
Related Content
- IoT - Ultimate Data Cyber Security - with Enterprise Blockchain and SAP BTP 🚀 in Technology Blogs by Members
- SAP Successfactors Implementation and Maintenance in Projects in 2024 in Technology Blogs by Members
- Single Sign On to SAP Cloud Integration (CPI runtime) from an external Identity Provider in Technology Blogs by SAP
- SAP BTP and Third-Party Cookies Deprecation in Technology Blogs by SAP
- SAP Datasphere - Space, Data Integration, and Data Modeling Best Practices in Technology Blogs by SAP
Top kudoed authors
| User | Count |
|---|---|
| 40 | |
| 25 | |
| 17 | |
| 14 | |
| 8 | |
| 7 | |
| 7 | |
| 7 | |
| 6 | |
| 6 |