
- SAP Community
- Products and Technology
- Technology
- Technology Blogs by SAP
- How to configure SAP Identity Provisioning Service...
Technology Blogs by SAP
Learn how to extend and personalize SAP applications. Follow the SAP technology blog for insights into SAP BTP, ABAP, SAP Analytics Cloud, SAP HANA, and more.
Turn on suggestions
Auto-suggest helps you quickly narrow down your search results by suggesting possible matches as you type.
Showing results for
former_member78
Explorer
Options
- Subscribe to RSS Feed
- Mark as New
- Mark as Read
- Bookmark
- Subscribe
- Printer Friendly Page
- Report Inappropriate Content
03-23-2022
7:30 AM
In this article I am going to talk about user provisioning for SAP Analytics Cloud via SCIM API and advantages of using it instead of other methods. I am then going to talk about SAP Identity Provisioning service and give a step-by-step guide on how to configure it. After reading this article, you will be able to provide Users and Groups to your SAP Analytics Cloud tenant through SAP Identity Provisioning Service.
Introduction
There are different types of user provisioning for SAP Analytics Cloud:
Here we are going to focus on SCIM user provisioning via SAP Identity Provisioning Service.
SCIM user provisioning in SAP Analytics Cloud is the primary access endpoint for the User and Team provisioning API.
The advantage of using SCIM user provisioning over SAML provisioning is that when using SAML, new users are created, and changes are made only during login. SCIM API, on the other hand, makes changes on the backend when they happen, so updates occur without a login.
SAP Identity Provisioning Service provides an out of the box connector for SAP Analytics Cloud. The main use case of SAP Identity Provisioning Service is to read users and groups from a source system and provision them to a target system. Filtering and/or mapping are applied during job execution.
The main benefit of using SAP Identity Provisioning Service is that you don't have to write an app specific for managing users - SAP Identity Provisioning Service calls SCIM API for you.
Below is a step-by-step guide on how to configure SAP Identity Provisioning Service to connect to SAP Analytics Cloud.
Step 1
In SAP Identity Provisioning Service go to "Source System" and click "Add".
Fill out information under "Details" tab: source system type, name. Optional: destination name and description. Then click "Save".
Step 3
Set up communication between SAP Identity Provisioning Service and source system (looking at Identity Authentication here) and configure your authentication method (certificate or basic).
For more information on adding Administrator go here.
If you are using another source system type, look for it in the menu and follow the steps to create user ID and password for the next step.
Step 4
Go to "Properties" tab and click on "Edit". Select "+" to add more properties.
Here is the list of properties to add if using Identity Authentication as your source system with Basic Authentication (no certificate):
See here for the list of additional properties.
If you are using another source system type, look for it in the menu here.
Step 5
Now we move on to the target system. Here we are going to talk about setting SAP Analytics Cloud as your target system.
Go to "Target System" page in SAP Identity Provisioning Service and click "Add".
Step 6
Fill out the "Details" and click "Save".
Step 7
Add a new OAuth client in SAP Analytics Cloud. The steps to follow are here.
In your SAP Analytics Cloud tenant, go to Administration -> App Integration -> Add a new OAuth client.
Purpose - API Access
Access - User Provisioning
Remember your secret, OAuth Client ID and Token URL for the next step.
Step 8
Go to "Properties" tab and click "Edit", then add new properties with "+".
The list of properties to add:
(*) When you are updating users/groups, SCIM API is expecting to get the assigned roles. This property defines whether the role assignment in SAP Analytics Cloud will be removed or not as a result of an update operation executed. In order to keep the roles unchanged, you can include this parameter with "true" value.
Here you can find more detailed information on how to configure the SAP Analytics Cloud system as a target.
Step 9
Now you are done with the set up! Next step is to run your first user provisioning job.
You can read the information on how to run user provisioning jobs here.
More Resources
SAP IPS Documentation
Please like, comment and share this article if you found it helpful. If you have any questions, please feel free to leave them in the Q&A here!
Introduction
There are different types of user provisioning for SAP Analytics Cloud:
- through SAP Analytics Cloud User Interface
- SAML
- SCIM API.
Here we are going to focus on SCIM user provisioning via SAP Identity Provisioning Service.
SCIM user provisioning in SAP Analytics Cloud is the primary access endpoint for the User and Team provisioning API.
The advantage of using SCIM user provisioning over SAML provisioning is that when using SAML, new users are created, and changes are made only during login. SCIM API, on the other hand, makes changes on the backend when they happen, so updates occur without a login.
SAP Identity Provisioning Service provides an out of the box connector for SAP Analytics Cloud. The main use case of SAP Identity Provisioning Service is to read users and groups from a source system and provision them to a target system. Filtering and/or mapping are applied during job execution.
The main benefit of using SAP Identity Provisioning Service is that you don't have to write an app specific for managing users - SAP Identity Provisioning Service calls SCIM API for you.
Below is a step-by-step guide on how to configure SAP Identity Provisioning Service to connect to SAP Analytics Cloud.
Setting up SAP Identity Provisioning Service
Step 1
In SAP Identity Provisioning Service go to "Source System" and click "Add".

Step 2
Fill out information under "Details" tab: source system type, name. Optional: destination name and description. Then click "Save".

Step 3
Set up communication between SAP Identity Provisioning Service and source system (looking at Identity Authentication here) and configure your authentication method (certificate or basic).
- In Identity Authentication go to Administration -> Add new system. This adds a new administrator of type System.
- Assign Manage Users and Manage Groups authorization roles to your technical user.
- For Basic Authentication, configure your password and user ID will be generated for you. You need to remember your password and generated ID to complete the next step.

For more information on adding Administrator go here.
If you are using another source system type, look for it in the menu and follow the steps to create user ID and password for the next step.
Step 4
Go to "Properties" tab and click on "Edit". Select "+" to add more properties.

Here is the list of properties to add if using Identity Authentication as your source system with Basic Authentication (no certificate):
| Authentication | BasicAuthentication |
| Password | Password of Identity Authentication technical user |
| ProxyType | Internet |
| Type | HTTP |
| URL | URL of your Identity Authentication tenant |
| User | User ID of Identity Authentication technical user |
See here for the list of additional properties.
If you are using another source system type, look for it in the menu here.
Step 5
Now we move on to the target system. Here we are going to talk about setting SAP Analytics Cloud as your target system.
Go to "Target System" page in SAP Identity Provisioning Service and click "Add".
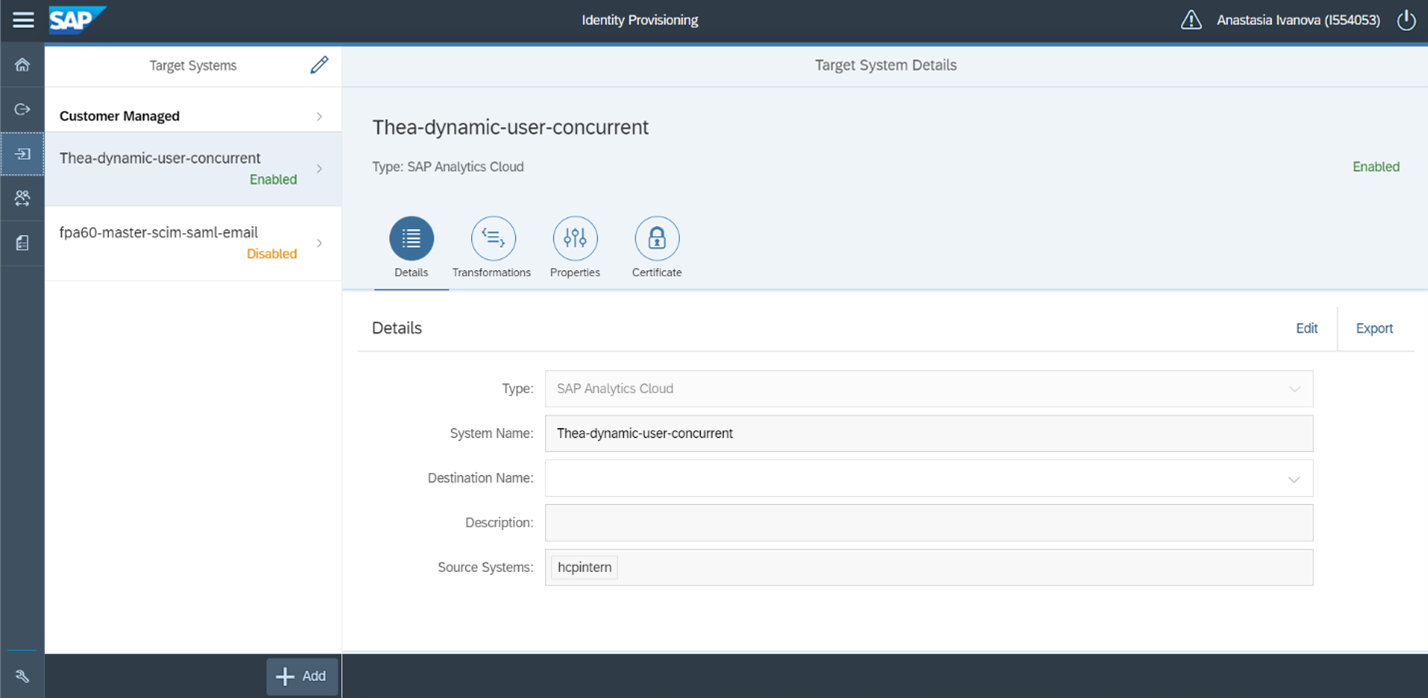
Step 6
Fill out the "Details" and click "Save".

Step 7
Add a new OAuth client in SAP Analytics Cloud. The steps to follow are here.
In your SAP Analytics Cloud tenant, go to Administration -> App Integration -> Add a new OAuth client.
Purpose - API Access
Access - User Provisioning
Remember your secret, OAuth Client ID and Token URL for the next step.
Step 8
Go to "Properties" tab and click "Edit", then add new properties with "+".
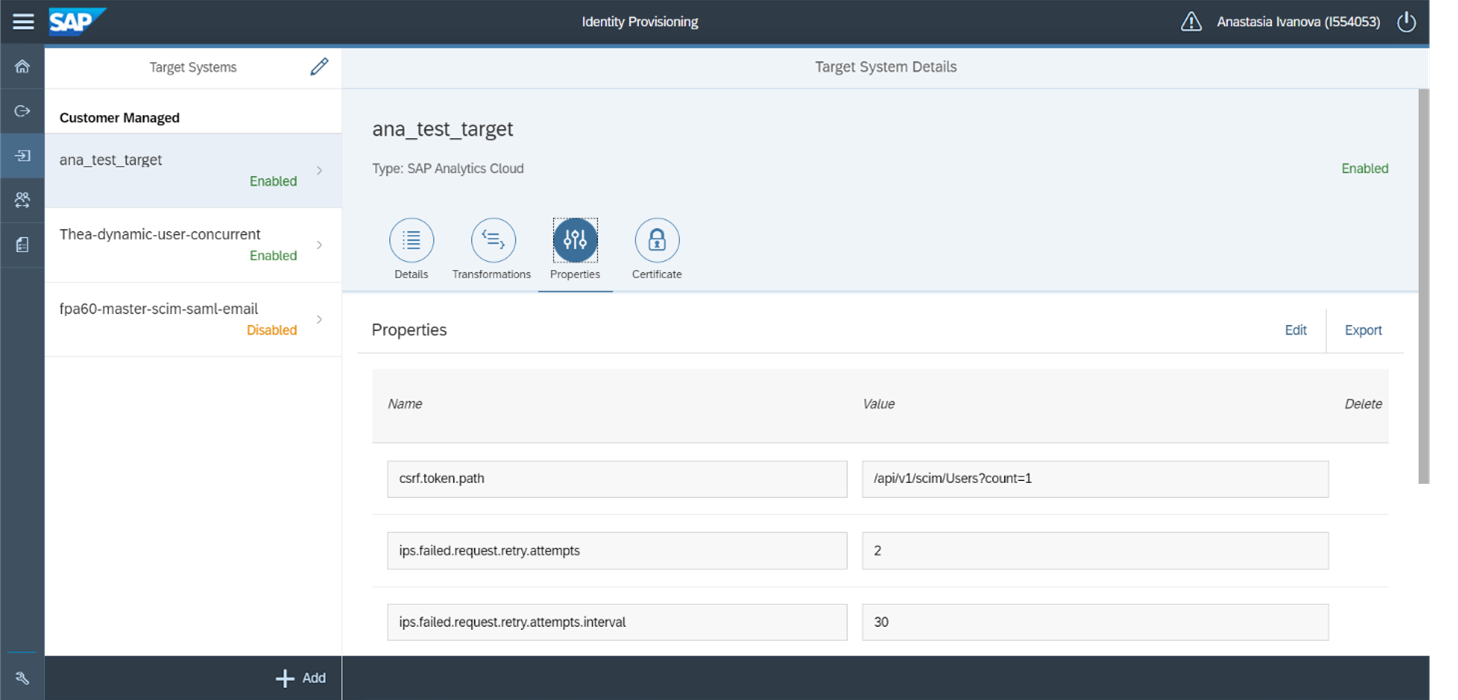
The list of properties to add:
| Authentication | BasicAuthentication |
| ips.http.header.x-ignore-roles-if-missing | true (*) |
| OAuth2TokenServiceURL | URL of the access token provider service |
| Password | Client secret to retrieve OAuth access token for SAP Analytics Cloud |
| ProxyType | Internet |
| Type | HTTP |
| URL | URL for your SAP Analytics Cloud system |
| User | Client ID to retrieve OAuth access token for SAP Analytics cloud |
(*) When you are updating users/groups, SCIM API is expecting to get the assigned roles. This property defines whether the role assignment in SAP Analytics Cloud will be removed or not as a result of an update operation executed. In order to keep the roles unchanged, you can include this parameter with "true" value.
Here you can find more detailed information on how to configure the SAP Analytics Cloud system as a target.
Step 9
Now you are done with the set up! Next step is to run your first user provisioning job.
You can read the information on how to run user provisioning jobs here.
More Resources
SAP IPS Documentation
Please like, comment and share this article if you found it helpful. If you have any questions, please feel free to leave them in the Q&A here!
- SAP Managed Tags:
- SAP Analytics Cloud,
- API,
- Identity Provisioning
Labels:
1 Comment
You must be a registered user to add a comment. If you've already registered, sign in. Otherwise, register and sign in.
Labels in this area
-
ABAP CDS Views - CDC (Change Data Capture)
2 -
AI
1 -
Analyze Workload Data
1 -
BTP
1 -
Business and IT Integration
2 -
Business application stu
1 -
Business Technology Platform
1 -
Business Trends
1,658 -
Business Trends
91 -
CAP
1 -
cf
1 -
Cloud Foundry
1 -
Confluent
1 -
Customer COE Basics and Fundamentals
1 -
Customer COE Latest and Greatest
3 -
Customer Data Browser app
1 -
Data Analysis Tool
1 -
data migration
1 -
data transfer
1 -
Datasphere
2 -
Event Information
1,400 -
Event Information
66 -
Expert
1 -
Expert Insights
177 -
Expert Insights
297 -
General
1 -
Google cloud
1 -
Google Next'24
1 -
Kafka
1 -
Life at SAP
780 -
Life at SAP
13 -
Migrate your Data App
1 -
MTA
1 -
Network Performance Analysis
1 -
NodeJS
1 -
PDF
1 -
POC
1 -
Product Updates
4,577 -
Product Updates
342 -
Replication Flow
1 -
RisewithSAP
1 -
SAP BTP
1 -
SAP BTP Cloud Foundry
1 -
SAP Cloud ALM
1 -
SAP Cloud Application Programming Model
1 -
SAP Datasphere
2 -
SAP S4HANA Cloud
1 -
SAP S4HANA Migration Cockpit
1 -
Technology Updates
6,873 -
Technology Updates
420 -
Workload Fluctuations
1
Related Content
- Consuming SAP with SAP Build Apps - Mobile Apps for iOS and Android in Technology Blogs by SAP
- Composite Data Source Configuration in Optimized Story Experience in Technology Blogs by SAP
- Configure Custom SAP IAS tenant with SAP BTP Kyma runtime environment in Technology Blogs by SAP
- Kyma Integration with SAP Cloud Logging. Part 2: Let's ship some traces in Technology Blogs by SAP
- Top Picks: Innovations Highlights from SAP Business Technology Platform (Q1/2024) in Technology Blogs by SAP
Top kudoed authors
| User | Count |
|---|---|
| 37 | |
| 25 | |
| 17 | |
| 13 | |
| 7 | |
| 7 | |
| 7 | |
| 6 | |
| 6 | |
| 6 |