
- SAP Community
- Products and Technology
- Technology
- Technology Blogs by SAP
- Comprehensive Guide to Parallel Processing in SAP ...
Technology Blogs by SAP
Learn how to extend and personalize SAP applications. Follow the SAP technology blog for insights into SAP BTP, ABAP, SAP Analytics Cloud, SAP HANA, and more.
Turn on suggestions
Auto-suggest helps you quickly narrow down your search results by suggesting possible matches as you type.
Showing results for
marcel_oenning
Explorer
Options
- Subscribe to RSS Feed
- Mark as New
- Mark as Read
- Bookmark
- Subscribe
- Printer Friendly Page
- Report Inappropriate Content
03-17-2022
7:25 AM
Introduction
Are you a pipeline developer working with SAP Data Intelligence? Is your custom Python operator the bottleneck of the overall pipeline execution? And you are you searching for more possibilities to parallelise the execution of pipeline operators aside from multi-instancing? - Then you found the right guide to solve your problems. This guide aims to provide a comprehensive overview of possible parallelisation methods in SAP Data Intelligence. It will help you to increase the throughput of your pipelines based on your needs.
A data processing pipeline on Data Intelligence can typically be divided into three parts:
- Ingestors - source operators generating or streaming data into the pipeline
- Processors - operators processing the data
- Sinks - operators writing the processed data to the target system
Most of the time the bottleneck of a pipeline is the "processing" part. Furthermore a lot of pipelines require custom logic to be implemented for this part. Most users decide to go for a custom Python operator. Therefore I decided to provide you with an example written in Python.
This guide requires some technical background, a basic understanding of Python and a good understanding of the Data Intelligence Modeler application. If you do have any questions, you can reach out to me in the comments section below.
If you do need some material to get started developing your first custom operator on Data Intelligence, check out these articles:
- SAP Data Hub – Develop, Run, Monitor and Trace a Data Pipeline (Part 2)
- SAP Data Hub – Develop a custom Pipeline Operator with own Dockerfile (Part 3)
Introduction to the Example Graph

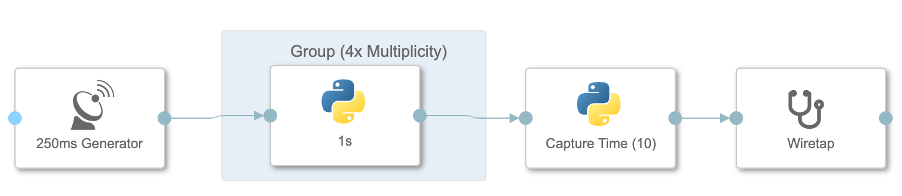
Example Graph used in this Guide
During this guide we will use the following simple graph to illustrate on how we can optimise our graph throughput by parallelisation. The first operator is a standard "Constant Generator" operator configured to produce an output every 250ms. And the second operator is a custom Python operator processing the input within 1s. The processing part is emulated by sleeping 1s before sending an output to the 3rd operator. The third operator is waiting for 10 inputs before sending the measured performance (in time) to the wiretap.
So overall we have a processing operator that is 4x slower than the source operator. This is our current bottleneck. The first operator can produce 10 Messages in 2.5s (each 250ms) but the second operator can only process 1 Message per second. This leads to back-pressure in the pipeline and a 4x performance loss with a total runtime of 10s for 10 Messages.
You can copy the following JSON into your Data Intelligence Modeler application when creating a new graph (gen1) from scratch. Use this as a template to apply the parallelisation methods below. Same methods can be applied to gen2 graphs with small adjustments to the new API.
Attention! All examples shown below can also be downloaded from this github repository and imported into your system. As an alternative you can copy the main graph below to adapt it yourself, following the guide step by step.
{"properties":{},"description":"[Ex] Main Graph - Parallelisation Guide","processes":{"constantgenerator1":{"component":"com.sap.util.constantGenerator","metadata":{"label":"250ms Generator","x":17,"y":12,"height":80,"width":120,"extensible":true,"generation":1,"config":{"mode":"pulse","duration":"250ms"}}},"python3operator1":{"component":"com.sap.system.python3Operator","metadata":{"label":"Capture Time (10)","x":355,"y":12,"height":80,"width":120,"extensible":true,"filesRequired":["script.py"],"generation":1,"config":{"script":"from datetime import datetime\nlast = datetime.now()\nn_inputs = 0\n\ndef on_input(data):\n global last\n global n_inputs\n n_inputs += 1\n \n if n_inputs == 10:\n now = datetime.now()\n diff = now - last\n last = now\n n_inputs = 0\n api.send(\"out\", str(diff))\n\napi.set_port_callback(\"in\", on_input)"},"additionalinports":[{"name":"in","type":"string"}],"additionaloutports":[{"name":"out","type":"string"}]}},"wiretap1":{"component":"com.sap.util.wiretap","metadata":{"label":"Wiretap","x":524,"y":12,"height":80,"width":120,"generation":1,"ui":"dynpath","config":{}}},"python3operator2":{"component":"com.sap.system.python3Operator","metadata":{"label":"1s ","x":186,"y":12,"height":80,"width":120,"extensible":true,"filesRequired":["script.py"],"generation":1,"config":{"script":"import time\n\ndef on_input(message):\n # Delay (process message in 1s)\n time.sleep(1)\n api.send(\"out\", message)\n \napi.set_port_callback(\"in\", on_input)"},"additionalinports":[{"name":"in","type":"string"}],"additionaloutports":[{"name":"out","type":"string"}]}}},"groups":[],"connections":[{"metadata":{"points":"479,52 519,52"},"src":{"port":"out","process":"python3operator1"},"tgt":{"port":"in","process":"wiretap1"}},{"metadata":{"points":"141,52 181,52"},"src":{"port":"out","process":"constantgenerator1"},"tgt":{"port":"in","process":"python3operator2"}},{"metadata":{"points":"310,52 350,52"},"src":{"port":"out","process":"python3operator2"},"tgt":{"port":"in","process":"python3operator1"}}],"inports":{},"outports":{},"metadata":{"generation":1}}Method 1: Multi-Instancing (Grouping / Multiplicity)
Method 1: Multi-instancing (Grouping)
The first option is the most well-known and also the easiest to apply. Simply group the affected operator(s) in the graph and configure the group's multiplicity (number of parallel instances executing the underlying code). SAP Data Intelligence will then spawn as many pods in the Kubernetes cluster as you need. Therefore this approach is fully capable of leveraging the full Kubernetes capabilities by scheduling a bunch of pods across the cluster. One limitation of this functionality is, that it isn't scaling up or down automatically. This can lead to a lot of idle resources, if the fluctuation in the throughput of the pipeline is high. Another disadvantage is that you will be loosing the order of the incoming Messages. So if you rely on the last Message to terminate your graph, you will either have to adapt the termination logic of your graph or you will have to use another parallelisation method shown below.
Advantages:
- Easy to apply
- Fully leverages the capabilities of Kubernetes by spawning multiple pods
Disadvantages:
- Inflexible (no auto-scaling). Note: Autoscaling is a requested feature that might be available in a later release. It wasn't available when publishing this blog
- Possibility of idle resources due to missing autoscaling functionality
- Message order is lost
-> Can be remedied by providing an index with each input initially and then writing a "gathering" operator that reorders the results after they have been sent out of the group
Steps to apply method 1 to the main graph:
- Group the affected operator(s)
- Configure the group's multiplicity
With a multiplicity of 1 your graph will need 10s for 10 Messages.
With a multiplicity of 2 - 5s, 3 - 3.33s and with a multiplicity of 4 - 2.5s.
A higher multiplicity than 4 still yields to a performance of 2.5s and just leads to idle resources in the cluster. Obviously, unless you optimise the producing operator as well.
Method 2: Master-Worker Pattern

Method 2: Multi Processing with a Master-Worker architecture
The next methods I am going to present, will be increasing the throughput of the "1s" operator with the help of multi-processing rather than multi-instancing. This means that the code of that operator will be executed in a single execution instance (1 Kubernetes pod/container), but within that single execution instance multiple processes will be spawned. This will already avoid most of the mentioned disadvantages of using the built-in multi-instancing approach.
Below you can find the full code snippet needed to parallelise the operator using the master-worker design pattern. Every detail of the code will be explained here step by step.
To make use of the multiprocessing library, we must import the parallelized function instead of defining it in the operator script directly (due to some architectural restrictions - Basically we are interpreting and running your code from a base operator and if you try to parallelise a function within the given script it will fail with a pickle error message).
Therefore I created a second file in the repository of my Data Intelligence cluster at “subengines/com/sap/python36/operators/com/example/multi.py”. This file can then be imported using the following statement
from operators.com.example.multi import parallel_fun It is important that every folder in the path contains an empty (0 byte) “__init.py__” file. Also it is important that the file is stored at “subengines/com/sap/python36/operators” path and not in the “operators” directory.
To allow a communication between the master and worker processes I have created an in_queue. The master will send any incoming messages directly into this queue and the workers will be consuming the messages from this queue. Additionally, I have created an out_queue which is used to send the results from the worker processes back to the master process.
Afterwards we are spawning 4 workers (daemon processes instead of pod instances) that should be processing the incoming messages. The processes are defined as daemon processes because they should keep running in the background even if they are idle.
The on_input callback contains the logic of the master process to forward any incoming message to the worker's queue. Additionally, the master will periodically check the out_queue for possible results returned from the workers using a timer callback. If it receives a result, then this result will be sent to the operator’s output port.
The workers will keep collecting the messages from the given in_queue until they receive a shutdown signal. You can see the shutdown logic in the shutdown_workers method below.
import multiprocessing

from multiprocessing import Pool, get_context

multiprocessing.set_start_method('spawn')

from operators.com.example.multi import parallel_fun


q_in = multiprocessing.Queue(1)

q_out = multiprocessing.Queue()


# Spawn workers

n_proc = 4

proc = [multiprocessing.Process(target=parallel_fun, args=(q_in, q_out)) for _ in range(n_proc)]

for p in proc:

    p.daemon = True

    p.start()


# Input callback sends data to in queue

def on_input(message):

    # Just put the Message into the queue for the workers

    q_in.put((False, message))


# Timer callback is handling the results from the out queue

import queue

def t1():

    try:

        out = q_out.get()

        api.send("out", out)

    except queue.Empty:

        pass

# "0" timer callback is started as quickly as possible (basically a while loop)

# Increase time if you expect the out_queue to be empty most of the time

api.add_timer("0", t1)


# shutdown the workers

def shutdown_workers():

    for _ in range(n_proc):

        q_in.put((True, None))

api.add_shutdown_handler(shutdown_workers)


api.set_port_callback("in", on_input)
The targeted parallelised function of the workers can be found in the file multi.py and looks like this:
import time


def parallel_fun(q_in, q_out):

    while True:

        shutdown, x = q_in.get()

        if shutdown is True:

            break

        time.sleep(1)

        q_out.put(("done"))
Advantages:
- You can scale the CPU consumption of a single pod (execution instance) to your needs.
So instead of having 10 pods consuming each 10x memory and 0.1 CPU
You can have 1 pod consuming less memory in total and 1 CPU. - Can provide you with auto-scaling:
- Upscaling in the on_input callback whenever a lot of messages arrive within a short time period or when the in_queue is blocked (using a timeout). -> Just spawn a new worker process and add it to the global list.
- Downscaling when no new input messages arrived on the on_input callback for a given time period. -> Just send a shutdown signal into the in_queue and one of the workers will shutdown.
Disadvantages:
- Message order is lost
-> Can be remedied by providing an index with each input initially and then writing a "gathering" operator that reorders the results after they have been sent out of the operator - Possible overhead of idle workers.
- Does not leverage the Kubernetes capabilities as all processes are running in the same pod, container on the same node in the cluster.
-> Can be remedied by combining this method with method 1.
Steps to apply method 2 to the main graph:
- Copy and Paste the provided script into the "1s" operator editor.
- Make sure to have parallel_fun3 available in the file "subengines/com/sap/python36/operators/com/example/multi.py" and make sure that all folders in that path contain an empty (0 byte) file called "__init.py__"
With 4 workers the graph is yielding to the maximum performance of 2.5s per 10 Messages. Having less workers will result in back-pressure in the given pipeline because the "1s" operator is processing the inputs slower than how they are generated. Having more than 4 workers will result in additional idle processes because they have to wait for new messages on the empty input_queue.
Method 3: Multi-Processing (1 Process for 1 Input)

Method 3: Multi Processing by spawning processes for complex inputs
This next method looks very similar to method 2 but with one slight difference: It does spawn a new daemon process with every given input Message. And therefore does not need any in_queue, but rather passes the given input Message directly to the newly spawned process.
You might be wondering when this slightly different pattern might be useful. The answer might be that you have a lot of small inputs that can be processed by the master process in a short time period, but only very few big inputs that take very long to be processed. In that case you can avoid the possible overhead of idle workers and just process all inputs in the master process directly and whenever you receive a big input you can pass it to a child process.
If you had no parallelisation then the single big input will block the (sequential) processing of all following smaller messages. But if you had implemented the master-worker pattern then the workers might be idle whenever they only receive small inputs but too busy or even blocked when receiving only big inputs.
from multiprocessing import Pool, get_context

from operators.com.example.multi import parallel_fun2

import multiprocessing as mp

mp.set_start_method('spawn')


q = mp.Queue()

# Process

def on_input(message):

    # Only spawn the process here

    # Dont get the data from the queue. Otherwhise your main process will be blocked again

    # Also don't join daemon processes.

    api.logger.info("logs before Parallel start")

    p = mp.Process(target=parallel_fun2, args=(message, q))

    p.daemon = True

    p.start()

    api.logger.info("logs after Parallel start")


# Timer callback is handling the results from the out queue

import queue

def t1():

    try:

        result = q.get()

        api.send("out", result)

    except queue.Empty:

        pass

# "0" timer callback is started as quickly as possible (basically a while loop)

# Increase time if you expect the out_queue to be empty most of the time

api.add_timer("0", t1)


api.set_port_callback("in", on_input)
Because of the missing in_queue the targeted parallelised function in the file multi.py is slightly different. Also the daemon process doesn't need any shutdown signal as it terminates automatically when it has processed the given Message.:
import time


def parallel_fun2(message, q_out):

    time.sleep(1)

    q_out.put((message))
Advantages:
- Very flexible to fluctuating input processing complexities ("big" complex inputs vs "small" easy inputs)
- Auto-Scaling
Disadvantages:
- Message order is lost
-> Can be remedied by providing an index with each input initially and then writing a "gathering" operator that reorders the results after they have been sent out of the operator - "big" complex Messages are processed slowly in the background.
- Inflexible to many "small" easy inputs
-> Can be remedied by combining this method with method 2. Basically having a Master-Worker pattern but filtering the "big" complex inputs and spawning separate processes for them. - Does not leverage the Kubernetes capabilities as all processes are running in the same pod, container on the same node in the cluster.
-> Can be remedied by combining this method with method 1.
Steps to apply method 3 to the main graph:
- Copy and Paste the provided script into the "1s" operator editor.
- Make sure to have parallel_fun3 available in the file "subengines/com/sap/python36/operators/com/example/multi.py" and make sure that all folders in that path contain an empty (0 byte) file called "__init.py__"
Method 4: Batched Multi-Processing (n Processes per Input)

Method 4: Multi Processing using Process Pools
As we have learned with method 3 we can already avoid a lot of disadvantages from method 1 and 2 while still keeping their advantages. But we still have the potential to optimise the processing of these "big" complex inputs. In some cases we can avoid them completely by dividing them into smaller chunks.
These smaller chunks can then be treated as singular smaller inputs and sending them to the worker processes as we did in method 2. However, often this is not possible because the pipeline might require that the given input should result into a single output.
In these cases where you have a "big" complex input, which can be divided in smaller chunks (in other words can be processed in parallel) but, on the other hand, needs to yield into a single result send to the output port. In those cases we can make use of so-called Process Pools.
To simulate such bigger inputs I have adapted the given example graph by collecting 10 inputs in a separate Python operator and then sending this big Message to the "1s" operator.
messages = []


def on_input(message):

    global messages

    # Collect messages in a list

    messages.append(message)


    # Until we have 10 and send them out as a batch of 10 messages

    if len(messages) == 10:

        api.send("batch", messages.copy())

        # Reset the variable for the next batch

        messages = []


api.set_port_callback("in", on_input)
Let's assume this operator would typically need 1s for smaller Messages, but in this case the input is so big that it would require 10s of processing time. To avoid such long processing times, we are spawning a process pool of size 10 and provide the list of 10 Messages to pool. The get_context("spawn") statement is needed due to the architectural restrictions mentioned above. Once we retrieved all results we could send them to the next operator in a single Message or split them into smaller output Messages again as shown below.
from multiprocessing import Pool, get_context

from operators.com.example.multi import parallel_fun3


# Pool

def on_input(data):

    # the list of messages is in the input data's body

    messages = data.body

    api.logger.info("logs before Parallel start")

    # Create a pool with 10 processes

    with get_context("spawn").Pool(10) as pool:

        # Run parallel function and split the input among them

        results = pool.map(parallel_fun3, data.body)

        # Send out the results as single messages

        for result in results:

            api.send("out", result)

    api.logger.info("logs after Parallel start")


api.set_port_callback("batch", on_input)
In this example we are not using any queues but rather return the results in the targeted parallelised function directly. It is also located in the file multi.py:
import time


def parallel_fun3(message):

    time.sleep(1)

    return message
Advantages:
- Message order is kept
- Divide and Conquer approach results in good performance for "big" complex inputs
Disadvantages:
- Can only be used when you have:
- "big" complex inputs
- that can be chunked and processed in parallel
- and ideally all chunks require the same processing time (don't differ in processing complexity)
- Does not leverage the Kubernetes capabilities as all processes are running in the same pod, container on the same node in the cluster.
-> Can be remedied by sending the chunks to another operator using method 1.
Steps to apply method 4 to the main graph:
- Create a “collect” operator with a Basic Type “string” input called ‘in’ and an output of Basic Type “message” called ‘batch’.
- Adapt the “1s” operator input port by changing it’s type to ‘message’ as well and the name to ‘batch’.
- Copy and Paste the first provided script into the "collect" operator
- Copy and Paste the second provided script into the "1s" operator editor.
- Make sure to have parallel_fun3 available in the file "subengines/com/sap/python36/operators/com/example/multi.py" and make sure that all folders in that path contain an empty (0 byte) file called "__init.py__"
Summary and “When to Use What”?
In this guide you should have learned how SAP Data Intelligence can be used to scale your data processing pipelines up and down to your needs. And that with small efforts you can even create auto-scaling processing operators. The “multi-instancing” (grouping) functionality is an easy to use built-in functionality, which helps to scale pipelines across several pods running on different nodes in your cluster. Whenever this feature is not fulfilling your requirements, you can make use of the standard multiprocessing Python library to finetune your data pipeline. In most cases a combination of the presented methods will yield into the best performance. To get an idea of these possible combinations, I have created an overview of possible situations and which method(s) can then be used to optimize your pipeline throughput.
| Scenario (multiple can apply to you) | Method to Use (additionally) |
| You want to leverage Kubernetes capabilities and distribute workload across different pods in your cluster | (1) |
| You want to parallelise within the pods running in your cluster | (2) and/or (3) and/or (4) |
| You have consistent inputs with comparable complexity | (1) and/or (2) |
| Only some of your total inputs are complex and block your (sequential) pipeline process | (3) or (3)+(2) or (3)+(2)+(1) |
| You have complex inputs which can be processed in smaller chunks but need to yield into a result that can be merged | (4) |
Enjoyed reading this guide? Any other patterns you want me to explore? - Let me know in the comments section below. You can also post a question related to SAP Data Intelligence here. Also make sure to checkout one of my other blog articles:
- SAP Managed Tags:
- SAP Data Intelligence,
- Python,
- Big Data,
- SAP Business Technology Platform
Labels:
13 Comments
You must be a registered user to add a comment. If you've already registered, sign in. Otherwise, register and sign in.
Labels in this area
-
ABAP CDS Views - CDC (Change Data Capture)
2 -
AI
1 -
Analyze Workload Data
1 -
BTP
1 -
Business and IT Integration
2 -
Business application stu
1 -
Business Technology Platform
1 -
Business Trends
1,658 -
Business Trends
93 -
CAP
1 -
cf
1 -
Cloud Foundry
1 -
Confluent
1 -
Customer COE Basics and Fundamentals
1 -
Customer COE Latest and Greatest
3 -
Customer Data Browser app
1 -
Data Analysis Tool
1 -
data migration
1 -
data transfer
1 -
Datasphere
2 -
Event Information
1,400 -
Event Information
66 -
Expert
1 -
Expert Insights
177 -
Expert Insights
299 -
General
1 -
Google cloud
1 -
Google Next'24
1 -
Kafka
1 -
Life at SAP
780 -
Life at SAP
13 -
Migrate your Data App
1 -
MTA
1 -
Network Performance Analysis
1 -
NodeJS
1 -
PDF
1 -
POC
1 -
Product Updates
4,577 -
Product Updates
344 -
Replication Flow
1 -
RisewithSAP
1 -
SAP BTP
1 -
SAP BTP Cloud Foundry
1 -
SAP Cloud ALM
1 -
SAP Cloud Application Programming Model
1 -
SAP Datasphere
2 -
SAP S4HANA Cloud
1 -
SAP S4HANA Migration Cockpit
1 -
Technology Updates
6,873 -
Technology Updates
423 -
Workload Fluctuations
1
Related Content
- Up Net Working Capital, Up Inventory and Down Efficiency. What to do? in Technology Blogs by SAP
- Unify your process and task mining insights: How SAP UEM by Knoa integrates with SAP Signavio in Technology Blogs by SAP
- SAP HANA Cloud Vector Engine: Quick FAQ Reference in Technology Blogs by SAP
- 10+ ways to reshape your SAP landscape with SAP Business Technology Platform – Blog 4 in Technology Blogs by SAP
- Top Picks: Innovations Highlights from SAP Business Technology Platform (Q1/2024) in Technology Blogs by SAP
Top kudoed authors
| User | Count |
|---|---|
| 40 | |
| 25 | |
| 17 | |
| 13 | |
| 8 | |
| 7 | |
| 7 | |
| 7 | |
| 6 | |
| 6 |