
- SAP Community
- Products and Technology
- Supply Chain Management
- SCM Blogs by SAP
- SAP EWM RFUI screen using EWM_MOBGUI service, Pers...
Supply Chain Management Blogs by SAP
Expand your SAP SCM knowledge and stay informed about supply chain management technology and solutions with blog posts by SAP. Follow and stay connected.
Turn on suggestions
Auto-suggest helps you quickly narrow down your search results by suggesting possible matches as you type.
Showing results for
Advisor
Options
- Subscribe to RSS Feed
- Mark as New
- Mark as Read
- Bookmark
- Subscribe
- Printer Friendly Page
- Report Inappropriate Content
03-10-2022
10:37 AM
Do you have customer requirements to personalize EWM RFUI screens?
Today I will introduce below, which is available from SAP Release SAP S/4HANA Cloud 2108 and higher or SAP S/4HANA 2021 On-Premise and higher.
1)EWM_MOBGUI service
- Steps and share how it looks when we use “EWM_MOBGUI” service.
2)SAP Screen Personas for RFUI
- Overview information and steps for you to image how you can utilize SAP Screen Personas for RFUI. Just to support identifying "Will SAP Screen Personas be the solution for your customer".
3) Useful links
- Please check the links for restrictions using this solution, installation, how to and optimization guide.
1)EWM_MOBGUI service
1-1. Overview
You can activate “EWM_MOBGUI” service in transaction SICF.
This will enable you to display ABAP Dynpro in RF Framework as SAP GUI for HTML.
It requires no generation of an HTML template.
It renders the RF screens in the most recent SAP Themes and Fiori Design for a modern look and feel.
Screens can be further personalized using SAP Screen Personas, which I will explain in 2)SAP Screen Personas for RFUI.
1-2. Steps to activate 1)EWM_MOBGUI service :
▸Step 1 : Activate and open service "EWM_MOBGUI"
Open transaction "SICF".
Activate the service "EWM_MOBGUI" and open the activated internet service.
or open the URL that follows the following pattern: https://<server>/sap/bc/gui/sap/its/ewm_mobgui?~transaction=/scwm/rfui&sap-language=EN. (Then you can skip step2)
*Service path is : /sap/bc/gui/sap/its/ewm_mobgui/

▸Step 2 : Open Transaction /SCWM/RFUI on web gui

▸Step 3 : Log on to your warehouse, resource , presentation device.
For example, you will be able to see below screens. (without creating HTML templates)
If your customer still want to personalize from below screens, check out SAP Screen Personas solution.

2)SAP Screen Personas for RFUI
2-1. Overview
At first please understand 2 features for SAP Screen personas.
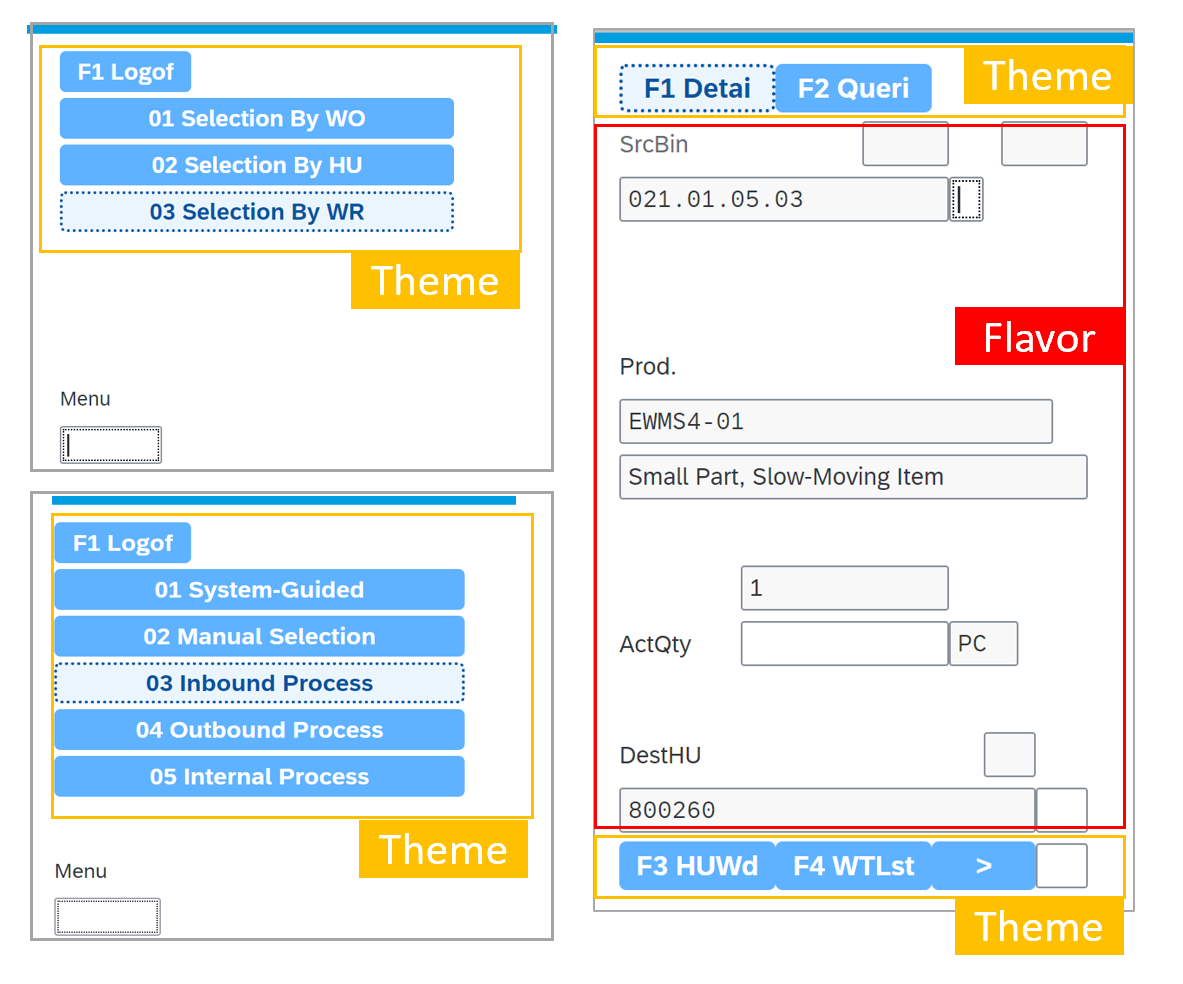
- Theme - Created to maintain visually consistent screens, apply to more than the currently shown screen but applied to all transactions in the current session. You can change Background image, Background colors of control, Font type and Font size. Area size and position, Border style. You can assign Theme to PFCG role.
- Flavor - Specific screen personalization applied to a particular transaction. Flavor can overwrite Theme. You can assign flavor to user or user group or PFCG role. Scripting could be done in Flavor editor, and offers developers a way to influence the screen and process flow using JavaScript. For example, scripts can be used to automate specific tasks that users perform regularly.
- Will introduce overview of Theme in Step 3, Flavor in Step 4. Scripting in Step 5.
- Check out Demo of SAP Screen Personas flavor applied to RF picking transaction.
2-2. Steps to create 2)SAP Screen Personas for RFUI:
▸Step 1 : Assign roles
To have the full rights I assigned /PERSONAS/ADMIN.
SAP Screen Personas 3.0 is only enabled for a user when the relevant authorizations (based on a user role) are granted. Without the necessary authorization, the solution will not be available.
- Administrator - /personas/admin_role - full rights
- Editor - /personas/editor_role - full access to the client, Themes, but not the Administrative UI.
- Consumer - /personas/consumer_role - for read-only access to SAP Screen Personas Flavors.
Further information from Configuring Authorizations and Roles - SAP Help Portal
▸Step 2 : Open Screen Personas
Open the activated "EWM_MOBGUI" service , and open transaction /SCWM/RFUI.
Log on to your warehouse, resource, presentation device. (This time I created presentation device as Portarit mode)
Select the "P" icon, which is the icon of Screen Personas.

Step 3 Theme
▸Step 3-1 : Theme - Create a new Theme
Select "Theme" and Select " + "Create New Theme " . Then enter name and description of your theme. Select "Done".

▸Step 3-2 : Theme - Edit your theme
This time I changed the UI as below editing Theme.
Applied below "button" settings, to change the UI as above,
- Borders to have dotted style, medium weight, light blue lines.
- Changed the font size, font color, font weight and button background color.
Easy isn't it? No CSS coding.

Step 4 Flavor
▸Step 4-1 : Flavor - Create new flavor
Move to the screen you want to personalize and Select the "P" icon, which is the icon of Screen Personas.

Select "+" button (Create New Flavor) and enter name and description of your flavor. Select create.
▸Step 4-2 : Flavor - Edit your flavor
This time I change the UI as below, using Flavor editor.
For this example , User could have required to
- Hide the boxes which they don't need.
- Highlight the Source bin to bold red letters.
- Fill out input fields red.
- Make the font bigger and bold.

Below are several changes , I applied to get above requested UI.
・Hide unnecessary fields. - ①Select the field you want to hide. ②Select Hide button.
・Change size of field. ①Drag and drop.
・Change font size, color, and thicker. - Select the field you want to change and ②Change the value.

・Create new labels - ①Label button ②Enter text of the label ③ Select "Done".
・Fill the input field red - ①Select the input field you want to fill red. ②Select ”Fill” button. Select "red" color from the pallet.
Hope this gave you hints to imagine how to realize your customer requirements.

Step 5 Scripting
Overview : As explained Scripting could be done in Flavor editor, offers developers a way to influence the screen and process flow using JavaScript. For example, scripts can be used to automate specific tasks that users perform regularly.
Attention : The more complicated the script is (retrieving data from multiple transactions, running JavaScript, executing Web RFCs), the more impact it will have on performance. The longer the script is the more time it will take to execute. Please check - Optimizing Techniques in SAP Screen Personas - SAP Help Portal
▸Step 5-1 : Apply Scripting
This time applied scripting to "Logon Pack Station" screen.
Usually you have to enter the "work center code for packing and then press enter" then you go back to the menu screen for packing.
I applied scripting to create buttons to logon to each work center. (Not entering/scanning each work center code and press enter but creating a button to log on for each work center, so user only have to select the button of work center. Value could be User no longer needs to remember the code of work center)
- Please be reminded that this is just a example scenario to understand scripting.

▸Step 5-2 : Apply Scripting - Create the screen
You will not be entering work center codes so create 2 Script buttons to logon work center "Y831" and "Y921".
Hide the ①labels and ②input field which you don't need.
Just for the user to understand you could add new labels on the screen such as "Logon to work center".

▸Step 5-3 : Apply Scripting - Open "Scripts"
Open "Script" button to edit your script. - Be sure you stay on the RF screen which you want to execute scripting.

▸Step 5-4 : Apply Scripting - Edit "Scripts"
①Create 2 scripts to logon each work center. - Create new scripts using "+(add)” button.
②Create script details and save. - You have options to write down the code (Java script) or use "Start recording" button to execute the transactions and the codes will be there. ( Finish without coding available)
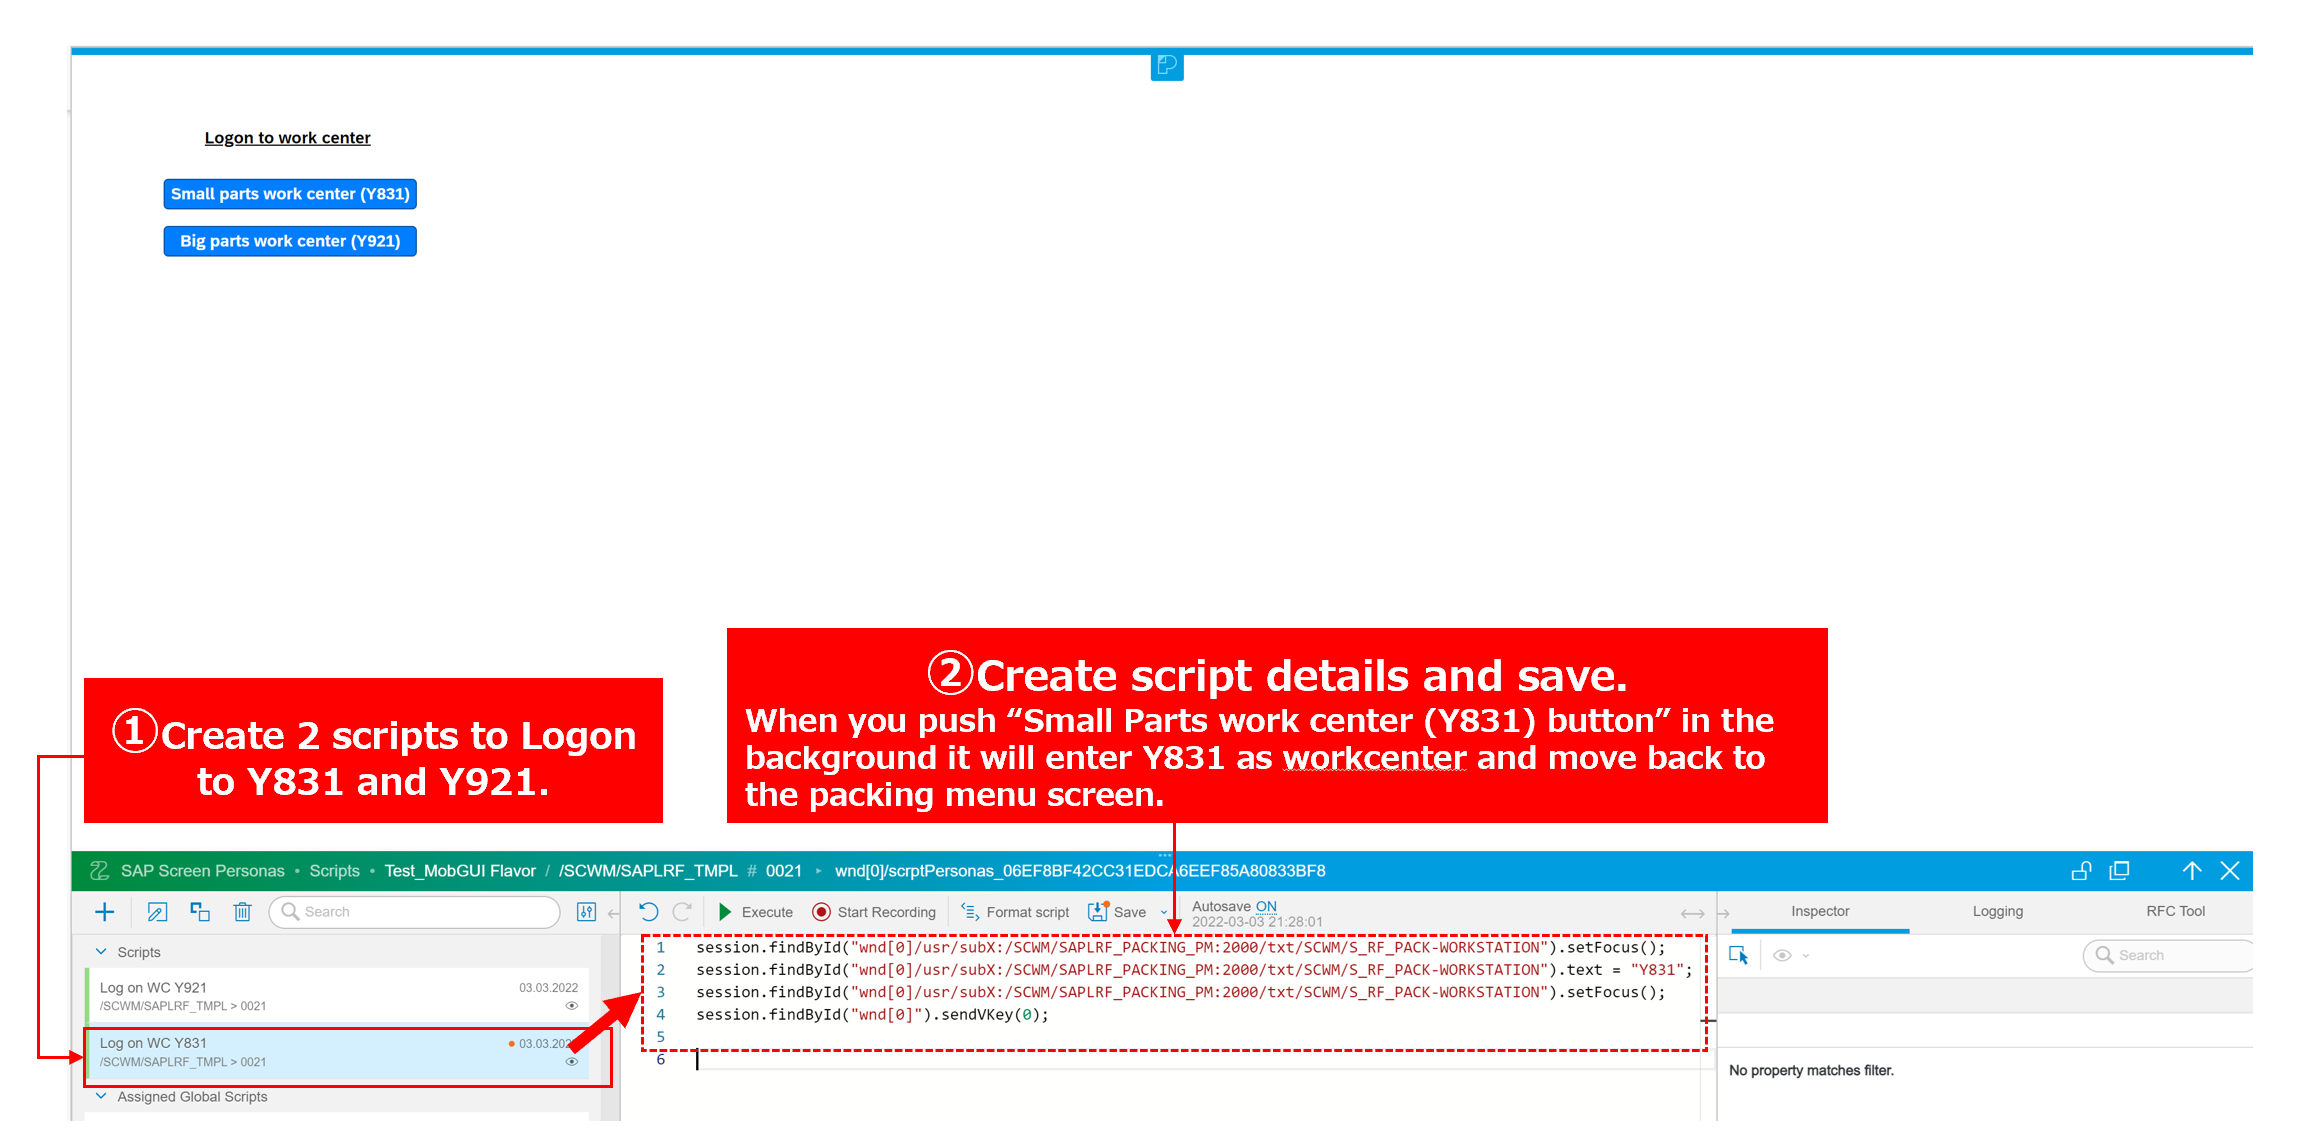 Example of coding this time: (For the other button just change Y831 to Y92)
session.findById("wnd[0]/usr/subX:/SCWM/SAPLRF_PACKING_PM:2000/txt/SCWM/S_RF_PACK-WORKSTATION").setFocus();
session.findById("wnd[0]/usr/subX:/SCWM/SAPLRF_PACKING_PM:2000/txt/SCWM/S_RF_PACK-WORKSTATION").text = "Y831";
session.findById("wnd[0]/usr/subX:/SCWM/SAPLRF_PACKING_PM:2000/txt/SCWM/S_RF_PACK-WORKSTATION").setFocus();
session.findById("wnd[0]").sendVKey(0);
▸Step 5-5 : Apply Scripting - Add script events
①Select the script button you created ②Push Script Events ③Select the script you want to identify on the button you chose for ①. and drag under "onClick".
Take the same action for the other button.
Save and Exit.
▸Step 5-6 : Apply Scripting - Test the scenario
Test the scenario by selecting ①Logon Pack Station ②Select Small parts work center (Y831).

Then open transaction code / SCWM/MON (Warehouse management monitor), Open the node Resource management > RF log. You will be able to confirm that Value Y831 was entered while you selected the "Small parts work center (Y831) button.

▸Step 6 : Give authorization of created Theme or Flavor.
To get the users to apply created Theme or Flavor,
Use transaction code /PERSONAS/ADMIN.
Apply theme for Role. Flavors could be applied to role or specific user or user group.

3)Useful Links
・SAP Personas installation steps :
https://help.sap.com/viewer/9db44532734f4718b91e460c020307fe/Current/en-US/2908a543b9a54baf871937e45...
・Performance Optimization guide for SAP Screen Personas:
https://help.sap.com/viewer/8be453f0277340778e78d72405c87179/Current/en-US
・SAP note 3048632 for information and restrictions :
For example, Please be aware that currently Audio outputs, for example, in the case of errors or warnings, are not offered.
https://launchpad.support.sap.com/#/notes/3048632
・How to guide :
SAP Screen Personas for Mobile RF Devices in Extended Warehouse Management
Conclusion :
Thanks for reading a long blog post.
As said in this blog post, SAP Screen Personas is a brand-new feature, but it is a topic deserving its own article so be sure to keep an eye out for that. SAP will be presenting more details what it is, what it does and how you can use it.
Also questions could be asked here.
Hope this gives you an quick overview.
Thank you!!
- SAP Managed Tags:
- SAP Extended Warehouse Management,
- SAP Screen Personas,
- EWM - Radio Frequency
Labels:
10 Comments
You must be a registered user to add a comment. If you've already registered, sign in. Otherwise, register and sign in.
Labels in this area
-
Business Trends
169 -
Business Trends
23 -
Catalog Enablement
1 -
Event Information
47 -
Event Information
4 -
Expert Insights
12 -
Expert Insights
38 -
intelligent asset management
1 -
Life at SAP
63 -
Product Updates
500 -
Product Updates
65 -
Release Announcement
1 -
SAP Digital Manufacturing for execution
1 -
Super Bowl
1 -
Supply Chain
1 -
Sustainability
1 -
Swifties
1 -
Technology Updates
187 -
Technology Updates
17
Related Content
- Even more Flexibility in Adaptation using Screen Personas Scripting with Mobile RF Devices in Warehouse Management in Supply Chain Management Blogs by SAP
- SAP® Warehouse Management in SAP S/4HANA Cloud 2208 – What’s New in Supply Chain Management Blogs by SAP
- PreBilt for SAP EWM: A Modernized Alternative for the ITS Mobile Interface in Supply Chain Management Blogs by SAP
- The 2021 SAP Extended Warehouse Management Advent Calendar in Supply Chain Management Blogs by SAP
Top kudoed authors
| User | Count |
|---|---|
| 9 | |
| 8 | |
| 5 | |
| 4 | |
| 3 | |
| 3 | |
| 3 | |
| 3 | |
| 3 | |
| 3 |