
- SAP Community
- Products and Technology
- Technology
- Technology Blogs by SAP
- SAP BTP – Security – OAuth 2.0 – Understanding Tok...
Technology Blogs by SAP
Learn how to extend and personalize SAP applications. Follow the SAP technology blog for insights into SAP BTP, ABAP, SAP Analytics Cloud, SAP HANA, and more.
Turn on suggestions
Auto-suggest helps you quickly narrow down your search results by suggesting possible matches as you type.
Showing results for
Product and Topic Expert
Options
- Subscribe to RSS Feed
- Mark as New
- Mark as Read
- Bookmark
- Subscribe
- Printer Friendly Page
- Report Inappropriate Content
03-07-2022
7:48 PM
This blog post covers SAP Business Technology Platform (SAP BTP), XSUAA service and Destination Service.
It is about a user-centric application that fires a request to an OAuth-protected backend application.
To realize authorization, Token Exchange is done.
We’re repeating the previous scenario – but today we will be using the Destination Service.
This should simplify our code – apart from the fact that we anyways would want to avoid hard-coding URLs in our code.
The Destination Service will automatically perform some of the tasks which we have coded manually in previous tutorial.
0. Introduction
1. Backend Application
2. Frontend Application
3. Run the Scenario
Appendix: Sample Code
There’s not much to introduce today, please refer to previous intro, for more details.
Just quick recap.
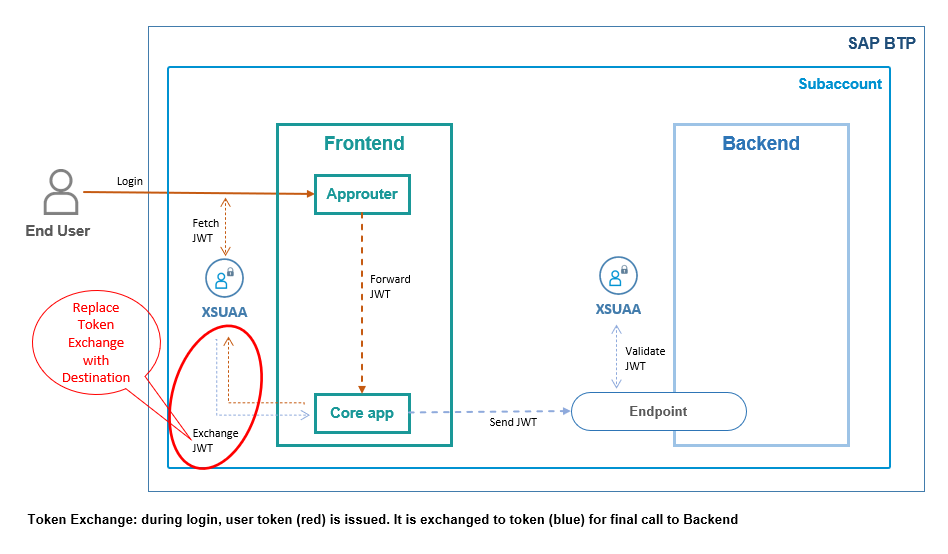
In our scenario, we have a user-centric frontend app that calls a (protected) backend app, to get some data (or whatever).
Our frontend app is accessed by a human user who has all required roles assigned.
User login is handled by approuter.
The core frontend app receives the user-token and fetches a JWT token from XSUAA, required to call the backend app endpoint.
The mechanism of fetching the JWT token is not client-credentials, but instead, token exchange is used.
This means that in addition to the XSUAA-credentials, the user-token is sent to XSUAA.
This way, user-info will be preserved in the new token.
As a consequence, the backend can access the user info as well.
In previous tutorial, we did the token exchange manually and we hard-coded the URL of the backend endpoint in our (core) app.
What we want to change today: extract the target URL into a destination.
When creating a destination, we have to choose the authentication type.
Luckily, the Destination Service in SAP BTP supports the token exchange.
As such, it will take the responsibility of contacting the XSUAA to do the token exchange.
Above diagram shows that our core app does a normal request to consume the destination service.
The destination service will talk to XSUAA to do the token exchange.
The configuration of the desired destination contains the specific details, required to perform the token exchange.
Note on Destinations:
When talking about destinations, we have to distinguish:
Destination service: this is the service instance which we create in the Cockpit or on command line, like any other service instance
Destination Configuration:
This is what we’re typically talking about, when referring to “destinations”.
Basically we configure a target URL such that we don’t need to hard-code it in the app.
Note on Destination Configurations:
Destination Configurations can be created on 2 different levels:
Subaccount level:
We go to our subaccount, open the Connectivity menu and define destinations there.
Instance level
We create a service instance, go to its dashboard and define destinations there.
The main difference is in the visibility:
Destination Configurations that are defined on instance level, can only be seen by applications that are bound to this instance.
Destination Configurations that are defined on subaccount level, can be seen by any application deployed in this subaccount.
In our tutorial, we’re making use of both levels.
Documentation in SAP Help Portal.
Another note on Destination Configurations:
Destination Configurations can be created in 4 different ways.
We don’t need to cover that in this tutorial, we’re just going for the usual way, using the editor in the Cockpit.
More info about alternatives can be found in the docu.
After this overview, we can now go ahead and create our minimalistic scenario.
As a prerequisite, you should have a look at the previous tutorial.
Anyways, we're working with SAP Business Technology Platform and node.js
To follow this tutorial, we're creating a project tex (token exchange) which we'll deploy later.
Create Project
Please refer to the description in previous blog.
We don’t need any change today.
See below screenshot, for your convenience:
The file content can be found in the appendix.
Our backend application represents an OAuth-protected API provider.
It requires a JWT token containing a scope.
In addition, it requires that the token contains user info, needed to write audit logs.
Today, there’s no change to the backend app, so please refer to previous blog post for detailed explanation.
1.1. Create XSUAA Service Instance
The configuration for the XSUAA service instance can be found in the appendix.
To create the service instance, we jump to the folder c:\tex\backend
and execute the following command:
cf cs xsuaa application texBackendXsuaa -c backend-security.json
1.2. Create Backend Application
The backend app just reads the user information from the incoming JWT token and writes some data to the Cloud Foundry log, which is meant to represent the audit logging.
The application code can be found in the appendix.
1.3. Deploy
After deploy, we take a note of the final URL of our endpoint, because we will need to enter it in the destination later on.
In my example:
https://texbackend.cfapps.sap.hana.ondemand.com/endpoint
Our frontend app represents a standard UI5 application in SAP BTP, which needs to call a backend API to fetch some data.
It is protected with OAuth and it requires a scope.
User login is handled by approuter and the user-token is forwarded to the core app, as usual.
Detailed explanation can be found in previous blog post.
However, todays frontend app will have a few changes in code and configuration.
So let's go through it.
2.1. Create XSUAA Service Instance
The configuration of both XSUAA instances are basically the same, with respect to scopes and roles and granting the backend scope to the frontend-XSUAA.
However, there’s one important additional setting, which we need to add to the frontend-XSUAA configuration:
We need to add the scope uaa.user to our role-template property.
This is required by destination service, otherwise the token exchange won’t be done.
Note
This scope uaa.user is one of the default scopes provided by Cloud Foundry out of the box.
As such, we can just add it to the role-template, we don’t need to define the scope itself in our security config file.
The configuration for the frontend XSUAA service instance, stored in C:\tex\frontend\frontend-security.json, can be found in the appendix.
To create the service instance, we jump into directory C:\tex\frontend and execute the following command:
cf cs xsuaa application texFrontendXsuaa -c frontend-security.json
2.2. Create Instance of Destination Service
To create the instance of destination service, we don’t need any configuration params, so we just run the following command (from any directory):
cf cs destination lite texDestination
2.3. Create Core Application
Our core application basically does the same steps like described in previous blog post:
The difference is in step 2: the token exchange is performed differently.
Consume Destination Service
What we want to do is to call the REST API of Destination Service.
As a result of the API call, we will receive
Yes, the destination service will do the token exchange for us.
What do we need to call the REST API or Destination Service?
As usual, the API is protected with OAuth.
As usual, we need the credentials, which can be found in the binding.
As usual, the credentials are used to fetch a JWT-token
This token is then used to call the API.
So we need a token-fetch function which takes the credentials as input:
Once we have the token, we can call the destination service API:
The parameters:
URL
We call a URL that is composed by the base Uri which we find in the binding credentials – and the path which we find in the documentation.
At the end, we need to append the name of the destination configuration.
Which destination configuration?
We create a destination configuration which points to our backend endpoint and which has type “Token Exchange” and name "destination_texbackend"
We will create this destination configuration below.
Authorization
As mentioned, the API is OAuth-protected, so we have to send the JWT token which we fetched before.
The header name is "Authorization" and the value is the literal “Bearer” plus space plus token.
User-token
This one is important:
As we learned in previous tutorial, the token exchange needs the existing user-token is input.
We send it to the destination service in a special header.
The header name: 'X-user-token'
The header value: just the JWT token.
Note that this is Destination-Service-specific
Response
As a response, we get a destination object which carries 2 basic structures:
- The desired destination configuration (used to access e.g. the target URL).
- A convenience object that can be used for authorization and which contains the new exchanged token.
So this is how we use this destination response object, when we call the target URL (our backend endpoint).
OK.
That’s basically all, what we wanted to learn in today’s tutorial.
One more change, compared to previous tutorial:
We need to add the binding to the instance of Destination Service which we created before.
This is necessary, because we want to read the credentials in the code, as mentioned before.
So here is the modified manifest.yml:
The application code can be found in the appendix.
2.4. Create Approuter
With respect to the approuter configuration, there’s no change:
We define a route which points to a destination which contains the URL of our core app.
…..
Points to a what?
Which destination?
OK, in previous tutorial we defined this destination in the manifest file, as environment variable
Today, we want to go the longer way and create a “real” destination configuration in the cloud cockpit.
How to create this destination?
This question is important:
As mentioned earlier, destinations can be created on subaccount level (we will use this level for the destination pointing to backend) and on instance level.
While a destination configuration on subaccount level is only a config stored somewhere, the instance level requires an instance of destination service.
We created that instance above, so we’re ready to go ahead.
Why are we talking about instance-level-destination before deploying our frontend?
Because approuter deployment will fail if it doesn’t find the destination to which the route is pointing.
One more TODO
To avoid failure on deployment:
As approuter is supposed to read the destination from Destination Service, it needs a binding to the instance of destination service which we created before.
So we need to add the binding in the manifest:
OK.
We’re done with approuter explanation and frontend app explanation, but before we deploy, we need to create a destination configuration.
2.5. Create Destination Configuration for Approuter
Below diagram shows one instance of destination service and 2 destination configurations.
The diagram doesn't show that the upper destination configuration is defined on instance level and the second one on subaccount level.
The destination service instance is used to find and read both configurations.
The upper configuration is used by approuter because it is mentioned in xs-app.json.
Internally, Approuter does a "find destination" call to read the destination, similarly like we're doing in our core app (chapter 2.3.).
So now, for one little chapter, we move from our code editing to the cloud cockpit.
We need to create a destination configuration on instance level.
This is the instance of destination service which we created above.
Why does it have to be instance level?
In fact, we don't have a choice here:
Because approuter supports only instance level destination.
See documentation.
And, BTW, this is another reason why we need to bind the approuter to destination service.
How to find the instance level?
We go to our subaccount.
-> then we choose “cloud Foundry”
-> “Spaces”
-> we step into our space
-> we choose “Services” -> “Instances”
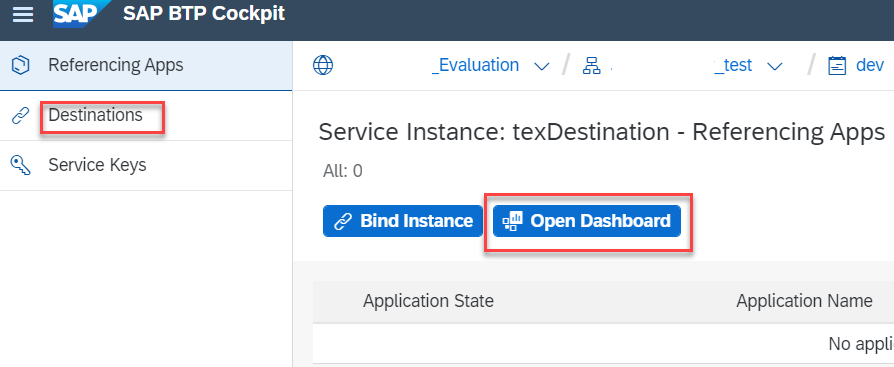
-> we find our instance with name "texDestination"
-> click
On the details page, we click on “Destinations” (or “Open Dashboard”)
On the “Destinations” page, we click “New Destination”.
We enter the following values:
Finally we press “Save”
Note:
Destination Configurations can be exported and imported,
They can as well be created during instance creation, by specifying the config in a json file.
For your convenience , please find the configuration in the appendix, for import.
2.6. Deploy Frontend
Now we can deploy our frontend app
Before we can open our app, we need 2 config steps:
- Assign role
- Create the second destination
3.1. Assign Role
Our frontend app requires that the user has a certain role assigned, as described in previous blog.
So we create a Role Collection in our subaccount.
We add the “FrontendUserRole”.
And we add our user to the role collection.
3.2. Create Token Exchange Destination Configuration
Finally.
Now we’re going to create the Token Exchange destination.
So this section is the main purpose of this blog post.
Note:
We can choose to create it at instance level or subaccount level.
Let’s go for subaccount level.
Remember:
This destination is meant to replace the URL to our backend app.
In previous tutorial, we hard-coded this URL in our code.
Before we start creating the destination, we need to view the credentials of our XSUAA instance, because we need to enter them in the destination configuration.
On command line, we run the command
cf env texfrontend
We search the “xsuaa” section and the “credentials” subnode:
We take a note of the following 3 properties and values:
clientid
clientsecret
url
Create destination on subaccount level
Where do we find that?
We just go to our subaccount, find “Connectivity” in the menu and click on “Destinations”:
We create a new destination configuration with the following values:
Name
The name of the destination is hard-coded in our sample app, so the value has to be the following:
"destination_texbackend"
Description
The description can be any text of our choice, e.g.
"Destination pointing to backend app endpoint"
Type
The type is HTTP
URL
The URL is the target URL to which the destination points to.
In our example, it is the endpoint of our backend application:
https://texbackend.cfapps.sap.hana.ondemand.com/endpoint
Proxy Type
Here we choose: Internet
Authentication
Here finally we can choose the interesting type:
"OAuth2UserTokenExchange"
Client ID
Here we enter the value which we copied from the cf env command
"sb-frontendxsuaa!t14860"
Client Secret
Again, here we enter the other value which we copied from the cf env command
"62jWmhDqnBIvV5zDICGWQcnkD5M="
Token Service URL Type
We leave the default “Dedicated” way.
What’s the difference?
The “Common” is required in case of multi tenancy, where we would pass a placeholder which would be resolved by the Destination Service
Token Service URL
The URL of XSUAA server.
Here we enter the value which we copied from the cf env command.
At the end of the url, we need to append /oauth/token
In my example:
https://test.authentication.sap.hana.ondemand.com/oauth/token
Finally, we press the button “New Property”, because we want to add a special parameter.
As we know from previous blog post, it is possible to reduce the number of scopes that are sent in the JWT token.
This filter parameter can be added here in the destination configuration editor.
We did that in previous tutorial, this time we do it in declarative way.
Name
We type or select: "scope"
Value
Same like in previous tutorial
"backendxsuaa!t14860.backendscope"
After pressing “Save”, we can try the “Check Connection” button
We get a green success popup – although it displays an error message.
Don’t wonder about that – it is expected.
The endpoint could be reached – that makes the check to be green.
The response returns an error – reason being, we don’t send a JWT token.
At least, we can be sure that the endpoint has responded. That’s enough for the moment.
3.3. Run
Now we finally open our frontend application.
Main entry point is:
ApprouterURL + route + endpoint + slash
In my example:
https://texfrontendrouter.cfapps.sap.hana.ondemand.com/tofrontend/app/
As a result, we get a login screen in which we enter the credentials of our valid BTP user.
Afterwards, we’re redirected to the homepage of our frontend app, which is the /app endpoint of our core server module.
It displays the claims of the 2 tokens.
All fine and just like in previous blog post.
cf d -r -f texfrontend
cf d -r -f texfrontendrouter
cf d -r -f texbackend
cf ds -f texBackendXsuaa
cf ds -f texFrontendXsuaa
cf ds -f texDestination
We have a user-centric app with user-login.
The app calls a protected API that requires different JWT token.
To fetch a token for the API, we use token exchange, because user info is preserved.
In Cloud cockpit, we create a destination of type Token Exchange.
In our code, we consume the REST API of the Destination Service.
We also move the destination which is used by approuter, from manifest file to instance level destination.
Grant scope in user-centric scenario:
Accept scope and add to role, in user-centric scenario:
Destination Service:
Needs to be bound to both core app and approuter.
Approuter supports only instance-level destination.
To configure Token Exchange destination, we need the normal XSUAA credentials, from app binding, just like we would do in case of client-credentials.
SAP Help Portal:
Destination Service REST API: Call Destination Service
Create Destination Configuration: OAuth User Token Exchange Authentication
Consuming the Destination Service: the reference page for the REST API of Destination Service
Consuming the Destination Service: OAuth2UserTokenExchange Destinations
Consuming the Destination Service: "Find Destination" Response Structure
Approuter documentation for destination service on npmjs
Tutorial for granting scopes.
Same, but across subaccount borders.
OAuth for dummies, explained by Dummy.
Info about the content of JWT tokens, explained in my dummy way.
Introduction and first dummy steps with approuter.
Spec for token exchange, i.e. request access token via JWT bearer token
Documentation in Cloud Foundry about token exchange.
Github for node-fetch module to execute HTTP requests.
npm site for xssec library.
Reference for xs-security.json file in the SAP Help portal.
Security Glossary.
backend-security.json
manifest.yml
package.json
server.js
frontend-security.json
manifest.yml
app
package.json
server.js
package.json
xs-app.json
destination_texbackend
destination_frontend
It is about a user-centric application that fires a request to an OAuth-protected backend application.
To realize authorization, Token Exchange is done.
We’re repeating the previous scenario – but today we will be using the Destination Service.
This should simplify our code – apart from the fact that we anyways would want to avoid hard-coding URLs in our code.
The Destination Service will automatically perform some of the tasks which we have coded manually in previous tutorial.
Quicklinks:
Quick Guide
Sample Code
Content
0. Introduction
1. Backend Application
2. Frontend Application
3. Run the Scenario
Appendix: Sample Code
Introduction
There’s not much to introduce today, please refer to previous intro, for more details.
Just quick recap.
In our scenario, we have a user-centric frontend app that calls a (protected) backend app, to get some data (or whatever).
Our frontend app is accessed by a human user who has all required roles assigned.
User login is handled by approuter.
The core frontend app receives the user-token and fetches a JWT token from XSUAA, required to call the backend app endpoint.
The mechanism of fetching the JWT token is not client-credentials, but instead, token exchange is used.
This means that in addition to the XSUAA-credentials, the user-token is sent to XSUAA.
This way, user-info will be preserved in the new token.
As a consequence, the backend can access the user info as well.
In previous tutorial, we did the token exchange manually and we hard-coded the URL of the backend endpoint in our (core) app.
What we want to change today: extract the target URL into a destination.
When creating a destination, we have to choose the authentication type.
Luckily, the Destination Service in SAP BTP supports the token exchange.
As such, it will take the responsibility of contacting the XSUAA to do the token exchange.

Above diagram shows that our core app does a normal request to consume the destination service.
The destination service will talk to XSUAA to do the token exchange.
The configuration of the desired destination contains the specific details, required to perform the token exchange.
Note on Destinations:
When talking about destinations, we have to distinguish:
Destination service: this is the service instance which we create in the Cockpit or on command line, like any other service instance
Destination Configuration:
This is what we’re typically talking about, when referring to “destinations”.
Basically we configure a target URL such that we don’t need to hard-code it in the app.
Note on Destination Configurations:
Destination Configurations can be created on 2 different levels:
Subaccount level:
We go to our subaccount, open the Connectivity menu and define destinations there.
Instance level
We create a service instance, go to its dashboard and define destinations there.
The main difference is in the visibility:
Destination Configurations that are defined on instance level, can only be seen by applications that are bound to this instance.
Destination Configurations that are defined on subaccount level, can be seen by any application deployed in this subaccount.
In our tutorial, we’re making use of both levels.
Documentation in SAP Help Portal.
Another note on Destination Configurations:
Destination Configurations can be created in 4 different ways.
We don’t need to cover that in this tutorial, we’re just going for the usual way, using the editor in the Cockpit.
More info about alternatives can be found in the docu.
After this overview, we can now go ahead and create our minimalistic scenario.
Prerequisites
As a prerequisite, you should have a look at the previous tutorial.
Anyways, we're working with SAP Business Technology Platform and node.js
Preparation
To follow this tutorial, we're creating a project tex (token exchange) which we'll deploy later.
Create Project
Please refer to the description in previous blog.
We don’t need any change today.
See below screenshot, for your convenience:

The file content can be found in the appendix.
1. Backend Application
Our backend application represents an OAuth-protected API provider.
It requires a JWT token containing a scope.
In addition, it requires that the token contains user info, needed to write audit logs.
Today, there’s no change to the backend app, so please refer to previous blog post for detailed explanation.
1.1. Create XSUAA Service Instance
The configuration for the XSUAA service instance can be found in the appendix.
To create the service instance, we jump to the folder c:\tex\backend
and execute the following command:
cf cs xsuaa application texBackendXsuaa -c backend-security.json
1.2. Create Backend Application
The backend app just reads the user information from the incoming JWT token and writes some data to the Cloud Foundry log, which is meant to represent the audit logging.
The application code can be found in the appendix.
1.3. Deploy
After deploy, we take a note of the final URL of our endpoint, because we will need to enter it in the destination later on.
In my example:
https://texbackend.cfapps.sap.hana.ondemand.com/endpoint
2. Frontend Application
Our frontend app represents a standard UI5 application in SAP BTP, which needs to call a backend API to fetch some data.
It is protected with OAuth and it requires a scope.
User login is handled by approuter and the user-token is forwarded to the core app, as usual.
Detailed explanation can be found in previous blog post.
However, todays frontend app will have a few changes in code and configuration.
So let's go through it.
2.1. Create XSUAA Service Instance
The configuration of both XSUAA instances are basically the same, with respect to scopes and roles and granting the backend scope to the frontend-XSUAA.
However, there’s one important additional setting, which we need to add to the frontend-XSUAA configuration:
We need to add the scope uaa.user to our role-template property.
This is required by destination service, otherwise the token exchange won’t be done.
Note
This scope uaa.user is one of the default scopes provided by Cloud Foundry out of the box.
As such, we can just add it to the role-template, we don’t need to define the scope itself in our security config file.
The configuration for the frontend XSUAA service instance, stored in C:\tex\frontend\frontend-security.json, can be found in the appendix.
"role-templates": [{

   "name": "FrontendUserRole",

   "scope-references": [ "$XSAPPNAME.frontendscope",

                         "$XSAPPNAME(application,backendxsuaa).backendscope",

                         "uaa.user"
To create the service instance, we jump into directory C:\tex\frontend and execute the following command:
cf cs xsuaa application texFrontendXsuaa -c frontend-security.json
2.2. Create Instance of Destination Service
To create the instance of destination service, we don’t need any configuration params, so we just run the following command (from any directory):
cf cs destination lite texDestination
2.3. Create Core Application
Our core application basically does the same steps like described in previous blog post:
- get incoming user-token from request
- use it to do token exchange
- use the exchanged token to call the backend app
- print the token claims to browser window
The difference is in step 2: the token exchange is performed differently.
app.get('/app', passport.authenticate('JWT', {session: false}), async (req, res) => {

   . . .

   const userJwtToken = auth.getAppToken()


   // fetch token for destination service

   const destJwtToken = await _fetchTokenForDestinationService()


   // call destination service (will do the token exchange)

   const destination = await _readDestination('destination_texbackend', destJwtToken, userJwtToken)


   // call backend app endpoint

   await _callBackend(destination)


   // print token info to browser

   . . .
Consume Destination Service
What we want to do is to call the REST API of Destination Service.
As a result of the API call, we will receive
- the information which is configured in the destination configuration.
This is the e.g. the target URL
In our case the URL of the backend endpoint which we want to call and which we don’t want to hard-code in our frontend app. - depending on the destination configuration, we also get the authentication data.
This can be e.g. a JWT token.
And in case of our destination, which is a token exchange destination, this will be already the exchanged token.
Yes, the destination service will do the token exchange for us.
What do we need to call the REST API or Destination Service?
As usual, the API is protected with OAuth.
As usual, we need the credentials, which can be found in the binding.
As usual, the credentials are used to fetch a JWT-token
This token is then used to call the API.
So we need a token-fetch function which takes the credentials as input:
xssec.requests.requestClientCredentialsToken(null, DESTINATION_CREDENTIALS, null, null, (error, token)=>{

   resolve(token)
Once we have the token, we can call the destination service API:
async function _readDestination(destinationName, jwtToken, userToken){

   const destServiceUrl = `${DESTINATION_CREDENTIALS.uri}/destination-configuration/v1/destinations/${destinationName}`

   const options = {

      headers: { Authorization: 'Bearer ' + jwtToken,

      'X-user-token' : userToken }

   }

   const response = await fetch(destServiceUrl, options)

   const responseJson = await response.json()
The parameters:
URL
We call a URL that is composed by the base Uri which we find in the binding credentials – and the path which we find in the documentation.
At the end, we need to append the name of the destination configuration.
Which destination configuration?
We create a destination configuration which points to our backend endpoint and which has type “Token Exchange” and name "destination_texbackend"
We will create this destination configuration below.
Authorization
As mentioned, the API is OAuth-protected, so we have to send the JWT token which we fetched before.
The header name is "Authorization" and the value is the literal “Bearer” plus space plus token.
User-token
This one is important:
As we learned in previous tutorial, the token exchange needs the existing user-token is input.
We send it to the destination service in a special header.
The header name: 'X-user-token'
The header value: just the JWT token.
Note that this is Destination-Service-specific
Response
As a response, we get a destination object which carries 2 basic structures:
- The desired destination configuration (used to access e.g. the target URL).
- A convenience object that can be used for authorization and which contains the new exchanged token.
So this is how we use this destination response object, when we call the target URL (our backend endpoint).
   const backendUrl = destination.destinationConfiguration.URL

   const options = {

      headers: {

         Authorization : destination.authTokens[0].http_header.value  // contains the "Bearer" plus space
OK.
That’s basically all, what we wanted to learn in today’s tutorial.
One more change, compared to previous tutorial:
We need to add the binding to the instance of Destination Service which we created before.
This is necessary, because we want to read the credentials in the code, as mentioned before.
So here is the modified manifest.yml:
applications:

  - name: texfrontend

    . . .

    services:

      - texDestination

      . . .
The application code can be found in the appendix.
2.4. Create Approuter
With respect to the approuter configuration, there’s no change:
"routes": [{

    "source": "^/tofrontend/(.*)$",

    "target": "$1",

    "destination": "destination_frontend",

    "authenticationType": "xsuaa"
We define a route which points to a destination which contains the URL of our core app.
…..
Points to a what?
Which destination?
OK, in previous tutorial we defined this destination in the manifest file, as environment variable
    env:

      destinations: >

        [{ "name":"destination_frontend", . . .
Today, we want to go the longer way and create a “real” destination configuration in the cloud cockpit.
How to create this destination?
This question is important:
As mentioned earlier, destinations can be created on subaccount level (we will use this level for the destination pointing to backend) and on instance level.
While a destination configuration on subaccount level is only a config stored somewhere, the instance level requires an instance of destination service.
We created that instance above, so we’re ready to go ahead.
Why are we talking about instance-level-destination before deploying our frontend?
Because approuter deployment will fail if it doesn’t find the destination to which the route is pointing.
One more TODO
To avoid failure on deployment:
As approuter is supposed to read the destination from Destination Service, it needs a binding to the instance of destination service which we created before.
So we need to add the binding in the manifest:
  - name: texfrontendrouter

    . . .

    services:

      - texDestination

    . . .
OK.
We’re done with approuter explanation and frontend app explanation, but before we deploy, we need to create a destination configuration.
2.5. Create Destination Configuration for Approuter
Below diagram shows one instance of destination service and 2 destination configurations.
The diagram doesn't show that the upper destination configuration is defined on instance level and the second one on subaccount level.
The destination service instance is used to find and read both configurations.
The upper configuration is used by approuter because it is mentioned in xs-app.json.
Internally, Approuter does a "find destination" call to read the destination, similarly like we're doing in our core app (chapter 2.3.).

So now, for one little chapter, we move from our code editing to the cloud cockpit.
We need to create a destination configuration on instance level.
This is the instance of destination service which we created above.
Why does it have to be instance level?
In fact, we don't have a choice here:
Because approuter supports only instance level destination.
See documentation.
And, BTW, this is another reason why we need to bind the approuter to destination service.
How to find the instance level?
We go to our subaccount.
-> then we choose “cloud Foundry”
-> “Spaces”
-> we step into our space
-> we choose “Services” -> “Instances”
-> we find our instance with name "texDestination"
-> click

On the details page, we click on “Destinations” (or “Open Dashboard”)
On the “Destinations” page, we click “New Destination”.
We enter the following values:
| Name | destination_frontend |
| Type | HTTP |
| Description | Destination for approuter, route to core app |
| URL | https://texfrontend.cfapps.sap.hana.ondemand.com |
| ProxyType | Internet |
| Authentication | NoAuthentication |
| Then we click “New Property” to add an additional property | |
| forwardAuthToken | true |

Finally we press “Save”
Note:
Destination Configurations can be exported and imported,
They can as well be created during instance creation, by specifying the config in a json file.
For your convenience , please find the configuration in the appendix, for import.
2.6. Deploy Frontend
Now we can deploy our frontend app
3. Run the scenario
Before we can open our app, we need 2 config steps:
- Assign role
- Create the second destination
3.1. Assign Role
Our frontend app requires that the user has a certain role assigned, as described in previous blog.
So we create a Role Collection in our subaccount.
We add the “FrontendUserRole”.
And we add our user to the role collection.
3.2. Create Token Exchange Destination Configuration
Finally.
Now we’re going to create the Token Exchange destination.
So this section is the main purpose of this blog post.
Note:
We can choose to create it at instance level or subaccount level.
Let’s go for subaccount level.
Remember:
This destination is meant to replace the URL to our backend app.
In previous tutorial, we hard-coded this URL in our code.
Before we start creating the destination, we need to view the credentials of our XSUAA instance, because we need to enter them in the destination configuration.
On command line, we run the command
cf env texfrontend
We search the “xsuaa” section and the “credentials” subnode:

We take a note of the following 3 properties and values:
clientid
clientsecret
url
Create destination on subaccount level
Where do we find that?
We just go to our subaccount, find “Connectivity” in the menu and click on “Destinations”:

We create a new destination configuration with the following values:
Name
The name of the destination is hard-coded in our sample app, so the value has to be the following:
"destination_texbackend"
Description
The description can be any text of our choice, e.g.
"Destination pointing to backend app endpoint"
Type
The type is HTTP
URL
The URL is the target URL to which the destination points to.
In our example, it is the endpoint of our backend application:
https://texbackend.cfapps.sap.hana.ondemand.com/endpoint
Proxy Type
Here we choose: Internet
Authentication
Here finally we can choose the interesting type:
"OAuth2UserTokenExchange"
Client ID
Here we enter the value which we copied from the cf env command
"sb-frontendxsuaa!t14860"
Client Secret
Again, here we enter the other value which we copied from the cf env command
"62jWmhDqnBIvV5zDICGWQcnkD5M="
Token Service URL Type
We leave the default “Dedicated” way.
What’s the difference?
The “Common” is required in case of multi tenancy, where we would pass a placeholder which would be resolved by the Destination Service
Token Service URL
The URL of XSUAA server.
Here we enter the value which we copied from the cf env command.
At the end of the url, we need to append /oauth/token
In my example:
https://test.authentication.sap.hana.ondemand.com/oauth/token
Finally, we press the button “New Property”, because we want to add a special parameter.
As we know from previous blog post, it is possible to reduce the number of scopes that are sent in the JWT token.
This filter parameter can be added here in the destination configuration editor.
We did that in previous tutorial, this time we do it in declarative way.
Name
We type or select: "scope"
Value
Same like in previous tutorial
"backendxsuaa!t14860.backendscope"

After pressing “Save”, we can try the “Check Connection” button

We get a green success popup – although it displays an error message.
Don’t wonder about that – it is expected.
The endpoint could be reached – that makes the check to be green.
The response returns an error – reason being, we don’t send a JWT token.
At least, we can be sure that the endpoint has responded. That’s enough for the moment.
3.3. Run
Now we finally open our frontend application.
Main entry point is:
ApprouterURL + route + endpoint + slash
In my example:
https://texfrontendrouter.cfapps.sap.hana.ondemand.com/tofrontend/app/
As a result, we get a login screen in which we enter the credentials of our valid BTP user.
Afterwards, we’re redirected to the homepage of our frontend app, which is the /app endpoint of our core server module.
It displays the claims of the 2 tokens.
All fine and just like in previous blog post.
4. Optional: cleanup
cf d -r -f texfrontend
cf d -r -f texfrontendrouter
cf d -r -f texbackend
cf ds -f texBackendXsuaa
cf ds -f texFrontendXsuaa
cf ds -f texDestination
Summary
We have a user-centric app with user-login.
The app calls a protected API that requires different JWT token.
To fetch a token for the API, we use token exchange, because user info is preserved.
In Cloud cockpit, we create a destination of type Token Exchange.
In our code, we consume the REST API of the Destination Service.
We also move the destination which is used by approuter, from manifest file to instance level destination.
Quick Guide
Grant scope in user-centric scenario:
"scopes": [{

    ...

    "granted-apps" : ["$XSAPPNAME(application, frontendxsuaa)"]
Accept scope and add to role, in user-centric scenario:
"role-templates": [{

    "scope-references": [   "$XSAPPNAME(application,backendxsuaa).backendscope"]

...

"foreign-scope-references": ["$XSAPPNAME(application,backendxsuaa).backendscope"],
Destination Service:
Needs to be bound to both core app and approuter.
Approuter supports only instance-level destination.
To configure Token Exchange destination, we need the normal XSUAA credentials, from app binding, just like we would do in case of client-credentials.
Links
SAP Help Portal:
Destination Service REST API: Call Destination Service
Create Destination Configuration: OAuth User Token Exchange Authentication
Consuming the Destination Service: the reference page for the REST API of Destination Service
Consuming the Destination Service: OAuth2UserTokenExchange Destinations
Consuming the Destination Service: "Find Destination" Response Structure
Approuter documentation for destination service on npmjs
Tutorial for granting scopes.
Same, but across subaccount borders.
OAuth for dummies, explained by Dummy.
Info about the content of JWT tokens, explained in my dummy way.
Introduction and first dummy steps with approuter.
Spec for token exchange, i.e. request access token via JWT bearer token
Documentation in Cloud Foundry about token exchange.
Github for node-fetch module to execute HTTP requests.
npm site for xssec library.
Reference for xs-security.json file in the SAP Help portal.
Security Glossary.
Appendix: Sample Code
Backend Application
backend-security.json
{

    "xsappname": "backendxsuaa",

    "tenant-mode": "dedicated",

    "scopes": [{

        "name": "$XSAPPNAME.backendscope",

        "granted-apps" : ["$XSAPPNAME(application, frontendxsuaa)"]

    }]

}
manifest.yml
---

applications:

  - name: texbackend

    path: app

    memory: 64M

    routes:

    - route: texbackend.cfapps.sap.hana.ondemand.com

    services:

      - texBackendXsuaa
app
package.json
{

  "dependencies": {

    "@sap/xsenv": "latest",

    "@sap/xssec": "latest",

    "express": "^4.17.1",

    "passport": "^0.4.0"

  }

}
server.js
const xsenv = require('@sap/xsenv')


const UAA_CREDENTIALS = xsenv.getServices({myXsuaa: {tag: 'xsuaa'}}).myXsuaa


const express = require('express')

const app = express();

const xssec = require('@sap/xssec')

const passport = require('passport')

const JWTStrategy = xssec.JWTStrategy

passport.use('JWT', new JWTStrategy(UAA_CREDENTIALS))

app.use(passport.initialize())

app.use(express.json())


// start server

app.listen(process.env.PORT)


// Endpoint to be called by frontend app

app.get('/endpoint', passport.authenticate('JWT', {session: false}), (req, res) => {

    const auth = req.authInfo

    if (! auth.checkScope(UAA_CREDENTIALS.xsappname + '.backendscope')) {

        res.status(403).end('Forbidden. Missing authorization.')

    }


    // The fake audit logging

    console.log(`===> [AUDIT] backend called by user '${auth.getGivenName()}' from subdomain '${auth.getSubdomain()}' with oauth client: '${auth.getClientId()}'`)


    res.json({'jwtToken': auth.getAppToken()})

})
Frontend Application
frontend-security.json
{

    "xsappname": "frontendxsuaa",

    "tenant-mode": "dedicated",

    "scopes": [

        {

            "name": "$XSAPPNAME.frontendscope",

            "description": "Scope required for human users to login to homepage"

        }


    ],

    "role-templates": [

        {

            "name": "FrontendUserRole",

            "description": "Role for end users, allows to login to app",

            "scope-references": [   "$XSAPPNAME.frontendscope",

                                    "$XSAPPNAME(application,backendxsuaa).backendscope",

                                    "uaa.user"

                                    ]

        }

    ],

    "foreign-scope-references": ["$XSAPPNAME(application,backendxsuaa).backendscope"],

    "oauth2-configuration": {"token-validity": 5}

}
manifest.yml
---

applications:

  - name: texfrontend

    path: app

    memory: 64M

    routes:

    - route: texfrontend.cfapps.sap.hana.ondemand.com

    services:

      - texFrontendXsuaa

      - texDestination

  - name: texfrontendrouter

    routes:

    - route: texfrontendrouter.cfapps.sap.hana.ondemand.com

    path: approuter

    memory: 128M

    services:

      - texFrontendXsuaa

      - texDestination
app
package.json
{

  "dependencies": {

    "@sap/xsenv": "latest",

    "@sap/xssec": "^3.2.12",

    "express": "^4.17.1",

    "node-fetch": "2.6.2",

    "passport": "^0.4.0"

  }

}
server.js
const xsenv = require('@sap/xsenv')

const INSTANCES = xsenv.getServices({

   myXsuaa: {tag: 'xsuaa'},

   myDestination: {tag: 'destination'}

})

const UAA_CREDENTIALS = INSTANCES.myXsuaa

const DESTINATION_CREDENTIALS = INSTANCES.myDestination


const fetch = require('node-fetch')

const express = require('express')

const app = express();

const xssec = require('@sap/xssec')

const passport = require('passport')

const JWTStrategy = xssec.JWTStrategy

passport.use('JWT', new JWTStrategy(UAA_CREDENTIALS))

app.use(passport.initialize())

app.use(express.json())


// start server

app.listen(process.env.PORT)


app.get('/app', passport.authenticate('JWT', {session: false}), async (req, res) => {

   const auth = req.authInfo

   if (! auth.checkScope(UAA_CREDENTIALS.xsappname + '.frontendscope')) {

       res.status(403).end('Forbidden. Authorization for homepage access is missing.')

   }


   const userJwtToken = auth.getAppToken()

   // fetch token for destination service

   const destJwtToken = await _fetchTokenForDestinationService()

   // this will do the token exchange

   const destination = await _readDestination('destination_texbackend', destJwtToken, userJwtToken)

   await _callBackend(destination)


   // print token info to browser

   const htmlUser = _formatClaims(userJwtToken) // login token

   const htmlTEX = _formatClaims(destination.authTokens[0].value) // after token exchange


   res.send(`  <h4>Claims from user login</h4>${htmlUser}

               <h4>Claims from token exchange</h4>${htmlTEX}`)

})


/* HELPER */


async function _fetchTokenForDestinationService(){

    return new Promise ((resolve, reject) => {

        xssec.requests.requestClientCredentialsToken(null, DESTINATION_CREDENTIALS, null, null, (error, token)=>{

            if(error){

                console.log('[_fetchTokenForDestinationService] ERROR: ' + error)

            }

            resolve(token)

        })

    })

}


async function _readDestination(destinationName, jwtToken, userToken){

   const destServiceUrl = `${DESTINATION_CREDENTIALS.uri}/destination-configuration/v1/destinations/${destinationName}`

   const options = {

      headers: { Authorization: 'Bearer ' + jwtToken,

      'X-user-token' : userToken }

   }

   const response = await fetch(destServiceUrl, options)

   const responseJson = await response.json()

   return responseJson

}


async function _callBackend (destination){

   const backendUrl = destination.destinationConfiguration.URL

   const options = {

      headers: {

         Authorization : destination.authTokens[0].http_header.value  // contains the "Bearer" plus space

      }

   }

   const response = await fetch(backendUrl, options)

   const responseJson = await response.json()

   return responseJson

}


function _formatClaims(jwtEncoded){


   const tokenInfo = new xssec.TokenInfo(jwtEncoded)

   const jwtDecodedJson =  tokenInfo.getPayload()

   console.log(`===> The full JWT: ${JSON.stringify(jwtDecodedJson)}`)


    const claims = new Array()

    claims.push(`client_id: ${jwtDecodedJson.client_id}`)

    claims.push(`<br>name: ${jwtDecodedJson.given_name} ${jwtDecodedJson.family_name}</br>`)

    claims.push(`email: ${jwtDecodedJson.email}`)

    claims.push(`<br>xs.system.attributes: ${JSON.stringify(jwtDecodedJson['xs.system.attributes'])}</br>`)

    claims.push(`scopes: ${jwtDecodedJson.scope}`)

    claims.push(`<br>aud: ${jwtDecodedJson.aud}</br>`)

    return claims.join('')

}
Approuter
package.json
{

    "dependencies": {

        "@sap/approuter": "latest"

    },

    "scripts": {

        "start": "node node_modules/@sap/approuter/approuter.js"

    }

}
xs-app.json
{

  "authenticationMethod": "route",

  "routes": [

    {

      "source": "^/tofrontend/(.*)$",

      "target": "$1",

      "destination": "destination_frontend",

      "authenticationType": "xsuaa"

    }

  ]

}
Destinations
destination_texbackend
#clientSecret=<< Existing password/certificate removed on export >>

#

Description=Destination pointing to TEX backend app endpoint

Type=HTTP

clientId=sb-frontendxsuaa\!t14860

Authentication=OAuth2UserTokenExchange

Name=destination_texbackend

tokenServiceURL=https\://test.authentication.sap.hana.ondemand.com/oauth/token

ProxyType=Internet

URL=https\://texbackend.cfapps.sap.hana.ondemand.com/endpoint

tokenServiceURLType=Dedicated
destination_frontend
#

URL=https\://texfrontend.cfapps.sap.hana.ondemand.com

Name=destination_frontend

ProxyType=Internet

Type=HTTP

forwardAuthToken=true

Authentication=NoAuthentication
- SAP Managed Tags:
- SAP BTP, Cloud Foundry runtime and environment,
- Security,
- SAP Business Technology Platform
Labels:
8 Comments
You must be a registered user to add a comment. If you've already registered, sign in. Otherwise, register and sign in.
Labels in this area
-
ABAP CDS Views - CDC (Change Data Capture)
2 -
AI
1 -
Analyze Workload Data
1 -
BTP
1 -
Business and IT Integration
2 -
Business application stu
1 -
Business Technology Platform
1 -
Business Trends
1,661 -
Business Trends
88 -
CAP
1 -
cf
1 -
Cloud Foundry
1 -
Confluent
1 -
Customer COE Basics and Fundamentals
1 -
Customer COE Latest and Greatest
3 -
Customer Data Browser app
1 -
Data Analysis Tool
1 -
data migration
1 -
data transfer
1 -
Datasphere
2 -
Event Information
1,400 -
Event Information
65 -
Expert
1 -
Expert Insights
178 -
Expert Insights
280 -
General
1 -
Google cloud
1 -
Google Next'24
1 -
Kafka
1 -
Life at SAP
784 -
Life at SAP
11 -
Migrate your Data App
1 -
MTA
1 -
Network Performance Analysis
1 -
NodeJS
1 -
PDF
1 -
POC
1 -
Product Updates
4,577 -
Product Updates
330 -
Replication Flow
1 -
RisewithSAP
1 -
SAP BTP
1 -
SAP BTP Cloud Foundry
1 -
SAP Cloud ALM
1 -
SAP Cloud Application Programming Model
1 -
SAP Datasphere
2 -
SAP S4HANA Cloud
1 -
SAP S4HANA Migration Cockpit
1 -
Technology Updates
6,886 -
Technology Updates
408 -
Workload Fluctuations
1
Related Content
- 10+ ways to reshape your SAP landscape with SAP Business Technology Platform – Blog 4 in Technology Blogs by SAP
- Top Picks: Innovations Highlights from SAP Business Technology Platform (Q1/2024) in Technology Blogs by SAP
- how to create destinations on mufti tenancy subscriber account with java cloud sdk in Technology Q&A
- SAP Sustainability Footprint Management: Q1-24 Updates & Highlights in Technology Blogs by SAP
- SAP Build Code - Speed up your development with Generative AI Assistant - Joule in Technology Blogs by SAP
Top kudoed authors
| User | Count |
|---|---|
| 13 | |
| 10 | |
| 10 | |
| 9 | |
| 8 | |
| 7 | |
| 6 | |
| 5 | |
| 5 | |
| 5 |